


8.1 TensorFlow2.0特性
- 谷歌官方定义:An end-to-end open source machine learning platform(一个端到端的开源机器学习平台)
- end-to-end:端到端是一种解决问题的思路,输入原始数据,直接得到输出结果
- open source:Github上开放源代码,开放设计和实现框架
- 论文:
TensorFlow:Larger-Scale Machine Learning on Heterogeous Distributed Systenms(TensforFlow:异构分布式系统的大规模机器学习)中介绍了Tensorflow系统的框架的设计和实现 - machine learning:不仅用于深度学习,还支持机器学习,变成了机器学习生态系统
8.1.1 TensorFlow的发展历程
- 2011:DistBelief
- 2015.11:TensorFlow 0.5.0
- 2017.2: TensorFlow 1.0
- 高层API,将keras库整合进其中
- Eager Execution(动态图机制)、TensorFlow Lite(面向移动智能终端的)、TensorFlow.js(面向网页前端的)
- AutoGraph(自动将Python转化为计算图的)
- 2019:Tensorflow 2.0(是对之前版本的革命性改造,非常的简单清晰好用,并且容易扩展,极大的降低了深度学习的门槛,目标是让普通人也能使用深度学习内容解决问题)
8.1.2 Tensorflow2.0的新特性
-
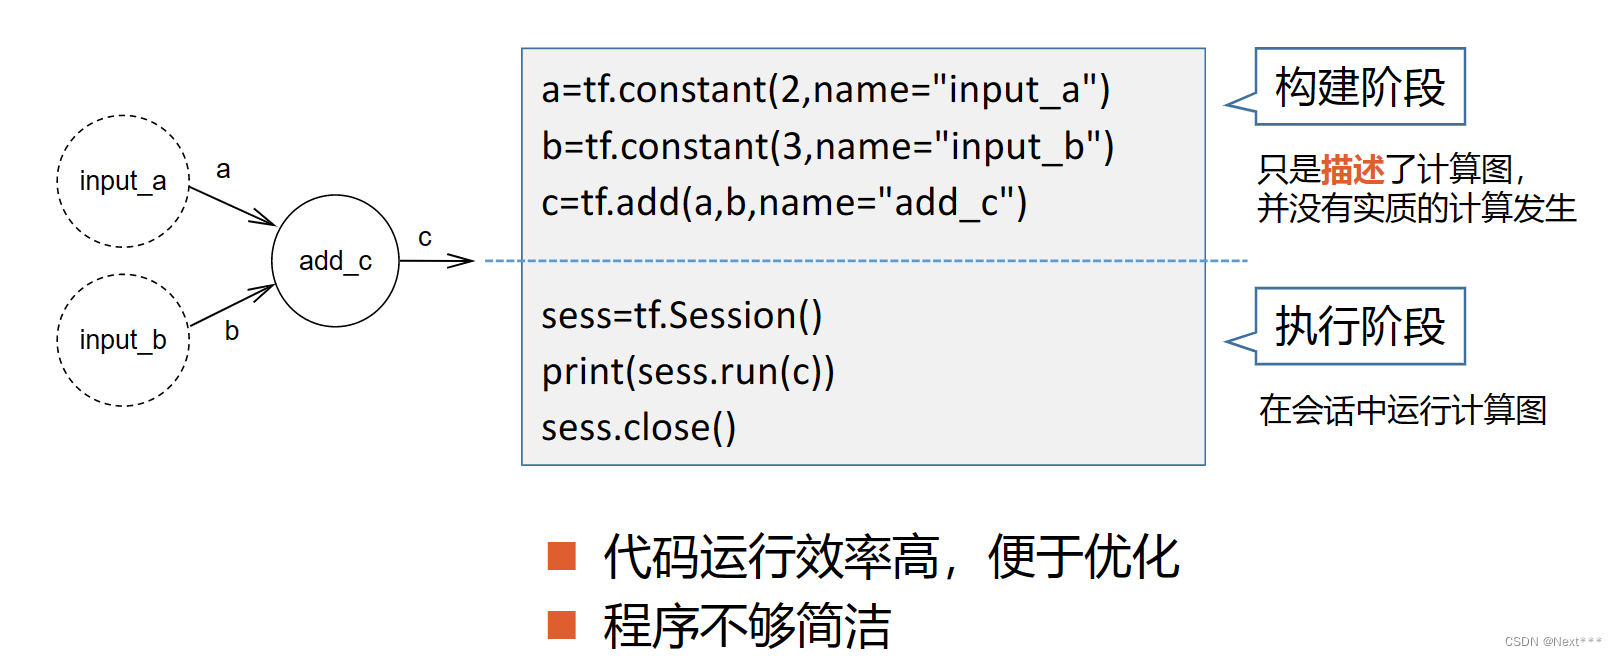
TensorFlow1.x----延迟执行机制(deferred execution)
-
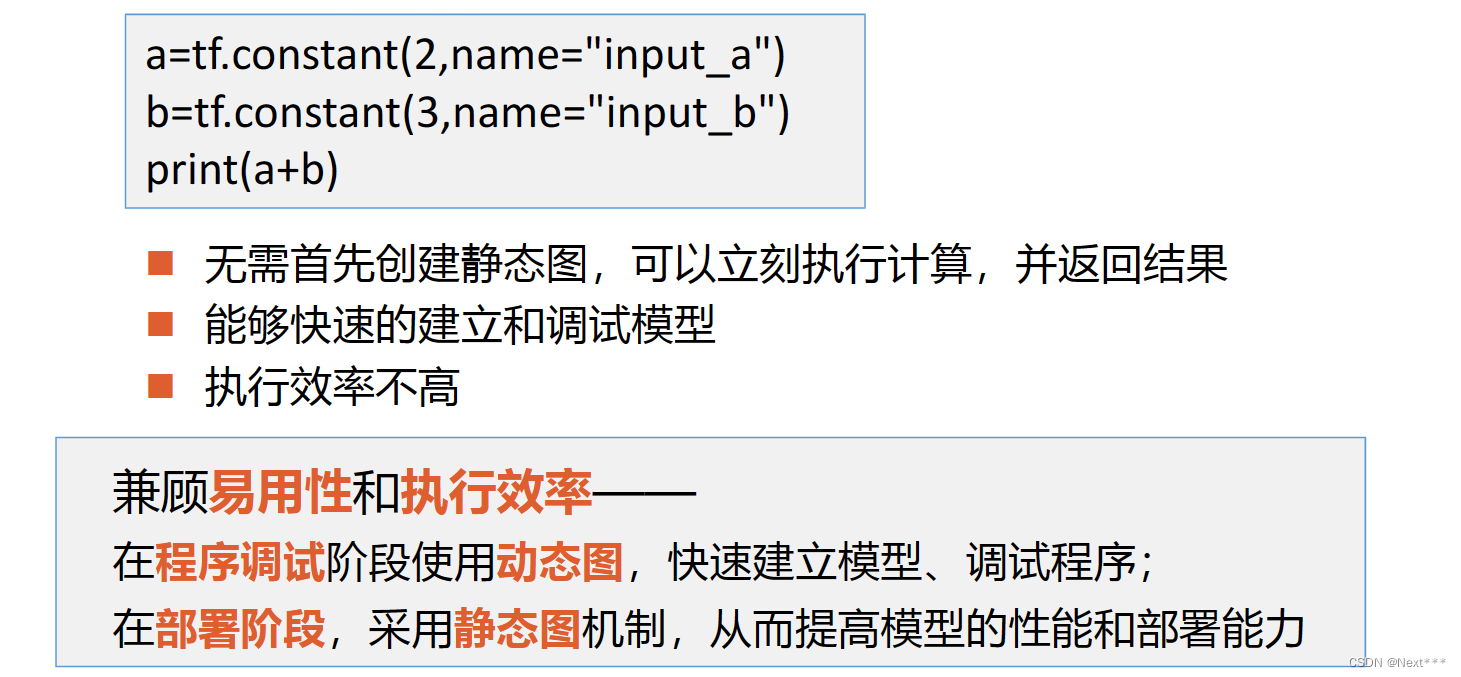
TensorFlow2.x----动态图机制(Eager execution默认)
-
静态图只需要创建一次,就可以重复使用它
-
静态图运行之前,可以优化,效率更高
-
可以在程序的调式阶段使用动态图,快速建立模型,调式程序;再部署阶段,采用静态图机制,从而提高模型的性能和部署能力
-
TensforFlow1.x—重复、冗余的API
- 构建神经网络:tf.slim、tf.layers、tf.contrib.layers、tf.keras
- 混乱、不利于程序共享,维护成本高
- TensorFlow2.x—清理/整合API
- 清理、整合了重复的API
- 将tf.keras作为构建和训练模型的标准高级API
8.1.3 TensorFlow框架特性
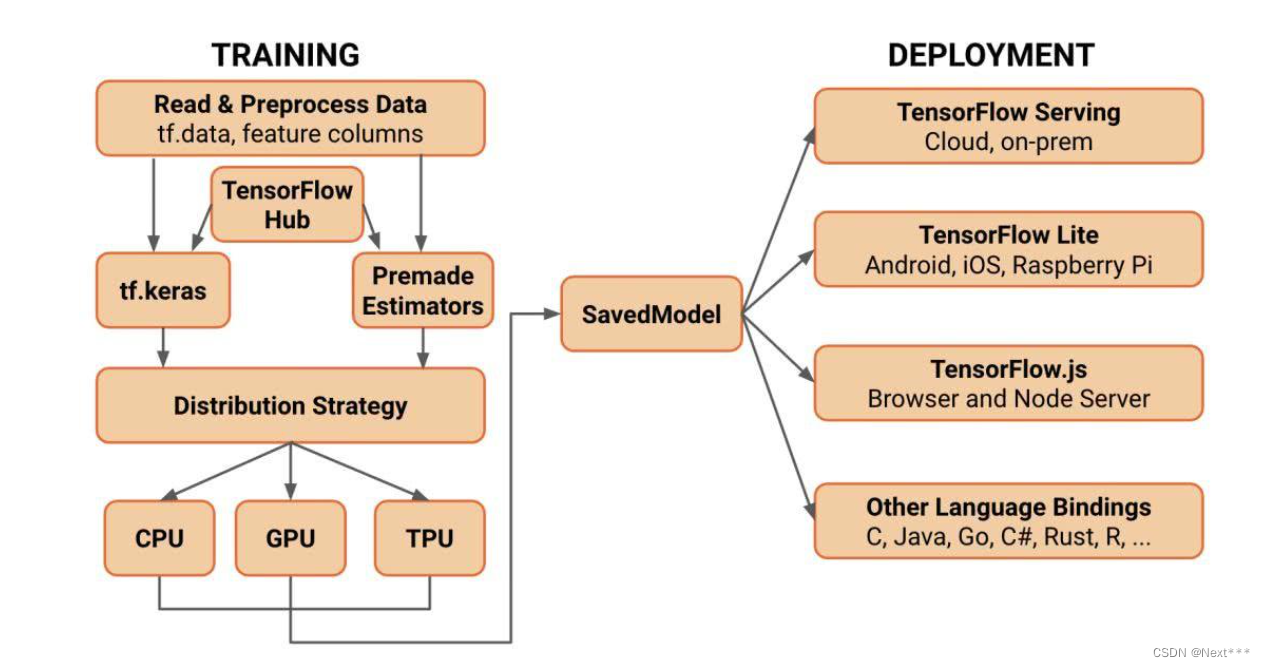
- 多种环境支持
- 可运动移动设备、个人计算机、服务器、集群等
- 云端、本地、浏览器、移动设备、嵌入式设备
- 随时随地的实现可靠的机器学习应用
- 支持分布式模式
- TensorFlow会自动检测GPU和CPU,并充分地利用它们并行、分布的执行程序
- 简洁高效
- 构建、训练、迭代模型:Eager Execution,keras
- 部署阶段:转化为静态图,提高执行效率
- 社区支持
8.2 创建张量
8.2.1 创建张量(1)
- 在TensorFlow2.4 CPU版安装教程,
- TensorFlow2.4 GPU版安装教程]
已经安装好了tensorflow2.4CPU及GPU版本
8.2.1.1 更新tensorflow
8.2.1.1.1 更新tensorflow到2.0.0
- 这里演示了如何更新tensorflow的版本,将tensorflow2.0.0 -beta版本更新到tensorflow 2.0.0
pip install --upgrade tensorflow==2.0.
如果不知道怎么做,可以看文章【TensorFlow 】查看Tensorflow和python对应版本、将现有的TensorFlow更新到指定的版本
8.2.1.1.2 查看版本号
(tensorflow2_7) C:\Users\xxx>python
Python 3.7.11 (default, Jul 27 2021, 09:42:29) [MSC v.1916 64 bit (AMD64)] :: Anaconda, Inc. on win32
Type "help", "copyright", "credits" or "license" for more information.
>>> import tensorflow as tf
>>> tf.__version__
'2.0.0'
>>> tf.executing_eagerly()# 检测当前是否在eager模式下
True
8.2.1.1.3 在TensorFlow2.x中运行TensorFlow1.x的代码
- 在TensorFlow2.0的环境中,运行TensorFlow1.x代码,常常会出现错误提示
例如:
对于代码:
import tensorflow as tf

a = tf.constant(2,name="input_a")
b = tf.constant(3,name="input_b")
c = tf.add(a,b,name="add_c")

sess = tf.Session()
print(sess.run(c))
sess.close()
运行结果为:
提示没有这个Session()函数
(tensorflow2_7) C:\Users\xxx\Desktop\english_cx\shen_du_xue_xi\3_1>python first.py

2021-11-08 20:46:09.709836: I tensorflow/core/platform/cpu_feature_guard.cc:142] Your CPU supports instructions that this TensorFlow binary was not compiled to use: AVX2
Traceback (most recent call last):
  File "first.py", line 7, in <module>
    sess = tf.Session()
AttributeError: module 'tensorflow' has no attribute 'Session'
- 在TensorFlow2.0的话环境中,运行TensorFlow1.x的代码,事实证明:不行,由于我可能用不到1.x版本,所以这里也就不折腾自己了,以后用到会想办法解决的
import tensorflow.compat.v1 as tf
tf.disable_v2_behavior()
如果刚开始学习Tensorflow,不用理会1.x
8.2.1.2 对比列表、ndarray数组和张量
- TensorFlow中的“Tensor”表示张量,其实就是多维数组。
- Python中的列表list
- Numpy中的数组对象ndarray
它们也都可以作为数据的载体
8.2.1.2.1 Python列表(list)
- 元素可以使用不同的数据类型,可以嵌套
- 在内存中并不是连续存放,是一个动态的指针数组
- 读写效率低,占用内存空间大,随着数据规模增大,数据内存空间快速增长
- 不适合做数值计算,由于列表高度灵活性,数据格式不规范性,不持支乘法运算,不支持一次性读取一行或一列
8.2.1.2.2 Numpy数组(ndarray)
- 数组中所有元素数据类型相同
- 每个元素在内存中占用的空间相同,存储在一个连续的内存区域中
- 存储空间小,读取和写入速度快
- 在CPU中运算,不能够主动检测、利用GPU进行运算
8.2.1.2.3 TensorFlow张量(Tensor) - 本身就是为了实现大规模深度学习产生的
- 可以高速运行于GPU和TPU之上
- 支持CPU、嵌入式、单机多卡和多级多卡等多种计算环境
- 可以高速实现神经网络和深度学习中的复杂算法
8.2.1.3 张量(Tensor)
- TensorFlow的基本运算、参数命名、运算规则、API的设计等与Numpy非常相近
8.2.1.3.1 创建张量(Tensor)对象
- 张量由Tensor类实现,每个张量都是一个Tensor对象
8.2.1.3.2 tf.constant()函数:创建张量
tf.constant(value,dtype,shape)
- 参数value:数字/Python列表/Numpy数组
- 参数dtype:元素的数据类型
- 参数shape:张量的形状
8.2.1.3.2.1 参数为Python列表
>>> import tensorflow as tf
>>> tf.constant([[1,2],[3,4]])
<tf.Tensor: id=2, shape=(2, 2), dtype=int32, numpy=
array([[1, 2],
       [3, 4]])>
- tf.Tensor:表示这是tensorflow中的张量对象
- id是张量的序号,由系统自动按顺序给出
- shape是张量的形状,这是一个二维张量,形状是(2,2)
- dtype:没有给出数据类型,默认是int32
- numpy:是张量的值,以数组的形式给出
8.2.1.3.2.2 参数为数字
>>> import tensorflow as tf
>>> tf.constant(1.0)
<tf.Tensor: id=14, shape=(), dtype=float32, numpy=1.0>
>>> tf.constant(1.)
<tf.Tensor: id=16, shape=(), dtype=float32, numpy=1.0>
>>> tf.constant(1.0, dtype = tf.float64)
<tf.Tensor: id=18, shape=(), dtype=float64, numpy=1.0>
shape=():可以看作是0维张量,也就是一个数字,一个标量dtype = tf.float64:创建张量时,指定张量元素的数据类型,这里要加上tf作为前缀,表示这是tensorflow中的数据类型
8.2.1.3.2.3 参数为NumPy数组
>>> import tensorflow as tf
>>> import numpy as np
>>> tf.constant(np.array([1,2]))
<tf.Tensor: id=20, shape=(2,), dtype=int32, numpy=array([1, 2])>
>>> tf.constant(np.array([1.0,2.0]))
<tf.Tensor: id=22, shape=(2,), dtype=float64, numpy=array([1., 2.])>
>>> tf.constant(np.array([1.0,2.0]),dtype=tf.float32)
<tf.Tensor: id=24, shape=(2,), dtype=float32, numpy=array([1., 2.], dtype=float32)>
- numpy创建浮点数数字时,默认的浮点型时64为浮点数
- Tensorflow默认的是32为浮点数
- 但是使用numpy数组创建,tensorflow在接受numpy数据时,会同时接受其中的数据类型,默认使用64位浮点数保存数据
- 在GPU中运行tensorflow程序,处理32位浮点数的速度要比处理64位浮点数的速度快得多,
- 大多数深度学习算法使用32位浮点数或整数就可以满足运算的精度
- 因此,在使用numpy数组创建张量时,建议指明数据类型为32位
8.2.1.3.2.4 参数为布尔型
- cast()函数看后面一小节
>>> import tensorflow as tf
>>> tf.constant(True)
<tf.Tensor: id=33, shape=(), dtype=bool, numpy=True>
>>> a = tf.constant([True,False])
>>> tf.cast(a, tf.int32)
<tf.Tensor: id=36, shape=(2,), dtype=int32, numpy=array([1, 0])>
>>> a = tf.constant([-1,0,1,2])
>>> tf.cast(a, tf.bool)
<tf.Tensor: id=39, shape=(4,), dtype=bool, numpy=array([ True, False,  True,  True])>
8.2.1.3.2.5 参数为字符串
>>> import tensorflow as tf
>>> tf.constant("hello")
<tf.Tensor: id=41, shape=(), dtype=string, numpy=b'hello'>
- 数据类型为string
numpy=b'hello’中的b意思是这是一个字节串,因为在python3中字符串默认是Unicode编码,因此要转换为字节串,在原先的字符串前加上一个b
8.2.1.3.2.6 张量的.numpy()方法
>>> import tensorflow as tf
>>> a = tf.constant([[1,2],[3,4]])
>>> a.numpy()  # 输出一个numpy数组
array([[1, 2],
       [3, 4]])
>>> type(a)
<class 'tensorflow.python.framework.ops.EagerTensor'>
# 表示是一个eager模式下的张量
>>> print(a)
tf.Tensor(
[[1 2]
 [3 4]], shape=(2, 2), dtype=int32)
- 在Tensorflow1.x中,默认是延迟执行机制,tensor只是定义了运算,并没有真正的进行运算,要在session中才执行运算
- 在TensorFlow2.0默认的eager模式中,tensor对象定义好之后,结果也计算好了
8.2.1.3.2.7 张量元素的数据类型
| 数据类型 | 描述 |
|---|---|
| tf.int8 | 8位有符号整数 |
| tf.int16 | 16位有符号整数 |
| tf.int32 | 32位有符号整数 |
| tf.int64 | 64位有符号整数 |
| tf.uint8 | 8位无符号整数 |
| tf.float32 | 32位浮点数 |
| tf.float64 | 64位浮点数 |
| tf.string | 字符串(非Unicode编码的字节数组) |
| tf.bool | 布尔型 |
| tf.comples64 | 复数,实部和虚部分分别为32位浮点型 |
8.2.1.3.3 tf.constant()函数:改变张量中元素的数据类型
程序格式为:
>>> import tensorflow as tf
>>> a = tf.constant(np.array([1,2]))
>>> b = tf.cast(a, dtype = tf.float32)
>>> b.dtype
tf.float32

>>> a = tf.constant(123456789,dtype = tf.int32)
>>> tf.cast(a,tf.int16)
<tf.Tensor: id=31, shape=(), dtype=int16, numpy=-13035>
- 数据溢出也会发生
8.2.1.3.4 tf.convert_to_tensor()函数:转变为tensor张量
tf.convert_to_tensor(数组/列表/数字/布尔型/字符串)
>>> import tensorflow as tf
>>> import numpy as np
>>> na = np.arange(12).reshape(3,4)
>>> ta = tf.convert_to_tensor(na)
>>> type(na)
<class 'numpy.ndarray'>
>>> type(ta)
<class 'tensorflow.python.framework.ops.EagerTensor'>
>>> ta
<tf.Tensor: id=43, shape=(3, 4), dtype=int32, numpy=
array([[ 0,  1,  2,  3],
       [ 4,  5,  6,  7],
       [ 8,  9, 10, 11]])>
>>> na
array([[ 0,  1,  2,  3],
       [ 4,  5,  6,  7],
       [ 8,  9, 10, 11]])
8.2.1.3.5 tf.if_tensor()函数:判断是否为张量
#接上
>>> tf.is_tensor(na)
False
>>> tf.is_tensor(ta)
True
8.2.1.3.6 isinstance()函数:判断参数的类型
>>> isinstance(ta,tf.Tensor)
True
>>> isinstance(na,np.ndarray)
True
8.2.2 创建张量(2)
- 张量是tensorflow中数据的载体
- 类似于Numpy,Tensorflow中也可以直接生成一些特殊的张量
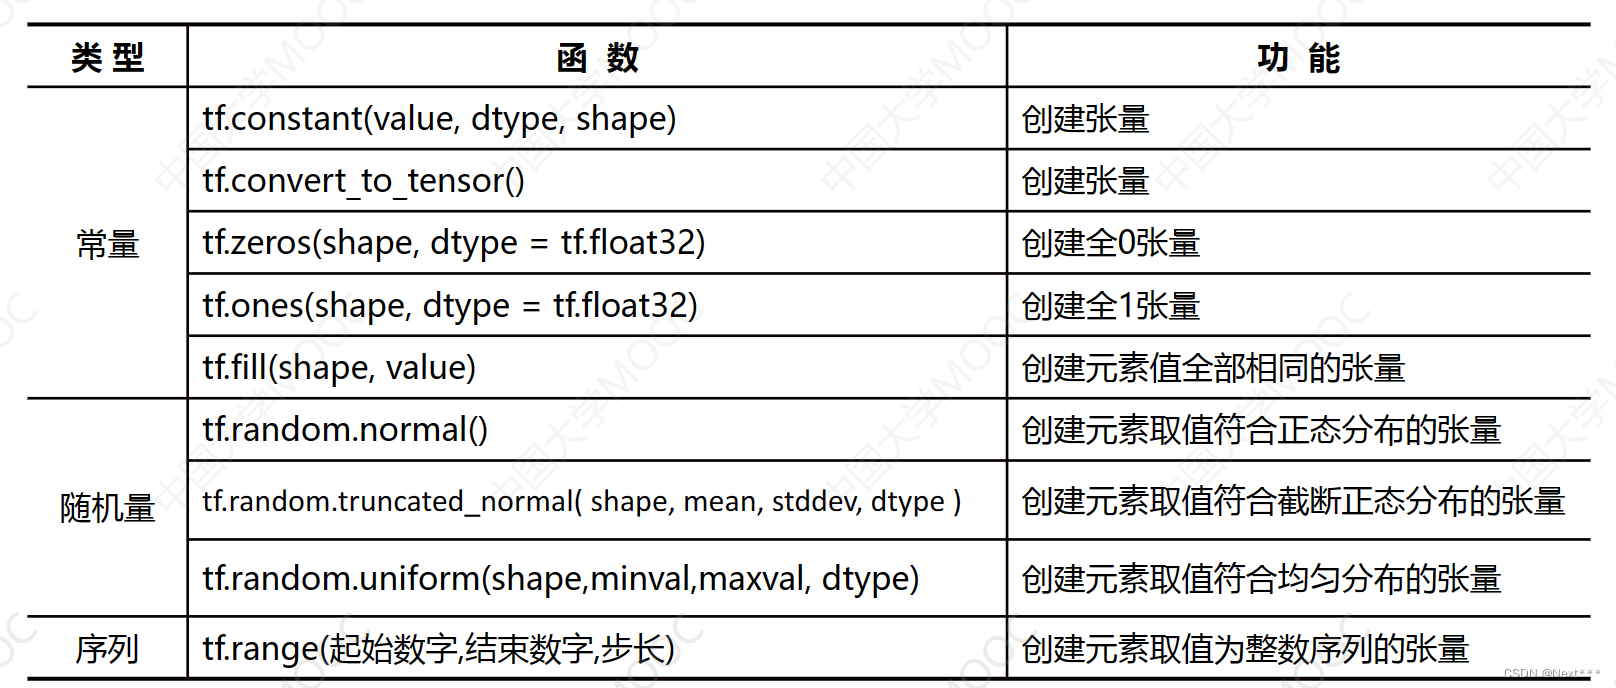
- 全0张量
- 全1张量
- 所有元素值都相同的张量
- 元素取值符合某种随机分布的张量
8.2.2.1 创建特殊张量
8.2.2.1.1 创建全0张量和全1张量
- 全0张量
tf.zeros(shape,dtype=tf.float32)
- 全1张量
tf.ones(shape,dtype=tf.float32)
- shape形状;dtype默认32位浮点数
例如:
>>> import tensorflow as tf
>>> tf.ones(shape=(2,1))
<tf.Tensor: id=47, shape=(2, 1), dtype=float32, numpy=
array([[1.],
       [1.]], dtype=float32)>
>>> tf.ones([6])
<tf.Tensor: id=51, shape=(6,), dtype=float32, numpy=array([1., 1., 1., 1., 1., 1.], dtype=float32)>
>>> tf.ones([2,3],tf.int32)
<tf.Tensor: id=59, shape=(2, 3), dtype=int32, numpy=
array([[1, 1, 1],
       [1, 1, 1]])>
8.2.2.1.2 创建元素值都相同的张量
8.2.2.1.2.1 tf.fill()函数
tf.fill(dims,value)
- 根据value类型自动判断数据类型
例如:
>>> import tensorflow as tf
>>> tf.fill([2,3],9)
<tf.Tensor: id=63, shape=(2, 3), dtype=int32, numpy=
array([[9, 9, 9],
       [9, 9, 9]])>
>>> tf.fill([2,3],9.0)
<tf.Tensor: id=67, shape=(2, 3), dtype=float32, numpy=
array([[9., 9., 9.],
       [9., 9., 9.]], dtype=float32)>
8.2.2.1.2.2 tf.constant()函数
- 为了避免混淆,使用这些参数时,尽量加上名称
>>> import tensorflow as tf

>>> tf.constant(9,shape=[2,3])
<tf.Tensor: id=71, shape=(2, 3), dtype=int32, numpy=
array([[9, 9, 9],
       [9, 9, 9]])>

>>> tf.constant(9,shape=(2,3))
<tf.Tensor: id=75, shape=(2, 3), dtype=int32, numpy=
array([[9, 9, 9],
       [9, 9, 9]])>

>>> tf.fill(dims=[2,3],value=9)
<tf.Tensor: id=79, shape=(2, 3), dtype=int32, numpy=
array([[9, 9, 9],
       [9, 9, 9]])>

>>> tf.constant(value=9,shape=[2,3])
<tf.Tensor: id=83, shape=(2, 3), dtype=int32, numpy=
array([[9, 9, 9],
       [9, 9, 9]])>
8.2.2.1.3 创建随机数张量
8.2.2.1.3.1 正态分布
tf.random.normal(shape,mean,stddev,dtype)
- shape:张量的形状
- mean:均值,省略的话默认是0
- stddev:标准差,省略的话默认是1
- dtype:数据类型,默认是32浮点数(tf.float32)
例如;创建一个2*2的张量,其元素服从标准正态分布的张量
>>> import tensorflow as tf
>>> tf.random.normal([2,2])
<tf.Tensor: id=90, shape=(2, 2), dtype=float32, numpy=
array([[ 0.48454306,  0.7746329 ],
       [ 2.2181435 , -0.62854046]], dtype=float32)>
例如:创建一个三位张量,其元素服从正态分布
>>> import tensorflow as tf
>>> tf.random.normal(shape=[3,3],mean=0,stddev=1,dtype=tf.float32)
<tf.Tensor: id=97, shape=(3, 3), dtype=float32, numpy=
array([[ 1.8088632 ,  0.49246895,  0.8497273 ],
       [-1.1053319 , -3.4912257 ,  0.03176761],
       [ 1.0519494 , -0.9557805 ,  0.4212218 ]], dtype=float32)>
8.2.2.1.3.2 截断正态分布
tf.random.truncated_normal(shape,mean,stddev,dtype)
- 返回一个截断的正太分布
- 截断的标准是2倍的标准差
- 也就是说,当均值为0,标准差为1时
- 使用tf.random.truncated_normal(),不可能出现区间[-2,2]以外的点
- 使用tf.random.normal(),可能出现区间[-2,2]以外的点
8.2.2.1.3.3 设置随机种子-tf.random.set_seed()函数
- 产生同样的随机张量
>>> import tensorflow as tf

>>> tf.random.set_seed(8)
>>> tf.random.normal([2,2])
<tf.Tensor: id=104, shape=(2, 2), dtype=float32, numpy=
array([[ 1.2074401 , -0.7452463 ],
       [ 0.6908678 , -0.76359874]], dtype=float32)>
>>> tf.random.normal([2,2])
<tf.Tensor: id=111, shape=(2, 2), dtype=float32, numpy=
array([[ 1.6407531 , -0.41693485],
       [-2.174734  ,  0.14891738]], dtype=float32)>
>>> tf.random.set_seed(8)
>>> tf.random.normal([2,2])
<tf.Tensor: id=118, shape=(2, 2), dtype=float32, numpy=
array([[ 1.2074401 , -0.7452463 ],
       [ 0.6908678 , -0.76359874]], dtype=float32)>
8.2.2.1.4 创建均匀分布张量–tf.random.uniform()函数
tf.random.uniform(shape,minval,maxval,dtype)
- shape:形状
- minval:最小值
- maxval:最大值
- dtype:数据类型
- 这是前闭后开的,所以最大值为9
>>> import tensorflow as tf

>>> tf.random.uniform(shape=[3,3],minval=0,maxval=10,dtype='int32')
<tf.Tensor: id=123, shape=(3, 3), dtype=int32, numpy=
array([[6, 8, 3],
       [9, 5, 1],
       [8, 6, 1]])>
8.2.2.1.5 随机打乱–tf.random.shuffle()函数
>>> import tensorflow as tf
>>> import numpy as np

>>> x = tf.constant([[1,2],[3,4],[5,6]])
>>> tf.random.shuffle(x)
<tf.Tensor: id=126, shape=(3, 2), dtype=int32, numpy=
array([[1, 2],
       [5, 6],
       [3, 4]])>

>>> y = [1,2,3,4,5,6]
>>> tf.random.shuffle(y)
<tf.Tensor: id=129, shape=(6,), dtype=int32, numpy=array([1, 5, 4, 2, 3, 6])>


>>> z = np.arange(5)
>>> tf.random.shuffle(z)
<tf.Tensor: id=132, shape=(5,), dtype=int32, numpy=array([3, 1, 2, 4, 0])>
8.2.2.2 创建序列–tf.range()函数
tf.range(start,limit,delta=1,dtype)
- 用法和numpy中类似
- start:起始数字,省略默认为0
- limit:结束数字
- delta:步长,省略默认为1
- dtype:类型
- 也是前闭后开的
- 起始数字和步长都可以省略
>>> import tensorflow as tf

>>> tf.range(10)
<tf.Tensor: id=137, shape=(10,), dtype=int32, numpy=array([0, 1, 2, 3, 4, 5, 6, 7, 8, 9])>

>>> tf.range(10,delta=2)
<tf.Tensor: id=142, shape=(5,), dtype=int32, numpy=array([0, 2, 4, 6, 8])>

>>> tf.range(1,10,delta=2)
<tf.Tensor: id=147, shape=(5,), dtype=int32, numpy=array([1, 3, 5, 7, 9])>
8.2.2.3 小结-创建张量
8.2.2.4 Tensor对象的属性-ndim、shape、dtype
8.2.2.4.1 张量.属性
>>> import tensorflow as tf

>>> tf.constant([[1,2],[3,4]])
<tf.Tensor: id=149, shape=(2, 2), dtype=int32, numpy=
array([[1, 2],
       [3, 4]])>
>>> a = tf.constant([[1,2],[3,4]])
>>> a.ndim
2
>>> a.shape
TensorShape([2, 2])
>>> a.dtype
tf.int32
8.2.2.4.1 tf.属性(张量)
>>> import tensorflow as tf

>>> tf.constant([[1,2],[3,4]])
<tf.Tensor: id=149, shape=(2, 2), dtype=int32, numpy=
array([[1, 2],
       [3, 4]])>
>>> a = tf.constant([[1,2],[3,4]])

>>> tf.shape(a)
<tf.Tensor: id=152, shape=(2,), dtype=int32, numpy=array([2, 2])>
>>> tf.size(a)
<tf.Tensor: id=154, shape=(), dtype=int32, numpy=4>
>>> tf.rank(a)
<tf.Tensor: id=156, shape=(), dtype=int32, numpy=2>
8.2.2.5 张量和Numpy数组
- 张量可以看作是在numpy数组的基础上又做了一层封装,使它可以执行tensorflow中的API,可以运行于GPU和TPU
- 在TensorFlow中,所有的运算都是在张量之间进行的
- NumPy数组仅仅是作为输入和输出来使用
- 例如,在运算之前,利用numpy数组提供数据,生成张量对象;在运算的过程中,或者运算结束之后,使用张量对象的numpy方法获取张量的值,以numpy数组的形式返回给我们;运算的过程中,numpy不参与计算。
- 张量可以运行于CPU,也可以运行于TPU和GPU
- 而Numpy数组只能在CPU中运行,当张量在GPU中时,其实于numpy数组共享同一片内存,只是读取和写入方式不同,这种情况使用张量的numpy方法可以很块的得到结果
- 而在GPU中运行时,把内存中的numpy数组中的值,在拷贝到GPU中的显存中,在GPU中做高速运算,此时用numpy方法读取它的值,就需要再从GPU的显存中拷贝到内存中,速度就会很慢
8.3 维度变换
- 上节回顾
- 张量时TensorFlow中多维数组的载体,用Tensor对象实现
- 在CPU环境中,张量和Numpy数组时共享同一片内存的
- 在内存中,多维张量都是以一维数组的方式连续存储的,他们的物理存储方式是一维的,而我们通过维度和形状在逻辑上把它理解为一个多维张量
8.3.1 理解张量的存储和视图
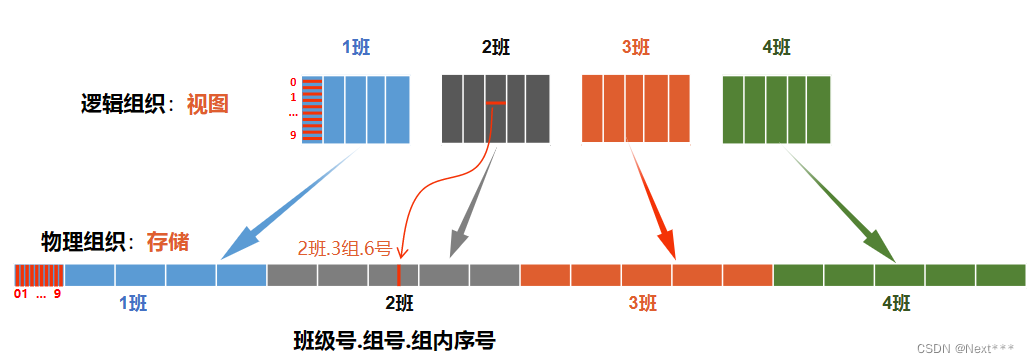
4个班级合并为两个班,每个班十组,逻辑上发生改变,物理上的位置不变
-
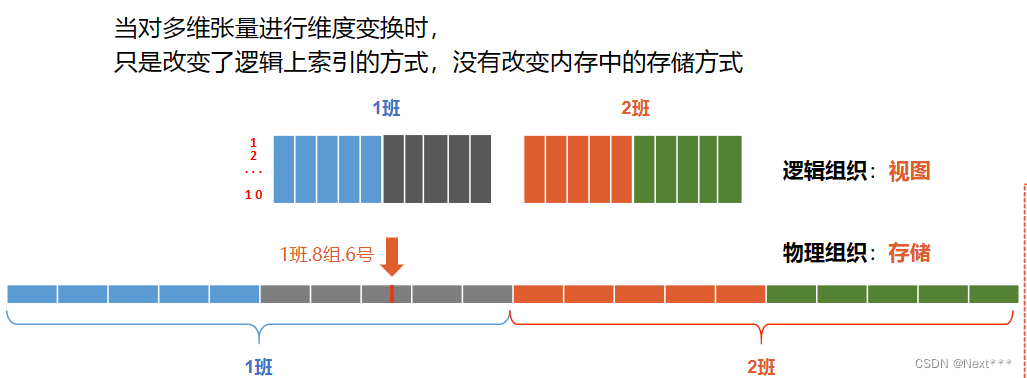
多维张量进行维度变换时,也只是改变了逻辑上的索引方式,在内存中的存储情况并没有发生任何改变
-
把逻辑组织称为视图
-
把物理组织称为存储
8.3.2 改变张量的形状
tf.reshape(tensor,shape)
- Tensorflow中的reshape()函数没有被封装到tensor对象中,所以前缀是tf,不能是张量对象
- tensor:要改变形状的张量
- shape:改变后的形状,元素()或者列表[]表示
例如:直接创建一个24序列的张量,然后将其转换为(2,3,4)形状的张量
>>> import tensorflow as tf

>>> a = tf.range(24)
>>> a
<tf.Tensor: id=161, shape=(24,), dtype=int32, numpy=
array([ 0,  1,  2,  3,  4,  5,  6,  7,  8,  9, 10, 11, 12, 13, 14, 15, 16,
       17, 18, 19, 20, 21, 22, 23])>

>>> b = tf.reshape(a,[2,3,4])
>>> b
<tf.Tensor: id=164, shape=(2, 3, 4), dtype=int32,
numpy=
array([[[ 0,  1,  2,  3],
        [ 4,  5,  6,  7],
        [ 8,  9, 10, 11]],

       [[12, 13, 14, 15],
        [16, 17, 18, 19],
        [20, 21, 22, 23]]])>
例如:创建一个形状(2,3,4)的数组,然后将其转化为张量
>>> import tensorflow as tf
>>> b = tf.reshape(tf.range(24),[2,3,4])
>>> tf.constant(np.arange(24).reshape(2,3,4))
<tf.Tensor: id=166, shape=(2, 3, 4), dtype=int32,
numpy=
array([[[ 0,  1,  2,  3],
        [ 4,  5,  6,  7],
        [ 8,  9, 10, 11]],

       [[12, 13, 14, 15],
        [16, 17, 18, 19],
        [20, 21, 22, 23]]])>
>>> tf.reshape(b,(4,-1))
<tf.Tensor: id=169, shape=(4, 6), dtype=int32, numpy=
array([[ 0,  1,  2,  3,  4,  5],
       [ 6,  7,  8,  9, 10, 11],
       [12, 13, 14, 15, 16, 17],
       [18, 19, 20, 21, 22, 23]])>
- shape参数=-1:自动推导出其长度
- 这些维度变换,都只是改变了张量的视图,张量的存储顺序始终没有改变
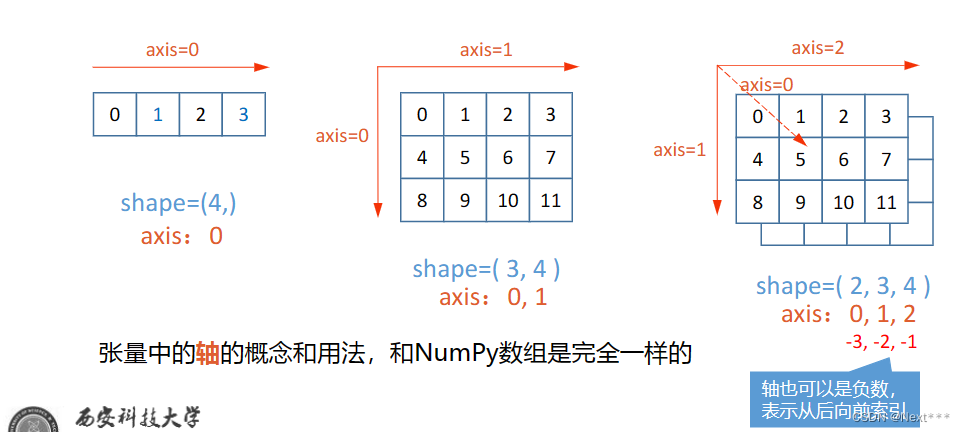
8.3.3 多维张量的轴:张量的维度
8.3.3.1 增加和删除维度
8.3.3.1.1 增加维度
tf.expend_dims(input,axis)
- 增加的这个维度上,长度为1,也就是只有一个元素
>>> import tensorflow as tf
>>> t = tf.constant([1,2])
>>> t
<tf.Tensor: id=2, shape=(2,), dtype=int32, numpy=array([1, 2])>

>>> t1 = tf.expand_dims(t,1)
<tf.Tensor: id=5, shape=(2, 1), dtype=int32, numpy=
array([[1],
       [2]])>

>>> t2 = tf.expand_dims(t,0)
>>> t2
<tf.Tensor: id=8, shape=(1, 2), dtype=int32, numpy=array([[1, 2]])>

>>> t3 = tf.expand_dims(t,-1)
>>> t3
<tf.Tensor: id=11, shape=(2, 1), dtype=int32, numpy=
array([[1],
       [2]])>
8.3.3.1.2 删除维度
只能删除长度为1的维度
tf.squeeze(input, axis)
例如:
如果一个张量的形状为:(1,2,1,3,1),使用tf.shape(tf.squeeze(t)),就会将其中长度为1的维度全部删除,得到的张量形状为(2,3);也可以指明删除的轴,tf.shape(tf.squeeze(t,[2,4])),得到的结果为张量形状为(1,2,3)
- 增加维度和删除维度,只是为了改变张量的视图,不会改变张量的存储
8.3.3.2 交换维度
tf.transpose(a,perm)
- a:输入的张量
- perm:是张量中各个轴的顺序,可以通过该参数修改张量的轴顺序,
例子:二维数组的例子
>>> import tensorflow as tf

>>> x = tf.constant([[1,2,3],[4,5,6]])
>>> x
<tf.Tensor: id=13, shape=(2, 3), dtype=int32, numpy=
array([[1, 2, 3],
       [4, 5, 6]])>

>>> tf.transpose(x,perm=[1,0])
<tf.Tensor: id=16, shape=(3, 2), dtype=int32, numpy=
array([[1, 4],
       [2, 5],
       [3, 6]])>
例子,三维数组的例子
>>> import tensorflow as tf

>>> a = tf.range(24)
>>> b = tf.reshape(a,[2,3,4])
>>> b
<tf.Tensor: id=23, shape=(2, 3, 4), dtype=int32, numpy=
array([[[ 0,  1,  2,  3],
        [ 4,  5,  6,  7],
        [ 8,  9, 10, 11]],

       [[12, 13, 14, 15],
        [16, 17, 18, 19],
        [20, 21, 22, 23]]])>
>>> tf.transpose(b,(1,0,2))
<tf.Tensor: id=26, shape=(3, 2, 4), dtype=int32, numpy=
array([[[ 0,  1,  2,  3],
        [12, 13, 14, 15]],

       [[ 4,  5,  6,  7],
        [16, 17, 18, 19]],

       [[ 8,  9, 10, 11],
        [20, 21, 22, 23]]])>
- 交换维度,不仅改变了张量的视图,同时也改变了张量的存储顺序
8.3.3.3 拼接和分割张量
8.3.3.3.1 拼接张量
- 就是在某个维度上合并
tf.concat(tensors,axis)
- tensors:是一个列表,包含所有需要拼接的张量
- axis:在哪个维度上拼接
>>> import tensorflow as tf

>>> t1 = [[1,2,3],[4,5,6]]
>>> t2 = [[7,8,9],[10,11,12]]
>>> tf.concat([t1,t2],0)
<tf.Tensor: id=31, shape=(4, 3), dtype=int32, numpy=
array([[ 1,  2,  3],
       [ 4,  5,  6],
       [ 7,  8,  9],
       [10, 11, 12]])>
>>> tf.concat([t1,t2],1)
<tf.Tensor: id=36, shape=(2, 6), dtype=int32, numpy=
array([[ 1,  2,  3,  7,  8,  9],
       [ 4,  5,  6, 10, 11, 12]])>
8.3.3.3.2 分割张量
将一个张量拆分成多个张量,分割后维度不变
tf.split(value,num_or_size_spluts,axis=0)
- value:带分割的张量
- num_or_size_spluts:分割的方案;
- 当为单个的数字时,指分割的份数;如2:平均分割为2个张量
- 当为列表时,不等的切割;如[1,2,1]:就表示分割成三个张量,长度分别是1,2,1
- axis:指定按照哪个轴来分割
例如:在轴axis=0轴上分割,平均分割两份
>>> import tensorflow as tf

>>> x = tf.range(24)
>>> x = tf.reshape(x,[4,6])
>>> x
<tf.Tensor: id=43, shape=(4, 6), dtype=int32, numpy=
array([[ 0,  1,  2,  3,  4,  5],
       [ 6,  7,  8,  9, 10, 11],
       [12, 13, 14, 15, 16, 17],
       [18, 19, 20, 21, 22, 23]])>

>>> tf.split(x,2,0)
[<tf.Tensor: id=47, shape=(2, 6), dtype=int32, numpy=
array([[ 0,  1,  2,  3,  4,  5],
       [ 6,  7,  8,  9, 10, 11]])>, <tf.Tensor: id=48, shape=(2, 6), dtype=int32, numpy=
array([[12, 13, 14, 15, 16, 17],
       [18, 19, 20, 21, 22, 23]])>]
例如:在轴axis=0轴上分割,分割三份,比例为1:2:1
>>> import tensorflow as tf

>>> x = tf.range(24)
>>> x = tf.reshape(x,[4,6])
>>> x
<tf.Tensor: id=43, shape=(4, 6), dtype=int32, numpy=
array([[ 0,  1,  2,  3,  4,  5],
       [ 6,  7,  8,  9, 10, 11],
       [12, 13, 14, 15, 16, 17],
       [18, 19, 20, 21, 22, 23]])>


>>> tf.split(x,[1,2,1],0)
[<tf.Tensor: id=53, shape=(1, 6), dtype=int32, numpy=array([[0, 1, 2, 3, 4, 5]])>, <tf.Tensor: id=54, shape=(2, 6), dtype=int32, numpy=
array([[ 6,  7,  8,  9, 10, 11],
       [12, 13, 14, 15, 16, 17]])>, <tf.Tensor: id=55, shape=(1, 6), dtype=int32, numpy=array([[18,
19, 20, 21, 22, 23]])>]
例如:在轴axis=1轴上分割,分割两份,比例为2:4
>>> import tensorflow as tf

>>> x = tf.range(24)
>>> x = tf.reshape(x,[4,6])
>>> x
<tf.Tensor: id=43, shape=(4, 6), dtype=int32, numpy=
array([[ 0,  1,  2,  3,  4,  5],
       [ 6,  7,  8,  9, 10, 11],
       [12, 13, 14, 15, 16, 17],
       [18, 19, 20, 21, 22, 23]])>

>>> tf.split(x,[2,4],1)
[<tf.Tensor: id=61, shape=(4, 2), dtype=int32, numpy=
array([[ 0,  1],
       [ 6,  7],
       [12, 13],
       [18, 19]])>, <tf.Tensor: id=62, shape=(4, 4), dtype=int32, numpy=
array([[ 2,  3,  4,  5],
       [ 8,  9, 10, 11],
       [14, 15, 16, 17],
       [20, 21, 22, 23]])>]
- 图像的分割和拼接,改变了张量的视图,但是张量的存储顺序并没有改变
8.3.3.4 堆叠和分解张量
8.3.3.4.1 堆叠张量
- 合并张量时,创建一个新的维度
tf.stack(values,axis)
- values:要堆叠的多个张良
- axie:指定插入新维度的位置
例如:
>>> import tensorflow as tf

>>> x = tf.constant([1,2,3])
>>> y = tf.constant([4,5,6])
>>> tf.stack((x,y),axis=0)
<tf.Tensor: id=67, shape=(2, 3), dtype=int32, numpy=
array([[1, 2, 3],
       [4, 5, 6]])>
>>> tf.stack((x,y),axis=1)
<tf.Tensor: id=69, shape=(3, 2), dtype=int32, numpy=
array([[1, 4],
       [2, 5],
       [3, 6]])>
8.3.3.4.2 分解张量
- 将张量分解为多个张量
- 分解后得到的每个张量,和原来的张量相比,维度都少了一维
tf.unstack(values,axis)
- values:要分解的张量
- axis:分解的轴,消失的轴
>>> import tensorflow as tf

>>> c = tf.constant([[1,2,3],[4,5,6]])
>>> c
<tf.Tensor: id=71, shape=(2, 3), dtype=int32, numpy=
array([[1, 2, 3],
       [4, 5, 6]])>
>>> tf.unstack(c,axis=0)
[<tf.Tensor: id=73, shape=(3,), dtype=int32, numpy=array([1, 2, 3])>,
<tf.Tensor: id=74, shape=(3,), dtype=int32, numpy=array([4, 5, 6])>]
>>> tf.unstack(c,axis=1)
[<tf.Tensor: id=77, shape=(2,), dtype=int32, numpy=array([1, 4])>,
<tf.Tensor: id=78, shape=(2,), dtype=int32, numpy=array([2, 5])>,
<tf.Tensor: id=79, shape=(2,), dtype=int32, numpy=array([3, 6])>]
8.4 部分采样
8.4.1 索引和切片
- 几乎和numpy中一摸一样
8.4.1.1 索引
- 一维张量
a[1]
- 二维张量
b[1][1]
b[1,1]
- 三维张量
c[1][1][1]
c[1,1,1]
- 手写数字图像数据集MNIST,表示为三维张量,形状为:
(60000,28,28)
- 第一维表示有60000张图片
- 后面两维对应二维图片中每个像素的灰度值
mnist[0]:取第1张图片中的数据mnist[0][1]:取第1张图片中的第2行mnist[0][1][2]:取第1张图片中的第2行的第3列
8.4.1.2 切片
- 前闭后开的
- 起始位置、结束位置、步长都可以省略;表示读取所有数据,步长为1
- 步长也可以是负数
8.4.1.2.1 一维张量切片
起始位置:结束位置:步长
>>> import tensorflow as tf

>>> a = tf.range(10)

>>> a[::]
<tf.Tensor: id=90, shape=(10,), dtype=int32, numpy=array([0, 1, 2, 3, 4, 5, 6, 7, 8, 9])>

>>> a[::2] # 读取所有的偶数
<tf.Tensor: id=95, shape=(5,), dtype=int32, numpy=array([0, 2, 4, 6, 8])>

>>> a[1::2] # 读取所有的奇数
<tf.Tensor: id=100, shape=(5,), dtype=int32, numpy=array([1, 3, 5, 7, 9])>

>>> a[::-1]  # 从最后以恶搞元素开始
<tf.Tensor: id=105, shape=(10,), dtype=int32, numpy=array([9, 8, 7, 6, 5, 4, 3, 2, 1, 0])>

>>> a[::-2]
<tf.Tensor: id=110, shape=(5,), dtype=int32, numpy=array([9, 7, 5, 3, 1])>
8.4.1.2.2 二维张量切片
- 维度之间用逗号隔开
- 鸢尾花数据集可以表示为一个二位张量
>>>import tensorflow as tf
>>> TRAIN_URL = "http://download.tensorflow.org/data/iris_training.csv"
>>> train_path = tf.keras.utils.get_file("iris_training.csv",TRAIN_URL)

>>> import pandas as pd
>>> df_iris = pd.read_csv(train_path)

>>> import numpy as np
>>> np_iris = np.array(df_iris)

>>> iris = tf.convert_to_tensor(np_iris)
>>> iris.shape
TensorShape([120, 5])

>>> iris[0,:] # 读取第一个样本中所有列
<tf.Tensor: id=4, shape=(5,), dtype=float64, numpy=array([6.4, 2.8, 5.6, 2.2, 2. ])>

>>> iris[0:5,0:4] # 前5个样本的所有属性
<tf.Tensor: id=8, shape=(5, 4), dtype=float64, numpy=
array([[6.4, 2.8, 5.6, 2.2],
       [5. , 2.3, 3.3, 1. ],
       [4.9, 2.5, 4.5, 1.7],
       [4.9, 3.1, 1.5, 0.1],
       [5.7, 3.8, 1.7, 0.3]])>

>>> iris[:,0] # 表示读取所有样本的第一个属性
<tf.Tensor: id=12, shape=(120,), dtype=float64, numpy=
array([6.4, 5. , 4.9, 4.9, 5.7, 4.4, 5.4, 6.9, 6.7, 5.1, 5.2, 6.9, 5.8,
       5.4, 7.7, 6.3, 6.8, 7.6, 6.4, 5.7, 6.7, 6.4, 5.4, 6.1, 7.2, 5.2,
       5.8, 5.9, 5.4, 6.7, 6.3, 5.1, 6.4, 6.8, 6.2, 6.9, 6.5, 5.8, 5.1,
       4.8, 7.9, 5.8, 6.7, 5.1, 4.7, 6. , 4.8, 7.7, 4.6, 7.2, 5. , 6.6,
       6.1, 5. , 7. , 6. , 7.4, 5.8, 6.2, 5. , 5.6, 6.7, 6.3, 6.4, 6.2,
       7.3, 4.4, 7.2, 6.5, 5. , 4.7, 6.6, 5.5, 7.7, 6.1, 4.9, 5.5, 5.7,
       6. , 6.4, 5.4, 6.1, 6.5, 5.6, 6.3, 4.9, 6.8, 5.7, 6. , 5. , 6.5,
       6.1, 5.1, 4.6, 6.5, 4.6, 4.6, 7.7, 5.9, 5.1, 4.9, 4.9, 4.5, 5.8,
       5. , 5.2, 5.3, 5. , 5.6, 4.8, 6.3, 5.7, 5.
, 6.3, 5. , 5.5, 5.7,
       4.4, 4.8, 5.5])>
8.4.1.2.3 三维张量切片-手写数字数据集MNIST(60000,28,28)
mnist[0,::,::]:第一张图片mnist[0,::,::]:第一张图片 (为了更加简洁,可以为1个:)mnist[0:10,:,:]:前10张图片mnist[0:20,0:28:2,:]:前20张图片的所有的行,隔行采样mnist[:,0:28:2,0:28:2]:对所有的图片,隔行采样,并且隔列采样
8.4.1.2.4 三维张量切片-彩色图片lena(512,512,3)
lena[:,:,0]:R通道的图片lena[:,:,2]:B通道的图片
8.4.1.2.5 四维张量切片-多张彩色图片(4,512,512,3)
image[0,:,:,0]:第1张图片的R通道image[0:2,:,:,2]:前2张图片的B通道image[0:2,0:512:2,:,2]:对前2张图片的B通道图片隔行采样
8.4.2 数据提取
- 取出没有规律,特定的数据
8.4.2.1 tf.gather()提取函数
- gather()函数:用一个索引列表,将给定张量中,对应索引值的元素提取出来
8.4.2.1.1 tf.gather()提取一维函数
gather(params,indices)
例如:
>>>import tensorflow as tf

>>> a = tf.range(5)
>>> tf.gather(a, indices=[0,2,3])
<tf.Tensor: id=19, shape=(3,), dtype=int32, numpy=array([0, 2, 3])>
8.4.2.1.2 tf.gather()提取多维函数
- tf.ganther()函数一次只能对一个函数索引
gather(params,axis,indices)
- axis:说明的在哪个轴上采样
>>>import tensorflow as tf

>>> b = tf.reshape(a,[4,5])
>>> b
<tf.Tensor: id=25, shape=(4, 5), dtype=int32, numpy=
array([[ 0,  1,  2,  3,  4],
       [ 5,  6,  7,  8,  9],
       [10, 11, 12, 13, 14],
       [15, 16, 17, 18, 19]])>

>>> tf.gather(b,axis=0,indices=[0,2,3])
<tf.Tensor: id=28, shape=(3, 5), dtype=int32, numpy=
array([[ 0,  1,  2,  3,  4],
       [10, 11, 12, 13, 14],
       [15, 16, 17, 18, 19]])>

>>> tf.gather(b,axis=1,indices=[0,2,3])
<tf.Tensor: id=31, shape=(4, 3), dtype=int32, numpy=
array([[ 0,  2,  3],
       [ 5,  7,  8],
       [10, 12, 13],
       [15, 17, 18]])>
8.4.2.2 tf.gather_nd()同时多个维度
- 指定采样点的坐标
>>>import tensorflow as tf

>>> b = tf.reshape(a,[4,5])
>>> b
<tf.Tensor: id=25, shape=(4, 5), dtype=int32, numpy=
array([[ 0,  1,  2,  3,  4],
       [ 5,  6,  7,  8,  9],
       [10, 11, 12, 13, 14],
       [15, 16, 17, 18, 19]])>

>>> tf.gather_nd(b,[[0,0],[1,1],[2,3]])
<tf.Tensor: id=37, shape=(3,), dtype=int32, numpy=array([ 0,  6, 13])>

# 等同于
>>> b[0,0]
<tf.Tensor: id=41, shape=(), dtype=int32, numpy=0
>>> b[1,1]
<tf.Tensor: id=45, shape=(), dtype=int32, numpy=6
>>> b[2,3]
<tf.Tensor: id=49, shape=(), dtype=int32, numpy=13>
- 选择采样维度
- 三维张量–彩色图片lena(512,512,3)
表示仅对前两维采样,每个点都包括所有三个通道的值
tf.gather_nd(lena,[[0,0],[1,1],[2,3]])
- 三维张量–手写数字数据集MNIST(60000,28,28)
只对第一维采样,取到索引为0,2,3的三张图片
tf.gather_nd(mnist,[[0],[2],[3]])
8.5 张量运算
8.5.1 张量运算(1)
- 加减乘除运算、幂运算、对数指数运算、矩阵运算等
8.5.1.1 基本数学运算
8.5.1.1.1 加减乘除运算
| 算术操作 | 描述 |
|---|---|
| tf.add(s,y) | 将x和y逐元素相加 |
| tf.subtract(x,y) | 将x和y逐元素相减 |
| tf.multiply(x,y) | 将x和y逐元素相乘 |
| tf.divide(x,y) | 将x和y逐元素相除 |
| tf.math.mod(x,y) | 对x逐元素取模 |
>>> import tensorflow as tf

>>> a = tf.constant([0,1,2])
>>> b = tf.constant([3,4,5])

>>> tf.add(a,b)
<tf.Tensor: id=3, shape=(3,), dtype=int32, numpy=array([3, 5, 7])>
- 减法、乘法、除法运算都是一样的,都是这两个张量逐元素的运算,并且要求各个张量中的元素数据类型必须一致
8.5.1.1.2 幂指对数运算
| 算术操作 | 描述 |
|---|---|
| tf.pow(x,y) | 对x求y的幂次方 |
| tf.square(x) | 对x逐元素求计算平方 |
| tf.aqrt(x) | 对x逐元素开平方根(要求x浮点数) |
| tf.exp(x) | 计算e的x次方(要求x浮点数) |
| tf.math.log(x) | 计算自然对数,底数为e(要求x浮点数) |
8.5.1.1.2.1 一维张量幂运算
>>> import tensorflow as tf
>>> x = tf.range(4)
>>> x
<tf.Tensor: id=7, shape=(4,), dtype=int32, numpy=array([0, 1, 2, 3])>
>>> tf.pow(x,2)
<tf.Tensor: id=9, shape=(4,), dtype=int32, numpy=array([0, 1, 4, 9])>
8.5.1.1.2.2 二维张量幂运算
>>> import tensorflow as tf

>>> x = tf.constant([[2,2],[3,3]])
>>> y = tf.constant([[8,16],[2,3]])
>>> tf.pow(x,y)
<tf.Tensor: id=20, shape=(2, 2), dtype=int32, numpy=
array([[  256, 65536],
       [    9,    27]])>

>>> x = tf.constant([1.,4.,9.,16.])  # 如果这里都是整数,下式中的0.5就会出现报错,必须是浮点数类型
>>> tf.pow(x,0.5)
<tf.Tensor: id=35, shape=(4,), dtype=float32, numpy=array([1., 2., 3., 4.], dtype=float32)>
8.5.1.1.2.3 张量平方开放运算
- 开根号运算要使用浮点数
>>> import tensorflow as tf

>>> x = tf.constant([1,2,3,4])
>>> tf.square(x)
<tf.Tensor: id=37, shape=(4,), dtype=int32, numpy=array([ 1,  4,  9, 16])>


>>> x = tf.constant([1.,4.,9.,16.])
>>> tf.sqrt(x)
<tf.Tensor: id=39, shape=(4,), dtype=float32, numpy=array([1., 2., 3., 4.], dtype=float32)>


>>> f = tf.constant([[1.,9.],[16.,100.]])
>>> tf.sqrt(f)
<tf.Tensor: id=41, shape=(2, 2), dtype=float32, numpy=
array([[ 1.,  3.],
       [ 4., 10.]], dtype=float32)>
8.5.1.1.2.4 自然指数和自然对数运算
>>> import tensorflow as tf

>>> tf.exp(1.)
<tf.Tensor: id=44, shape=(), dtype=float32, numpy=2.7182817>


>>> x = tf.exp(3.)
>>> tf.math.log(x)
<tf.Tensor: id=47, shape=(), dtype=float32, numpy=3.0>
8.5.1.1.2.5 对数运算
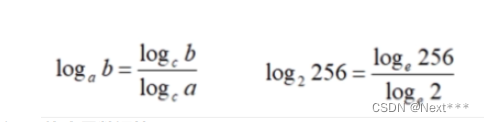
- tensorflow对数运算只有以e为底的自然对数,没有以其他数为底的对数,所以使用换底函数运算
>>> import tensorflow as tf

>>> x = tf.constant(256.)
>>> y = tf.constant(2.)
>>> tf.math.log(x)/tf.math.log(y)
<tf.Tensor: id=52, shape=(), dtype=float32, numpy=8.0>

>>> x = tf.constant([[1.,9.],[16.,100.]])
>>> y = tf.constant([[2.,3.],[2.,10.]])
>>> tf.math.log(x)/tf.math.log(y)
<tf.Tensor: id=57, shape=(2, 2), dtype=float32, numpy=
array([[0., 2.],
       [4., 2.]], dtype=float32)>
- 指数运算和对数运算不在同一个模块中,以及没有提供以其他自然数为底的对数运算
8.5.1.1.3 其他运算
| 函数 | 描述 |
|---|---|
| tf.sign(x) | 返回x的符号 |
| tf.abs(x) | 对x逐元素求绝对值 |
| tf.negative(x) | 对x逐元素求相反数,y=-x |
| tf.reciproca(x) | 取x的倒数 |
| tf.logical_not(x) | 对x逐元素求得逻辑非 |
| tf.ceil(x) | 向上取整 |
| tf.floor(x) | 向下取整 |
| tf.rint(x) | 取最接近得整数 |
| tf.round(x) | 对x逐元素求舍入最接近得整数 |
| tf.maximum(x,y) | 返回两tensor中的最大值 |
| tf.minimum(x.y) | 返回两tensor中的最小值 |
8.5.1.1.4 三角函数和反三角函数
| 函数 | 描述 |
|---|---|
| tf.cos(x) | 三角函数cos |
| tf.sin(x) | 三角函数sin |
| tf.tan(x) | 三角函数tan |
| tf.acos(x) | 反三角函数arccos |
| tf.asin(x) | 反三角函数arcsin |
| tf.atan(x) | 反三角函数arctan |
8.5.1.2 重载运算符
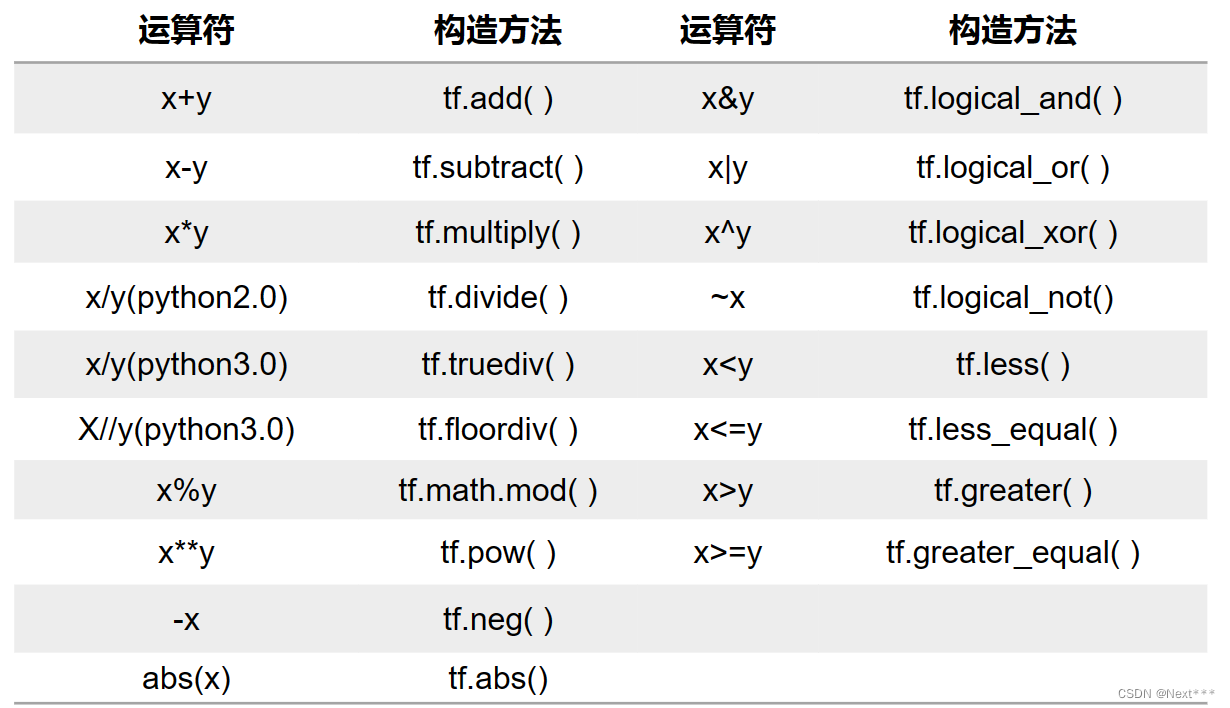
>>> import tensorflow as tf

>>> a = tf.constant([0,1,2,3])
>>> b = tf.constant([4,5,6,7])
>>> a+b
<tf.Tensor: id=60, shape=(4,), dtype=int32, numpy=array([ 4,  6,  8, 10])>
>>> a-b
<tf.Tensor: id=61, shape=(4,), dtype=int32, numpy=array([-4, -4, -4, -4])>
>>> a*b
<tf.Tensor: id=62, shape=(4,), dtype=int32, numpy=array([ 0,  5, 12, 21])>
>>> a/b
<tf.Tensor: id=65, shape=(4,), dtype=float64, numpy=array([0.        , 0.2       , 0.33333333, 0.42857143])>
- 还可以使用%取余数,a中的元素依次除以b取余数
>>> a = tf.constant([0,1,2,3])
>>> b = 2
>>> a%b
<tf.Tensor: id=69, shape=(4,), dtype=int32, numpy=array([0, 1, 0, 1])>
- //表示整除
>>> a = tf.constant([[0,1,2,3],[0,-1,-2,-3]])
>>> b = 2
>>> a//b
<tf.Tensor: id=72, shape=(2, 4), dtype=int32, numpy=
array([[ 0,  0,  1,  1],
       [ 0, -1, -1, -2]])>
- 指数运算**
>>> a = tf.constant([0,1,2,3])
>>> b = 2
>>> a**b
<tf.Tensor: id=75, shape=(4,), dtype=int32, numpy=array([0, 1, 4, 9])>
8.5.1.3 广播机制
- 参与运算的张量形状不同,如何计算?
- a是一维张量,b是二维张量,a+b即将a依次和b中的每一行相加,这就是广播机制,即a被广播到b中每一行上
- 要求两个张量的最后一个维度必须相等
- 一维张量+二维张量
>>> import tensorflow as tf

>>> a = tf.constant([1,2,3])
>>> a
<tf.Tensor: id=76, shape=(3,), dtype=int32, numpy=array([1, 2, 3])>

>>> b = tf.constant(np.arange(12).reshape(4,3))
>>> b
<tf.Tensor: id=77, shape=(4, 3), dtype=int32, numpy=
array([[ 0,  1,  2],
       [ 3,  4,  5],
       [ 6,  7,  8],
       [ 9, 10, 11]])>

>>> a+b
<tf.Tensor: id=78, shape=(4, 3), dtype=int32, numpy=
array([[ 1,  3,  5],
       [ 4,  6,  8],
       [ 7,  9, 11],
       [10, 12, 14]])>

>>> c = tf.constant(np.arange(12).reshape(2,2,3))
>>> c
<tf.Tensor: id=79, shape=(2, 2, 3), dtype=int32, numpy=
array([[[ 0,  1,  2],
        [ 3,  4,  5]],

       [[ 6,  7,  8],
        [ 9, 10, 11]]])>

>>> a+c
<tf.Tensor: id=80, shape=(2, 2, 3), dtype=int32, numpy=
array([[[ 1,  3,  5],
        [ 4,  6,  8]],

       [[ 7,  9, 11],
        [10, 12, 14]]])>

>>> a*c
<tf.Tensor: id=81, shape=(2, 2, 3), dtype=int32, numpy=
array([[[ 0,  2,  6],
        [ 3,  8, 15]],

       [[ 6, 14, 24],
        [ 9, 20, 33]]])>
- 当张量和一个数字进行运算时,会将这个数字值广播到张量的各个元素
8.5.1.4 张量和Numpy数组之间的相互转换
- Numpy数组转化为张量:
tf.constant();tf.convert_to_tensor - 张量转换为Numpy数组:
Tensor.numpy()
8.5.1.4.1 当张量和Numpy数组共同参与运算时
- 执行Tensorflow操作,那么TensorFlow将自动的把Numpy数组转换为张量
- 执行Numpy操作,那么Numpy将自动的张量转换为Numpy数组,在进行运算
- 只要操作数中有一个Tensor对象,就把所有的操作数都转换为张量,然后再进行运算。
>>> import tensorflow as tf
>>> import numpy as np

>>> nd = np.ones([2,2])
>>> t = tf.multiply(nd,36)
>>> t
<tf.Tensor: id=84, shape=(2, 2), dtype=float64, numpy=
array([[36., 36.],
       [36., 36.]])>

>>> np.add(nd,t)
array([[37., 37.],
       [37., 37.]])
8.5.2 张量运算(2)
8.5.2.1 张量乘法
8.5.2.1.1 向量乘法
- 元素乘法:
tf.multiply(),*运算符;对应元素相等 - 向量乘法:
tf.matmul(),@运算符矩阵乘法
8.5.2.1.1.1 二维向量乘法
>>> import tensorflow as tf
>>> print("TensorFlow version: ",tf.__version__)
TensorFlow version:  2.0.0
# 先创建两个张量a和b
>>> import numpy as np
>>> a = tf.constant(np.arange(6),shape=(2,3))
>>> a
<tf.Tensor: id=87, shape=(2, 3), dtype=int32, numpy=
array([[0, 1, 2],
       [3, 4, 5]])>

>>> b = tf.constant(np.arange(6),shape=(3,2))
>>> b
<tf.Tensor: id=90, shape=(3, 2), dtype=int32, numpy=
array([[0, 1],
       [2, 3],
       [4, 5]])>

>>> tf.matmul(a,b)
<tf.Tensor: id=91, shape=(2, 2), dtype=int32, numpy=
array([[10, 13],
       [28, 40]])>
>>> a@b
<tf.Tensor: id=92, shape=(2, 2), dtype=int32, numpy=
array([[10, 13],
       [28, 40]])>
8.5.2.1.1.2 多维向量乘法—三维张量×二维张量
- 会采用广播机制,将b张量和a张量中最后两维依次相乘计算
>>> import tensorflow as tf
>>> import numpy as np

>>> a = tf.random.normal([2,3,5])
>>> b = tf.random.normal([5,4])
>>> tf.matmul(a,b)
<tf.Tensor: id=105, shape=(2, 3, 4), dtype=float32, numpy=
array([[[ 0.66367817, -1.8407946 , -5.1079473 ,  1.115813  ],
        [-1.0903633 ,  2.9237514 ,  1.0623133 ,  0.25142556],
        [ 0.19272862, -1.9880747 , -7.018299  ,  1.1446145 ]],

       [[ 1.5938025 , -3.0838017 ,  2.6247544 , -2.5586433 ],
        [-1.4260333 ,  0.4984906 , -0.7839435 ,  0.8160777 ],
        [-0.18613842,  2.533684  ,  3.4380057 ,  0.7654592 ]]],
      dtype=float32)>
8.5.2.1.1.3 多维向量乘法—三维张量×三维张量
- 当张量a和b张量的维度都大于2时,Tensorflow会选择a和b的最后两位进行矩阵相乘,前面的维度保持形状不变
>>> import tensorflow as tf
>>> import numpy as np

>>> a = tf.constant(np.arange(12),shape=(2,2,3))
>>> a
<tf.Tensor: id=108, shape=(2, 2, 3), dtype=int32,
numpy=
array([[[ 0,  1,  2],
        [ 3,  4,  5]],

       [[ 6,  7,  8],
        [ 9, 10, 11]]])>
>>> b = tf.constant(np.arange(12),shape=(2,3,2))
>>> b
<tf.Tensor: id=111, shape=(2, 3, 2), dtype=int32,
numpy=
array([[[ 0,  1],
        [ 2,  3],
        [ 4,  5]],

       [[ 6,  7],
        [ 8,  9],
        [10, 11]]])>

>>> tf.matmul(a,b)
<tf.Tensor: id=112, shape=(2, 2, 2), dtype=int32,
numpy=
array([[[ 10,  13],
        [ 28,  40]],

       [[172, 193],
         [244, 274]]])>
8.5.2.1.1.4 多维向量乘法—四维张量×四维张量
- 同样也是最后两维进行运算
>>> import tensorflow as tf
>>> import numpy as np
>>> a = tf.constant(np.arange(24),shape=(2,2,2,3))
>>> a
<tf.Tensor: id=115, shape=(2, 2, 2, 3), dtype=int32, numpy=
array([[[[ 0,  1,  2],
         [ 3,  4,  5]],

        [[ 6,  7,  8],
         [ 9, 10, 11]]],


       [[[12, 13, 14],
         [15, 16, 17]],

        [[18, 19, 20],
         [21, 22, 23]]]])>
>>> b = tf.constant(np.arange(24),shape=(2,2,3,2))
>>> b
<tf.Tensor: id=118, shape=(2, 2, 3, 2), dtype=int32, numpy=
array([[[[ 0,  1],
         [ 2,  3],
         [ 4,  5]],

        [[ 6,  7],
         [ 8,  9],
         [10, 11]]],


       [[[12, 13],
         [14, 15],
         [16, 17]],

        [[18, 19],
         [20, 21],
         [22, 23]]]])>

>>> tf.matmul(a,b)
<tf.Tensor: id=119, shape=(2, 2, 2, 2), dtype=int32, numpy=
array([[[[  10,   13],
         [  28,   40]],

        [[ 172,  193],
         [ 244,  274]]],


       [[[ 550,  589],
         [ 676,  724]],

        [[1144, 1201],
         [1324, 1390]]]])>
8.5.2.2 数据统计
- 数据统计:求张量在某个维度上、或者全局的统计值
- reduce表示降维的意思
| 函数 | 描述 |
|---|---|
| tf.reduce_sum(input_tensor,axis) | 求和 |
| tf.reduce_mean(input_tensor,axis) | 求平均值 |
| tf.reduce_max(input_tensor,axis) | 求最大值 |
| tf.reduce_min(input_tensor,axis) | 求最小值 |
- axis:表示指明在哪个维度上求统计值;不指明的话就是求全局
8.5.2.2.1求和函数–tf.reduce_sum()
>>> import tensorflow as tf
>>> a = tf.constant([[1,5,3],[4,2,6]])
>>> a
<tf.Tensor: id=120, shape=(2, 3), dtype=int32, numpy=
array([[1, 5, 3],
       [4, 2, 6]])>
>>> tf.reduce_sum(a,axis=0)
<tf.Tensor: id=122, shape=(3,), dtype=int32, numpy=array([5, 7, 9])>
>>> tf.reduce_sum(a,axis=1)
<tf.Tensor: id=124, shape=(2,), dtype=int32, numpy=array([ 9, 12])>
>>> tf.reduce_sum(a)
<tf.Tensor: id=126, shape=(), dtype=int32, numpy=21>
8.5.2.2.2求均值函数–tf.reduce_mean()
- 如果张量是整型,求均值也是整型,会出现只能得到均值整数部分,此时可以使用tf.cast()将张量类型转化为浮点型
- 如果张量是32位浮点型,得到的均值就是完整的
>>> import tensorflow as tf
>>> a = tf.constant([[1,5,3],[4,2,6]])
>>> a
<tf.Tensor: id=120, shape=(2, 3), dtype=int32, numpy=
array([[1, 5, 3],
       [4, 2, 6]])>
>>> tf.reduce_mean(a,axis=0) # 这里有所不对,因为a张量是32位整型,所以求出的均值也是32位整型,不能显示小数
<tf.Tensor: id=128, shape=(3,), dtype=int32, numpy=array([2, 3, 4])>


>>> a = tf.constant([[1.,5.,3.],[4.,2.,6.]])
>>> tf.reduce_mean(a,axis=0)
<tf.Tensor: id=131, shape=(3,), dtype=float32, numpy=array([2.5, 3.5, 4.5], dtype=float32)>


>>> a = tf.constant([[1,5,3],[4,2,6]])
>>> tf.reduce_mean(tf.cast(a,tf.float32),axis=0)
<tf.Tensor: id=135, shape=(3,), dtype=float32, numpy=array([2.5, 3.5, 4.5], dtype=float32)>
8.5.2.2.3 求最大值、最小值函数–tf.reduce_max()、tf.reduce_min()
>>> import tensorflow as tf
>>> a = tf.constant([[1,5,3],[4,2,6]])

>>> tf.reduce_max(a,axis=0)
<tf.Tensor: id=138, shape=(3,), dtype=int32, numpy=array([4, 5, 6])>

>>> tf.reduce_max(a,axis=1)
<tf.Tensor: id=140, shape=(2,), dtype=int32, numpy=array([5, 6])>

>>> tf.reduce_max(a)
<tf.Tensor: id=142, shape=(), dtype=int32, numpy=6>
8.5.2.2.4 求最值得索引–tf.argmax()、tf.argmin()
- 这个函数在没有指定axis时,默认为0,与reduce不同
>>> import tensorflow as tf
>>> a = tf.constant([[1,5,3],[4,2,6]])

>>> tf.argmax(a,axis=0)
<tf.Tensor: id=144, shape=(3,), dtype=int64, numpy=array([1, 0, 1], dtype=int64)>

>>> tf.argmax(a,axis=1)
<tf.Tensor: id=146, shape=(2,), dtype=int64, numpy=array([1, 2], dtype=int64)>

>>> tf.argmax(a)
<tf.Tensor: id=148, shape=(3,), dtype=int64, numpy=array([1, 0, 1], dtype=int64)>
8.6 使用GPU
8.6.1 导入Tensroflow,查看版本
>>> import tensorflow as tf
>>> print(tf.__version__)
2.0.0
8.6.2 查看当前主机上得运算设备
>>> gpus = tf.config.experimental.list_physical_devices(device_type='GPU')
>>> cpus = tf.config.experimental.list_physical_devices(device_type='CPU')
>>> print(gpus)
[PhysicalDevice(name='/physical_device:GPU:0', device_type='GPU')]
>>> print(cpus)
[PhysicalDevice(name='/physical_device:CPU:0', device_type='CPU')]
8.6.3 指定在CPU上执行
>>> with tf.device('/cpu:0'):
...     cpu_a = tf.random.normal([10000,1000])
...     cpu_b = tf.random.normal([1000,2000])
...     cpu_c = tf.matmul(cpu_a,cpu_b)
...

>>> print("cpu_a:",cpu_a.device)
cpu_a: /job:localhost/replica:0/task:0/device:CPU:0
>>> print("cpu_b:",cpu_b.device)
cpu_b: /job:localhost/replica:0/task:0/device:CPU:0
>>> print("cpu_c:",cpu_c.device)
cpu_c: /job:localhost/replica:0/task:0/device:CPU:0
8.6.4 指定在GPU上执行
8.6.4.1 查看GPU是否可用
>>> tf.test.is_gpu_available()
True
8.6.4.2 指定在GPU上执行随机数操作
>>> with tf.device('/gpu:0'):
...     gpu_a = tf.random.normal([10000,1000])
...     gpu_b = tf.random.normal([1000,2000])
...     gpu_c = tf.matmul(gpu_a,gpu_b)
...
>>> print("gpu_a:",gpu_a.device)
gpu_a: /job:localhost/replica:0/task:0/device:GPU:0
>>> print("gpu_b:",gpu_b.device)
gpu_b: /job:localhost/replica:0/task:0/device:GPU:0
>>> print("gpu_c:",gpu_c.device)
gpu_c: /job:localhost/replica:0/task:0/device:GPU:0
下面给出上述所有的代码:
# 1 导入Tensroflow,查看版本
import tensorflow as tf
print(tf.__version__)

# 2 查看当前主机上得运算设备
gpus = tf.config.experimental.list_physical_devices(device_type='GPU')
cpus = tf.config.experimental.list_physical_devices(device_type='CPU')
print(gpus)
print(cpus)

# 3 指定在CPU上执行
with tf.device('/cpu:0'):
    cpu_a = tf.random.normal([10000,1000])
    cpu_b = tf.random.normal([1000,2000])
    cpu_c = tf.matmul(cpu_a,cpu_b)

print("cpu_a:",cpu_a.device)
print("cpu_b:",cpu_b.device)
print("cpu_c:",cpu_c.device)

# 4 指定在GPU上执行
# 4.1 查看GPU是否可用
tf.test.is_gpu_available()

# 4.2 指定在GPU上执行随机数操作
with tf.device('/gpu:0'):
    gpu_a = tf.random.normal([10000,1000])
    gpu_b = tf.random.normal([1000,2000])
    gpu_c = tf.matmul(gpu_a,gpu_b)

print("gpu_a:",gpu_a.device)
print("gpu_b:",gpu_b.device)
print("gpu_c:",gpu_c.device)
8.6.5 创建函数cpu_run()和gpu_run()
- 在一个.py文件中保存
# 1 导入Tensroflow,查看版本
import tensorflow as tf


# 5 创建函数cpu_run()和gpu_run()
# 函数cpu_run()
def cpu_run():
    with tf.device('/cpu:0'):
        cpu_a = tf.random.normal([10000,1000])
        cpu_b = tf.random.normal([1000,2000])
        c = tf.matmul(cpu_a,cpu_b)
    return c
# 函数gpu_run()
def gpu_run():
    with tf.device('/gpu:0'):
        gpu_a = tf.random.normal([10000,1000])
        gpu_b = tf.random.normal([1000,2000])
        c = tf.matmul(gpu_a,gpu_b)
    return c
8.6.6 比较在CPU和GPU上执行乘法操作的时间
# 1 导入Tensroflow,查看版本
import tensorflow as tf
# 动态分配显存
gpus = tf.config.experimental.list_physical_devices(device_type='GPU')
tf.config.experimental.set_memory_growth(gpus[0], True)

# 5 创建函数cpu_run()和gpu_run()
# 函数cpu_run()
def cpu_run():
    with tf.device('/cpu:0'):
        cpu_a = tf.random.normal([10000,1000])
        cpu_b = tf.random.normal([1000,2000])
        c = tf.matmul(cpu_a,cpu_b)
    return c
# 函数gpu_run()
def gpu_run():
    with tf.device('/gpu:0'):
        gpu_a = tf.random.normal([10000,1000])
        gpu_b = tf.random.normal([1000,2000])
        c = tf.matmul(gpu_a,gpu_b)
    return c

# 6 比较在CPU和GPU上执行乘法操作的时间
# 6.1 导入timeit模块
import timeit

# 6.2 使用timeit工具来统计执行10次的时间
cpu_time = timeit.timeit(cpu_run,number=10)
gpu_time = timeit.timeit(gpu_run,number=10)
print("cpu:",cpu_time," gpu:",gpu_time)
输出结果为:
cpu: 2.2233819 gpu: 0.24505219999999994
修改代码执行100次,输出结果为:
cpu: 17.637937400000002 gpu: 0.2524400999999976
- 在Tensorflow中,张量可以运行在CPU、GPU或TPU中
- 一般无需指定设备,Tensorflow会自动调用可用资源进行计算,决定执行操作的设备,并在需要时将操作复制到该设备
【参考文献】: 神经网络与深度学习——TensorFlow实践


 224
224


 被折叠的 条评论
为什么被折叠?
被折叠的 条评论
为什么被折叠?
 到【灌水乐园】发言


