


摘要
本周阅读了论文《Paint by Example: Exemplar-based Image Editing with Diffusion Models》。该论文提出了一种基于样例图像的扩散式图像编辑方法,能够根据用户提供或从数据库检索的参考图像,对目标图像进行语义层面的内容编辑。具体而言,作者在训练阶段引入不规则随机掩码以提升模型鲁棒性,并采用无分类器引导策略,增强生成图像的质量与其对参考图像的语义一致性。此外,为解决训练与测试之间的域差距问题,方法中引入了样例图像和掩码的增强机制。整体框架在保持图像上下文连贯性的同时,实现了姿态、形状和视角等复杂属性的转换。
abstract
This week, I read the paper “Paint by Example: Exemplar-based Image Editing with Diffusion Models”. This paper proposes a diffusion-based image editing method based on sample images, which is capable of performing semantic-level content editing on the target image according to the reference images provided by users or retrieved from the database. Specifically, the author introduced irregular random masks in the training stage to enhance the robustness of the model and adopted a classifier-free guidance strategy to improve the quality of the generated images and their semantic consistency with the reference images. Furthermore, to solve the domain gap problem between training and testing, the enhancement mechanism of sample images and masks is introduced in the method. The overall framework realizes the transformation of complex attributes such as posture, shape and perspective while maintaining the coherence of the image context.
论文简介
本文的目标是在保持图像上下文连贯性的同时,进行更复杂的语义转换,例如改变姿势、形状或视角。作者训练了一个以样例图像为条件的扩散模型,对传统图像编辑工作流程进行自动化,同时实现了更复杂的编辑任务。该工作的主要挑战是收集足够的训练对(源图像、样例和对应的编辑真实值),因此作者提出自监督训练的方法,并利用生成先验和信息瓶颈理念对模型进行训练,使网络更好地理解样例图像的高级语义和源图像的上下文。
方法介绍
本工作旨在基于样例编辑图像,自动将样例图像(无论是从数据库中检索还是由用户提供)与源图像融合,使融合后的图像看起来合理且逼真。作者选用了扩散模型,训练流程如下图:
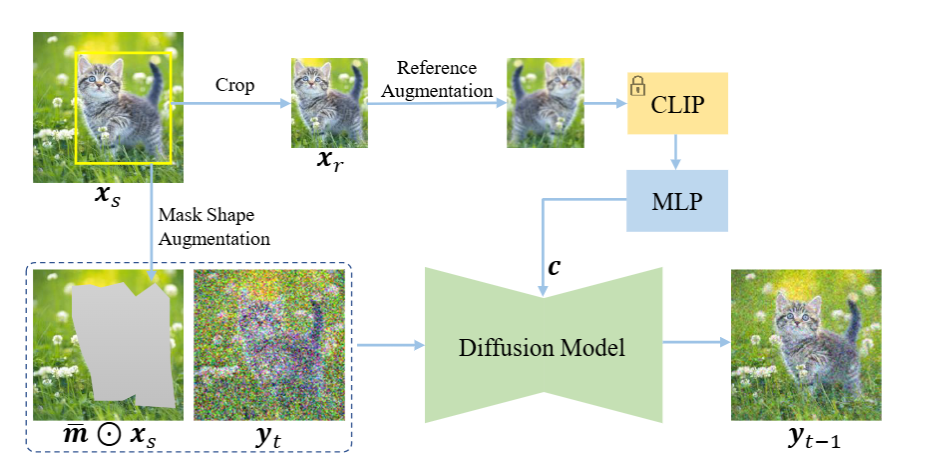
该模型设计主要出于以下两个方面考虑:
- 特征压缩:基于文本条件和图像条件之间的差异性。对于文本条件,模型天然被迫学习语义,文本是一种内在的语义信号。而对于图像条件,网络很容易记住和复制内容而不是理解上下文信息,从而得到平凡解。为了避免这种情况,这篇论文通过压缩样例图像的信息来增加重构掩码区域的难度。具体来说,只利用预训练的clip图像编码器中的class token作为样例图像的条件,将一个224* 224 *3压缩为一个维度为1024的一维向量。这种高度压缩的表示倾向于忽略高频细节,同时保持语义信息。防止了生成器在训练中直接复制粘贴以达到最佳效果,为考虑表达能力,添加了几个额外的全连接层来解码特征,并通过交叉注意力将其注入到扩散过程中。
- 图像先验:为了进一步直接记忆样例图像,作者利用了一个经过良好训练得扩散模型作为强大的图像先验进行初始化。
由于收集和标注成对数据用于网络训练的困难性,作者提出进行自监督训练。给定一副图像x和图像中一个物体的边界框,如果在模拟训练数据时,直接使用物体的边界框作为二进制掩码m,将源图像边界框内的图像作为样例图像,这样会导致训练和测试的域差距(如室内和野外的小猫小狗,当训练大都使用室内的图像训练,会导致域差距存在),为了减少域差距,坐着采用以下两个方面:
- 样例图像增强(旋转、模糊和弹性变换)
- 掩码形状增强
作者提出基于边界框生成一个任意形状的掩码。首先,构造一个贝塞尔曲线来拟合它,然后在曲线上均匀采样20个点,并随机添加一个到五个像素的偏移量到它们的坐标上。最后,按顺序连接这些点,形成一个任意形状的掩码。 - 相似度控制
为了控制编辑区域域样例图像之间的相似程度,作者发现使用无分类器采样策略时一个很好的选择,无分类器的引导实际上是先验和后验约束的组合:
log p ( y t ∣ c ) + ( λ − 1 ) log p ( c ∣ y t ) ∝ log p ( y t ) + λ ( log p ( y t ∣ c ) − log p ( y t ) ) \log p(y_t\mid c)+(\lambda-1)\log p(c\mid y_t)\propto\log p(y_t)+\lambda(\log p(y_t\mid c)-\log p(y_t)) logp(yt∣c)+(λ−1)logp(c∣yt)∝logp(yt)+λ(logp(yt∣c)−logp(yt))
λ \lambda λ 表示无分类器引导的尺度,也可以被视为用于控制生成图像与样例图像相似性的尺度。较大的 λ \lambda λ 表示融合结果更依赖于条件输入。
实验结果
下图展示了这篇论文的方法与其他几种现有方法的对比结果:
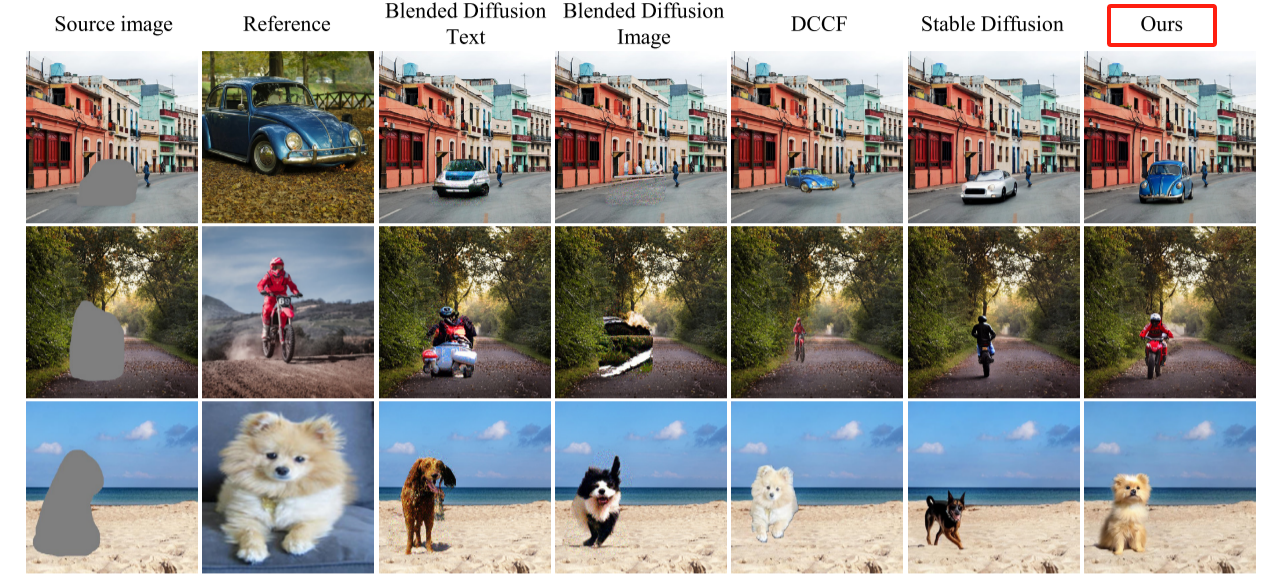
上图可以看出本文的方法可以生成输入的样例图像在感知质量上具有语义一致性的结果。

上图展示了可视话消融实验,作者在他们的方法中逐渐消除掩码边界伪影,并最终取得令人信服的生成结果。
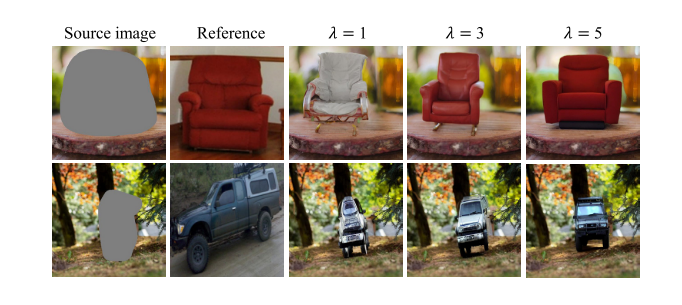
上图展示了无分类器引导尺度对结果的影响,较大的
λ
\lambda
λ 可以使生成区域更接近样例图像。

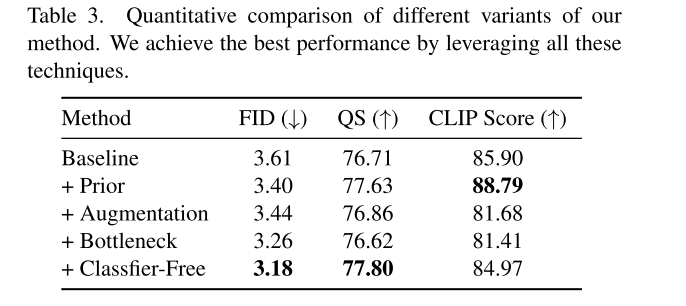
上图对比了不同方法的定量对比,FID(衡量生成图像与真实图像之间的分布距离),QS(图像质量评分),CLIP Score(语义一致性,衡量生成图像与输入参考图像之间的语义匹配程度)
下面这一段代码是计算一组图像之间平均CLIIP相似度分数(CLIP Score)用以衡量两个图像在语义层面上的相似性。
- 参数解析
parser = ArgumentParser(formatter_class=ArgumentDefaultsHelpFormatter)
parser.add_argument('--result_dir', type=str, default=None,
                    help='Device to use. Like cuda, cuda:0 or cpu')
parser.add_argument('--device', type=str, default=None,
                    help='Device to use. Like cuda, cuda:0 or cpu')
opt = parser.parse_args()
- 加载数据集
test_dataset=COCOImageDataset(test_bench_dir='test_bench',result_dir=opt.result_dir)
test_dataloader= torch.utils.data.DataLoader(test_dataset,
                                    batch_size=1,
                                    num_workers=4,
                                    pin_memory=True,
                                    shuffle=False,#sampler=train_sampler,
                                    drop_last=True)
clip_model,preprocess = clip.load("ViT-B/32", device="cuda")
- 加载clip模型
clip_model, preprocess = clip.load("ViT-B/32", device="cuda")
- 计算图像之间的clip相似度
for crop_tensor, ref_image_tensor in tqdm(test_dataloader):
    crop_tensor = crop_tensor.to('cuda')
    ref_image_tensor = ref_image_tensor.to('cuda')

    result_feat = clip_model.encode_image(crop_tensor)
    ref_feat = clip_model.encode_image(ref_image_tensor)

    # 归一化(单位向量)
    result_feat = result_feat / result_feat.norm(dim=-1, keepdim=True)
    ref_feat = ref_feat / ref_feat.norm(dim=-1, keepdim=True)

    similarity = (100.0 * result_feat @ ref_feat.T)  # 点乘计算余弦相似度
    sum += similarity.item()
    count += 1
下面是计算FID分数代码实现
def calculate_frechet_distance(mu1, sigma1, mu2, sigma2, eps=1e-6):
    """Numpy implementation of the Frechet Distance.
    The Frechet distance between two multivariate Gaussians X_1 ~ N(mu_1, C_1)
    and X_2 ~ N(mu_2, C_2) is
            d^2 = ||mu_1 - mu_2||^2 + Tr(C_1 + C_2 - 2*sqrt(C_1*C_2)).
    Stable version by Dougal J. Sutherland.
    Params:(参数说明)
    -- mu1   : Numpy array containing the activations of a layer of the
               inception net (like returned by the function 'get_predictions')
               for generated samples.
    -- mu2   : The sample mean over activations, precalculated on an
               representative data set.
    -- sigma1: The covariance matrix over activations for generated samples.
    -- sigma2: The covariance matrix over activations, precalculated on an
               representative data set.
    Returns:
    --   : The Frechet Distance.
    """

    mu1 = np.atleast_1d(mu1)
    mu2 = np.atleast_1d(mu2)

    sigma1 = np.atleast_2d(sigma1)
    sigma2 = np.atleast_2d(sigma2)

    assert mu1.shape == mu2.shape, \
        'Training and test mean vectors have different lengths'
    assert sigma1.shape == sigma2.shape, \
        'Training and test covariances have different dimensions'

    diff = mu1 - mu2

    # Product might be almost singular
    covmean, _ = linalg.sqrtm(sigma1.dot(sigma2), disp=False)
    if not np.isfinite(covmean).all():
        msg = ('fid calculation produces singular product; '
               'adding %s to diagonal of cov estimates') % eps
        print(msg)
        offset = np.eye(sigma1.shape[0]) * eps
        covmean = linalg.sqrtm((sigma1 + offset).dot(sigma2 + offset))

    # Numerical error might give slight imaginary component
    if np.iscomplexobj(covmean):
        if not np.allclose(np.diagonal(covmean).imag, 0, atol=1e-3):
            m = np.max(np.abs(covmean.imag))
            raise ValueError('Imaginary component {}'.format(m))
        covmean = covmean.real

    tr_covmean = np.trace(covmean)

    return (diff.dot(diff) + np.trace(sigma1)
            + np.trace(sigma2) - 2 * tr_covmean)
结论
该工作提出了一个新颖的图像编辑场景:基于样例的图像编辑,它旨在根据样例图像在语义上改变图像内容。作者通过利用基于扩散模型的自监督训练来实现这一目标。然而朴素的方法会导致边界伪影问题,作者仔细分析并通过提出一系列技术来解决这个问题。该算法能使用户更精确地控制编辑,并在真实图片上取得了令人印象深刻的表现。该工作将作为一个坚实的基准,进一步推动未来在基于样例的图像编辑领域的研究。
个人思考
该方法会忽略源图像编辑区域的信息(如姿态、风格),导致不和谐的场景交互(烟斗悬空),如下图
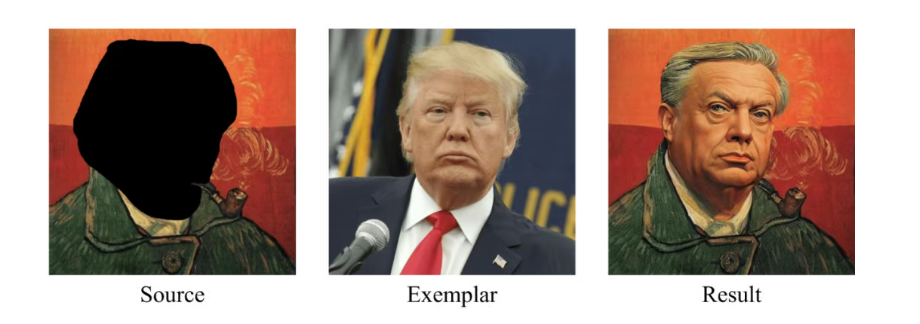
问题分析:
在现有方法中,模型更关注目标生成区域的语义对齐和美观程度,忽略了与源图像上下文的深层结构互动关系。
尝试改进:
- 引入结构引导/结构图:提取源图像的人体姿态活边缘图,让生成区域参考这些结构。
- 保留上下文感知特征:在编辑区域使用跨区域注意力机制,把未编辑区域的信息引入进来;或者使用特征融合机制,把源图像的风格/结构作为编码信息保持不丢失。
总结
本文提出了一种创新的基于样例的图像编辑方法,通过自监督训练的扩散模型在不依赖成对标注的前提下实现语义控制。该方法不仅具备灵活的编辑能力,还通过引入无分类器引导机制提升了生成图像与参考样例的语义一致性。实验结果表明,该方法在图像质量、语义保真度以及用户主观评分方面均优于现有方法。然而,该方法在编辑区域与源图像上下文之间的结构对齐方面仍存在不足,可能导致不自然的交互表现。未来工作可进一步探索姿态引导或跨区域注意力机制,提升融合效果与语义协调性。该方法为图像编辑提供了新思路,并有望拓展至更多样本驱动的图像生成任务中。
参考文献
https://arxiv.org/pdf/2211.13227.pdf


 1139
1139

 被折叠的 条评论
为什么被折叠?
被折叠的 条评论
为什么被折叠?
 到【灌水乐园】发言


