


CLIP原理
Introduction
以前也有人尝试利用文本的语义来辅助训练视觉模型,但是效果都不是很好,作者指出原因可能是以前没有现在这么大的算力、模型(VIT)、自监督训练(也就是数据量可以很大但是不需要很贵的标注成本)。
在这篇文章,作者收集了4亿个(文本、图像)的数据对通过对比学习的方式对模型进行训练,发现在很多领域如OCR、分类等都能表现出很好的Zero-shot能力,有很好的泛化性,还发现模型的尺寸与精度成正比。
Method
预训练思路
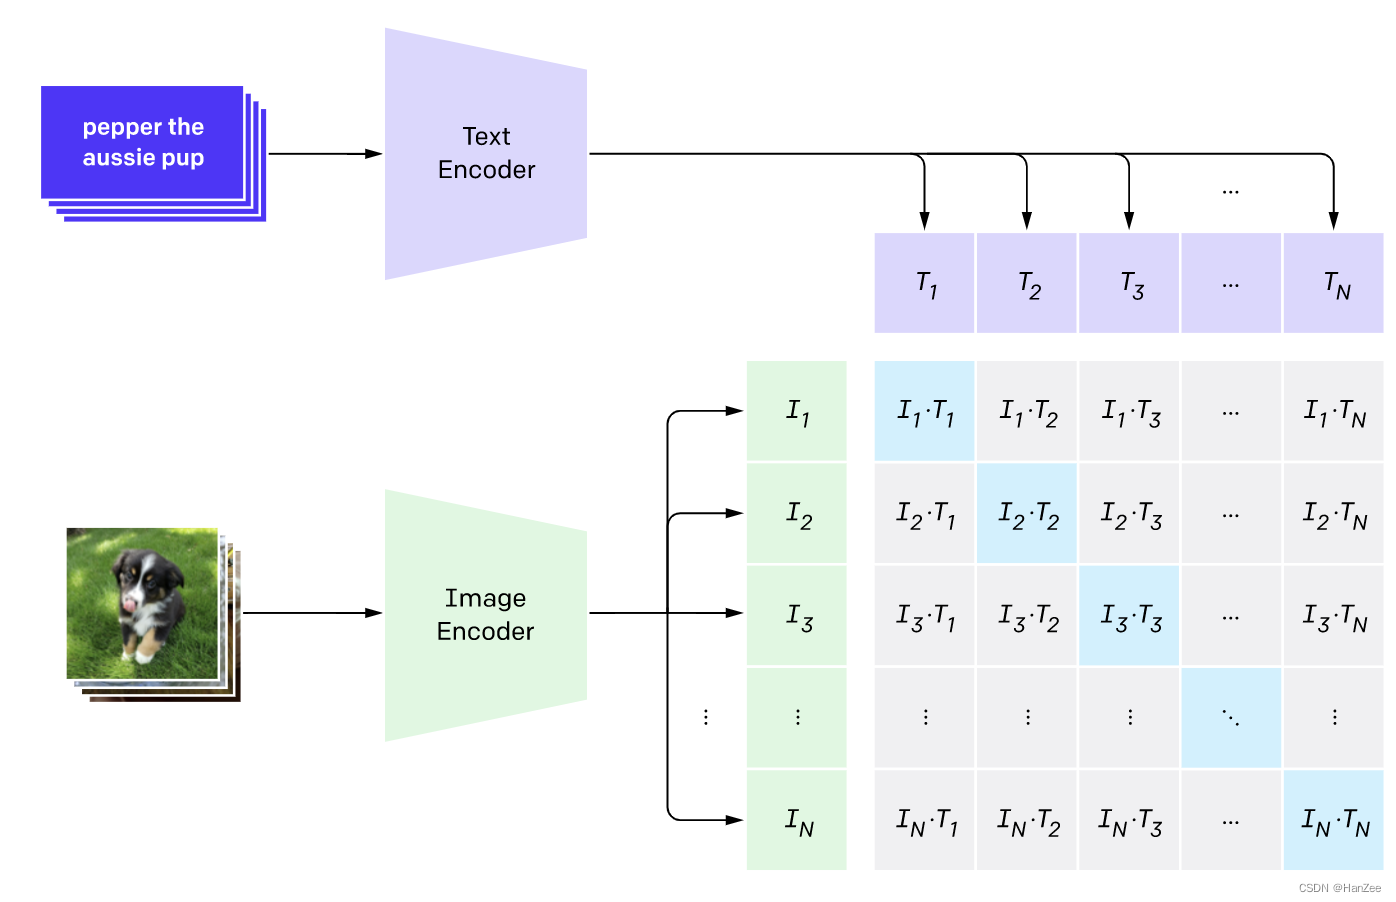
预训练模型时期,如上图,描述图像的文本与图像分别通过Text Encoder、与Image Encoder 转换成对应的向量,其中Ti表示一个batch中第i个图像表示的特征,Ii表示第i张图像表示的特征。
之后采用对比学习的形式对这两组特征做点乘,结果作为模型的logits,对角线的元素表示了对应的文本与图像的乘积,优化目标就是让对角线的元素softmax后的结果趋近于1,其他趋近于0,分别以图像与文本两个维度做cross_entropy_loss,然后对二者loss加权求和计算总loss。
训练要领:如何做到从图像中读取的信息和自然语言信息相匹配,从理解的正确顺序上看,就是如何正确表达出一个图像的意思以及该如何表达显得自然合理,当然预测时需要加入prompt。
预测过程
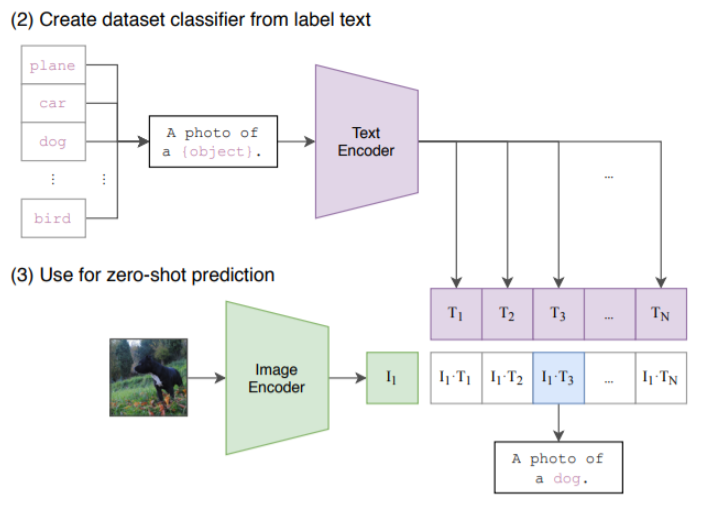
简要来说:输入图片向量,找相关程度最高的的N个向量(N个词)中的一个
CLIP实验
预装虚拟环境:
$ conda install --yes -c pytorch pytorch=1.7.1 torchvision cudatoolkit=11.0
$ pip install ftfy regex tqdm
$ pip install git+https://github.com/openai/CLIP.git
那么需要注意一点:版本预转pillow是9.3.0,引入Image报错,你需要安装版本为pillow==9.5.0
简单demo分类:
import os
import clip
import torch
from torchvision.datasets import CIFAR100

# Load the model
device = "cuda" if torch.cuda.is_available() else "cpu"
model, preprocess = clip.load('ViT-B/32', device)

# Download the dataset
cifar100 = CIFAR100(root=os.path.expanduser("~/.cache"), download=True, train=False)

# Prepare the inputs
image, class_id = cifar100[3637]
image_input = preprocess(image).unsqueeze(0).to(device)
text_inputs = torch.cat([clip.tokenize(f"a photo of a {c}") for c in cifar100.classes]).to(device)

# Calculate features
with torch.no_grad():
    image_features = model.encode_image(image_input)
    text_features = model.encode_text(text_inputs)

# Pick the top 5 most similar labels for the image
image_features /= image_features.norm(dim=-1, keepdim=True)
text_features /= text_features.norm(dim=-1, keepdim=True)
similarity = (100.0 * image_features @ text_features.T).softmax(dim=-1)
values, indices = similarity[0].topk(5)

# Print the result
print("\nTop predictions:\n")
for value, index in zip(values, indices):
    print(f"{cifar100.classes[index]:>16s}: {100 * value.item():.2f}%")
视频异常检测基础
使用UCF_Crime数据集作为视频异常检测的数据集的话,可以得到一个分类标签和图像的对其结果
如果直接利用预训练模型进行zeroshort的话,效果不甚理想,下面是代码:
import os
import clip
import torch
from torchvision.datasets import CIFAR100
from torchvision import transforms
from PIL import Image


folder_path = "archive/Train"
classes = os.listdir(folder_path)


device = "cuda" if torch.cuda.is_available() else "cpu"
model, preprocess = clip.load('ViT-B/32', device)

input_image_path = "archive/Train/Abuse/Abuse001_x264_610.png"


# Prepare the inputs
image = Image.open(input_image_path)
image_input = preprocess(image).unsqueeze(0).to(device)

text_inputs = torch.cat([clip.tokenize(f"a photo of a {c}") for c in classes]).to(device)

# Calculate features
with torch.no_grad():
    image_features = model.encode_image(image_input)
    text_features = model.encode_text(text_inputs)

# Pick the top 5 most similar labels for the image
image_features /= image_features.norm(dim=-1, keepdim=True)
text_features /= text_features.norm(dim=-1, keepdim=True)
similarity = (100.0 * image_features @ text_features.T).softmax(dim=-1)
values, indices = similarity[0].topk(5)

# Print the result
print("\nTop predictions:\n")
for value, index in zip(values, indices):
    print(f"{classes[index]:>16s}: {100 * value.item():.2f}%")
结果如下,abuse的标签得到的最困难结果是这几个,非常不正确,又试了几个不同的标签数据,效果不好
Top predictions:

    NormalVideos: 33.01%
        Shooting: 16.24%
        Burglary: 14.46%
         Assault: 10.37%
          Arrest: 6.54%
直接使用预训练权重不好。
现在可以解决的方案有两种,一种是在原有基础上进行微调,还是以图片对图片标签形式进行微调训练;一种是建构模型,当然还是CLiP的思想,建构视频序列输入和文本对其,因为这样可以获取到行为序列特征,对判断异常行为非常重要,当然需要解决的问题就是一个不同视频序列的长度不同,如果按照文本的解决方案的话就是采用一个固定的token长度,不足的用zero补齐,多的cut掉,到行为检测中我认为可以将不足的用同一个序列补齐,这样同一个输入数据输入的是同一种行为,而不会出现为zero的情况
对于第一种方案实现起来不难,项目源码如下
GitHub - laoniandisko/CLIP_Crime at master
import os
from PIL import Image
import numpy as np
import torch
import clip
from loguru import logger
from torch.utils.data import Dataset, DataLoader, ConcatDataset
import torch.optim as optim
from torch.optim import lr_scheduler
import torch.nn as nn
from tqdm import tqdm

class YDataset(Dataset):
    def __init__(self,img_root,meta_root,is_train,preprocess):

        self.img_root = img_root
        self.meta_root = meta_root
        self.train_set_file = meta_root+'/path_tag_train.txt'
        self.test_set_file = meta_root+'/path_tag_test.txt'
        self.is_train = is_train
        self.img_process = preprocess
        self.samples = []
        self.sam_labels = []
        self.read_file = ""
        if is_train:
            self.read_file = self.train_set_file
        else:
            self.read_file = self.test_set_file
        with open(self.read_file,'r') as f:
            path_tag = f.readlines()
            for line in path_tag:
                img_path = line.split("\t")[0]
                label = line.split("\t")[1]
                label = "a photo of " + label
                self.samples.append(img_path)
                self.sam_labels.append(label)
        # 转换为token
        self.tokens = clip.tokenize(self.sam_labels)

    def __len__(self):
        return len(self.samples)

    def __getitem__(self, idx):
        img_path = self.samples[idx]
        token = self.tokens[idx]
        # 加载图像
        image = Image.open(img_path).convert('RGB')
        # 对图像进行转换
        image = self.img_process(image)
        return image,token
if __name__ == '__main__':

    device = torch.device("cuda:0" if torch.cuda.is_available() else "cpu")
    net, preprocess = clip.load("RN50",device=device,jit=False)

    optimizer = optim.Adam(net.parameters(), lr=1e-6,betas=(0.9,0.98),eps=1e-6,weight_decay=0.001)
    scheduler = lr_scheduler.StepLR(
            optimizer, step_size=10, gamma=0.1)

    # 创建损失函数
    loss_img = nn.CrossEntropyLoss()
    loss_txt = nn.CrossEntropyLoss()


    ydataset = YDataset(img_root= '../archive',meta_root= '../archive',is_train=True,preprocess=preprocess)
    dataset_size_y = len(ydataset)
    ydataloader = DataLoader(ydataset,batch_size=4,shuffle=True,num_workers=4,pin_memory=False)


    phase = "train"
    model_name = "CLIP_Crime"
    ckt_gap = 4
    epoches = 30
    for epoch in range(epoches):
        scheduler.step()
        total_loss = 0
        batch_num = 0
        # 使用混合精度,占用显存更小
        with torch.cuda.amp.autocast(enabled=True):
            for images,label_tokens in tqdm(ydataloader) :
                # 将图片和标签token转移到device设备
                images = images.to(device)
                label_tokens = label_tokens.to(device)
                batch_num += 1
                # 优化器梯度清零
                optimizer.zero_grad()
                with torch.set_grad_enabled(phase == "train"):
                    logits_per_image, logits_per_text = net(images, label_tokens)
                    ground_truth = torch.arange(len(images),dtype=torch.long,device=device)
                    cur_loss = (loss_img(logits_per_image,ground_truth) + loss_txt(logits_per_text,ground_truth))/2
                    total_loss += cur_loss
                    if phase == "train":
                        cur_loss.backward()
                        if device == "cpu":
                            optimizer.step()
                        else:
                            optimizer.step()
                            clip.model.convert_weights(net)
                if batch_num % 4 == 0:
                    logger.info('{} epoch:{} loss:{}'.format(phase,epoch,cur_loss))
            epoch_loss = total_loss / dataset_size_y
            torch.save(net.state_dict(),f"{model_name}_epoch_{epoch}.pth")
            logger.info(f"weights_{epoch} saved")
            if epoch % ckt_gap == 0:
                checkpoint_path = f"{model_name}_ckt.pth"
                checkpoint = {
                    'it': epoch,
                    'network': net.state_dict(),
                    'optimizer': optimizer.state_dict(),
                    'scheduler': scheduler.state_dict()}
                torch.save(checkpoint, checkpoint_path)
                logger.info(f"checkpoint_{epoch} saved")
            logger.info('{} Loss: {:.4f}'.format(
                phase, epoch_loss))
关于第三个任务,使用BLIP进行解决,BLIP的思想和处理流程如下:
使用编码器-解码器的多模式混合(MED),
文本编码器是 BERT
image编码器使用 ViT
图像文本编码器
通过在自自注意力(SA)层和前馈网络(FFN)之间为文本编码器的每个 变压器块插入一个附加的交叉注意(CA)层来注入视觉信息。
图像文本解码器
用因果自注意力层替换基于图像的文本编码器中的双向自注意力层。[decode]标记用于表示序列的开始,序列结束标记用于表示其结束
我使用官方给的预训练权重进行caption生成:
from transformers import BlipForConditionalGeneration, AutoProcessor

model = BlipForConditionalGeneration.from_pretrained("ybelkada/blip-image-captioning-base-football-finetuned").to(device)
processor = AutoProcessor.from_pretrained("ybelkada/blip-image-captioning-base-football-finetuned")


from matplotlib import pyplot as plt

fig = plt.figure(figsize=(18, 14))

# prepare image for the model
for i, example in enumerate(dataset):
  image = example["image"]
  inputs = processor(images=image, return_tensors="pt").to(device)
  pixel_values = inputs.pixel_values

  generated_ids = model.generate(pixel_values=pixel_values, max_length=50)
  generated_caption = processor.batch_decode(generated_ids, skip_special_tokens=True)[0]
  fig.add_subplot(2, 3, i+1)
  plt.imshow(image)
  plt.axis("off")
  plt.title(f"Generated caption: {generated_caption}")
使用BLIP预训练模型进行微调,代码如下:
from transformers.utils import send_example_telemetry
send_example_telemetry("image_captioning_blip_notebook", framework="pytorch")
from datasets import load_dataset
dataset = load_dataset("ybelkada/football-dataset", split="train")
from torch.utils.data import Dataset, DataLoader

class ImageCaptioningDataset(Dataset):
    def __init__(self, dataset, processor):
        self.dataset = dataset
        self.processor = processor

    def __len__(self):
        return len(self.dataset)

    def __getitem__(self, idx):
        item = self.dataset[idx]
        encoding = self.processor(images=item["image"], text=item["text"], padding="max_length", return_tensors="pt")
        # remove batch dimension
        encoding = {k:v.squeeze() for k,v in encoding.items()}
        return encoding

from transformers import AutoProcessor, BlipForConditionalGeneration

processor = AutoProcessor.from_pretrained("Salesforce/blip-image-captioning-base")
model = BlipForConditionalGeneration.from_pretrained("Salesforce/blip-image-captioning-base")


train_dataset = ImageCaptioningDataset(dataset, processor)
train_dataloader = DataLoader(train_dataset, shuffle=True, batch_size=2)


import torch

optimizer = torch.optim.AdamW(model.parameters(), lr=5e-5)

device = "cuda" if torch.cuda.is_available() else "cpu"
model.to(device)

model.train()

for epoch in range(50):
  print("Epoch:", epoch)
  for idx, batch in enumerate(train_dataloader):
    input_ids = batch.pop("input_ids").to(device)
    pixel_values = batch.pop("pixel_values").to(device)

    outputs = model(input_ids=input_ids,
                    pixel_values=pixel_values,
                    labels=input_ids)

    loss = outputs.loss

    print("Loss:", loss.item())

    loss.backward()

    optimizer.step()
    optimizer.zero_grad()


# load image
example = dataset[0]
image = example["image"]

# prepare image for the model
inputs = processor(images=image, return_tensors="pt").to(device)
pixel_values = inputs.pixel_values

generated_ids = model.generate(pixel_values=pixel_values, max_length=50)
generated_caption = processor.batch_decode(generated_ids, skip_special_tokens=True)[0]
print(generated_caption)


 945
945


 被折叠的 条评论
为什么被折叠?
被折叠的 条评论
为什么被折叠?
 到【灌水乐园】发言


