


目录
(1)QBoxLayout(QHBoxLayout)水平分布管理器
(2)QBoxLayout(QVBoxLayout)垂直分布管理器
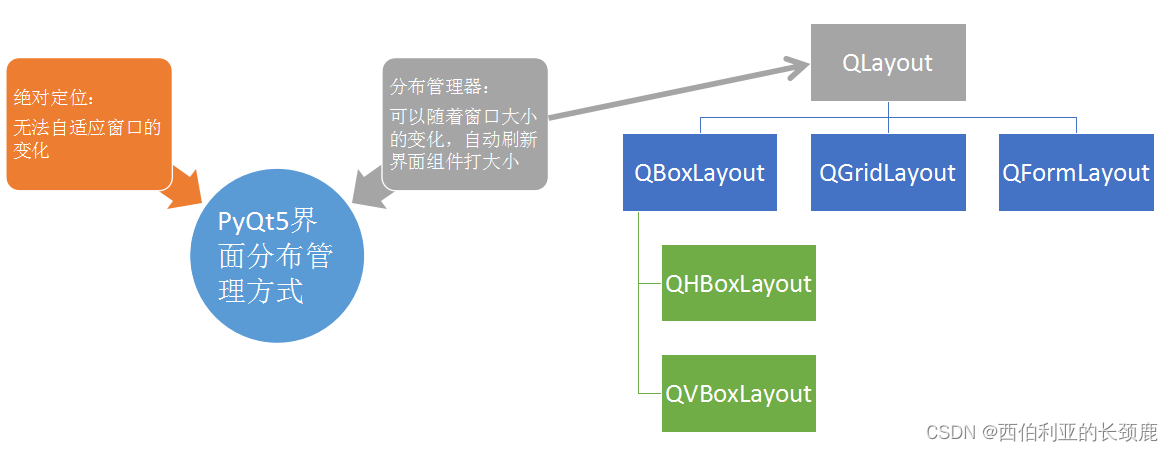
一、介绍
在窗体设计中,位置的摆放是一个最基本且关键的步骤,它直接影响到整个窗体的美观,
在PyQt5中有两种方式可以进行控件的位置摆放,一种是绝对定位,一种十分布管理器。
绝对定位的好处在于,可以根据坐标准放置在需要的位置上,一般使用Move()函数,其缺点就是无法随着窗体大小的变化而变化
而布局管理器的优点则体现在控件可以跟随窗口大小的变化做自动的适应,自动的更新界面控件的大小
二、实例
在布局管理器中,一般会使用到两个方法,一个是addWidget()用来添加控件的,一个是addLayout()用来嵌套分布管理器的。
(1)QBoxLayout(QHBoxLayout)水平分布管理器
import sys
from PyQt5.QtWidgets import QHBoxLayout,QMainWindow,QApplication,QToolTip,QPushButton,QWidget
from PyQt5.QtGui import QFont

class TooltipForm(QMainWindow):
    def __init__(self):
        super().__init__()
        self.initUI()

    def initUI(self):
        QToolTip.setFont(QFont('SansSerif',12))#设置说明字体
        self.setToolTip('今天是<b>星期二</b>')#设置窗口说明
        self.setGeometry(300,30,200,300)#设置窗口位置及大小
        self.setWindowTitle('设置控件提示消息')#设置窗口标题

        self.button1 = QPushButton('Button1')#实例一个按钮控件
        self.button1.setToolTip('这是一个按钮')#设置按钮说明
        self.button2=QPushButton('Button2')#实例一个按钮控件

        layout = QHBoxLayout()#实例一个水平分布器
        #将按钮分别放入水平分布器
        layout.addWidget(self.button1)
        layout.addWidget(self.button2)

        #QMainWindow中在setUi时自动为用户创建了一个菜单栏、工具栏、中心窗口和状态栏。
        #而QWidget是没有这几点的。
        #QWidget运行后就只有一个“页面”
        #而QMainWindow运行后生成了一个“窗口”。

        mainFrame = QWidget()#实例一个QWidget工作区创空
        mainFrame.setLayout(layout)#将分布器嵌入到工作区内
        self.setCentralWidget(mainFrame)#将工作区嵌入窗体中去

if __name__ == '__main__':
    app = QApplication(sys.argv)
    main = TooltipForm()
    main.show()
    app.exec_()
    del app
(2)QBoxLayout(QVBoxLayout)垂直分布管理器
import sys
from PyQt5.QtWidgets import QVBoxLayout,QHBoxLayout,QMainWindow,QApplication,QToolTip,QPushButton,QWidget
from PyQt5.QtGui import QFont

class TooltipForm(QMainWindow):
    def __init__(self):
        super().__init__()
        self.initUI()

    def initUI(self):
        QToolTip.setFont(QFont('SansSerif',12))#设置说明字体
        self.setToolTip('今天是<b>星期二</b>')#设置窗口说明
        self.setGeometry(300,30,200,300)#设置窗口位置及大小
        self.setWindowTitle('设置控件提示消息')#设置窗口标题

        self.button1 = QPushButton('Button1')#定义一个按钮控件
        self.button1.setToolTip('这是一个按钮')#设置按钮说明
        self.button2=QPushButton('Button2')#定义按钮控件

        layout = QVBoxLayout()#定义一个垂直分布器
        #添加按钮到分布器内
        layout.addWidget(self.button1)
        layout.addWidget(self.button2)

        mainFrame = QWidget()#定义一个嵌入窗体
        mainFrame.setLayout(layout)#将分布器嵌入到嵌入窗体内
        self.setCentralWidget(mainFrame)#将嵌入窗体嵌入到主窗体内

if __name__ == '__main__':
    app = QApplication(sys.argv)
    main = TooltipForm()
    main.show()
    app.exec_()
    del app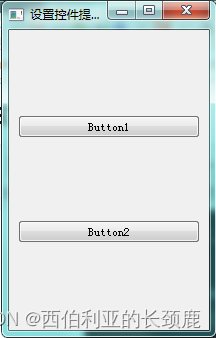
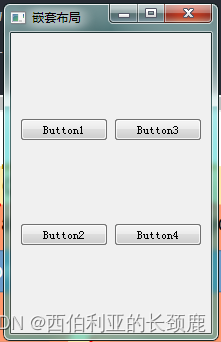
(3)QBoxLayout的嵌套使用
import sys
from PyQt5.QtWidgets import QVBoxLayout,QHBoxLayout,QMainWindow,QApplication,QToolTip,QPushButton,QWidget
from PyQt5.QtGui import QFont

class TooltipForm(QMainWindow):
    def __init__(self):
        super().__init__()
        self.initUI()

    def initUI(self):
        QToolTip.setFont(QFont('SansSerif',12))#设置说明字体
        self.setGeometry(300,30,200,300)#设置窗体位置及大小
        self.setWindowTitle('嵌套布局')#设置窗体标题

        #定义四个按钮控件对象
        self.button1 = QPushButton('Button1')
        self.button2=QPushButton('Button2')
        self.button3=QPushButton('Button3')
        self.button4=QPushButton('Button4')

        #定义一个水平分布器与两个垂直分布器
        layout = QHBoxLayout()
        layout1= QVBoxLayout()
        layout2= QVBoxLayout()
        #将两个垂直分布器放入水平分布器内
        layout.addLayout(layout1)
        layout.addLayout(layout2)
        #将按钮控件分别放入两个垂直分布器内
        layout1.addWidget(self.button1)
        layout1.addWidget(self.button2)
        layout2.addWidget(self.button3)
        layout2.addWidget(self.button4)

        mainFrame = QWidget()#定义一个嵌入窗体
        mainFrame.setLayout(layout)#将分布器嵌入到嵌入窗体内
        self.setCentralWidget(mainFrame)#将嵌入窗体嵌入到窗体内

if __name__ == '__main__':
    app = QApplication(sys.argv)
    main = TooltipForm()
    main.show()
    app.exec_()
    del app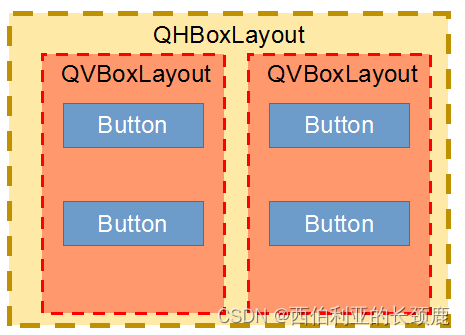
(4)QGridLayout网格布局器
import sys
from PyQt5.QtWidgets import *
from PyQt5.QtGui import QFont

class TooltipForm(QMainWindow):
    def __init__(self):
        super().__init__()
        self.initUI()

    def initUI(self):
        QToolTip.setFont(QFont('SansSerif',12))
        self.setWindowTitle('设置网格布局')
#       self.setGeometry(300,30,200,300)
        button1 = QPushButton('Button1',self)
        button2 = QPushButton('Button2',self)
        button3 = QPushButton('Button3',self)
        button4 = QPushButton('Button4',self)
        button5 = QPushButton('Button5',self)
        button6 = QPushButton('Button6',self)

        layout = QGridLayout()
        layout.addWidget(button1,0,0,1,1)#第0行第0列开始,占1行1列
        layout.addWidget(button2,0,1,1,2)#第0行第1列开始,占1行2列
        layout.addWidget(button3,1,0,1,1)#第1行第0列开始,占1行1列
        layout.addWidget(button4,1,1,1,2)#第1行第1列开始,占1行2列
        layout.addWidget(button5,2,1,1,1)#第2行第1列开始,占1行1列
        layout.addWidget(button6,2,2,1,1)#第2行第2列开始,占1行1列

        mainFrame = QWidget()
        mainFrame.setLayout(layout)
        self.setCentralWidget(mainFrame)

if __name__ == '__main__':
    app = QApplication(sys.argv)
    main = TooltipForm()
    main.show()
    app.exec_()
    del app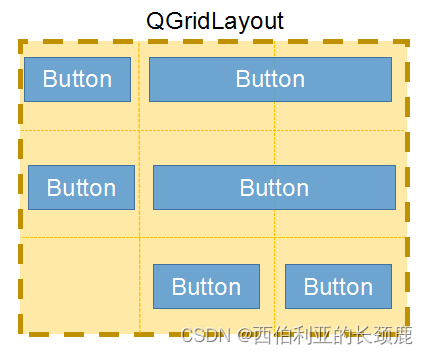
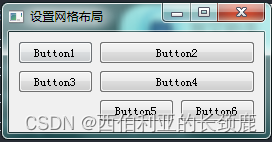
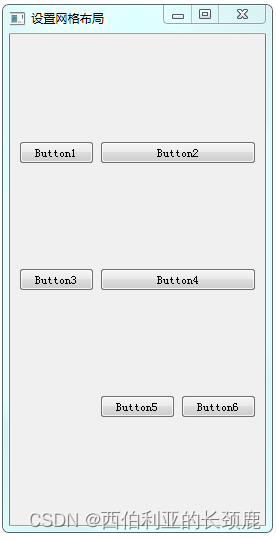
但当拉动窗体使其变长时间,则会发现,比例间距有点过大
使用表单分布器则不会出现这类问题
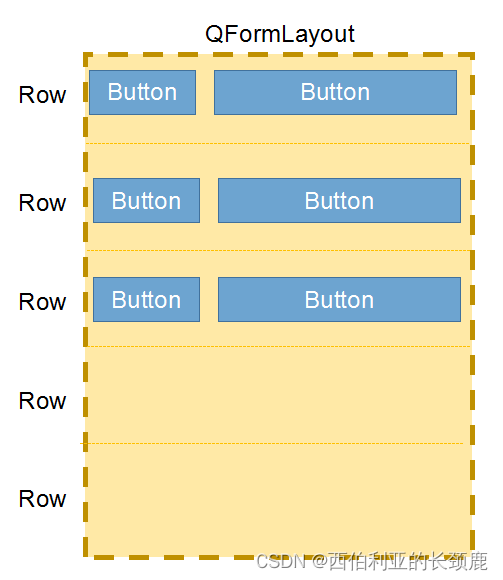
(5)QFormLayout表单分布器
from PyQt5.QtWidgets import *

import sys

class QLineEditEchoMode(QWidget) :
    def __init__(self):
        super(QLineEditEchoMode,self).__init__()
        self.initUI()

    def initUI(self):
        self.setWindowTitle('设置表单布局')
        self.setGeometry(300,30,200,300)
        button1 = QPushButton('Button1',self)
        button2 = QPushButton('Button2',self)
        button3 = QPushButton('Button3',self)
        button4 = QPushButton('Button4',self)
        button5 = QPushButton('Button5',self)
        button6 = QPushButton('Button6',self)

        formLayout = QFormLayout()

        formLayout.addRow(button1,button2)
        formLayout.addRow(button3,button4)
        formLayout.addRow(button5,button6)

        self.setLayout(formLayout)

if __name__ == '__main__':
    app = QApplication(sys.argv)
    main = QLineEditEchoMode()
    main.show()
    app.exec_()
del app 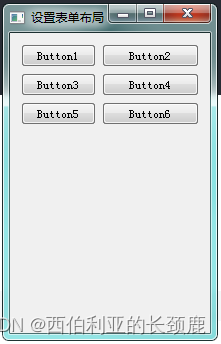
四类分布器均可以做嵌套使用


 2万+
2万+


 被折叠的 条评论
为什么被折叠?
被折叠的 条评论
为什么被折叠?
 到【灌水乐园】发言


