


一、基础知识
1 设置彩色/黑白:
- sensor.set_pixformat() 设置像素模式。
- sensor.GRAYSCALE: 灰度,每个像素8bit。
- sensor.RGB565: 彩色,每个像素16bit。
2 设置图像大小:
- sensor.set_framesize() 设置图像的大小
- sensor.QQCIF: 88x72
- sensor.QCIF: 176x144
- sensor.CIF: 352x288
- sensor.QQSIF: 88x60
- sensor.QSIF: 176x120
- sensor.SIF: 352x240
- sensor.QQQQVGA: 40x30
- sensor.QQQVGA: 80x60
- sensor.QQVGA: 160x120
- sensor.QVGA: 320x240
- sensor.VGA: 640x480
- sensor.HQQQVGA: 80x40
- sensor.HQQVGA: 160x80
- sensor.HQVGA: 240x160
- sensor.B64X32: 64x32 (用于帧差异 image.find_displacement())
- sensor.B64X64: 64x64 用于帧差异 image.find_displacement())
- sensor.B128X64: 128x64 (用于帧差异 image.find_displacement())
- sensor.B128X128: 128x128 (用于帧差异 image.find_displacement())
- sensor.LCD: 128x160 (用于LCD扩展板)
- sensor.QQVGA2: 128x160 (用于LCD扩展板)
- sensor.WVGA: 720x480 (用于 MT9V034)
- sensor.WVGA2:752x480 (用于 MT9V034)
- sensor.SVGA: 800x600 (仅用于 OV5640 感光元件)
- sensor.XGA: 1024x768 (仅用于 OV5640 感光元件)
- sensor.SXGA: 1280x1024 (仅用于 OV5640 感光元件)
- sensor.UXGA: 1600x1200 (仅用于 OV5640 感光元件)
- sensor.HD: 1280x720 (仅用于 OV5640 感光元件)
- sensor.FHD: 1920x1080 (仅用于 OV5640 感光元件)
- sensor.QHD: 2560x1440 (仅用于 OV5640 感光元件)
- sensor.QXGA: 2048x1536 (仅用于 OV5640 感光元件)
- sensor.WQXGA: 2560x1600 (仅用于 OV5640 感光元件)
- sensor.WQXGA2: 2592x1944 (仅用于 OV5640 感光元件)
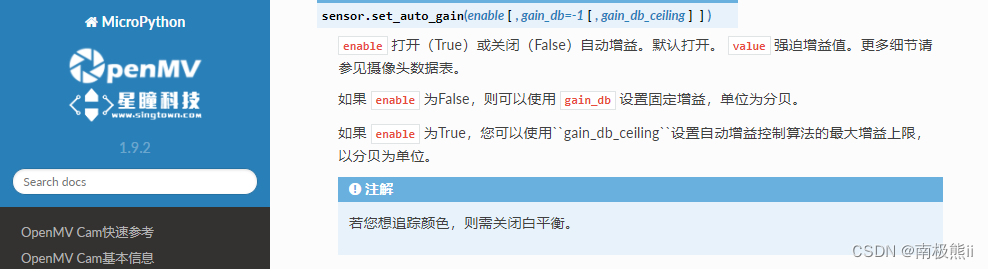
3 自动增益/白平衡/曝光:
-
sensor.set_auto_gain() ——自动增益开启(True)或者关闭(False)。
-
在使用颜色追踪时,需要关闭自动增益。
自动调节图像亮度:
当光线较暗时,摄像头会自动增加增益,使得图像变得更加明亮。
当光线过强时,摄像头会减少增益,以防止图像过曝。
适应不同的光照条件:
适用于光照变化频繁的场景,如从室内到室外的转换。
在无人值守的监控设备中,可以保证全天候图像质量。
简化图像处理:
不需要手动调整增益参数,简化了图像处理和摄像头配置的复杂性。
提高了图像处理算法的鲁棒性,因为图像亮度的一致性更好。
-
sensor.set_auto_whitebal()——自动白平衡开启(True)或者关闭(False)。
-
在使用颜色追踪时,需要关闭自动白平衡。
-
sensor.set_auto_exposure(enable[\, exposure_us])
- enable 打开(True)或关闭(False)自动曝光。默认打开。
- 如果 enable 为False, 则可以用 exposure_us 设置一个固定的曝光时间(以微秒为单位)。
4 设置窗口ROI
sensor.set_windowing(roi)
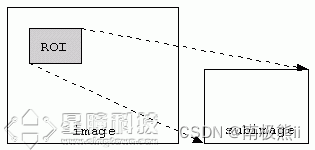
sensor.set_framesize(sensor.VGA) # 高分辨率
sensor.set_windowing((640, 80)) #取中间的640*80区域
roi的格式是(x, y, w, h)。你可以只传递 (w,h),而
roi将会在图像中居中。
5 设置翻转
sensor.set_hmirror(True)
# 水平方向翻转

sensor.set_vflip(True)
# 垂直方向翻转
二、画图
1 画线
- image.draw_line(line_tuple, color=White) 在图像中画一条直线。
- line_tuple的格式是(x0, y0, x1, y1),意思是(x0, y0)到(x1, y1)的直线。
- 颜色可以是灰度值(0-255),或者是彩色值(r, g, b)的tupple。默认是白色
2 画框
- image.draw_rectangle(rect_tuple, color=White) 在图像中画一个矩形框。
- rect_tuple 的格式是 (x, y, w, h)。
3 画十字
- image.draw_cross(x, y, size=5, color=White) 在图像中画一个十字
- x,y是坐标
- size是两侧的尺寸
三、AprilTag标记跟踪
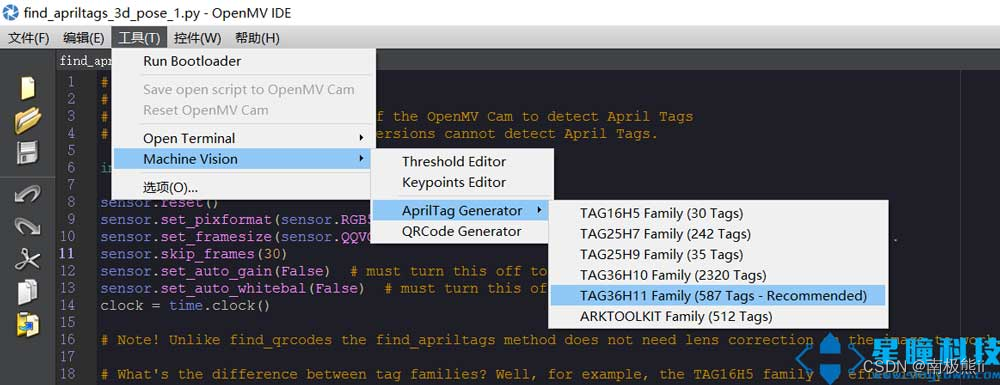
AprilTag测距代码:
import sensor, image, time, math

sensor.reset()
sensor.set_pixformat(sensor.GRAYSCALE)
sensor.set_framesize(sensor.QQVGA) # we run out of memory if the resolution is much bigger...
sensor.skip_frames(30)
sensor.set_auto_gain(False)  # must turn this off to prevent image washout...
sensor.set_auto_whitebal(False)  # must turn this off to prevent image washout...
sensor.set_hmirror(True)
clock = time.clock()

# f_x 是x的像素为单位的焦距。
# f_y 是y的像素为单位的焦距。
# c_x 是图像的x中心位置
# c_y 是图像的y中心位置

f_x = (2.8 / 3.984) * 160 # 默认值
f_y = (2.8 / 2.952) * 120 # 默认值
c_x = 160 * 0.5 # 默认值(image.w * 0.5)
c_y = 120 * 0.5 # 默认值(image.h * 0.5)

def degrees(radians):
    return (180 * radians) / math.pi

while(True):
    clock.tick()
    img = sensor.snapshot()
    for tag in img.find_apriltags(fx=f_x, fy=f_y, cx=c_x, cy=c_y): # 默认为TAG36H11
        img.draw_rectangle(tag.rect(), color = (255, 0, 0))
        img.draw_cross(tag.cx(), tag.cy(), color = (0, 255, 0))
        distance = math.sqrt(tag.x_translation()**2 + tag.y_translation()**2 + tag.z_translation()**2) * 2.550108137

        # 位置的单位是未知的,旋转的单位是角度
        print("Dis:",distance)
四、模块识别
1. 多模版匹配
使用NCC算法,可识别区域仅支持离中心左右30°范围内。
# Template Matching Example - Normalized Cross Correlation (NCC)
import time, sensor, image
from image import SEARCH_EX, SEARCH_DS
# 仅引入SEARCH_EX, SEARCH_DS两个需要的部分

sensor.reset()
sensor.set_contrast(1)
sensor.set_gainceiling(16)
sensor.set_framesize(sensor.QQVGA)
sensor.set_pixformat(sensor.GRAYSCALE)
clock = time.clock()

templates = ["/0.pgm", "/1.pgm", "/2.pgm", "/6.pgm"]

while (True):
    clock.tick()
    img = sensor.snapshot()

    for t in templates:
        template = image.Image(t)

        r = img.find_template(template, 0.50, step=4, search=SEARCH_EX) #, roi=(10, 0, 60, 60))
    #find_template(template, threshold, [roi, step, search])
    #threshold是相似度阈值,roi是进行匹配的区域(左上顶点为(10,0),长80宽60的矩形),
    #注意roi的大小要比模板图片大,比frambuffer小
        if r:
            img.draw_rectangle(r)
            print(t)
五、图像滤波处理
1. 直方图均衡
img = sensor.snapshot().histeq()
2. 高斯模糊
img.gaussian(1,unsharp=True)
3. 核滤波
kernel_size = 1 # 3x3==1, 5x5==2, 7x7==3, etc.

kernel = [-2, -1,  0, \
          -1,  1,  1, \
           0,  1,  2]

    # Run the kernel on every pixel of the image.
    # 在图像的每个像素上运行核
    img.morph(kernel_size, kernel)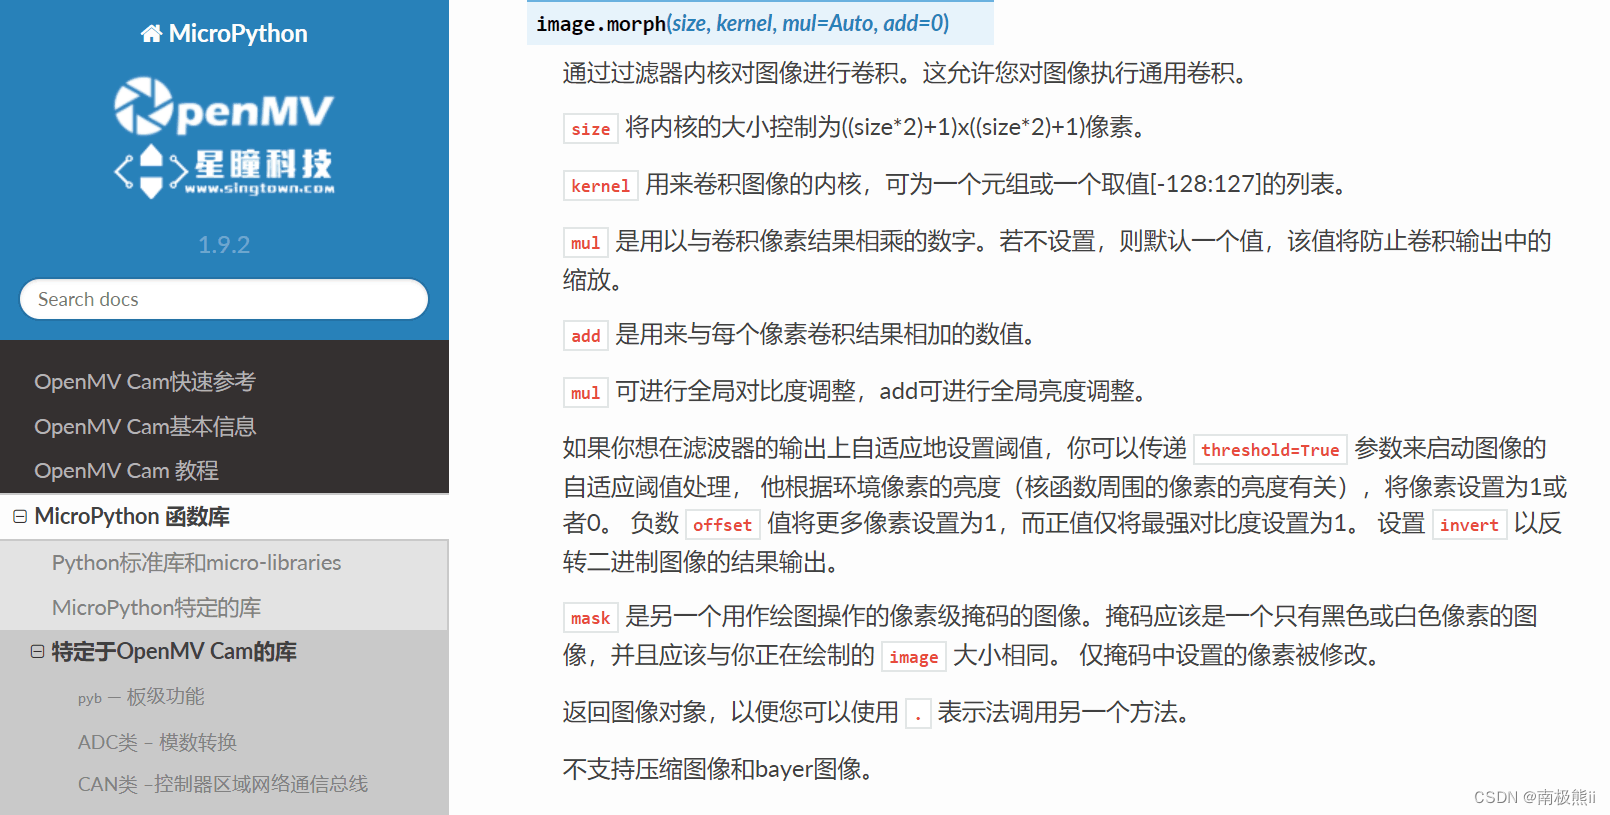
4. 双边滤波:去噪保边
img.bilateral(2, color_sigma=0.1, space_sigma=1)
双边滤波对高斯噪声可以平滑掉,但对孤立点的滤波效果不好
5. 白光去除
# 彩图光线去除例程
# 从图像中删除明亮的光线允许您在图像上使用histeq(),
# 而不会使图像的过饱和部分的异常值破坏算法...

```
sensor.set_pixformat(sensor.RGB565)
thresholds = (4, 97, -22, 40, -24, 43)

while(True):
    clock.tick()
    img = sensor.snapshot().binary([thresholds], invert=True, zero=True)


# 灰度滤波例程
```
sensor.set_pixformat(sensor.GRAYSCALE)

thresholds = (0, 200)

while(True):
    clock.tick()
    img = sensor.snapshot().binary([thresholds], invert=True, zero=True)
6. 边缘检测
```
sensor.set_pixformat(sensor.GRAYSCALE)


while(True):
    clock.tick()
    img = sensor.snapshot()

    # 使用Canny算法进行边缘检测
    # 可以调整阈值以适应不同的光照条件和线条粗细
    edges = img.find_edges(image.EDGE_CANNY, threshold=(50, 80))
7. 腐蚀和膨胀
# 腐蚀和膨胀
# 这个例子展示了可以在二进制图像上运行的腐蚀和膨胀函数来消除噪声。

```
sensor.set_pixformat(sensor.GRAYSCALE)
grayscale_thres = (170, 255)


while(True):
    img = sensor.snapshot()
    img.binary([grayscale_thres])

    img.erode(2)
    #对图像边缘进行侵蚀
    #侵蚀函数erode(size, threshold=Auto),size为kernal的大小,去除边缘相邻处多余的点。
    #threshold用来设置去除相邻点的个数,threshold数值越大,被侵蚀掉的边缘点越多,边缘旁边白色杂点少;

    img.dilate(2)
    #对图像边缘进行膨胀
    #膨胀函数image.dilate(size, threshold=Auto),size为kernal的大小,使边缘膨胀。
    #threshold用来设置去除相邻点的个数,threshold数值越大,边缘越膨胀;
8. 灰度二值化
# 灰度二值化图像滤波
import sensor, image, math

sensor.reset()
sensor.set_framesize(sensor.QVGA)
sensor.set_pixformat(sensor.GRAYSCALE)

low_threshold = (0, 50)
high_threshold = (205, 255)

while(True):
    # 测试低阈值
    for i in range(300):
        img = sensor.snapshot()
        img.binary([low_threshold])
        #image.binary(thresholds, invert=False)此函数将在thresholds内的
        #图像部分的全部像素变为1白,将在阈值外的部分全部像素变为0黑。invert将图像
        #的0 1(黑 白)进行反转,默认为false不反转。

    # 测试高阈值
    for i in range(300):
        img = sensor.snapshot()
        img.binary([high_threshold])
9. 畸变矫正
# 畸变校正
# 这个例程展示了如何使用畸变矫正方法来修复图像失真问题。在二维码/条形码/矩形码检测时需要使用此方法。
# 增加下面的strength直到直线在视图中。
# zoom是在对图像进行缩放的数值。默认值为1。


while(True):
    clock.tick()
    img = sensor.snapshot().lens_corr(strength = 1.8, zoom = 1.0)
10. 直线滤波
# 直线滤波例程
# 传感器模块可以在图像读取期间执行一些基本的图像处理而无需额外的开销。

```
# 将源复制到目标
# 注意源是YUYV 目标是1BPP灰度
def line_filter_copy(src, dst):
    for i in range(0, len(dst), 1):
        dst[i] = src[i<<1]


# 按照阈值分割图像。
# 注意源是YUYV目标 是1BPP灰度
def line_filter_bw(src, dst):
    for i in range(0, len(dst), 1):
        if (src[i<<1] > 100 and src[i<<1] < 255):
            dst[i] = 0xFF
        else:
            dst[i] = 0x00


while(True):
    clock.tick()
    lines = 0
    img = sensor.snapshot(line_filter = line_filter_copy)
11. 均值滤波
# 均值滤波例程
# 这个例子展示了均值滤波。均值滤波是NxN邻域的标准均值滤波。
# 均值滤波通过模糊所有内容来消除图像中的噪点。
# 但是,这是最快的内核过滤器操作

```

while(True):
    clock.tick()
    img = sensor.snapshot()

    # 唯一的参数是内核大小。N对a ((N*2)+1)^2的核大小有响应。
    # 例如:1 == 3x3内核,2 == 5x5内核,等等。
    # 注意:不应该使用大于2的值。
    img.mean(1)
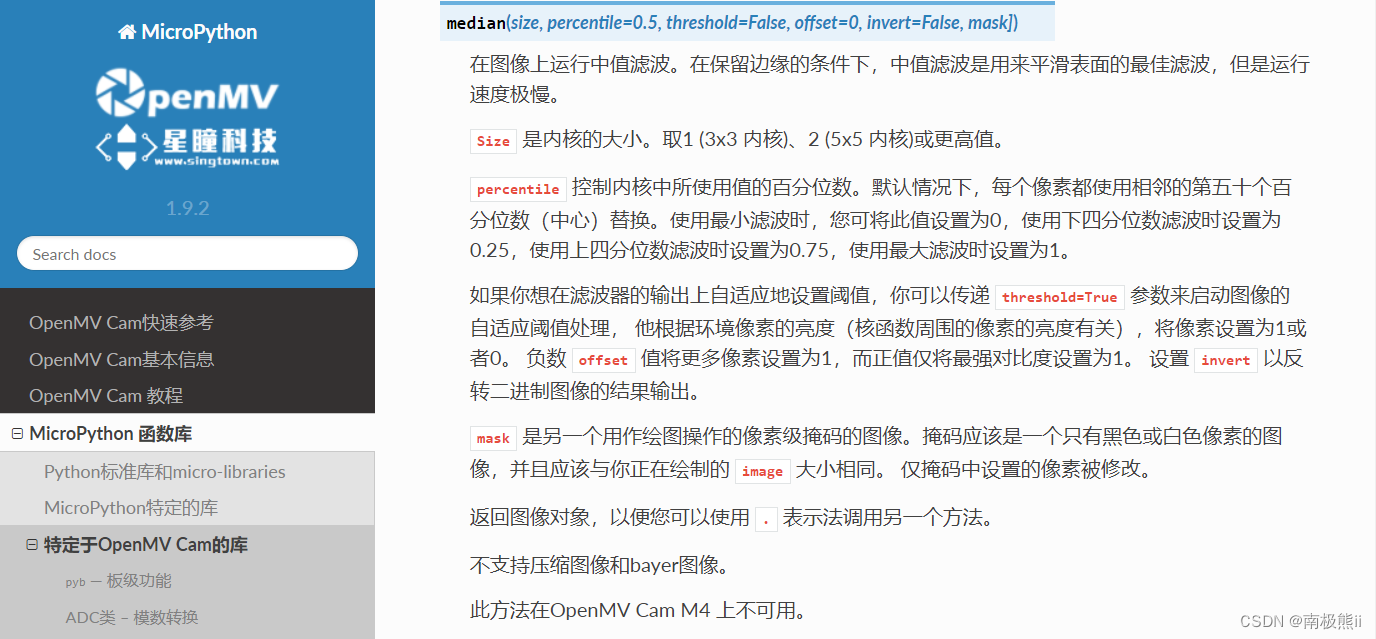
12. 中值滤波
# 中值滤波
# 中值滤波用其NxN邻域的中位数替换每个像素。中值滤波对于在保留边缘的同时去除图像中的噪声是很好的。
# 中值滤波对椒盐噪声有很强的抑制能力,可以很好地去除图像中的瞬时脉冲干扰。
# 对于高斯噪声等其他类型噪声,中值滤波的效果不如均值滤波等线性滤波器。

while(True):
    clock.tick()
    img = sensor.snapshot()

    img.median(1, percentile=0.25)
    # Size是内核的大小。取1 (3x3 内核)、2 (5x5 内核)或更高值。
    # percentile控制内核中所使用值的百分位数。默认情况下,每个像素都使用相邻的第五
    # 十个百分位数(中心)替换。使用最小滤波时,您可将此值设置为0,使用下四分位数滤
    # 波时设置为0.25,使用上四分位数滤波时设置为0.75,使用最大滤波时设置为1。
13. 中点滤波
# 中点滤波例程
# 中点滤波用NxN邻域的最小和最大像素值的平均值代替每个像素。
# 中点滤波对于去除包含极大和极小值的噪声(如椒盐噪声)具有良好效果。


while(True):
    clock.tick()
    img = sensor.snapshot()

    # size 是内核的大小。取1 (3x3 内核)、2 (5x5 内核)或更高值。
    # bias 控制图像混合的最小/最大程度。0只适用于最小滤波,1仅用于最大滤波。您可以
    # 通过对图像进行最小/最大化过滤。
    img.midpoint(1, bias=0.25)
- 在处理大窗口噪声的方面,由于需要对所有像素值进行排序以找出中值或中点,所以两者的计算复杂度都相对较高。
- 中值滤波对窗口大小比较敏感,窗口过大可能导致图像细节丢失,过小则去噪效果不明显。而中点滤波对非椒盐噪声(如高斯噪声)的处理能力则不如中值滤波。
14. 众数滤波
# 众数滤波例程
# 众数滤波是一种高度非线性的操作,它会在图像边缘造成伪影.
# 众数滤波特别适合去除椒盐噪声和胡椒噪声
# 不适用于噪声模式复杂或不规则的噪声处理

while(True):
    clock.tick()
    img = sensor.snapshot()

    # Size是内核的大小。取1 (3x3 内核)、2 (5x5 内核)。
    img.mode(1)
六、其他图像处理
1. 图像锐化
while(True):
    clock.tick()
    img = sensor.snapshot()

    # 在图像的每个像素上运行核
    img.laplacian(2, sharpen=True)
2. 垂直水平镜像转置图像
# 垂直翻转 - 水平镜像 - 转置图像

# vflip=False, hmirror=False, transpose=False -> 0 degree rotation
# vflip=True,  hmirror=False, transpose=True  -> 90 degree rotation
# vflip=True,  hmirror=True,  transpose=False -> 180 degree rotation
# vflip=False, hmirror=True,  transpose=True  -> 270 degree rotation

import sensor
import time
sensor.reset()
sensor.set_pixformat(sensor.RGB565)
sensor.set_framesize(sensor.QVGA)
sensor.skip_frames(time=2000)
clock = time.clock()
ticks = time.ticks_ms()
counter = 0

while True:
    clock.tick()

    img = sensor.snapshot().replace(
        vflip=(counter // 2) % 2,
        hmirror=(counter // 4) % 2,
        transpose=(counter // 8) % 2,
    )

    if time.ticks_diff(time.ticks_ms(), ticks) > 1000:
        ticks = time.ticks_ms()
        counter += 1
七、感光元件控制
1 感光元件自动增益控制
# 感光元件自动增益控制

# 增益和曝光控制之间有什么区别?
# 通过增加图像的曝光时间,您可以在相机上获得更多光线。这为您提供了最佳的信噪比。
# 您通常总是希望增加曝光时间...除非,当您增加曝光时间时,您会降低最大可能的帧速率,
# 如果图像中有任何移动,它将在更长的曝光时间内开始模糊。
# 增益控制允许您使用模拟和数字乘法器增加每像素的输出......但是,它也会放大噪声。
# 因此,最好尽可能让曝光增加,然后使用增益控制来弥补任何剩余的地画面。

# 我们可以通过在自动增益控制算法上设置增益上限来实现上述目的。
# 一旦设置完毕,算法将不得不增加曝光时间以满足任何增益需求,而不是使用增益。
# 然而,当照明变化相对于曝光恒定且增益变化时,这是以曝光时间的变化为代价的。

import sensor, image, time
sensor.reset()
sensor.set_pixformat(sensor.RGB565)
sensor.set_framesize(sensor.QVGA)

sensor.set_auto_gain(True, gain_db_ceiling = 16.0)
#注意!如果在不调整曝光控制目标值的情况下将增益上限设置为低,那么如果曝光控制打开,您将从曝光控制中获得大量振荡。
sensor.skip_frames(time = 2000)
clock = time.clock()

while(True):
    clock.tick()
    img = sensor.snapshot()
    print("FPS %f, Gain %f dB, Exposure %d us" % \
        (clock.fps(), sensor.get_gain_db(), sensor.get_exposure_us()))
2 曝光控制
# 感光元件曝光控制
# 增益和曝光控制之间有什么区别?
# 通过增加图像的曝光时间,您可以在相机上获得更多光线。这为您提供了最佳的信噪比。
# 您通常总是希望增加曝光时间...除非,当您增加曝光时间时,您会降低最大可能的帧速率,
# 如果图像中有任何移动,它将在更长的曝光时间内开始模糊。
# 增益控制允许您使用模拟和数字乘法器增加每像素的输出......但是,它也会放大噪声。
# 因此,最好尽可能让曝光增加,然后使用增益控制来弥补任何剩余的地画面。
# 我们可以通过在自动增益控制算法上设置增益上限来实现上述目的。
# 一旦设置完毕,算法将不得不增加曝光时间以满足任何增益需求,而不是使用增益。
# 然而,当照明变化相对于曝光恒定且增益变化时,这是以曝光时间的变化为代价的。

import sensor, image, time
sensor.reset()
sensor.set_pixformat(sensor.RGB565)
sensor.set_framesize(sensor.QVGA)
# 您必须关闭自动增益控制和自动白平衡,否则他们将更改图像增益以撤消您放置的任何曝光设置...
sensor.set_auto_gain(False)
sensor.set_auto_whitebal(False)

# 更改此值以调整曝光。试试10.0 / 0.1 /等。
EXPOSURE_TIME_SCALE = 1.0
sensor.skip_frames(time = 2000)
clock = time.clock()

current_exposure_time_in_microseconds = sensor.get_exposure_us()
# 默认情况下启用自动曝光控制(AEC)。调用以下功能可禁用传感器自动曝光控制。
# 另外“exposure_us”参数在AEC被禁用后覆盖自动曝光值。
sensor.set_auto_exposure(False, \
    exposure_us = int(current_exposure_time_in_microseconds * EXPOSURE_TIME_SCALE))

while(True):
    clock.tick()                    # 更新FPS帧率时钟。
    img = sensor.snapshot()         # 拍一张照片并返回图像。
八、测距
import sensor, image, time

sensor.reset()
sensor.set_pixformat(sensor.RGB565)
sensor.set_framesize(sensor.QVGA)
sensor.skip_frames(100)
sensor.set_auto_whitebal(False)
sensor.set_auto_gain(False)
sensor.set_auto_exposure(False)
clock = time.clock()


K = 850                           #the value should be measured 距离参数
Target_Threshold = (0, 25, -25, 30, -28, 13)


while(True):
    clock.tick()
    img = sensor.snapshot().histeq(adaptive=True, clip_limit=3)
    img.laplacian(1, sharpen=True)
    img.binary([Target_Threshold],invert=True)

    blobs = img.find_blobs([Target_Threshold])
    if len(blobs) == 1:
        # Draw a rect around the blob.
        b = blobs[0]
        img.draw_rectangle(b[0:4]) # rect
        img.draw_cross(b[5], b[6]) # cx, cy
        Lm = (b[2]+b[3])/2
        length = K/Lm
        print(length)
九、神经网络目标检测
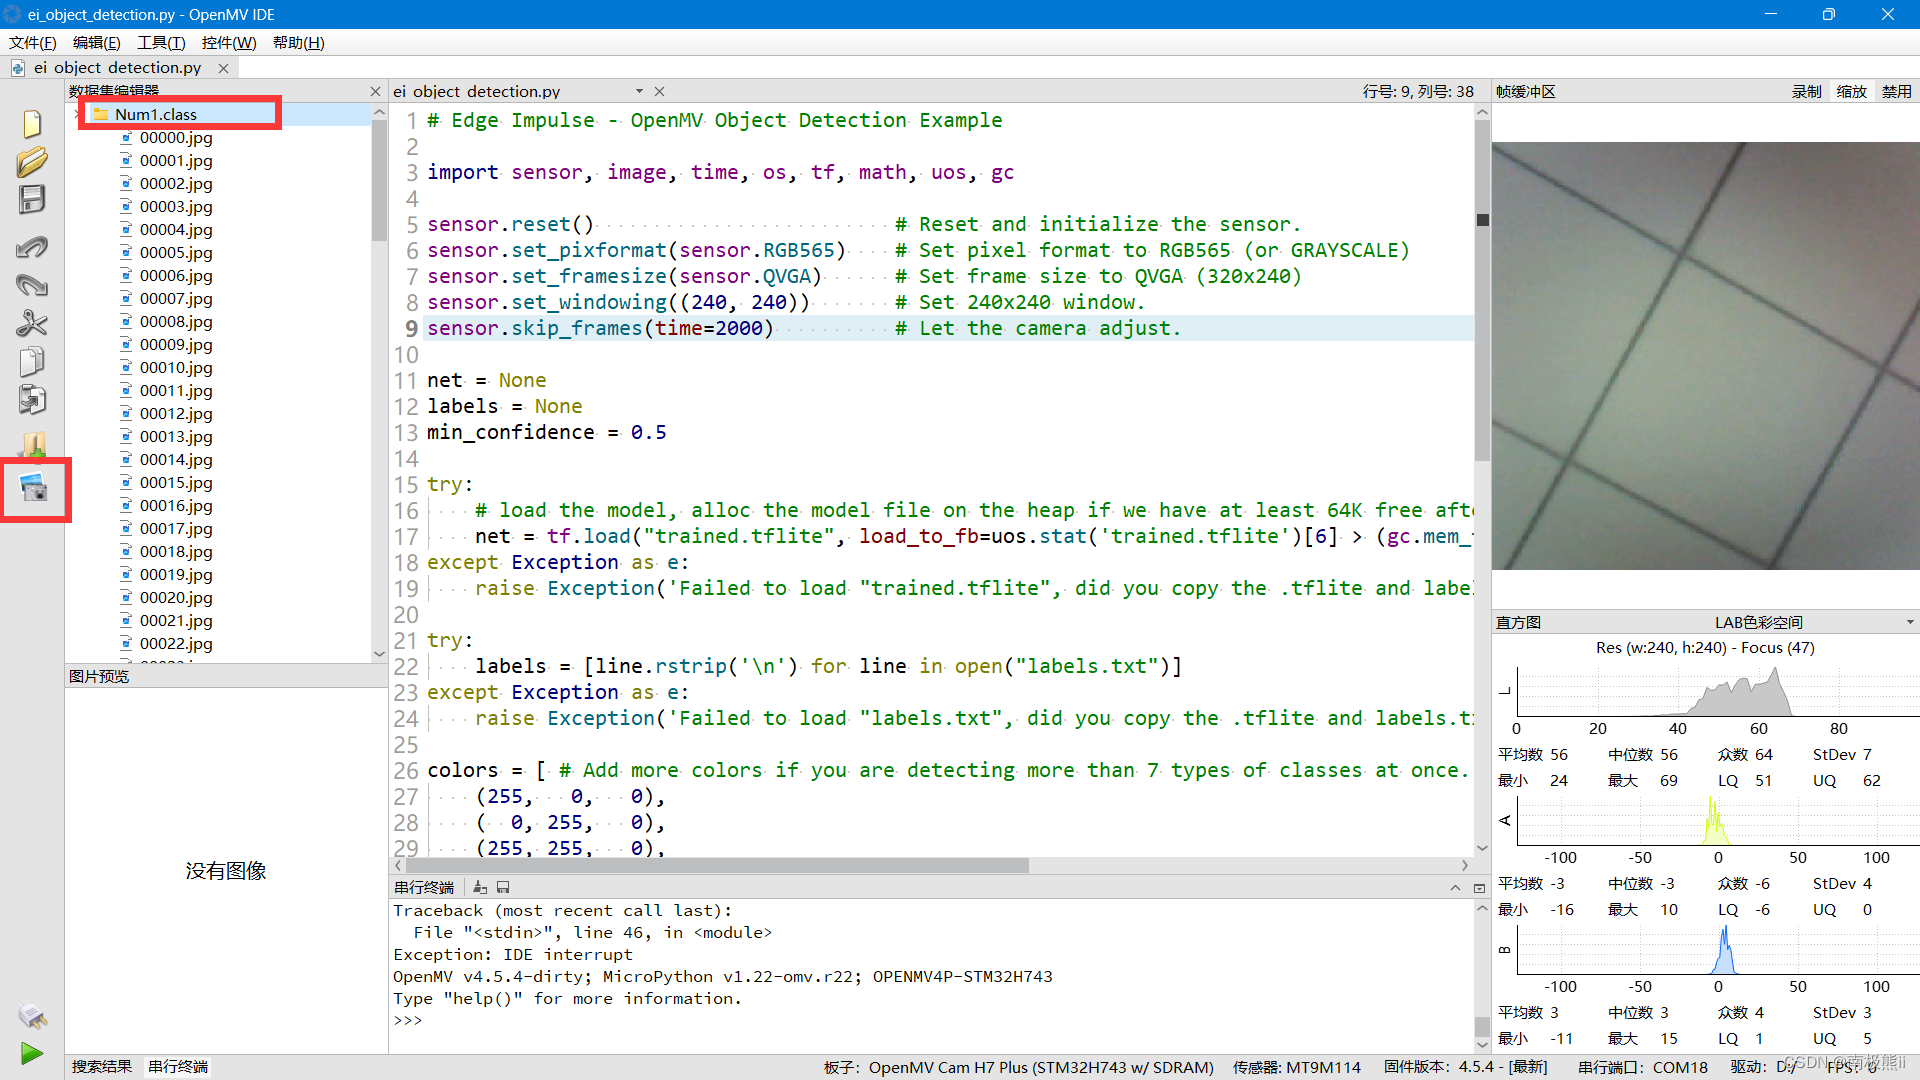
1. 开启数据集,存放数据图片
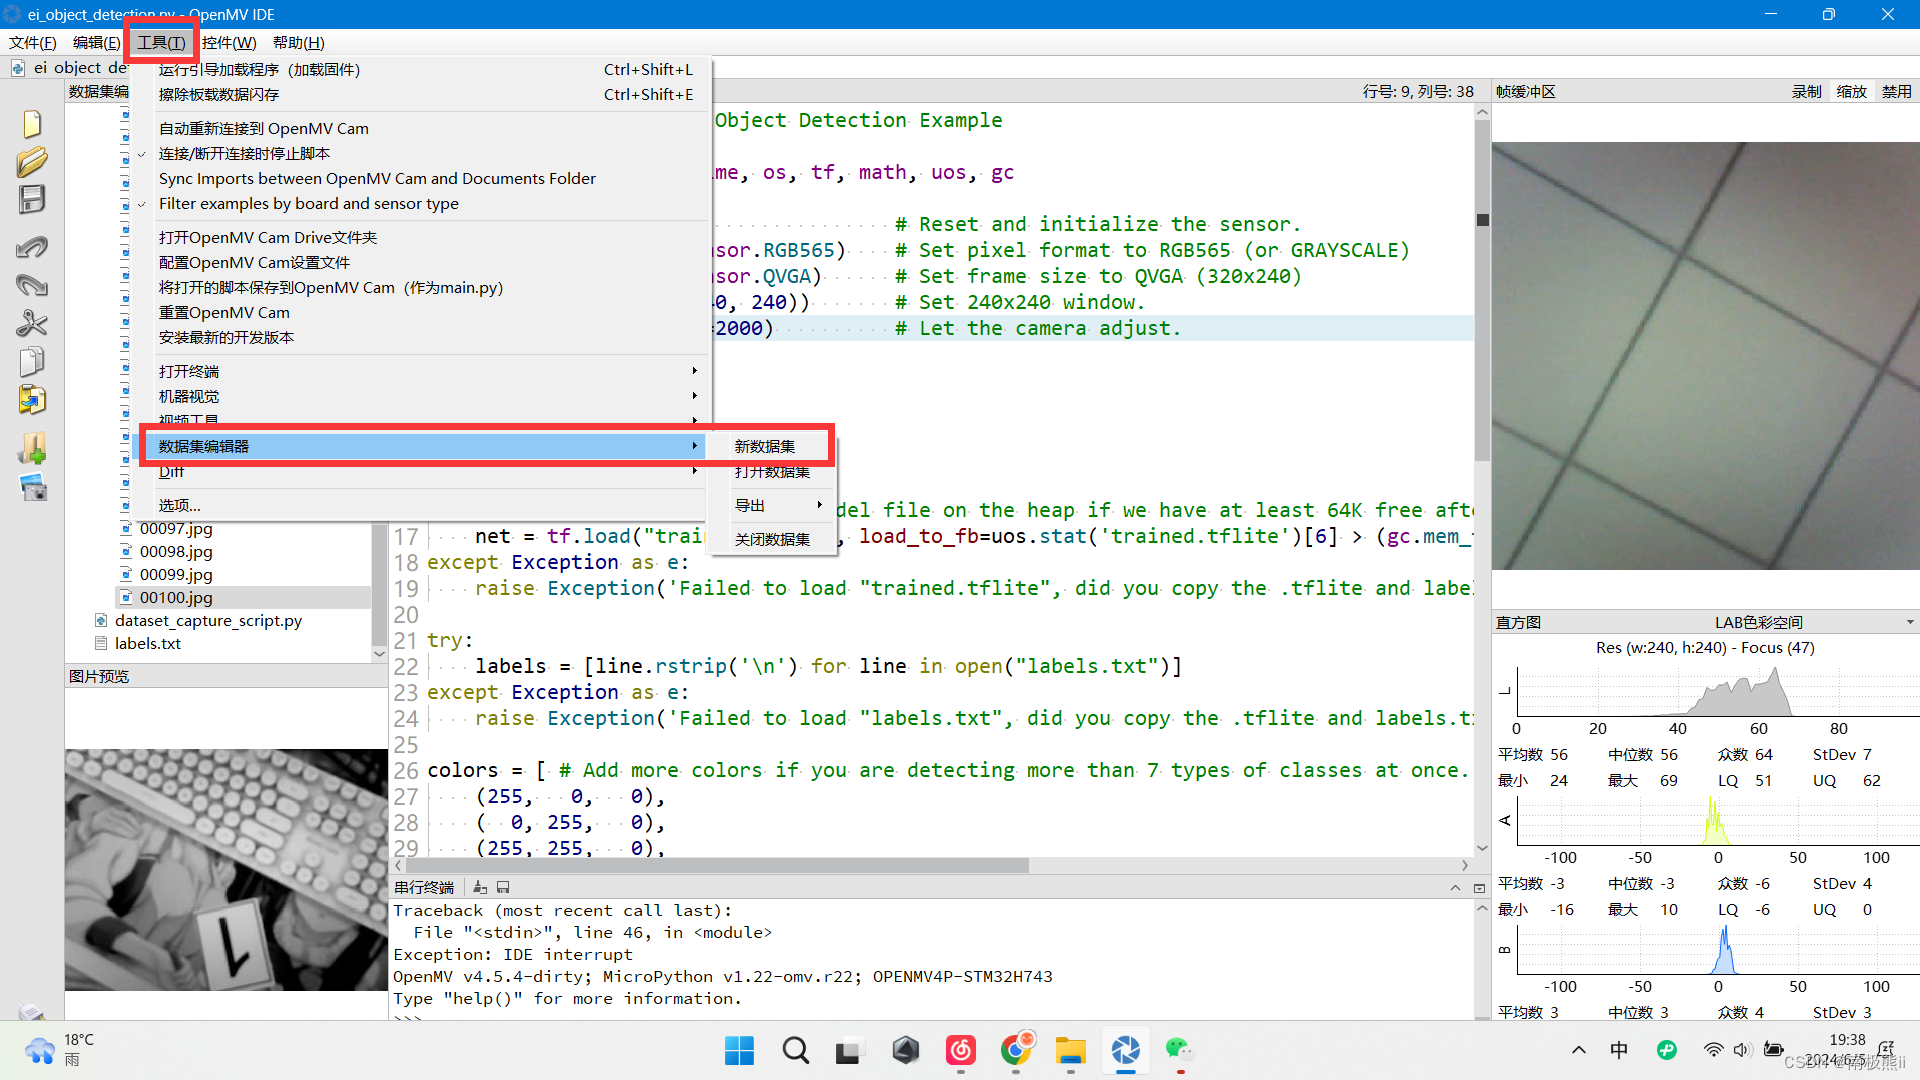
2. 对准目标对象,点击进行拍摄
拍摄约2、3百张
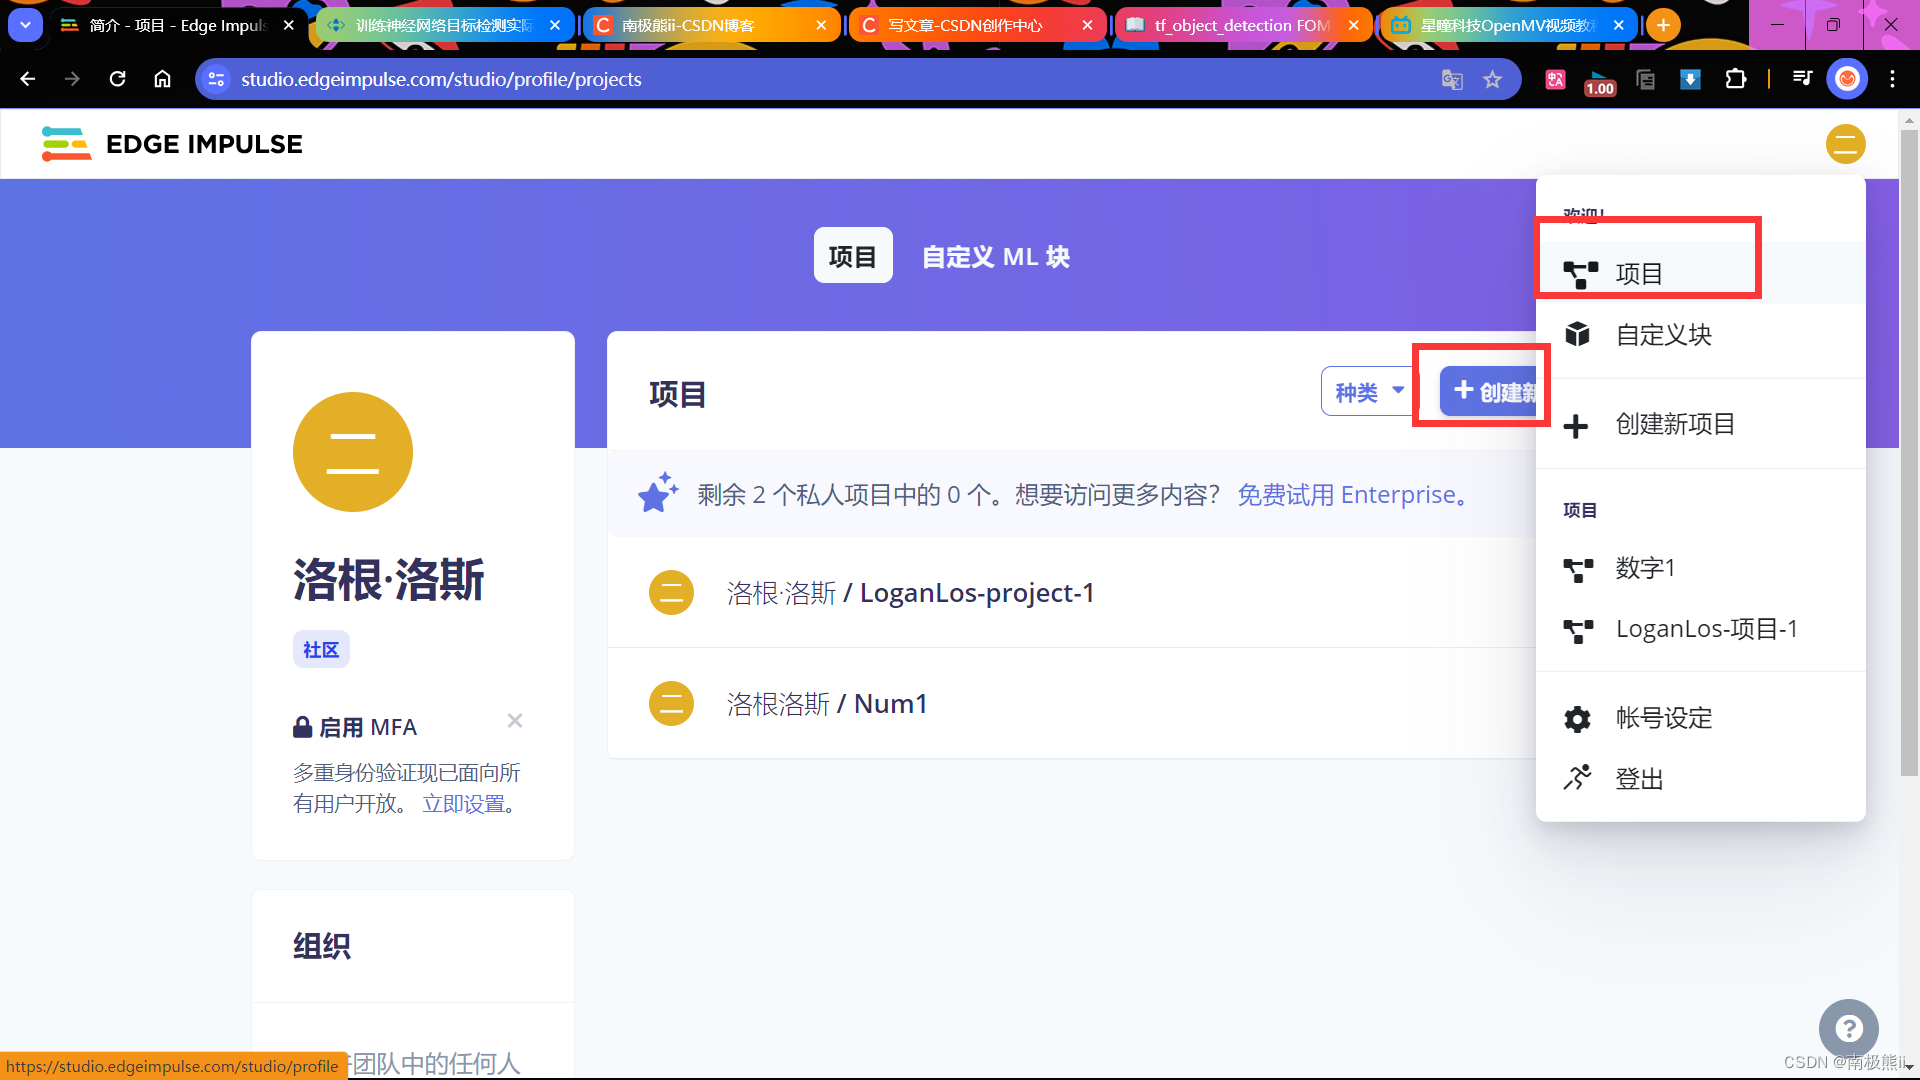
3. 登录训练神经网络网站,创建新项目
4. 点击上传已有数据
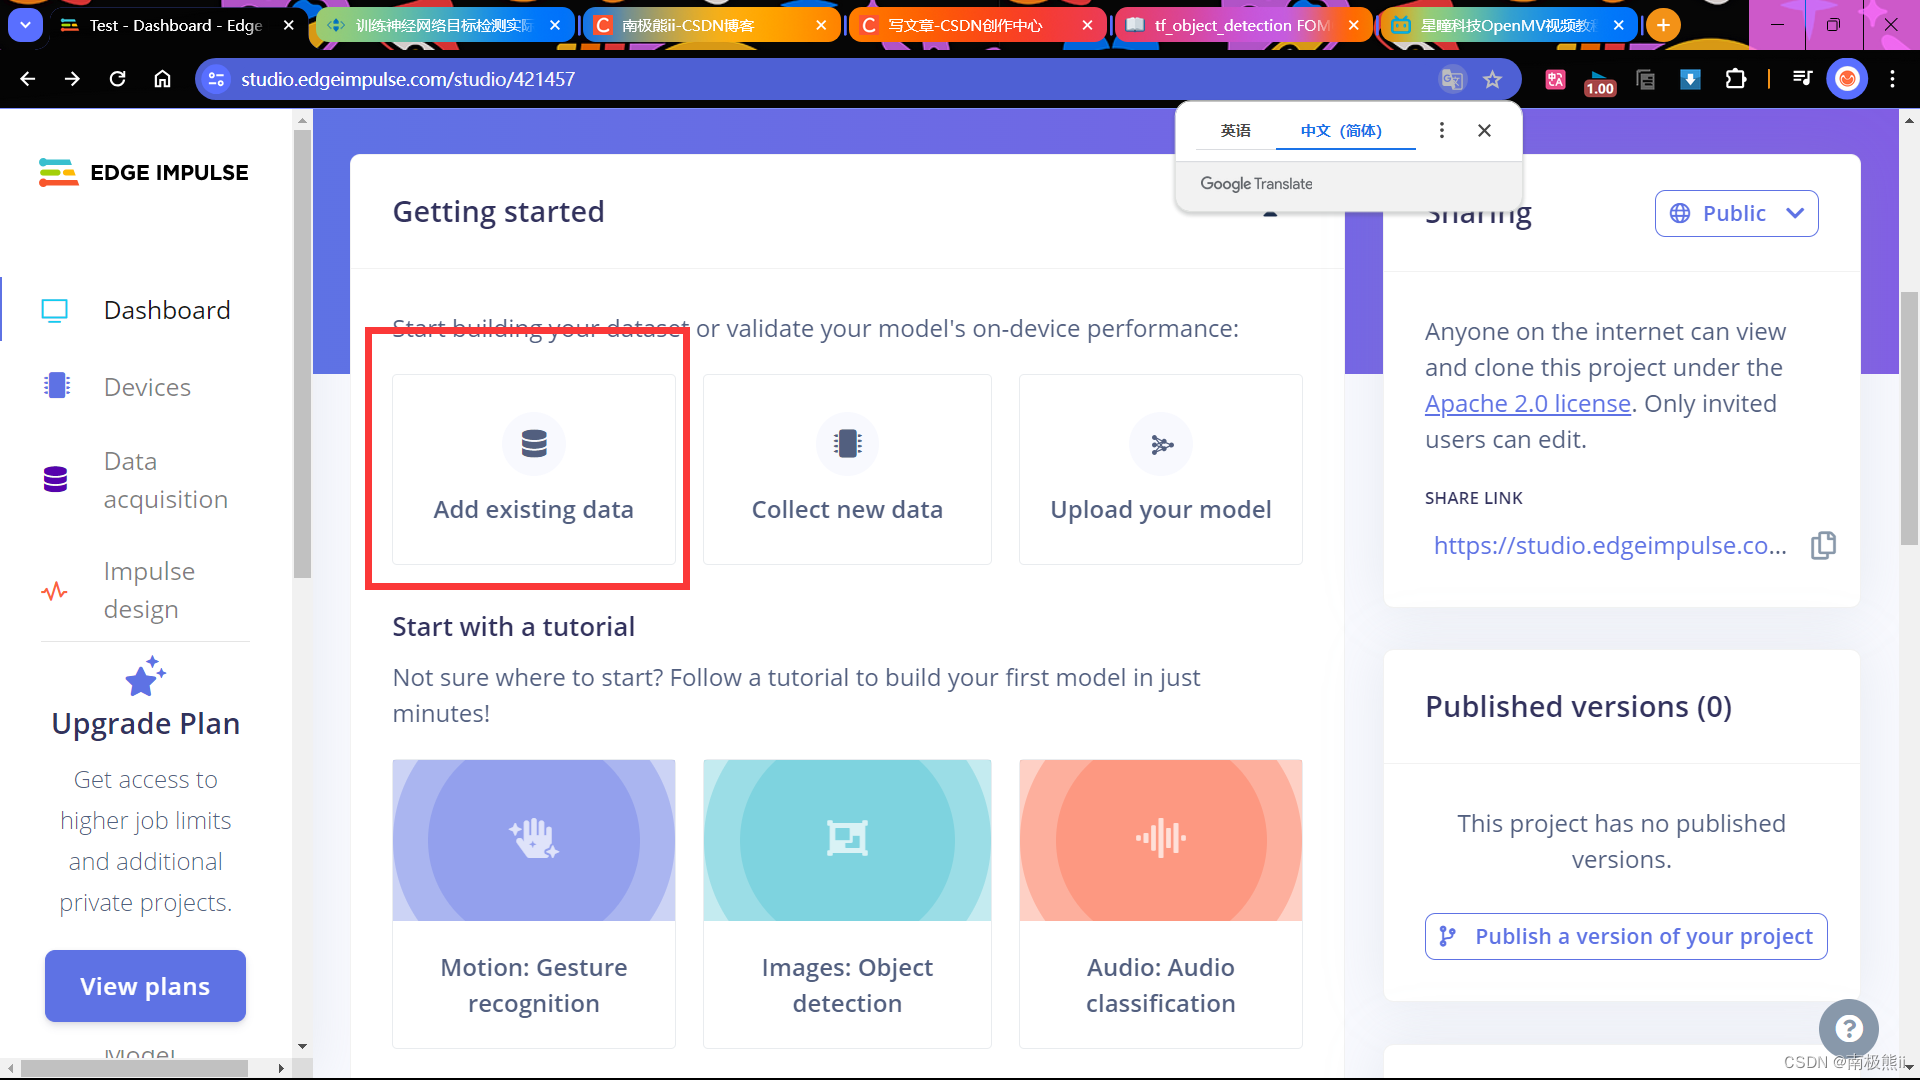
5. 上传数据文件 / 文件夹

6. 添加检测标签
直至添加完所有标签

7. 配置Impulse

8. 配置图像参数并保存

点击生成特征

9. 配置物体检测

10. 存储项目版本

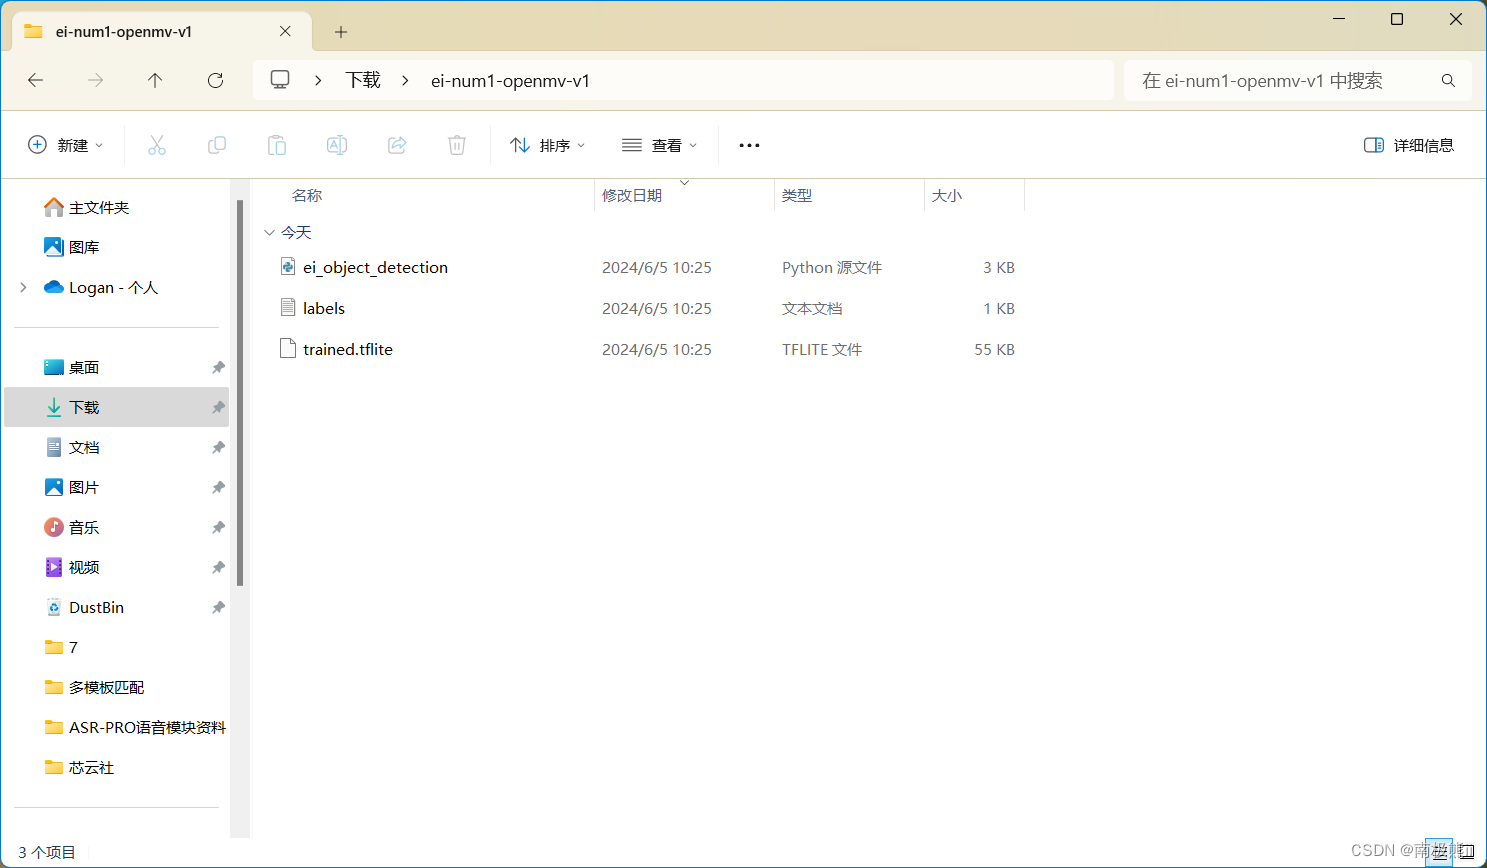
11. 配置部署

配置完毕,会提示下载压缩包,解压后将其中文件导入OpenMV内存中运行即可


 2146
2146

 被折叠的 条评论
为什么被折叠?
被折叠的 条评论
为什么被折叠?
 到【灌水乐园】发言


