


一、问题描述
时装类别识别
时装类别识别问题是预测一张图片中的时装类别。
数据集:fashionMnist
训练集:60000张时装图片,每张图片是28*28的灰度矩阵,有一个{0,1,…,9}的类标签,表示时装的类别。测试数据:10000张测试数据。
要求:
导入fashionMnist数据。
设计神经网络算法,完成时装类别的预测问题。
上机报告中应写出遇到问题和解决方法。
注意:fashionMnist数据集的导入,会遇到一些问题,自主尝试解决。
时装类别识别问题是预测一张图片中的时装类别。
数据集:fashionMnist
训练集:60000张时装图片,每张图片是28*28的灰度矩阵,有一个{0,1,…,9}的类标签,表示时装的类别。测试数据:10000张测试数据。
二、实验目的
设计神经网络算法,完成时装类别的预测问题。
三、实验内容
3.1数据导入
import tensorflow as tf
from tensorflow import keras

import numpy as np
import matplotlib.pyplot as plt

class_names=['T-shirt/top', 'Trouser', 'Pullover', 'Dress', 'Coat',
               'Sandal', 'Shirt', 'Sneaker', 'Bag', 'Ankle boot']
3.2数据预处理
在训练网络之前,必须对数据进行预处理。如果检查训练集中的第个六图像,会看到像素值处于 0 到 255 之间。
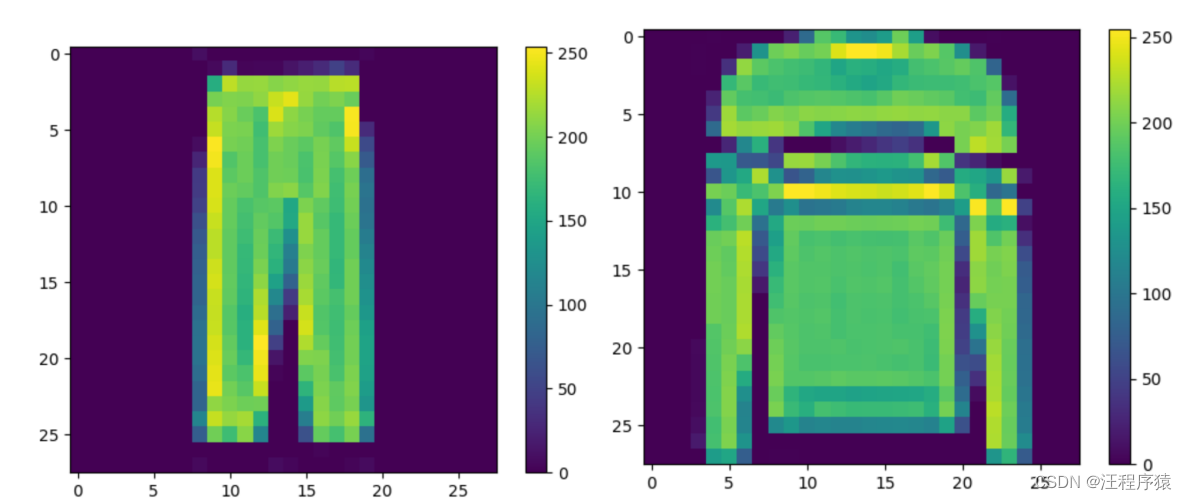
plt.figure()
plt.imshow(train_images[5])
plt.colorbar()
plt.grid(False)
plt.show()
将这些值缩小至 0 到 1 之间,然后将其馈送到神经网络模型。为此,请将这些值除以 255。接下里以相同的方式对训练集和测试集进行预处理,并且展示出来。
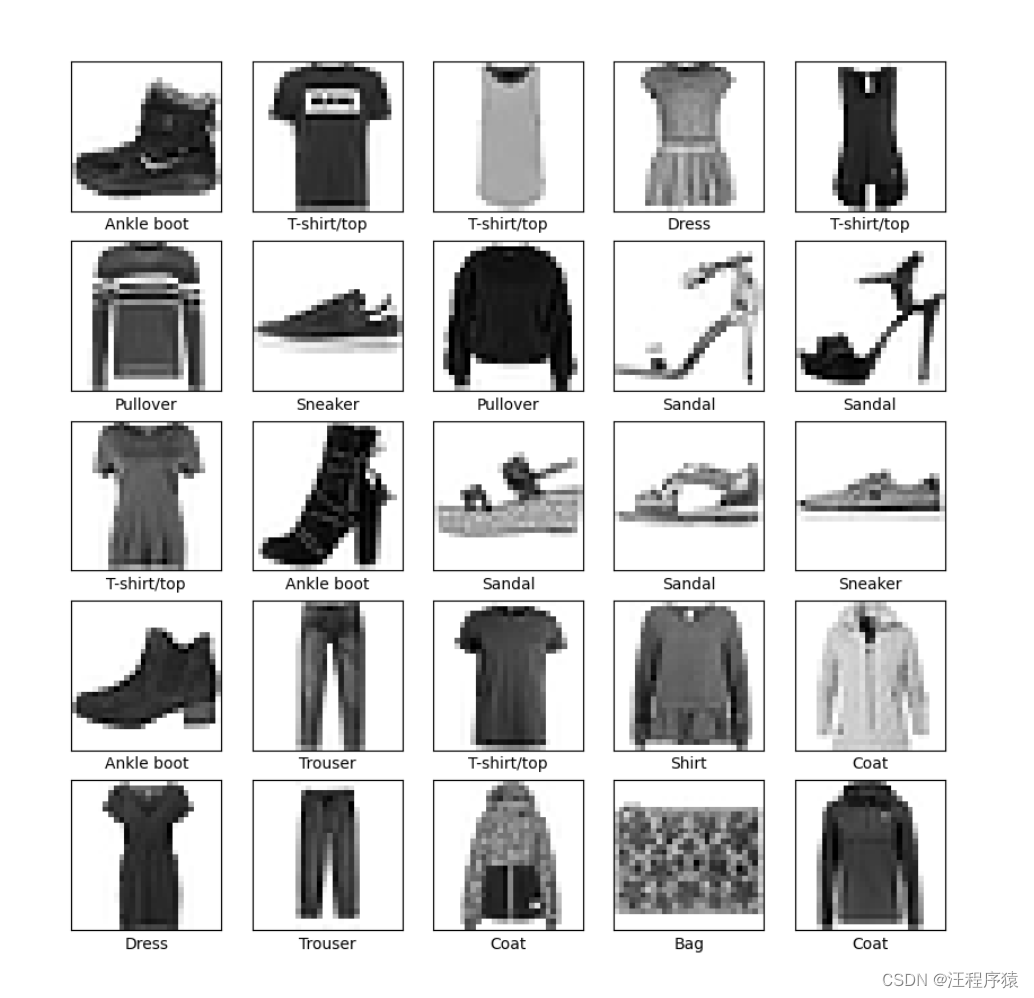
train_images = train_images / 255.0
test_images = test_images / 255.0
plt.figure(figsize=(10,10))
# 画出25个图片,展示
for i in range(25):
    plt.subplot(5,5,i+1)
    plt.xticks([])
    plt.yticks([])
    plt.grid(False)
    plt.imshow(train_images[i], cmap=plt.cm.binary)
    plt.xlabel(class_names[train_labels[i]])
plt.show()
3.3算法描述
神经网络分类算法是模型假设是一个含有n个输入 和k个输出的网络结构, k元交叉熵为目标函数的经验损失最小化算法。
神经网络的基本组成部分是层。层会从向其馈送的数据中提取表示形式。大多数深度学习都包括将简单的层链接在一起。大多数层(如 tf.keras.layers.Dense)都具有在训练期间才会学习的参数。
该网络的第一层 tf.keras.layers.Flatten 将图像格式从二维数组(28 x 28 像素)转换成一维数组(28 x 28 = 784 像素)。将该层视为图像中未堆叠的像素行并将其排列起来。该层没有要学习的参数,它只会重新格式化数据。
展平像素后,网络会包括两个 tf.keras.layers.Dense 层的序列。它们是密集连接或全连接神经层。第一个 Dense 层有 128 个节点(或神经元)。第二个(也是最后一个)层会返回一个长度为 10 的数组。每个节点都包含一个得分,用来表示当前图像属于 10 个类中的哪一类。
model = keras.Sequential([
    keras.layers.Flatten(input_shape=(28, 28)), #输入图像的像素
    keras.layers.Dense(128, activation='relu'),# 计算参数 activation 激励函数 relu过滤>0
    keras.layers.Dense(10) #数据集服装10分类 softmax选出最大
])

# 神经网络初始是采用的都是随机参数
# 通过损失函数评价训练模型 通过优化函数优化模型参数
# metrics 用于监控训练和测试步骤
model.compile(optimizer='adam',
              loss=tf.keras.losses.SparseCategoricalCrossentropy(from_logits=True),
              metrics=['accuracy'])
# 训练
model.fit(train_images, train_labels, epochs=10)
test_loss, test_acc = model.evaluate(test_images,  test_labels, verbose=2)
3.4主要代码(完整代码)
#首先我们需哟引入我们需要的工具模块
import tensorflow as tf
from tensorflow import keras
# 引入数据分析工具和画图工具
import numpy as np
import matplotlib.pyplot as plt

from main import predictions
# 画图函数
def plot_image(i, predictions_array, true_label, img):
 predictions_array, true_label, img = predictions_array, true_label[i], img[i]
 plt.grid(False)
 plt.xticks([])
 plt.yticks([])
 plt.imshow(img, cmap=plt.cm.binary)
 predicted_label = np.argmax(predictions_array)
 # 预测对了,显示蓝色;错了显示红色
 if predicted_label == true_label:
  color = 'blue'
 else:
  color = 'red'

 plt.xlabel("{} {:2.0f}% ({})".format(class_names[predicted_label],
                                      100 * np.max(predictions_array),
                                      class_names[true_label]),
            color=color)

# 画图函数
def plot_value_array(i, predictions_array, true_label):
 predictions_array, true_label = predictions_array, true_label[i]
 plt.grid(False)
 plt.xticks(range(10))
 plt.yticks([])
 thisplot = plt.bar(range(10), predictions_array, color="#777777")
 plt.ylim([0, 1])
 predicted_label = np.argmax(predictions_array)

 thisplot[predicted_label].set_color('red')
 thisplot[true_label].set_color('blue')

# 导入数据
fashion_mnist = keras.datasets.fashion_mnist
(train_images, train_labels), (test_images, test_labels) = fashion_mnist.load_data()
class_names = ['T-shirt/top', 'Trouser', 'Pullover', 'Dress', 'Coat',
               'Sandal', 'Shirt', 'Sneaker', 'Bag', 'Ankle boot']
plt.figure()
plt.imshow(train_images[5])
plt.colorbar()
plt.grid(False)
plt.show()

train_images = train_images / 255.0
test_images = test_images / 255.0
plt.figure(figsize=(10,10))
# 画出25个图片,展示
for i in range(25):
    plt.subplot(5,5,i+1)
    plt.xticks([])
    plt.yticks([])
    plt.grid(False)
    plt.imshow(train_images[i], cmap=plt.cm.binary)
    plt.xlabel(class_names[train_labels[i]])
plt.show()
# 序贯模型(Sequential):单输入单输出,一条路通到底,层与层之间只有相邻关系,没有跨层连接。这种模型编译速度快,操作也比较简单
model = keras.Sequential([
    keras.layers.Flatten(input_shape=(28, 28)), #输入图像的像素
    keras.layers.Dense(128, activation='relu'),# 计算参数 activation 激励函数 relu过滤>0
    keras.layers.Dense(10) #数据集服装10分类 softmax选出最大
])
# 神经网络初始是采用的都是随机参数
# 通过损失函数评价训练模型 通过优化函数优化模型参数
# metrics 用于监控训练和测试步骤
model.compile(optimizer='adam',
              loss=tf.keras.losses.SparseCategoricalCrossentropy(from_logits=True),
              metrics=['accuracy'])
# 训练
model.fit(train_images, train_labels, epochs=10)
test_loss, test_acc = model.evaluate(test_images,  test_labels, verbose=2)

print('\nTest accuracy:', test_acc)
num_rows = 5
num_cols = 3
num_images = num_rows*num_cols
plt.figure(figsize=(2*2*num_cols, 2*num_rows))

# 展示运算的结果
for i in range(num_images):
  plt.subplot(num_rows, 2*num_cols, 2*i+1)
  plot_image(i, predictions[i], test_labels, test_images)
  plt.subplot(num_rows, 2*num_cols, 2*i+2)
  plot_value_array(i, predictions[i], test_labels)
plt.tight_layout()
plt.show()
四、实验结果及分析
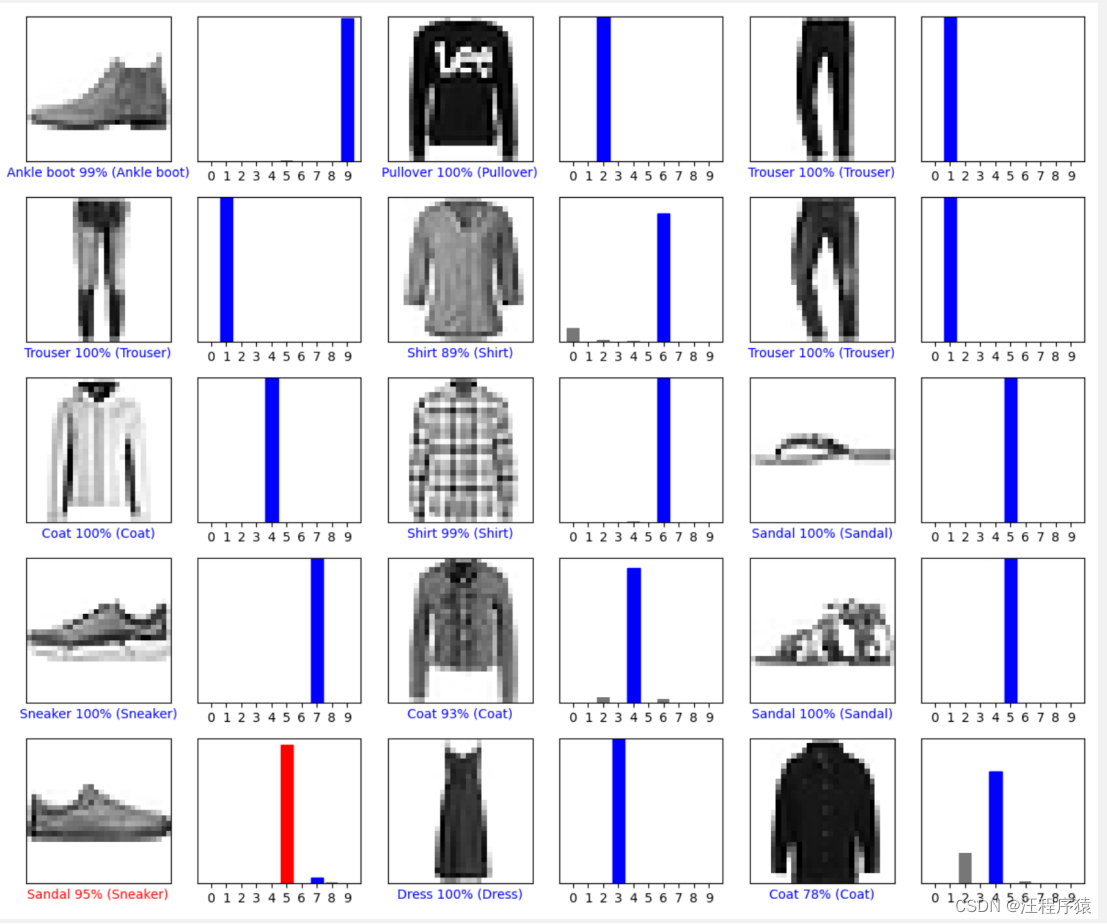

蓝色表示预测正确,红色表示预测错误。最终训练出的模型达到88%。
五、遇到的问题和解决方法
1.导入图片
一开始导入代码如下:
train_image = "D:\pythonProject\MachineLearning\homework\homework6\data\train-labels-idx1-ubyte\train-labels.idx1-ubyte"
test_image = "D:\pythonProject\MachineLearning\homework\homework6\data\train-labels-idx1-ubyte"
train_label = "D:/PyCharm/Project/machine_learning/machine_learning/homework/week13/train-labels-idx1-ubyte"
test_label = "D:\pythonProject\MachineLearning\homework\homework6\data\train-labels-idx1-ubyte"
一直出现错误。
后来采用在线下载导入。
导入数据
fashion_mnist = keras.datasets.fashion_mnist
(train_images, train_labels), (test_images, test_labels) = fashion_mnist.load_data()
资料获取

1.关注微信公众号:汪程序员,回复26121600,即可获取


 8598
8598

 被折叠的 条评论
为什么被折叠?
被折叠的 条评论
为什么被折叠?
 到【灌水乐园】发言


