


- 🍨 本文为🔗365天深度学习训练营 中的学习记录博客
- 🍖 原作者:K同学啊
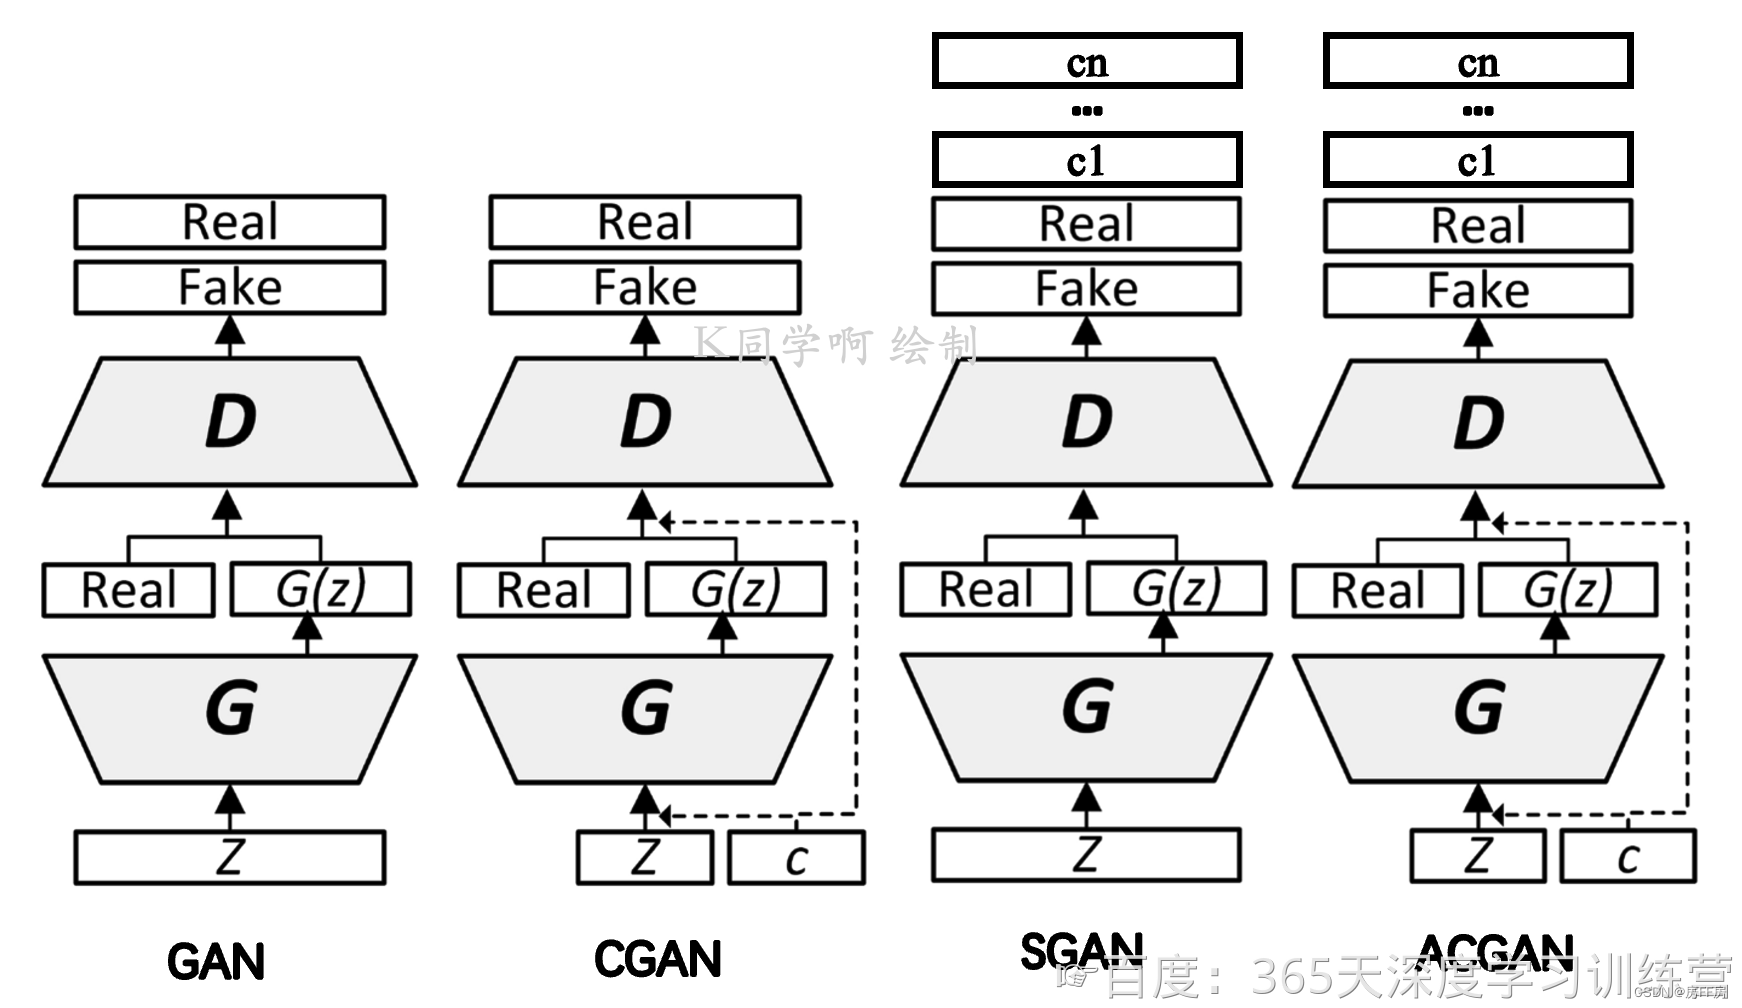
ACGAN的网络结构其实和之前的CGAN和SGAN都非常接近,可以说是两者的结合体。但这样的修改可以有效生成高质量的生成结果,并且使得训练更加稳定。
根据框架图,如何写出代码?
1.CGAN代码实现
定义生成器 Generator
'''
定义生成器 Generator
'''
class Generator(nn.Module):
    def __init__(self):
        super(Generator, self).__init__()
        # 定义条件标签的生成器部分,用于将标签映射到嵌入空间中
        # n_classes:条件标签的总数
        # embedding_dim:嵌入空间的维度
        self.label_conditioned_generator = nn.Sequential(
            nn.Embedding(n_classes, embedding_dim),  # 使用Embedding层将条件标签映射为稠密向量
            nn.Linear(embedding_dim, 16)             # 使用线性层将稠密向量转换为更高维度
        )
        # 定义潜在向量的生成器部分,用于将噪声向量映射到图像空间中
        # latent_dim:潜在向量的维度
        self.latent = nn.Sequential(
            nn.Linear(latent_dim, 4*4*512),  # 使用线性层将潜在向量转换为更高维度
            nn.LeakyReLU(0.2, inplace=True)  # 使用LeakyReLU激活函数进行非线性映射
        )
        # 定义生成器的主要结构,将条件标签和潜在向量合并成生成的图像
        self.model = nn.Sequential(
            # 反卷积层1:将合并后的向量映射为64x8x8的特征图
            nn.ConvTranspose2d(513, 64*8, 4, 2, 1, bias=False),
            nn.BatchNorm2d(64*8, momentum=0.1, eps=0.8),  # 批标准化
            nn.ReLU(True),  # ReLU激活函数
            # 反卷积层2:将64x8x8的特征图映射为64x4x4的特征图
            nn.ConvTranspose2d(64*8, 64*4, 4, 2, 1, bias=False),
            nn.BatchNorm2d(64*4, momentum=0.1, eps=0.8),
            nn.ReLU(True),
            # 反卷积层3:将64x4x4的特征图映射为64x2x2的特征图
            nn.ConvTranspose2d(64*4, 64*2, 4, 2, 1, bias=False),
            nn.BatchNorm2d(64*2, momentum=0.1, eps=0.8),
            nn.ReLU(True),
            # 反卷积层4:将64x2x2的特征图映射为64x1x1的特征图
            nn.ConvTranspose2d(64*2, 64*1, 4, 2, 1, bias=False),
            nn.BatchNorm2d(64*1, momentum=0.1, eps=0.8),
            nn.ReLU(True),
            # 反卷积层5:将64x1x1的特征图映射为3x64x64的RGB图像
            nn.ConvTranspose2d(64*1, 3, 4, 2, 1, bias=False),
            nn.Tanh()  # 使用Tanh激活函数将生成的图像像素值映射到[-1, 1]范围内
        )

    def forward(self, inputs):
        noise_vector, label = inputs
        # 通过条件标签生成器将标签映射为嵌入向量
        label_output = self.label_conditioned_generator(label)
        # 将嵌入向量的形状变为(batch_size, 1, 4, 4),以便与潜在向量进行合并
        label_output = label_output.view(-1, 1, 4, 4)
        # 通过潜在向量生成器将噪声向量映射为潜在向量
        latent_output = self.latent(noise_vector)
        # 将潜在向量的形状变为(batch_size, 512, 4, 4),以便与条件标签进行合并
        latent_output = latent_output.view(-1, 512, 4, 4)
        # 将条件标签和潜在向量在通道维度上进行合并,得到合并后的特征图
        concat = torch.cat((latent_output, label_output), dim=1)
        # 通过生成器的主要结构将合并后的特征图生成为RGB图像
        image = self.model(concat)
        return image


# 创建生成器
generator = Generator().to(device)
# 使用 "weights_init" 函数对所有权重进行随机初始化,
# 平均值(mean)设置为0,标准差(stdev)设置为0.02。
generator.apply(weights_init)
# 打印生成器模型
print(generator)
定义判别器 Discriminator
'''
定义判别器 Discriminator
'''
class Discriminator(nn.Module):
    def __init__(self):
        super(Discriminator, self).__init__()
        # 定义一个条件标签的嵌入层,用于将类别标签转换为特征向量
        self.label_condition_disc = nn.Sequential(
            nn.Embedding(n_classes, embedding_dim),     # 嵌入层将类别标签编码为固定长度的向量
            nn.Linear(embedding_dim, 3*128*128)         # 线性层将嵌入的向量转换为与图像尺寸相匹配的特征张量
        )
        # 定义主要的鉴别器模型
        self.model = nn.Sequential(
            nn.Conv2d(6, 64, 4, 2, 1, bias=False),       # 输入通道为6(包含图像和标签的通道数),输出通道为64,4x4的卷积核,步长为2,padding为1
            nn.LeakyReLU(0.2, inplace=True),             # LeakyReLU激活函数,带有负斜率,增加模型对输入中的负值的感知能力
            nn.Conv2d(64, 64*2, 4, 3, 2, bias=False),    # 输入通道为64,输出通道为64*2,4x4的卷积核,步长为3,padding为2
            nn.BatchNorm2d(64*2, momentum=0.1, eps=0.8),  # 批量归一化层,有利于训练稳定性和收敛速度
            nn.LeakyReLU(0.2, inplace=True),
            nn.Conv2d(64*2, 64*4, 4, 3, 2, bias=False),  # 输入通道为64*2,输出通道为64*4,4x4的卷积核,步长为3,padding为2
            nn.BatchNorm2d(64*4, momentum=0.1, eps=0.8),
            nn.LeakyReLU(0.2, inplace=True),
            nn.Conv2d(64*4, 64*8, 4, 3, 2, bias=False),  # 输入通道为64*4,输出通道为64*8,4x4的卷积核,步长为3,padding为2
            nn.BatchNorm2d(64*8, momentum=0.1, eps=0.8),
            nn.LeakyReLU(0.2, inplace=True),
            nn.Flatten(),                               # 将特征图展平为一维向量,用于后续全连接层处理
            nn.Dropout(0.4),                            # 随机失活层,用于减少过拟合风险
            nn.Linear(4608, 1),                         # 全连接层,将特征向量映射到输出维度为1的向量
            nn.Sigmoid()                                # Sigmoid激活函数,用于输出范围限制在0到1之间的概率值
        )

    def forward(self, inputs):
        img, label = inputs
        # 将类别标签转换为特征向量
        label_output = self.label_condition_disc(label)
        # 重塑特征向量为与图像尺寸相匹配的特征张量
        label_output = label_output.view(-1, 3, 128, 128)
        # 将图像特征和标签特征拼接在一起作为鉴别器的输入
        concat = torch.cat((img, label_output), dim=1)
        # 将拼接后的输入通过鉴别器模型进行前向传播,得到输出结果
        output = self.model(concat)
        return output


# 创建判别器对象
discriminator = Discriminator().to(device)
# 应用 "weights_init" 函数来随机初始化所有权重
# 使用 mean=0, stdev=0.2 的方式进行初始化
discriminator.apply(weights_init)
# 打印判别器模型
print(discriminator)
2.SGAN代码实现
定义判别器 Discriminator
class Discriminator(nn.Module):
    def __init__(self):
        super(Discriminator, self).__init__()

        def discriminator_block(in_filters, out_filters, bn=True):
            """返回每个鉴别器块的层"""
            block = [nn.Conv2d(in_filters, out_filters, 3, 2, 1), nn.LeakyReLU(0.2, inplace=True), nn.Dropout2d(0.25)]
            if bn:
                block.append(nn.BatchNorm2d(out_filters, 0.8))
            return block

        # 鉴别器的卷积块
        self.conv_blocks = nn.Sequential(
            *discriminator_block(opt.channels, 16, bn=False),
            *discriminator_block(16, 32),
            *discriminator_block(32, 64),
            *discriminator_block(64, 128),
        )

        # 下采样图像的高度和宽度
        ds_size = opt.img_size // 2 ** 4

        # 输出层
        self.adv_layer = nn.Sequential(nn.Linear(128 * ds_size ** 2, 1), nn.Sigmoid())  # 用于鉴别真假的输出层
        self.aux_layer = nn.Sequential(nn.Linear(128 * ds_size ** 2, opt.num_classes + 1), nn.Softmax())  # 用于鉴别类别的输出层

    def forward(self, img):
        out = self.conv_blocks(img)
        out = out.view(out.shape[0], -1)
        validity = self.adv_layer(out)
        label = self.aux_layer(out)

        return validity, label
Discriminator区别:返回不同
Conditional GAN:CGAN
G:将类标签作为条件信息和噪声一起放入G后生成样本
D:将类标签和生成样本或者训练样本放入D,D的输出是输出样本为真假的概率或者0,1二值
Semi-supervised GAN:
G:不输入类别,只输入噪声来生成样本
D:输入生成样本或者训练样本,最后的输入是输入图像所属类别或者输入图像为假,一共N+1维(N是总类别数)
ACGAN同时结合了CGAN和SGAN的做法来提高图片的生成质量,即CGAN通过结合标签信息来提高生成数据的质量,SGAN通过重建标签信息来提高生成数据的质量。
在ACGAN中,主要是在原CGAN的基础上,对判别器的输入进行改变,不仅要输出图片的真假信息,同时还对应一个分类器来判断输入图片所属的类别,对应类别的损失会告诉判别器和生成器往着目标类别生成图片。
3.ACGAN代码
# 生成器网络类
class Generator(nn.Module):
    def __init__(self):
        super(Generator, self).__init__()

        # 为类别标签创建嵌入层
        self.label_emb = nn.Embedding(opt.n_classes, opt.latent_dim)

        # 计算上采样前的初始大小
        self.init_size = opt.img_size // 4  # Initial size before upsampling

        # 第一层线性层
        self.l1 = nn.Sequential(nn.Linear(opt.latent_dim, 128 * self.init_size ** 2))

        # 卷积层块
        self.conv_blocks = nn.Sequential(
            nn.BatchNorm2d(128),
            nn.Upsample(scale_factor=2),
            nn.Conv2d(128, 128, 3, stride=1, padding=1),
            nn.BatchNorm2d(128, 0.8),
            nn.LeakyReLU(0.2, inplace=True),
            nn.Upsample(scale_factor=2),
            nn.Conv2d(128, 64, 3, stride=1, padding=1),
            nn.BatchNorm2d(64, 0.8),
            nn.LeakyReLU(0.2, inplace=True),
            nn.Conv2d(64, opt.channels, 3, stride=1, padding=1),
            nn.Tanh(),
        )

    def forward(self, noise, labels):
        # 将标签嵌入到噪声中
        gen_input = torch.mul(self.label_emb(labels), noise)

        # 通过第一层线性层
        out = self.l1(gen_input)

        # 重新整形为合适的形状
        out = out.view(out.shape[0], 128, self.init_size, self.init_size)

        # 通过卷积层块生成图像
        img = self.conv_blocks(out)
        return img

# 判别器网络类
class Discriminator(nn.Module):
    def __init__(self):
        super(Discriminator, self).__init__()

        # 定义判别器块的函数
        def discriminator_block(in_filters, out_filters, bn=True):
            """返回每个判别器块的层"""
            block = [nn.Conv2d(in_filters, out_filters, 3, 2, 1), nn.LeakyReLU(0.2, inplace=True), nn.Dropout2d(0.25)]
            if bn:
                block.append(nn.BatchNorm2d(out_filters, 0.8))
            return block

        # 判别器的卷积层块
        self.conv_blocks = nn.Sequential(
            *discriminator_block(opt.channels, 16, bn=False),
            *discriminator_block(16, 32),
            *discriminator_block(32, 64),
            *discriminator_block(64, 128),
        )

        # 下采样后图像的高度和宽度
        ds_size = opt.img_size // 2 ** 4

        # 输出层
        self.adv_layer = nn.Sequential(nn.Linear(128 * ds_size ** 2, 1), nn.Sigmoid())
        self.aux_layer = nn.Sequential(nn.Linear(128 * ds_size ** 2, opt.n_classes), nn.Softmax())

    def forward(self, img):
        out = self.conv_blocks(img)
        out = out.view(out.shape[0], -1)
        validity = self.adv_layer(out)
        label = self.aux_layer(out)

        return validity, label


 2000
2000


 被折叠的 条评论
为什么被折叠?
被折叠的 条评论
为什么被折叠?
 到【灌水乐园】发言


