


1. 视频处理成关键帧
官方提供按照驾驶员行为分类(5类,含正负样本)的142个视频,如果对视频作为直接的数据集来标注和学习训练处理困难,较为流行和成熟的技术是对图片进行标注训练。视频的本质是图片,因此我们起初设计的关键帧抽取采用简单的时间间隔采法,是将视频(12秒左右)按照10fps裁剪,但是最终出现的图片质量有的较为模糊,有的没有体现关键动作。因此决定采用抽帧方式。
注:从动画上来说一秒二十四帧刚好符合人大脑处理图片的速度,小于10帧/秒会显得卡顿,大于30/秒会视觉晕眩。假设同样为10秒的视频, 30fps的视频总共有300帧, 每秒播放30帧。 (录制帧率=播放帧率=30)
计算视频帧之间差异import cv2 import argparse import json import os import numpy as np import errno def getInfo(sourcePath): cap = cv2.VideoCapture(sourcePath) info = { "framecount": cap.get(cv2.CAP_PROP_FRAME_COUNT), "fps": cap.get(cv2.CAP_PROP_FPS), "width": int(cap.get(cv2.CAP_PROP_FRAME_WIDTH)), "heigth": int(cap.get(cv2.CAP_PROP_FRAME_Heigth)), "codec": int(cap.get(cv2.CAP_PROP_FOURCC)) } cap.release() return info def scale(img, xScale, yScale): res = cv2.resize(img, None,fx=xScale, fy=yScale, interpolation = cv2.INTER_AREA) return res def resize(img, width, heigth): res = cv2.resize(img, (width, heigth), interpolation=cv2.INTER_AREA) return res def extract_cols(image, numCols): # convert to np.float32 matrix that can be clustered Z = image.reshape((-1, 3)) Z = np.float32(Z) # Set parameters for the clustering max_iter = 20 epsilon = 1.0 K = numCols criteria = (cv2.TERM_CRITERIA_EPS + cv2.TERM_CRITERIA_MAX_ITER, max_iter, epsilon) labels = np.array([]) # cluster compactness, labels, centers = cv2.kmeans(Z, K, labels, criteria, 10, cv2.KMEANS_RANDOM_CENTERS) clusterCounts = [] for idx in range(K): count = len(Z[np.where(labels == idx)]) clusterCounts.append(count) rgbCenters = [] for center in centers: bgr = center.tolist() bgr.reverse() rgbCenters.append(bgr) cols = [] for i in range(K): iCol = { "count": clusterCounts[i], "col": rgbCenters[i] } cols.append(iCol) return cols def calculateFrameStats(sourcePath, verbose=True, after_frame=0): # 提取相邻帧的差别 cap = cv2.VideoCapture(sourcePath) # 提取视频 data = { "frame_info": [] } lastFrame = None while(cap.isOpened()): ret, frame = cap.read() if frame is None: break frame_number = cap.get(cv2.CAP_PROP_POS_FRAMES) - 1 gray = cv2.cvtColor(frame, cv2.COLOR_BGR2GRAY) # 提取灰度信息 gray = scale(gray, 0.25, 0.25) # 缩放为原来的四分之一 gray = cv2.GaussianBlur(gray, (9, 9), 0.0) # 做高斯模糊 # lastFrame = gray if frame_number < after_frame: lastFrame = gray continue if lastFrame is not None: diff = cv2.subtract(gray, lastFrame) # 用当前帧减去上一帧 diffMag = cv2.countNonZero(diff) # 计算两帧灰度值不同的像素点个数 frame_info = { "frame_number": int(frame_number), "diff_count": int(diffMag) } data["frame_info"].append(frame_info) if verbose: cv2.imshow('diff', diff) if cv2.waitKey(1) & 0xFF == ord('q'): break # Keep a ref to this frame for differencing on the next iteration lastFrame = gray cap.release() cv2.destroyAllWindows() # compute some states diff_counts = [fi["diff_count"] for fi in data["frame_info"]] data["stats"] = { "num": len(diff_counts), "min": np.min(diff_counts), "max": np.max(diff_counts), "mean": np.mean(diff_counts), "median": np.median(diff_counts), "sd": np.std(diff_counts) # 计算所有帧之间, 像素变化个数的标准差 } greater_than_mean = [fi for fi in data["frame_info"] if fi["diff_count"] > data["stats"]["mean"]] greater_than_median = [fi for fi in data["frame_info"] if fi["diff_count"] > data["stats"]["median"]] greater_than_one_sd = [fi for fi in data["frame_info"] if fi["diff_count"] > data["stats"]["sd"] + data["stats"]["mean"]] greater_than_two_sd = [fi for fi in data["frame_info"] if fi["diff_count"] > (data["stats"]["sd"] * 2) + data["stats"]["mean"]] greater_than_three_sd = [fi for fi in data["frame_info"] if fi["diff_count"] > (data["stats"]["sd"] * 3) + data["stats"]["mean"]] # 统计其他信息 data["stats"]["greater_than_mean"] = len(greater_than_mean) data["stats"]["greater_than_median"] = len(greater_than_median) data["stats"]["greater_than_one_sd"] = len(greater_than_one_sd) data["stats"]["greater_than_three_sd"] = len(greater_than_three_sd) data["stats"]["greater_than_two_sd"] = len(greater_than_two_sd) return data def writeImagePyramid(destPath, name, seqNumber, image): fullPath = os.path.join(destPath, name + "_" + str(seqNumber) + ".png") cv2.imwrite(fullPath, image) def detectScenes(sourcePath, destPath, data, name, verbose=False): destDir = os.path.join(destPath, "images") # TODO make sd multiplier externally configurable # diff_threshold = (data["stats"]["sd"] * 1.85) + data["stats"]["mean"] diff_threshold = (data["stats"]["sd"] * 2.05) + (data["stats"]["mean"]) cap = cv2.VideoCapture(sourcePath) for index, fi in enumerate(data["frame_info"]): if fi["diff_count"] < diff_threshold: continue cap.set(cv2.CAP_PROP_POS_FRAMES, fi["frame_number"]) ret, frame = cap.read() # extract dominant color small = resize(frame, 100, 100) cols = extract_cols(small, 5) data["frame_info"][index]["dominant_cols"] = cols if frame is not None: # file_name = sourcePath.split('.')[0] writeImagePyramid(destDir, name, fi["frame_number"], frame) if verbose: cv2.imshow('extract', frame) if cv2.waitKey(1) & 0xFF == ord('q'): break cap.release() cv2.destroyAllWindows() return data def makeOutputDirs(path): try: os.makedirs(os.path.join(path, "metadata")) os.makedirs(os.path.join(path, "images")) except OSError as exc: # Python >2.5 if exc.errno == errno.EEXIST and os.path.isdir(path): pass else: raise
读取视频文件,可以使用OpenCV等库。
对于每一帧,将其转换为灰度图像,这样每个像素只需要一个8位的值来表示。可以使用OpenCV中的cvtColor函数来实现灰度转换。
对于每一帧,将其缩小并进行高斯模糊处理。缩小图像可以减少计算量,同时也可以去除一些噪声。高斯模糊可以减少图像中的高频噪声,使得计算出的差异更加准确。可以使用OpenCV中的resize函数和GaussianBlur函数来实现缩小和高斯模糊。
计算每个帧与前一个帧之间的差异,并记录两帧之间不同像素的数量。可以使用像素级差分来计算两帧之间的差异。具体地,可以逐个比较两帧中相同位置的像素值,如果它们之间的差异超过一个预定的阈值,则认为它们不同。可以使用OpenCV中的absdiff函数来实现像素级差分,同时也可以使用阈值函数来设置差异阈值。
计算帧差异数值的统计信息,如最小值、最大值、中位数、均值和标准差。可以使用numpy中的函数来实现这些计算。
统计一些超过平均、中位数、标准差的阈值的帧数。可以使用numpy中的函数来实现这些计算。
因此之前在本地写了一个采样帧的文件:(供参考,提供了一种分类匹配处理文件名的手法)
import os
import cv2
from PIL import Image
import numpy as np

# 定义不同命名规则对应的文件名匹配模式
filename_patterns = {
    "day_man": "./video/day_man_{}_{}_{}.mp4",
    "night_man": "./video/night_man_{}_{}_{}.mp4",
    "day_woman": "./video/day_woman_{}_{}_{}.mp4",
    "night_woman": "./video/night_woman_{}_{}_{}.mp4"
}

# 遍历所有文件名匹配模式
for pattern_name, filename_pattern in filename_patterns.items():
    for collector_id in range(1, 1000):
        for action_id in ["00", "10", "11", "20", "21", "30", "31", "40", "41"]:
            for segment_id in range(1, 10):
                # 使用字符串格式化函数构造具体的文件名
                filename = filename_pattern.format(str(collector_id).zfill(3), action_id, str(segment_id))
                # 判断文件是否存在
                if os.path.exists(filename):
                    # 如果文件存在,读取视频并抽帧
                    cap = cv2.VideoCapture(filename)
                    fps = cap.get(cv2.CAP_PROP_FPS)
                    imageNum = 0
                    sum = 0
                    timef = 6 # 隔6帧保存一张图片
                    while True:
                        (frameState, frame) = cap.read()  # 记录每帧及获取状态
                        sum += 1
                        if frameState == True and (sum % timef == 0):
                            # 格式转变,BGRtoRGB
                            frame = cv2.cvtColor(frame, cv2.COLOR_BGR2RGB)
                            # 转变成Image
                            frame = Image.fromarray(np.uint8(frame))
                            frame = np.array(frame)
                            # RGBtoBGR满足opencv显示格式
                            frame = cv2.cvtColor(frame, cv2.COLOR_RGB2BGR)
                            imageNum = imageNum + 1
                            # 存储路径
                            output_dir = "./output/{}_{}_{}".format(pattern_name, str(collector_id).zfill(3), action_id)
                            os.makedirs(output_dir, exist_ok=True)
                            filename = os.path.join(output_dir, "{}.jpg".format(str(imageNum).zfill(5)))
                            cv2.imwrite(filename, frame, [cv2.IMWRITE_JPEG_QUALITY, 100])
                            print(filename + " successful")  # 输出存储状态
                        elif frameState == False:
                            break
                    print('finish!')
                    cap.release()
"""
最终存储位置在"./output/{}{}{}",其中{}的部分分别是pattern_name(命名规则),
collector_id(采集员编号)和action_id(动作编号)。存储的文件格式为jpg,命名方式为"{imageNum}.jpg",
其中imageNum为图像编号,以0填充到5位。例如,第一张图像的文件名为"00001.jpg"。
"""
接下来导入视频数据,从obs://obs-aigallery-zc/clf/dataset/Fatigue_driving_detection_video,下载到本地notebook,为裁帧准备。 基于华为云的modelarts开发,mox库是用于支持华为云云端的obs的相关操作。
import moxing as mox
mox.file.copy_parallel('obs://obs-aigallery-zc/clf/dataset/Fatigue_driving_detection_video','Fatigue_driving_detection_video')  # 拷贝142段视频到ModelArts Notebook
抽帧后保存的文件命名与路径
dest = "key frame" # 抽取图像保存路径

makeOutputDirs(dest)
test_path ='Fatigue_driving_detection_video'   # 在这里修改视频路径
filenames = os.listdir(test_path)
count = 0
for filename in filenames:

    source = os.path.join(test_path, filename)

    name = filename.split('.')[0]

    data = calculateFrameStats(source, False, 0)
    data = detectScenes(source, dest, data, name, False)
    keyframeInfo = [frame_info for frame_info in data["frame_info"] if "dominant_cols" in frame_info]

    # Write out the results

    data_fp = os.path.join(dest, "metadata", name + "-meta.txt")
    with open(data_fp, 'w') as f:
        f.write(str(data))

    keyframe_info_fp = os.path.join(dest, "metadata", name + "-keyframe-meta.txt")
    with open(keyframe_info_fp, 'w') as f:
        f.write(str(keyframeInfo))
print(count)
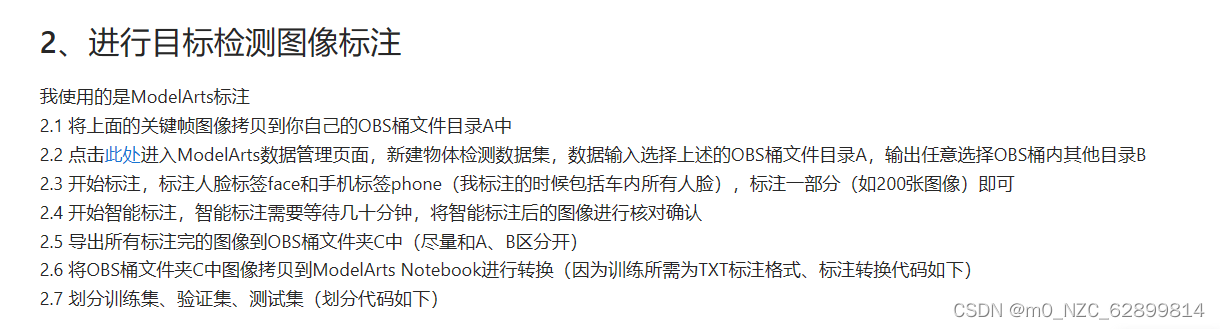
2. 标注
标注图片后的产物是会给每一个图片对应生成一个xml格式的文件,但是如果要用yolo框架去训练模型,输入的数据必须是txt格式,因此这里有一步转换格式的过程
标注工作可以在本地进行,也可以在云端。本地优势在于可以随意切换保存格式,可以跳过转换这一步。但是建议在云端标注,因为可以团队协作。
注意看:obs这里有三个文件夹,第一个是关键帧的文件夹A,第二个是标注时输出的位置为文件夹B,第三个是智能标注后和手动标注的合集文件夹C。
'***转换xml标注文件为txt格式,无法直接运行***'
import copy
from lxml.etree import Element, SubElement, tostring, ElementTree

import xml.etree.ElementTree as ET
import pickle
import os
from os import listdir, getcwd
from os.path import join

classes = ["face", "phone"]  # 类别


def convert(size, box):
    dw = 1. / size[0]
    dh = 1. / size[1]
    x = (box[0] + box[1]) / 2.0
    y = (box[2] + box[3]) / 2.0
    w = box[1] - box[0]
    h = box[3] - box[2]
    x = x * dw
    w = w * dw
    y = y * dh
    h = h * dh
    return (x, y, w, h)


def convert_annotation(image_id):
    in_file = open('./label_xml/%s.xml' % (image_id), encoding='UTF-8')

    out_file = open('yolov7/datasets/Fatigue_driving_detection/txt_labels/%s.txt' % (image_id), 'w')  # 生成txt格式文件, 保存在yolov7训练所需的数据集路径中
    tree = ET.parse(in_file)
    root = tree.getroot()
    size = root.find('size')
    w = int(size.find('width').text)
    h = int(size.find('height').text)

    for obj in root.iter('object'):
        cls = obj.find('name').text
        print(cls)
        if cls not in classes:
            continue
        cls_id = classes.index(cls)
        xmlbox = obj.find('bndbox')
        b = (float(xmlbox.find('xmin').text), float(xmlbox.find('xmax').text), float(xmlbox.find('ymin').text),
             float(xmlbox.find('ymax').text))
        bb = convert((w, h), b)
        out_file.write(str(cls_id) + " " + " ".join([str(a) for a in bb]) + '\n')

xml_path = './label_xml/'  # xml_path应该是上述步骤OBS桶文件夹C中的所有文件,记得拷贝过来

img_xmls = os.listdir(xml_path)
for img_xml in img_xmls:
    label_name = img_xml.split('.')[0]
    if  img_xml.split('.')[1] == 'xml':
        convert_annotation(label_name)
每个xml文件包含了一张图像的标注信息,包括物体类别和位置信息。脚本首先解析每个xml文件,提取图像大小和物体位置信息,并将它们转换成yolov7所需的标注格式。最后,它将标注信息保存到对应的txt文件中,以便于yolov7读取。在这个脚本中,txt文件的保存路径为'yolov7/datasets/Fatigue_driving_detection/txt_labels/',而xml文件的路径为'./label_xml/'。
'***转换xml标注文件为txt格式,无法直接运行***'
import moxing as mox
from random import sample
file_list = mox.file.list_directory( xml_path)  # xml_path中是上述步骤OBS桶文件夹C中的所有文件,记得拷贝到本地
print(len(file_list))
val_file_list = sample(file_list, 300)  # 选择了300张做测试集
line = ''
for i in val_file_list:
    if i.endswith('.png') :
        line += 'datasets/Fatigue_driving_detection/images/'+i+'\n'     # datasets/Fatigue_driving_detection/images/ 是yolov7训练使用的
with open('yolov7/datasets/Fatigue_driving_detection/val.txt', 'w+') as f:
    f.writelines(line)

test_file_list = sample(file_list, 300)
line = ''
for i in test_file_list:
    if i.endswith('.png'):
        line += 'datasets/Fatigue_driving_detection/images/'+i+'\n'
with open('yolov7/datasets/Fatigue_driving_detection/test.txt', 'w+') as f:
    f.writelines(line)

line = ''
for i in file_list:
    if i not in val_file_list and i not in test_file_list:
        if i.endswith('.png') :
            line += 'datasets/Fatigue_driving_detection/images/'+i+'\n'
with open('yolov7/datasets/Fatigue_driving_detection/train.txt', 'w+') as f:
    f.writelines(line)
这段代码用于生成yolov7训练所需的train.txt, test.txt和val.txt文件。首先通过mox模块读取存放在OBS桶中的xml标注文件路径,然后从中随机选择300个作为测试集(test.txt和val.txt),剩余的作为训练集(train.txt)。注意,这里选择的是.xml文件对应的图片,而不是.xml文件本身。在文件名前面加上了datasets/Fatigue_driving_detection/images/,这是yolov7训练所需的路径。
3. 使用yolov7训练目标检测模型
https://developer.huaweicloud.com/develop/aigallery/notebook/detail?id=4f59e6c9-3e48-48e7-a723-ac972bb85aa8
# 拷贝提供的baseline 模型包到本地
import moxing as mox
mox.file.copy_parallel('obs://obs-aigallery-zc/clf/model/video_classification','video_classification')
# 推理代码 展示
from PIL import Image
import copy
import sys
import traceback
import os
import numpy as np
import time
import cv2
from input_reader import InputReader
from tracker import Tracker
from EAR import eye_aspect_ratio
from MAR import mouth_aspect_ratio

from models.experimental import attempt_load
from utils1.general import check_img_size
from tempfile import NamedTemporaryFile
from utils1.torch_utils import TracedModel
from detect import detect
from model_service.pytorch_model_service import PTServingBaseService


class fatigue_driving_detection(PTServingBaseService):
    def __init__(self, model_name, model_path):
        # these three parameters are no need to modify
        self.model_name = model_name
        self.model_path = model_path

        self.capture = 'test.mp4'

        self.width = 1920
        self.height = 1080
        self.fps = 30
        self.first = True

        self.standard_pose = [180, 40, 80]
        self.look_around_frame = 0
        self.eyes_closed_frame = 0
        self.mouth_open_frame = 0
        self.use_phone_frame = 0
        # lStart, lEnd) = (42, 48)
        self.lStart = 42
        self.lEnd = 48
        # (rStart, rEnd) = (36, 42)
        self.rStart = 36
        self.rEnd = 42
        # (mStart, mEnd) = (49, 66)
        self.mStart = 49
        self.mEnd = 66
        self.EYE_AR_THRESH = 0.2
        self.MOUTH_AR_THRESH = 0.6
        self.frame_3s = self.fps * 3
        self.face_detect = 0

        self.weights = "best.pt"
        self.imgsz = 640

        self.device = 'cpu'  # 大赛后台使用CPU判分

        model = attempt_load(model_path, map_location=self.device)
        self.stride = int(model.stride.max())
        self.imgsz = check_img_size(self.imgsz, s=self.stride)

        self.model = TracedModel(model, self.device, self.imgsz)


        self.need_reinit = 0
        self.failures = 0

        self.tracker = Tracker(self.width, self.height, threshold=None, max_threads=4, max_faces=4,
                          discard_after=10, scan_every=3, silent=True, model_type=3,
                          model_dir=None, no_gaze=False, detection_threshold=0.6,
                          use_retinaface=0, max_feature_updates=900,
                          static_model=True, try_hard=False)

        # self.temp = NamedTemporaryFile(delete=False)  # 用来存储视频的临时文件

    def _preprocess(self, data):
        # preprocessed_data = {}
        for k, v in data.items():
            for file_name, file_content in v.items():
                try:
                    try:
                        with open(self.capture, 'wb') as f:
                            file_content_bytes = file_content.read()
                            f.write(file_content_bytes)

                    except Exception:
                        return {"message": "There was an error loading the file"}

                    # self.capture = self.temp.name  # Pass temp.name to VideoCapture()
                except Exception:
                    return {"message": "There was an error processing the file"}
        return 'ok'

    def _inference(self, data):
        """
        model inference function
        Here are a inference example of resnet, if you use another model, please modify this function
        """
        print(data)
        result = {"result": {"category": 0, "duration": 6000}}

        self.input_reader = InputReader(self.capture, 0, self.width, self.height, self.fps)
        source_name = self.input_reader.name
        now = time.time()
        while self.input_reader.is_open():
            if not self.input_reader.is_open() or self.need_reinit == 1:
                self.input_reader = InputReader(self.capture, 0, self.width, self.height, self.fps, use_dshowcapture=False, dcap=None)
                if self.input_reader.name != source_name:
                    print(f"Failed to reinitialize camera and got {self.input_reader.name} instead of {source_name}.")
                    # sys.exit(1)
                self.need_reinit = 2
                time.sleep(0.02)
                continue
            if not self.input_reader.is_ready():
                time.sleep(0.02)
                continue

            ret, frame = self.input_reader.read()

            self.need_reinit = 0

            try:
                if frame is not None:
                    # 剪裁主驾驶位
                    frame = frame[:, 600:1920, :]

                    # 检测驾驶员是否接打电话 以及低头的人脸
                    bbox = detect(self.model, frame, self.stride, self.imgsz)
                    # print(results)

                    for box in bbox:
                        if box[0] == 0:
                            self.face_detect = 1
                        if box[0] == 1:
                            self.use_phone_frame += 1

                    # 检测驾驶员是否张嘴、闭眼、转头
                    faces = self.tracker.predict(frame)
                    if len(faces) > 0:

                        face_num = 0
                        max_x = 0
                        for face_num_index, f in enumerate(faces):
                            if max_x <= f.bbox[3]:
                                face_num = face_num_index
                                max_x = f.bbox[3]

                        f = faces[face_num]
                        f = copy.copy(f)
                        # 检测是否转头
                        if np.abs(self.standard_pose[0] - f.euler[0]) >= 45 or np.abs(self.standard_pose[1] - f.euler[1]) >= 45 or \
                                np.abs(self.standard_pose[2] - f.euler[2]) >= 45:
                            self.look_around_frame += 1
                        else:
                            self.look_around_frame = 0

                        # 检测是否闭眼
                        leftEye = f.lms[self.lStart:self.lEnd]
                        rightEye = f.lms[self.rStart:self.rEnd]
                        leftEAR = eye_aspect_ratio(leftEye)
                        rightEAR = eye_aspect_ratio(rightEye)
                        # average the eye aspect ratio together for both eyes
                        ear = (leftEAR + rightEAR) / 2.0

                        if ear < self.EYE_AR_THRESH:
                            self.eyes_closed_frame += 1
                        else:
                            self.eyes_closed_frame = 0
                        # print(ear, eyes_closed_frame)

                        # 检测是否张嘴
                        mar = mouth_aspect_ratio(f.lms)

                        if mar > self.MOUTH_AR_THRESH:
                            self.mouth_open_frame += 1
                    else:
                        if self.face_detect:
                            self.look_around_frame += 1
                            self.face_detect = 0
                    # print(self.look_around_frame)
                    if self.use_phone_frame >= self.frame_3s:
                        result['result']['category'] = 3
                        break

                    elif self.look_around_frame >= self.frame_3s:
                        result['result']['category'] = 4
                        break

                    elif self.mouth_open_frame >= self.frame_3s:
                        result['result']['category'] = 2
                        break

                    elif self.eyes_closed_frame >= self.frame_3s:
                        result['result']['category'] = 1
                        break
                    else:
                        result['result']['category'] = 0

                    self.failures = 0
                else:
                    break
            except Exception as e:
                if e.__class__ == KeyboardInterrupt:
                    print("Quitting")
                    break
                traceback.print_exc()
                self.failures += 1
                if self.failures > 30:   # 失败超过30次就默认返回
                    break
            del frame
        final_time = time.time()
        duration = int(np.round((final_time - now) * 1000))
        result['result']['duration'] = duration
        return result

    def _postprocess(self, data):
        # os.remove(self.temp.name)
        return data


 5509
5509


 被折叠的 条评论
为什么被折叠?
被折叠的 条评论
为什么被折叠?
 到【灌水乐园】发言


