


目录
MMSegmentation训练与测试
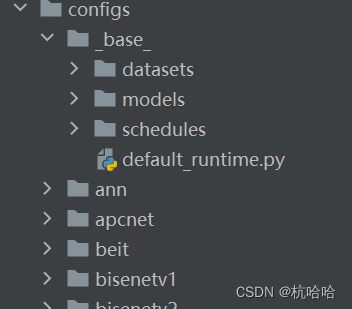
(一)配置文件
1.配置文件结构
数据集(dataset),
模型(model),
训练策略(schedule)
运行时的默认设置(default runtime)
原始配置 (primitive)
配置文件命名风格:
{algorithm name}_{model component names [component1]_[component2]_[...]}_{training settings}_{training dataset information}_{testing dataset information}
'''
    {algorithm name}: 算法的名称,如 deeplabv3, pspnet 等。

    {model component names}: 算法中使用的组件名称,如主干(backbone)、解码头(head)等。例如,r50-d8 表示使用ResNet50主干网络,并使用主干网络的8倍下采样输出作为下一级的输入。

    {training settings}: 训练时的参数设置,如 batch size、数据增强(augmentation)、损失函数(loss)、学习率调度器(learning rate scheduler)和训练轮数(epochs/iterations)。例如: 4xb4-ce-linearlr-40K 意味着使用4个gpu,每个gpu4个图像,使用交叉熵损失函数(CrossEntropy),线性学习率调度程序,训练40K iterations。 一些缩写:

    {gpu x batch_per_gpu}: GPU数量和每个GPU的样本数。bN 表示每个GPU的batch size为N,如 8xb2 为8个gpu x 每个gpu2张图像的缩写。如果未提及,则默认使用 4xb4 。

    {schedule}: 训练计划,选项有20k,40k等。20k 和 40k 分别表示20000次迭代(iterations)和40000次迭代(iterations)。

    {training dataset information}: 训练数据集名称,如 cityscapes , ade20k 等,以及输入分辨率。例如: cityscapes-768x768  表示使用 cityscapes 数据集进行训练,输入分辨率为768x768 。

    {testing dataset information} (可选): 测试数据集名称。当您的模型在一个数据集上训练但在另一个数据集上测试时,请将测试数据集名称添加到此处。如果没有这一部分,则意味着模型是在同一个数据集上进行训练和测试的。
 '''
例如:
pspnet_r50-d8_4xb2-40k_cityscapes-512x1024.py
算法名_组件_训练参数4GPUxBatchszie=2_迭代40k_数据集_输入分辨率
这些都是用于训练和测试PSPNet的配置文件,使用MMEngine实现的Config来加载和解析它们。
from mmengine.config import Config

cfg = Config.fromfile('configs/pspnet/pspnet_r50-d8_4xb2-40k_cityscapes-512x1024.py')
print(cfg.train_dataloader)
(二)使用预训练模型推理
1. 推理器MMSegInferencer
from mmseg.apis import MMSegInferencer
# 将模型加载到内存中
inferencer = MMSegInferencer(model='deeplabv3plus_r18-d8_4xb2-80k_cityscapes-512x1024')
# 推理
inferencer('demo/demo.png', show=True)
使用 MMSegInferencer 来处理一个包含多张图片的 list:
images = [image1, image2, ...] # image1 可以是文件路径或 np.ndarray
inferencer(images, show=True, wait_time=0.5) # wait_time 是延迟时间,0 表示无限

images = $IMAGESDIR
inferencer(images, show=True, wait_time=0.5)

inferencer(images, out_dir='outputs', img_out_dir='vis', pred_out_dir='pred')
2. 推理 API
mmseg.apis.init_model从配置文件初始化一个分割器。
from mmseg.apis import init_model

config_path = 'configs/pspnet/pspnet_r50-d8_4xb2-40k_cityscapes-512x1024.py'
checkpoint_path = 'checkpoints/pspnet_r50-d8_512x1024_40k_cityscapes_20200605_003338-2966598c.pth'

# 初始化不带权重的模型
model = init_model(config_path)

# 初始化模型并加载权重
model = init_model(config_path, checkpoint_path)

# 在 CPU 上的初始化模型并加载权重
model = init_model(config_path, checkpoint_path, 'cpu')
'''
参数:

    config(str,Path 或 mmengine.Config)- 配置文件路径或配置对象。

    checkpoint(str,可选)- 权重路径。如果为 None,则模型将不会加载任何权重。

    device(str,可选)- CPU/CUDA 设备选项。默认为 ‘cuda:0’。

    cfg_options(dict,可选)- 用于覆盖所用配置中的某些设置的选项。

返回值:

    nn.Module:构建好的分割器。

'''
mmseg.apis.inference_model使用分割器推理图像。
from mmseg.apis import init_model, inference_model

config_path = 'configs/pspnet/pspnet_r50-d8_4xb2-40k_cityscapes-512x1024.py'
checkpoint_path = 'checkpoints/pspnet_r50-d8_512x1024_40k_cityscapes_20200605_003338-2966598c.pth'
img_path = 'demo/demo.png'


model = init_model(config_path, checkpoint_path)
result = inference_model(model, img_path)
'''
参数:

    model(nn.Module)- 加载的分割器

    imgs(str,np.ndarray 或 list[str/np.ndarray])- 图像文件或加载的图像

返回值:

    SegDataSample 或 list[SegDataSample]:
    !如果 imgs 是列表或元组,则返回相同长度的列表类型结果,否则直接返回分割结果。


SegDataSample 中的参数分为几个部分:

    gt_sem_seg(PixelData)- 语义分割的标注。

    pred_sem_seg(PixelData)- 语义分割的预测。

    seg_logits(PixelData)- 模型最后一层的输出结果。

'''
mmseg.apis.show_result_pyplot在图像上可视化分割结果。
from mmseg.apis import init_model, inference_model, show_result_pyplot

config_path = 'configs/pspnet/pspnet_r50-d8_4xb2-40k_cityscapes-512x1024.py'
checkpoint_path = 'checkpoints/pspnet_r50-d8_512x1024_40k_cityscapes_20200605_003338-2966598c.pth'
img_path = 'demo/demo.png'


# 从配置文件和权重文件构建模型
model = init_model(config_path, checkpoint_path, device='cuda:0')

# 推理给定图像
result = inference_model(model, img_path)

# 展示分割结果
vis_image = show_result_pyplot(model, img_path, result)

# 保存可视化结果,输出图像将在 `workdirs/result.png` 路径下找到
vis_iamge = show_result_pyplot(model, img_path, result, out_file='work_dirs/result.png')

# 修改展示图像的时间,注意 0 是表示“无限”的特殊值
vis_image = show_result_pyplot(model, img_path, result, wait_time=5)

'''
参数:

    model(nn.Module)- 加载的分割器。

    img(str 或 np.ndarray)- 图像文件名或加载的图像。

    result(SegDataSample)- SegDataSample 预测结果。

    opacity(float)- 绘制分割图的不透明度。默认值为 0.5,必须在 (0,1] 范围内。

    title(str)- pyplot 图的标题。默认值为 ‘’。

    draw_gt(bool)- 是否绘制 GT SegDataSample。默认为 True。

    draw_pred(draws_pred)- 是否绘制预测 SegDataSample。默认为 True。

    wait_time(float)- 显示的间隔,0 是表示“无限”的特殊值。默认为 0。

    show(bool)- 是否展示绘制的图像。默认为 True。

    save_dir(str,可选)- 为所有存储后端保存的文件路径。如果为 None,则后端存储将不会保存任何数据。

    out_file(str,可选)- 输出文件的路径。默认为 None。

返回值:

    np.ndarray:通道为 RGB 的绘制图像。

注意: 如果当前设备没有图形用户界面,建议将 show 设置为 False,并指定 out_file 或 save_dir 来保存结果。如果您想在窗口上显示结果,则不需要特殊设置。
'''
(三)使用现有模型进行训练和测试
1.在单GPU上训练和测试
1.tools/train.py 文件提供了在单GPU上部署训练任务的方法
python tools/train.py  ${配置文件} [可选参数]
'''
    --work-dir ${工作路径}: 重新指定工作路径

    --amp: 使用自动混合精度计算

    --resume: 从工作路径中保存的最新检查点文件(checkpoint)恢复训练

    --cfg-options ${需更覆盖的配置}: 覆盖已载入的配置中的部分设置,并且 以 xxx=yyy 格式的键值对 将被合并到配置文件中。 比如: ‘–cfg-option model.encoder.in_channels=6’, 更多细节请看指导。
'''

!命令行参数 --resume 和在配置文件中的参数 load_from 的不同之处:

--resume 只决定是否继续使用工作路径中最新的检查点,它常常用于恢复被意外打断的训练。

load_from 会明确指定被载入的检查点文件,且训练迭代器将从0开始,通常用于微调模型。

如果您希望从指定的检查点上恢复训练您可以使用:

python tools/train.py ${配置文件} --resume --cfg-options load_from=${检查点}
2.tools/test.py 文件提供了在单 GPU 上启动测试任务的方法。
python tools/test.py ${配置文件} ${模型权重文件} [可选参数]
'''
    --work-dir: 如果指定了路径,结果会保存在该路径下。如果没有指定则会保存在 work_dirs/{配置文件名} 路径下.

    --show: 当 --show-dir 没有指定时,可以使用该参数,在程序运行过程中显示预测结果。

    --show-dir: 绘制了分割掩膜图片的存储文件夹。如果指定了该参数,则可视化的分割掩膜将被保存到 work_dir/timestamp/{指定路径}.

    --wait-time: 多次可视化结果的时间间隔。当 --show 为激活状态时发挥作用。默认为2。

    --cfg-options: 如果被具体指定,以 xxx=yyy 形式的键值对将被合并入配置文件中。

'''
2.测试并保存分割结果
当需要保存测试输出的分割结果,用 --out 指定分割结果输出路径
python tools/test.py ${CONFIG_FILE} ${CHECKPOINT_FILE} --out ${OUTPUT_DIR}
以保存模型 fcn_r50-d8_4xb4-80k_ade20k-512x512 在 ADE20K 验证数据集上的结果为例:
python tools/test.py configs/fcn/fcn_r50-d8_4xb4-80k_ade20k-512x512.py ckpt/fcn_r50-d8_512x512_80k_ade20k_20200614_144016-f8ac5082.pth --out work_dirs/format_results
'''
或者通过配置文件定义 output_dir。例如在 configs/fcn/fcn_r50-d8_4xb4-80k_ade20k-512x512.py 添加 test_evaluator 定义:

test_evaluator = dict(type='IoUMetric', iou_metrics=['mIoU'], output_dir='work_dirs/format_results')

然后执行相同功能的命令不需要再使用 --out:

python tools/test.py configs/fcn/fcn_r50-d8_4xb4-80k_ade20k-512x512.py ckpt/fcn_r50-d8_512x512_80k_ade20k_20200614_144016-f8ac5082.pth

'''
当测试的数据集没有提供标注,评测时没有真值可以参与计算,因此需要设置 format_only=True, 同时需要修改 test_dataloader,由于没有标注,我们需要在数据增强变换中删掉 dict(type=‘LoadAnnotations’),以下是一个配置示例:
test_evaluator = dict(
    type='IoUMetric',
    iou_metrics=['mIoU'],
    format_only=True,
    output_dir='work_dirs/format_results')
test_dataloader = dict(
    batch_size=1,
    num_workers=4,
    persistent_workers=True,
    sampler=dict(type='DefaultSampler', shuffle=False),
    dataset=dict(
        type = 'ADE20KDataset'
        data_root='data/ade/release_test',
        data_prefix=dict(img_path='testing'),
        # 测试数据变换中没有加载标注
        pipeline=[
            dict(type='LoadImageFromFile'),
            dict(type='Resize', scale=(2048, 512), keep_ratio=True),
            dict(type='PackSegInputs')
        ]))
然后执行测试命令:
python tools/test.py configs/fcn/fcn_r50-d8_4xb4-80k_ade20k-512x512.py ckpt/fcn_r50-d8_512x512_80k_ade20k_20200614_144016-f8ac5082.pth
举例:测试 Cityscapes 数据集并保存输出分割结果
使用 CityscapesMetric 来保存模型在 Cityscapes 数据集上的测试结果,以下是一个配置示例:
test_evaluator = dict(
    type='CityscapesMetric',
    format_only=True,
    keep_results=True,
    output_dir='work_dirs/format_results')
test_dataloader = dict(
    batch_size=1,
    num_workers=4,
    persistent_workers=True,
    sampler=dict(type='DefaultSampler', shuffle=False),
    dataset=dict(
        type='CityscapesDataset',
        data_root='data/cityscapes/',
        data_prefix=dict(img_path='leftImg8bit/test'),
        pipeline=[
            dict(type='LoadImageFromFile'),
            dict(type='Resize', scale=(2048, 1024), keep_ratio=True),
            dict(type='PackSegInputs')
        ]))
'''
python tools/test.py configs/fcn/fcn_r18-d8_4xb2-80k_cityscapes-512x1024.py ckpt/fcn_r18-d8_512x1024_80k_cityscapes_20201225_021327-6c50f8b4.pth
'''


 4511
4511


 被折叠的 条评论
为什么被折叠?
被折叠的 条评论
为什么被折叠?
 到【灌水乐园】发言


