


Kubernetes介绍以及Kubernetes快速部署
1.Kubernetes介绍:
1.1.Kubernetes简介
Kubernetes是一种用于自动化部署、扩展和管理容器化应用程序的开源平台。它提供了容器编排、自动伸缩、负载平衡、存储管理、自我修复和滚动更新等功能,从而使应用程序的部署和管理更加简单和高效。
1.2. Kubernetes应用部署方式演变
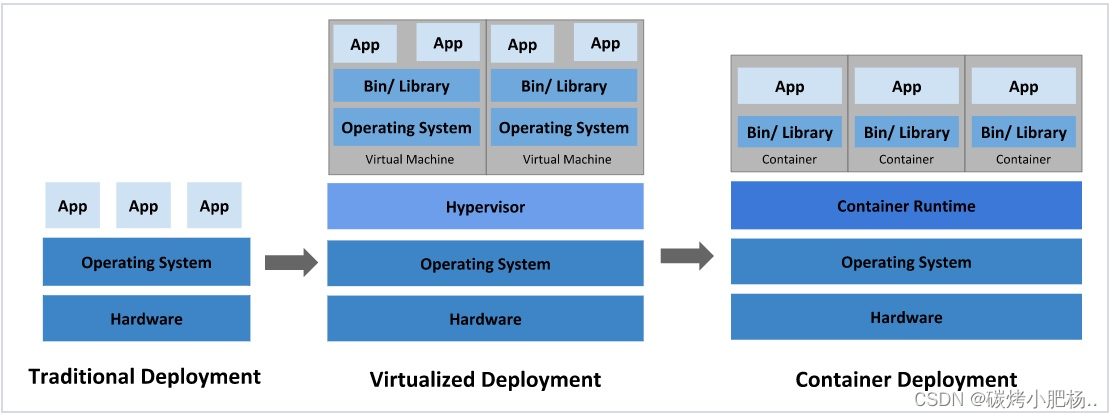
在部署应用程序的方式上,主要经历了三个时代:
-
传统部署:互联网早期,会直接将应用程序部署在物理机上
优点:简单,不需要其它技术的参与
缺点:不能为应用程序定义资源使用边界,很难合理地分配计算资源,而且程序之间容易产生影响
-
虚拟化部署:可以在一台物理机上运行多个虚拟机,每个虚拟机都是独立的一个环境
优点:程序环境不会相互产生影响,提供了一定程度的安全性
缺点:增加了操作系统,浪费了部分资源
-
容器化部署:与虚拟化类似,但是共享了操作系统
优点:
可以保证每个容器拥有自己的文件系统、CPU、内存、进程空间等
运行应用程序所需要的资源都被容器包装,并和底层基础架构解耦
容器化的应用程序可以跨云服务商、跨Linux操作系统发行版进行部署
容器化部署方式给带来很多的便利,但是也会出现一些问题,比如说:
- 一个容器故障停机了,怎么样让另外一个容器立刻启动去替补停机的容器
- 当并发访问量变大的时候,怎么样做到横向扩展容器数量
这些容器管理的问题统称为容器编排问题,为了解决这些容器编排问题,就产生了一些容器编排的软件:
- Swarm:Docker自己的容器编排工具
- Mesos:Apache的一个资源统一管控的工具,需要和Marathon结合使用
- Kubernetes:Google开源的的容器编排工具
1.3.Kubernetes功能
- 负载均衡:通过服务发现和负载均衡,确保应用程序具有高可用性和可伸缩性。
- 自动容器部署和调度:通过定义Pod(包含一个或多个容器)的方式,实现容器的自动化部署和调度。
- 自动容器组管理:Kubernetes可以自动控制和管理容器组,处理容器组的生命周期,如启动、停止、重启等。
- 容器监控和故障检测:通过内置的监控和故障检测机制,实现对容器和节点的实时监控和故障检测。
- 自动扩缩容:根据应用程序的负载和流量自动调整容器的数量,在应对高负载和低负载时提高集群的资源利用率。
1.4.Kubernetes工作原理
Kubernetes通过在计算资源和网络资源之间创建抽象层,实现对容器化应用程序的编排和管理。在Kubernetes中,应用程序通过Pod进行定义和部署,Pod是一个或多个容器的集合。控制面板是Kubernetes的核心组件,负责管理集群资源和状态,保证Kubernetes集群的正确运行。
组件:
- 控制面板(Control Plane):Kubernetes集群的核心组件,负责管理集群状态和资源。包括API服务器、etcd、调度器、控制器等。
- Node节点:Kubernetes集群中的计算节点,运行Pod并且负责管理Pod的生命周期和容器运行环境。包括kubelet、kube-proxy等组件。
- 服务发现与负载均衡:Kubernetes通过服务定义来实现容器间的通信和负载均衡,包括Service、Endpoint等。
- 存储管理:Kubernetes支持多种存储管理方式,包括卷(Volume)、存储类型(StorageClass)等,可以根据应用程序的需求选择不同的存储方式。
- 网络管理:Kubernetes可以为应用程序分配独立的网络空间,实现对网络资源的管理和隔离。其中包括CNI、Service IP等组件。
总之,Kubernetes提供了强大的容器编排和管理功能,可以帮助用户快速部署、扩展和管理容器化应用程序,提高应用程序的可靠性、可扩展性和灵活性。
1.5.工作流程
Kubernetes的工作流程大致如下:
- 开发者使用Docker将应用程序打包成容器镜像。
- kubectl命令或API向Kubernetes集群提交应用程序的容器镜像和部署配置。
- Kubernetes根据配置文件中的定义,自动启动和编排容器进行部署。
- Kubernetes自动进行容器伸缩,负载均衡和服务发现等工作,确保应用程序高可靠和高性能运行。
- Kubernetes提供多种监控、日志和警报等功能,以帮助管理员进行应用程序管理。
总之,Kubernetes是一个强大的容器编排平台,可以自动化和集成化地部署和管理应用程序。尽管配置和管理具有挑战性,但Kubernetes的众多优势使其成为部署容器化应用程序的最佳选择之一。
1.6.优缺点
优点:
- 自动化和集成化,方便应用的部署和管理
- 高度可扩展和可靠
- 灵活的负载均衡和服务发现
- 支持多种云端和物理设施
- 开源社区活跃,拥有丰富的生态系统和插件
缺点:
- 配置和管理复杂度较高,需要一定的学习成本
- 需要一定的运维经验和技能
- 部署和管理特别小型应用时,可能会因为功能复杂而过度设计
2.Kubernetes环境部署
2.1.环境说明
| 主机名称 | IP地址 | 所需安装的软件 | 充当角色 | 系统版本 |
|---|---|---|---|---|
| master | 192.168.195.133 | docker,kubeadm,kubelet,kubectl | 控制节点 | centos8 |
| node1 | 192.168.195.134 | docker,kubeadm,kubelet,kubectl | 工作节点 | centos8 |
| node2 | 192.168.195.135 | docker,kubeadm,kubelet,kubectl | 工作节点 | centos8 |
2.2.前提准备(基本配置)
所有主机上操作,用master主机做解析
//永久关闭防火墙和selinux,并建立新的缓存
[root@master ~]# systemctl disable --now firewalld.service
Removed /etc/systemd/system/multi-user.target.wants/firewalld.service.
Removed /etc/systemd/system/dbus-org.fedoraproject.FirewallD1.service.
[root@master ~]# setenforce 0
[root@master ~]# sed -i 's/^SELINUX=enforcing/SELINUX=disabled/g' /etc/selinux/config
[root@master ~]# rm -rf /etc/yum.repos.d/*
[root@master ~]# curl -o /etc/yum.repos.d/CentOS-Base.repo https://mirrors.aliyun.com/repo/Centos-vault-8.5.2111.repo
  % Total    % Received % Xferd  Average Speed   Time    Time     Time  Current
                                 Dload  Upload   Total   Spent    Left  Speed
100  2495  100  2495    0     0   7252      0 --:--:-- --:--:-- --:--:--  7252
[root@master ~]# yum clean all && yum makecache
Updating Subscription Management repositories.
Unable to read consumer identity
This system is not registered to Red Hat Subscription Management. You can use subscription-manager to register.
12 files removed
Updating Subscription Management repositories.
Unable to read consumer identity
This system is not registered to Red Hat Subscription Management. You can use subscription-manager to register.
CentOS-8.5.2111 - Base - mirrors.aliyun.com                                           5.3 MB/s | 4.6 MB     00:00
CentOS-8.5.2111 - Extras - mirrors.aliyun.com                                         101 kB/s |  10 kB     00:00
CentOS-8.5.2111 - AppStream - mirrors.aliyun.com                                      9.3 MB/s | 8.4 MB     00:00
Metadata cache created.

所有主机上操作,用master主机做演示
//安装基础工具包(所有主机都安装)
[root@master ~]# yum -y install vim wget

//配置主机名解析
[root@master ~]# vim /etc/hosts
[root@master ~]# cat /etc/hosts
127.0.0.1   localhost localhost.localdomain localhost4 localhost4.localdomain4
::1         localhost localhost.localdomain localhost6 localhost6.localdomain6

    192.168.195.133 master
    192.168.195.134 node1
    192.168.195.135 node2

所有主机上操作,用master主机做演示
//关闭swap分区,注释掉swap分区的那一行
[root@master ~]# vim /etc/fstab
[root@master ~]# tail -1 /etc/fstab
#/dev/mapper/rhel-swap   swap                    swap    defaults        0 0

所有主机上操作,用master主机做演示
//将桥接的IPv4流量传递到iptables的链
[root@master ~]# vim /etc/sysctl.d/k8s.conf
[root@master ~]# cat /etc/sysctl.d/k8s.conf
net.bridge.bridge-nf-call-ip6tables = 1
net.bridge.bridge-nf-call-iptables = 1
net.ipv4.ip_forward = 1
[root@master ~]# sysctl --system

//配置时间同步
1.设置时区(将时区设置为自己本地时区,此处我设置的为上海时区)
所有主机操作,用master主机做演示
[root@master ~]# timedatectl set-timezone Asia/Shanghai

2.master主机(控制节点)的配置
[root@master ~]# yum -y install chrony
[root@master ~]# vim /etc/chrony.conf
[root@master ~]# head -5 /etc/chrony.conf
# Use public servers from the pool.ntp.org project.
# Please consider joining the pool (http://www.pool.ntp.org/join.html).
pool time1.aliyun.com iburst  //将默认的时间同步服务器换成阿里云的时间同步服务器

# Record the rate at which the system clock gains/losses time.
[root@master ~]# systemctl enable chronyd
[root@master ~]# systemctl restart chronyd    //重启生效
[root@master ~]# chronyc sources
MS Name/IP address         Stratum Poll Reach LastRx Last sample
===============================================================================
^* 203.107.6.88                  2   6   367    56  -3114us[-4960us] +/-   39ms

3.node1主机,node2主机(工作节点)的配置,用node1做演示,node2上相同操作操作
[root@node1 ~]# yum -y install chrony
[root@node1 ~]# vim /etc/chrony.conf
[root@node1 ~]# head -5 /etc/chrony.conf
# Use public servers from the pool.ntp.org project.
# Please consider joining the pool (http://www.pool.ntp.org/join.html).
pool master iburst    //将默认的时间同步服务器指向master主机(控制节点)

# Record the rate at which the system clock gains/losses time.
[root@node1 ~]# systemctl enable chronyd
[root@node1 ~]# systemctl restart chronyd
[root@node1 ~]# chronyc sources
MS Name/IP address         Stratum Poll Reach LastRx Last sample
===============================================================================
^? master                        0   6     0     -     +0ns[   +0ns] +/-    0ns

//配置免密登录,只在master主机(控制节点)上做配置
[root@master ~]# ssh-keygen -t rsa
Generating public/private rsa key pair.
Enter file in which to save the key (/root/.ssh/id_rsa):
Created directory '/root/.ssh'.
Enter passphrase (empty for no passphrase):
Enter same passphrase again:
Your identification has been saved in /root/.ssh/id_rsa.
Your public key has been saved in /root/.ssh/id_rsa.pub.
The key fingerprint is:
SHA256:WWppoHSCIvfyxq4sGJkKL2jxmzIdDHFf1ckIbzTzneI root@master
The key's randomart image is:
+---[RSA 3072]----+
|       .o=+ .    |
| . o   .o.++. .  |
|o = + +  o.o o   |
|.+ o = ..=. .    |
| o+ o   S  E     |
|=. *   o         |
|=o+ =            |
|*=.=.            |
|.o=+o            |
+----[SHA256]-----+
[root@master ~]# ssh-copy-id root@master
/usr/bin/ssh-copy-id: INFO: Source of key(s) to be installed: "/root/.ssh/id_rsa.pub"
The authenticity of host 'master (192.168.195.133)' can't be established.
ECDSA key fingerprint is SHA256:KtCxYXSsV732izj+QL2uzJDCS2G/X1MOMV+uUkriDno.
Are you sure you want to continue connecting (yes/no/[fingerprint])? yes
/usr/bin/ssh-copy-id: INFO: attempting to log in with the new key(s), to filter out any that are already installed
/usr/bin/ssh-copy-id: INFO: 1 key(s) remain to be installed -- if you are prompted now it is to install the new keys
root@master's password:

Number of key(s) added: 1

Now try logging into the machine, with:   "ssh 'root@master'"
and check to make sure that only the key(s) you wanted were added.

[root@master ~]# ssh-copy-id root@node1
/usr/bin/ssh-copy-id: INFO: Source of key(s) to be installed: "/root/.ssh/id_rsa.pub"
The authenticity of host 'node1 (192.168.195.134)' can't be established.
ECDSA key fingerprint is SHA256:PpYSHqN+jx3HbDTkqSYiS+mXR5hKTq6ZweYdGYxHxYg.
Are you sure you want to continue connecting (yes/no/[fingerprint])? yes
/usr/bin/ssh-copy-id: INFO: attempting to log in with the new key(s), to filter out any that are already installed
/usr/bin/ssh-copy-id: INFO: 1 key(s) remain to be installed -- if you are prompted now it is to install the new keys
root@node1's password:

Number of key(s) added: 1

Now try logging into the machine, with:   "ssh 'root@node1'"
and check to make sure that only the key(s) you wanted were added.

[root@master ~]# ssh-copy-id root@node2
/usr/bin/ssh-copy-id: INFO: Source of key(s) to be installed: "/root/.ssh/id_rsa.pub"
The authenticity of host 'node2 (192.168.195.135)' can't be established.
ECDSA key fingerprint is SHA256:rX8qo9h9J++q89dUg33ZnWDL7KT30i/It603EM37Mic.
Are you sure you want to continue connecting (yes/no/[fingerprint])? yes
/usr/bin/ssh-copy-id: INFO: attempting to log in with the new key(s), to filter out any that are already installed
/usr/bin/ssh-copy-id: INFO: 1 key(s) remain to be installed -- if you are prompted now it is to install the new keys
root@node2's password:

Number of key(s) added: 1

Now try logging into the machine, with:   "ssh 'root@node2'"
and check to make sure that only the key(s) you wanted were added.

[root@master ~]#reboot    //重启所有主机重新读取相关配置文件(注:swap分区特别注意)
[root@master ~]# swapoff -a
[root@master ~]# free
              total        used        free      shared  buff/cache   available
Mem:        3842056      300360     2408788        9180     1132908     3297876
Swap:             0           0           0
2.3.安装docker
在所有主机上操作,用master主机演示
//安装docker依赖包
[root@master ~]# yum install -y yum-utils device-mapper-persistent-data lvm2

//配置docker的yum源
[root@master ~]# dnf config-manager --add-repo=https://download.docker.com/linux/centos/docker-ce.repo

//查看是否启用
[root@master ~]# dnf repolist -v

//查看可安装的版本
[root@master ~]# dnf list docker-ce --showduplicates | sort -r

//安装最新的稳定版本
[root@master ~]# yum -y install docker-ce-24.0.6-1.el8 --allowerasing

//启动并设置docker开机自启
[root@master ~]# systemctl enable --now docker.service
Created symlink /etc/systemd/system/multi-user.target.wants/docker.service → /usr/lib/systemd/system/docker.service.
2.4.安装kubeadm、kubelet、kubectl
2.4.1.配置所需yum源
先添加一个kubernetes的yum源,再安装上述各软件包(所有主机)
所有主机上操作,用master主机做演示
[root@master ~]# vim /etc/yum.repos.d/kubernetes.repo
[root@master ~]# cat /etc/yum.repos.d/kubernetes.repo
[kubernetes]
name=Kubernetes
baseurl=https://mirrors.aliyun.com/kubernetes/yum/repos/kubernetes-el7-x86_64
enabled=1
gpgcheck=0
repo_gpgcheck=0
gpgkey=https://mirrors.aliyun.com/kubernetes/yum/doc/yum-key.gpg https://mirrors.aliyun.com/kubernetes/yum/doc/rpm-package-key.gpg
[root@master ~]# yum makecache    //建立新的缓存
Updating Subscription Management repositories.
Unable to read consumer identity
This system is not registered to Red Hat Subscription Management. You can use subscription-manager to register.
CentOS-8.5.2111 - Base - mirrors.aliyun.com                                            44 kB/s | 3.9 kB     00:00
CentOS-8.5.2111 - Extras - mirrors.aliyun.com                                          31 kB/s | 1.5 kB     00:00
CentOS-8.5.2111 - AppStream - mirrors.aliyun.com                                       63 kB/s | 4.3 kB     00:00
Docker CE Stable - x86_64                                                             4.5 kB/s | 3.5 kB     00:00
Kubernetes                                                                            295 kB/s | 182 kB     00:00
Metadata cache created.
[root@master ~]#

//安装kubeadm、kubelet和kubectl
[root@master ~]# yum -y install kubelet kubeadm kubectl

//设置开机自启(仅设置开机自启,千万不要启动!!!)
[root@master ~]# systemctl is-active kubelet
inactive
[root@master ~]# systemctl enable kubelet
Created symlink /etc/systemd/system/multi-user.target.wants/kubelet.service → /usr/lib/systemd/system/kubelet.service.
[root@master ~]#
2.4.2.containerd配置
在 /etc/containerd/ 下面有一个 config.toml 的文件
//这个文件默认是没有很多功能的,基本上都是注释掉的,所以我们不用这,而是重新生成一个新的config.toml 的文件
[root@master ~]# cat /etc/containerd/config.toml
#   Copyright 2018-2022 Docker Inc.

#   Licensed under the Apache License, Version 2.0 (the "License");
#   you may not use this file except in compliance with the License.
#   You may obtain a copy of the License at

#       http://www.apache.org/licenses/LICENSE-2.0

#   Unless required by applicable law or agreed to in writing, software
#   distributed under the License is distributed on an "AS IS" BASIS,
#   WITHOUT WARRANTIES OR CONDITIONS OF ANY KIND, either express or implied.
#   See the License for the specific language governing permissions and
#   limitations under the License.

disabled_plugins = ["cri"]
省略. . . . . .
//生成一个新的config.toml文件
[root@master ~]# containerd config default > /etc/containerd/config.toml

//修改拉取镜像的位置,默认位置是外网,正常情况访问不到。所以换成国内的
--在这个配置文件中找到sandbox_image = "registry.k8s.io/pause:3.6"这一行,把这行改为
  sandbox_image = "registry.aliyuncs.com/google_containers/pause:3.6"
[root@master ~]# vim /etc/containerd/config.toml
[root@master ~]# grep 'sandbox_image' /etc/containerd/config.toml
    sandbox_image = "registry.aliyuncs.com/google_containers/pause:3.6"
[root@master ~]#

//重启containerd服务并设置开机自启
[root@master ~]# systemctl restart containerd.service
[root@master ~]# systemctl enable containerd.service
Created symlink /etc/systemd/system/multi-user.target.wants/containerd.service → /usr/lib/systemd/system/containerd.service.

//把这个改好的文件scp到另外两个工作节点
[root@master ~]# scp /etc/containerd/config.toml root@node1:/etc/containerd/
config.toml                                                                         100% 6996     7.7MB/s   00:00
[root@master ~]# scp /etc/containerd/config.toml root@node2:/etc/containerd/
config.toml

//在另外两个工作节点上重启containerd服务并设置开机自启
[root@node1 ~]# systemctl restart containerd.service && systemctl enable containerd.service
Created symlink /etc/systemd/system/multi-user.target.wants/containerd.service → /usr/lib/systemd/system/containerd.service.
[root@node2 ~]# systemctl restart containerd.service && systemctl enable containerd.service
Created symlink /etc/systemd/system/multi-user.target.wants/containerd.service → /usr/lib/systemd/system/containerd.service.
2.5.部署Kubernetes Master(管理节点)
只在master主机(控制节点)上操作
//初始化集群
[root@master ~]# kubeadm init \
   --apiserver-advertise-address=192.168.195.133 \
   --image-repository registry.aliyuncs.com/google_containers \
   --kubernetes-version v1.28.2 \
   --service-cidr=10.96.0.0/12 \
   --pod-network-cidr=10.244.0.0/16

//出现这行就代表初始化成功:Your Kubernetes control-plane has initialized successfully!

//初始化后生成的一些教程复制下来,写在一个文件里面保存起来,说不定以后会用到
[root@master ~]# vim k8s-init
[root@master ~]# cat k8s-init
Your Kubernetes control-plane has initialized successfully!

To start using your cluster, you need to run the following as a regular user:

  mkdir -p $HOME/.kube
  sudo cp -i /etc/kubernetes/admin.conf $HOME/.kube/config
  sudo chown $(id -u):$(id -g) $HOME/.kube/config

Alternatively, if you are the root user, you can run:

  export KUBECONFIG=/etc/kubernetes/admin.conf

You should now deploy a pod network to the cluster.
Run "kubectl apply -f [podnetwork].yaml" with one of the options listed at:
  https://kubernetes.io/docs/concepts/cluster-administration/addons/

Then you can join any number of worker nodes by running the following on each as root:

kubeadm join 192.168.195.133:6443 --token wvwe33.1nrijnqlrwf691ti \
	--discovery-token-ca-cert-hash sha256:1dc1d532f75d563d96282f79bf707f891c02884379c7cb33f3fb20c8f873f689

//设置环境变量
[root@master ~]# echo "export KUBECONFIG=/etc/kubernetes/admin.conf" > /etc/profile.d/k8s.sh
[root@master ~]# source /etc/profile.d/k8s.sh
2.6.安装Pod网络插件(CNI)
//下载一个flannel资源模板文件
[root@master ~]# wget https://github.com/flannel-io/flannel/releases/latest/download/kube-flannel.yml
[root@master ~]# ls
anaconda-ks.cfg  k8s-init  kube-flannel.yml

//添加flannel资源
[root@master ~]# kubectl apply -f kube-flannel.yml
namespace/kube-flannel created
serviceaccount/flannel created
clusterrole.rbac.authorization.k8s.io/flannel created
clusterrolebinding.rbac.authorization.k8s.io/flannel created
configmap/kube-flannel-cfg created
daemonset.apps/kube-flannel-ds created

//查看flannel资源
[root@master ~]# kubectl get -f kube-flannel.yml
NAME                     STATUS   AGE
namespace/kube-flannel   Active   34s

NAME                     SECRETS   AGE
serviceaccount/flannel   0         34s

NAME                                            CREATED AT
clusterrole.rbac.authorization.k8s.io/flannel   2023-11-14T10:21:25Z

NAME                                                   ROLE                  AGE
clusterrolebinding.rbac.authorization.k8s.io/flannel   ClusterRole/flannel   34s

NAME                         DATA   AGE
configmap/kube-flannel-cfg   2      34s

NAME                             DESIRED   CURRENT   READY   UP-TO-DATE   AVAILABLE   NODE SELECTOR   AGE
daemonset.apps/kube-flannel-ds   1         1         1       1            1           <none>          34s
资源加载成功

//查看k8s组件的pod
[root@master ~]# kubectl get pods -n kube-system
NAME                             READY   STATUS    RESTARTS   AGE
coredns-66f779496c-8zhb6         1/1     Running   0          11m
coredns-66f779496c-ffq2l         1/1     Running   0          11m
etcd-master                      1/1     Running   0          11m
kube-apiserver-master            1/1     Running   0          11m
kube-controller-manager-master   1/1     Running   0          11m
kube-proxy-xzqw4                 1/1     Running   0          11m
kube-scheduler-master            1/1     Running   0          11m

//查看所有名称空间
[root@master ~]# kubectl get namespace
NAME              STATUS   AGE
default           Active   12m
kube-flannel      Active   106s
kube-node-lease   Active   12m
kube-public       Active   12m
kube-system       Active   12m
2.7.加入Kubernetes Node
在两台工作节点上执行;node1和node2
//在node1和node2上执行
[root@node1 ~]# kubeadm join 192.168.195.133:6443 --token wvwe33.1nrijnqlrwf691ti \
> --discovery-token-ca-cert-hash sha256:1dc1d532f75d563d96282f79bf707f891c02884379c7cb33f3fb20c8f873f689
[preflight] Running pre-flight checks
	[WARNING FileExisting-tc]: tc not found in system path
[preflight] Reading configuration from the cluster...
[preflight] FYI: You can look at this config file with 'kubectl -n kube-system get cm kubeadm-config -o yaml'
[kubelet-start] Writing kubelet configuration to file "/var/lib/kubelet/config.yaml"
[kubelet-start] Writing kubelet environment file with flags to file "/var/lib/kubelet/kubeadm-flags.env"
[kubelet-start] Starting the kubelet
[kubelet-start] Waiting for the kubelet to perform the TLS Bootstrap...

This node has joined the cluster:
* Certificate signing request was sent to apiserver and a response was received.
* The Kubelet was informed of the new secure connection details.

Run 'kubectl get nodes' on the control-plane to see this node join the cluster.

[root@node2 ~]# kubeadm join 192.168.195.133:6443 --token wvwe33.1nrijnqlrwf691ti \
> --discovery-token-ca-cert-hash sha256:1dc1d532f75d563d96282f79bf707f891c02884379c7cb33f3fb20c8f873f689
[preflight] Running pre-flight checks
	[WARNING FileExisting-tc]: tc not found in system path
[preflight] Reading configuration from the cluster...
[preflight] FYI: You can look at this config file with 'kubectl -n kube-system get cm kubeadm-config -o yaml'
[kubelet-start] Writing kubelet configuration to file "/var/lib/kubelet/config.yaml"
[kubelet-start] Writing kubelet environment file with flags to file "/var/lib/kubelet/kubeadm-flags.env"
[kubelet-start] Starting the kubelet
[kubelet-start] Waiting for the kubelet to perform the TLS Bootstrap...

This node has joined the cluster:
* Certificate signing request was sent to apiserver and a response was received.
* The Kubelet was informed of the new secure connection details.

Run 'kubectl get nodes' on the control-plane to see this node join the cluster.

//在master上查看加入的node节点
[root@master ~]# kubectl get nodes
NAME     STATUS   ROLES           AGE   VERSION
master   Ready    control-plane   14m   v1.28.2
node1    Ready    <none>          60s   v1.28.2
node2    Ready    <none>          57s   v1.28.2

//查看网络组件,在两台工作节点上也跑起来了
[root@master ~]# kubectl get pods -n kube-flannel -o wide
NAME                    READY   STATUS    RESTARTS   AGE    IP                NODE     NOMINATED NODE   READINESS GATES
kube-flannel-ds-lkzzg   1/1     Running   0          5m3s   192.168.195.133   master   <none>           <none>
kube-flannel-ds-sv9mq   1/1     Running   0          101s   192.168.195.134   node1    <none>           <none>
kube-flannel-ds-zv5hk   1/1     Running   0          98s    192.168.195.135   node2    <none>           <none>
2.8.测试Kubernetes 集群
//创建一个名字叫nginx,镜像为nginx,在default名称空间里面的pod
[root@master ~]# kubectl create deployment nginx --image=nginx
deployment.apps/nginx created

//查看pod状态,已经跑起来了,在内部使用容器ip访问
[root@master ~]# kubectl get pods -o wide
NAME                     READY   STATUS    RESTARTS   AGE   IP           NODE    NOMINATED NODE   READINESS GATES
nginx-7854ff8877-srb6g   1/1     Running   0          48s   10.244.1.2   node1   <none>           <none>

//在集群内部访问
[root@master ~]# curl 10.244.1.2
<!DOCTYPE html>
<html>
<head>
<title>Welcome to nginx!</title>
<style>
html { color-scheme: light dark; }
body { width: 35em; margin: 0 auto;
font-family: Tahoma, Verdana, Arial, sans-serif; }
</style>
</head>
<body>
<h1>Welcome to nginx!</h1>
<p>If you see this page, the nginx web server is successfully installed and
working. Further configuration is required.</p>

<p>For online documentation and support please refer to
<a href="http://nginx.org/">nginx.org</a>.<br/>
Commercial support is available at
<a href="http://nginx.com/">nginx.com</a>.</p>

<p><em>Thank you for using nginx.</em></p>
</body>
</html>
成功访问

//暴露端口号,使其能够通过真机的ip访问
[root@master ~]# kubectl expose deployment nginx --port=80 --type=NodePort
service/nginx exposed
[root@master ~]# kubectl get pod,svc
NAME                         READY   STATUS    RESTARTS   AGE
pod/nginx-7854ff8877-srb6g   1/1     Running   0          2m51s

NAME                 TYPE        CLUSTER-IP       EXTERNAL-IP   PORT(S)        AGE
service/kubernetes   ClusterIP   10.96.0.1        <none>        443/TCP        19m
service/nginx        NodePort    10.111.176.166   <none>        80:30400/TCP   14s

deployment类型只能在集群内部访问
NodePort类型可以通过暴露端口号通过外部访问
2.9.通过控制节点的ip加映射的随机端口号在浏览器访问
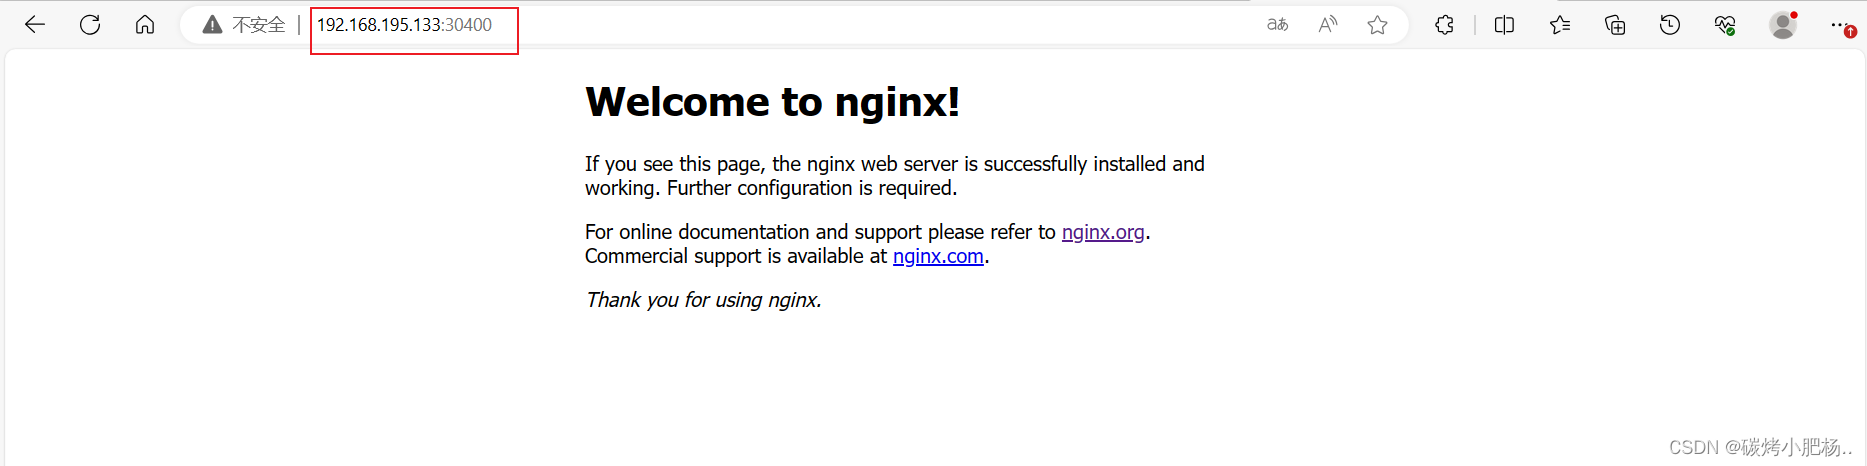
成功访问


 1497
1497


 被折叠的 条评论
为什么被折叠?
被折叠的 条评论
为什么被折叠?
 到【灌水乐园】发言


