


引言
这个抽奖系统的业务逻辑其实非常简单。首先,我们需要一个9宫格的页面,用户可以在页面上添加参与人员。虽然我们可以使用数据库来存储参与人员的信息,但为了方便演示,我选择了简单地使用内存存储。
在这个系统中,除了保证每个人只有一个参与机会外,其他的校验要求都很少。然后,用户可以通过点击开始按钮,页面会随机停下来,然后将停下来的奖项传给后台并保存,最后在前端页面上显示。
虽然逻辑简单,但是通过这个抽奖系统的开发,我们可以巩固自己对Python语法和框架的理解,同时也能够体验到人工智能带来的便利。让我们一起动手搭建这个简易版的抽奖系统吧!
前端界面
尽管前端界面写得不够出色,但这并非我今天的重点。实际上,我想回顾一下Python的编写方式和框架的理解。我创建了一个简单的九宫格,每个格子都设有不同的奖项,而且用户还可以手动进行设置和修改,从而保证了灵活性。
前端代码:
<!DOCTYPE html>
<html lang="en">
<head>
    <meta charset="UTF-8">
    <title>抽奖系统</title>
    <link rel="stylesheet" href="/static/css/styles.css">
    <script src="/static/js/main.js"></script>
</head>
<body>
    <h1>欢迎来到小雨抽奖系统</h1>
    <form id="participant-form">
        <label for="participant-name">参与者姓名:</label>
        <input type="text" id="participant-name" name="participant-name" required>
        <button type="submit">添加参与者</button>
    </form>
    <div id="grid">
        <div class="grid-item" data-prize="奖项1">奖项1</div>
        <div class="grid-item" data-prize="奖项2">奖项2</div>
        <div class="grid-item" data-prize="奖项3">奖项3</div>
        <div class="grid-item" data-prize="奖项4">奖项4</div>
        <div class="grid-item" data-prize="奖项5">奖项5</div>
        <div class="grid-item" data-prize="奖项6">奖项6</div>
        <div class="grid-item" data-prize="奖项7">奖项7</div>
        <div class="grid-item" data-prize="奖项8">奖项8</div>
        <div class="grid-item" data-prize="奖项9">奖项9</div>
    </div>
    <button id="draw-button">抽奖</button>
    <h2>获奖名单</h2>
    <ul id="prize-list"></ul>
    <script>
        document.getElementById('participant-form').addEventListener('submit', function(event) {
            event.preventDefault();
            var participantName = document.getElementById('participant-name').value;
            fetch('/participant', {
                method: 'POST',
                headers: {
                    'Content-Type': 'application/json',
                },
                body: JSON.stringify({name: participantName}),
            })
            .then(response => response.json())
            .then(data => {
                console.log(data);
                document.getElementById('participant-name').value = '';
            })
            .catch((error) => {
                console.error('Error:', error);
            });
        });

        document.getElementById('draw-button').addEventListener('click', function() {
            var items = document.getElementsByClassName('grid-item');
            var index = 0;
            var interval = setInterval(function() {
                items[index].classList.remove('active');
                index = (index + 1) % items.length;
                items[index].classList.add('active');
            }, 100);
            setTimeout(function() {
                clearInterval(interval);
                var prize = items[index].getAttribute('data-prize');
                fetch('/draw', {
                    method: 'POST',
                    headers: {
                        'Content-Type': 'application/json',
                    },
                    body: JSON.stringify({prize: prize}),
                })
                .then(response => response.json())
                .then(data => {
                    console.log(data);
                    if (data.code !== 1) {
                        alert(data.message);
                    } else {
                        var li = document.createElement("li");
                        li.appendChild(document.createTextNode(data.message));
                        document.getElementById('prize-list').appendChild(li);
                    }
                })
                .catch((error) => {
                    console.error('Error:', error);
                });
            }, Math.floor(Math.random() * (10000 - 3000 + 1)) + 3000);
        });
    </script>
</body>
</html>
</h2></button></title>
CSS样式主要用于配置9个宫格的显示位置和实现动态动画高亮效果。除此之外,并没有对其他效果进行配置。如果你有兴趣,可以在抽奖后自行添加一些炫彩烟花等效果,完全取决于你的发挥。
代码如下:
body {
    font-family: Arial, sans-serif;
    margin: 0;
    padding: 0;
    background-color: #f4f4f4;
}

h1, h2 {
    color: #333;
}

form {
    margin-bottom: 20px;
}

#participant-form {
    display: flex;
    justify-content: center;
    margin-top: 20px;
}

#participant-form label {
    margin-right: 10px;
}

#participant-form input {
    margin-right: 10px;
}

#participant-form button {
    background-color: #4CAF50;
    color: white;
    border: none;
    padding: 10px 20px;
    text-align: center;
    text-decoration: none;
    display: inline-block;
    font-size: 16px;
    margin: 4px 2px;
    cursor: pointer;
}

#draw-button {
    display: block;
    width: 200px;
    height: 50px;
    margin: 20px auto;
    background-color: #f44336;
    color: white;
    border: none;
    text-align: center;
    line-height: 50px;
    font-size: 20px;
    cursor: pointer;
}

#grid {
    display: grid;
    grid-template-columns: repeat(3, 1fr);
    grid-template-rows: repeat(3, 1fr);
    gap: 10px;
    width: 300px;
    height: 300px;
    margin: 0 auto; /* This will center the grid horizontally */
}

.grid-item {
    width: 100%;
    height: 100%;
    border: 1px solid black;
    display: flex;
    justify-content: center;
    align-items: center;
}

.grid-item.active {
    background-color: yellow;
}

#prize-list {
    list-style-type: none;
    padding: 0;
    width: 80%;
    margin: 20px auto;
}

#prize-list li {
    padding: 10px;
    border-bottom: 1px solid #ccc;
}
Python后台
在我们的Python后端中,我们选择使用了fastapi作为框架来接收请求。这个框架有很多优点,其中最重要的是它的速度快、简单易懂。但唯一需要注意的是,在前端向后端传递请求参数时,请求头必须包含一个json的标识。如果没有这个标识,后端将无法正确接收参数,并可能报错。
为了更好地优化我们的后端,如果你有足够的时间,可以考虑集成数据库等一些重量级的操作。这样可以更好地处理数据,并提供更多功能。
主要的Python代码如下:
from fastapi import FastAPI, Request
from fastapi.templating import Jinja2Templates
from fastapi.staticfiles import StaticFiles
# from models import Participant, Prize
# from database import SessionLocal, engine
from pydantic import BaseModel
from random import choice

app = FastAPI()

app.mount("/static", StaticFiles(directory="static"), name="static")

templates = Jinja2Templates(directory="templates")
prizes = []
participants = []

class Participant(BaseModel):
    name: str

class Prize(BaseModel):
    winner: str
    prize: str

class DatePrize(BaseModel):
    prize: str

@app.get("/")
async def root(request: Request):
    return templates.TemplateResponse("index.html", {"request": request})

@app.post("/participant")
async def add_participant(participant: Participant):
   participants.append(participant)
   return {"message": "Participant added successfully"}

@app.post("/draw")
async def draw_prize(date_prize: DatePrize):
    if not participants:
        return {"message": "No participants available","code":0}
    winner = choice(participants)
    prize = Prize(winner=winner.name,prize=date_prize.prize)
    prizes.append(prize)
    participants.remove(winner)
    return {"message": f"Congratulations {winner.name}, you have won a prize : {date_prize.prize}!","code":1}


@app.get("/prizes")
async def get_prizes():
    return {"prizes": [prize.winner for prize in prizes]}

@app.get("/participants")
async def get_participants():
    return {"participants": [participant.name for participant in participants]}
由于我使用的是poetry作为项目的运行工具,因此在使用之前,你需要进行一些配置工作。
[tool.poetry]
name = "python-lottery"
version = "0.1.0"
description = "python 抽奖"
authors = ["努力的小雨"]

[tool.poetry.dependencies]
python = "^3.10"
fastapi = "^0.105.0"
jinja2 = "^3.1.2"


[[tool.poetry.source]]
name = "aliyun"
url = "https://mirrors.aliyun.com/pypi/simple/"
default = true
secondary = false
启动项目命令:poetry run uvicorn main:app --reload --port 8081
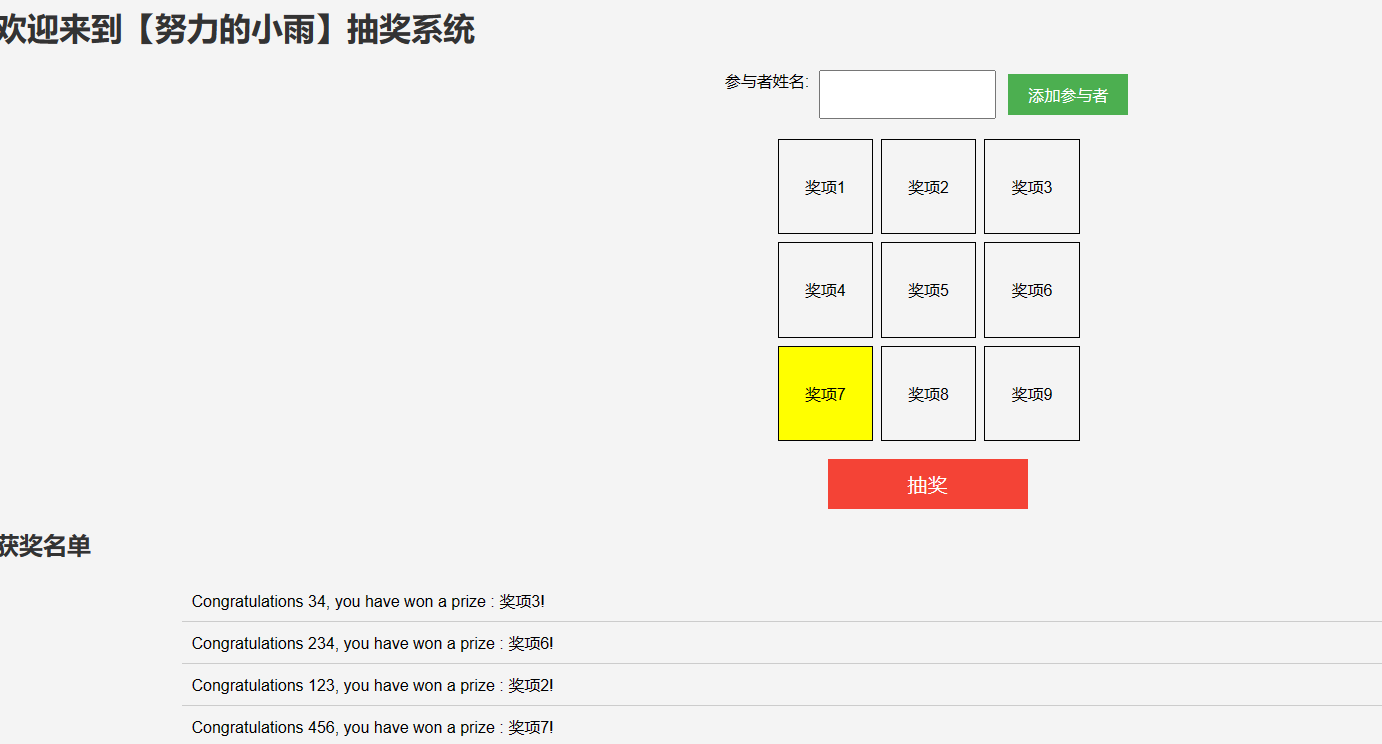
效果图
总结
在本文中,我们使用Python语言和fastapi框架构建了一个简易的抽奖系统。系统的前端界面使用了HTML、JS和CSS来配置样式和实现交互效果。后端使用了fastapi框架接收前端的请求,并处理抽奖逻辑。

如有侵权,请联系删除。


 2813
2813

 被折叠的 条评论
为什么被折叠?
被折叠的 条评论
为什么被折叠?
 到【灌水乐园】发言


