


第1章 需求分析与环境搭建
1.1需求描述
项⽬描述:针针对与汽⻋做了管理系统,管理系统中不仅有客户的管理还有⻋辆租赁的管理,租赁⻋辆公司对于租⻋的流程,租⻋过程的问题,对于客户的维护及不同维度统计租⻋的情况做数据化管理,⽅便租⻋公司更好的维护⻋辆和⻋辆的信息。
功能:
- 基础模块主要是客户信息和⻋辆信息管理;
- 业务模块主要是客户进⾏租⻋,归还⻋,保修单打印等;
- 系统模块维护⽤户⻆⾊⽇志等基础功能;
- 统计模块可以按时间对⻋辆,客户进⾏统计,以饼形图的形式展示。
运⾏环境:jdk8+tomcat8+mysql5.7+IntelliJ IDEA+maven
项⽬技术(必填):spring+spring mvc+mybatis+layui+jquery
1.2项⽬演示
1.3项⽬环境搭建
1.3.1 构建项⽬
采⽤maven的webapp⻣架构建项⽬

项⽬的⽬录结构分别为三成: bus业务管理 sys系统管理 stat统计分析

1.3.2引⼊依赖
pom.xml
<?xml version="1.0" encoding="UTF-8"?>

<project xmlns="http://maven.apache.org/POM/4.0.0" xmlns:xsi="http://www.w3.org/2001/XMLSchema-instance"
  xsi:schemaLocation="http://maven.apache.org/POM/4.0.0 http://maven.apache.org/xsd/maven-4.0.0.xsd">
  <modelVersion>4.0.0</modelVersion>

  <groupId>com.doujiang.crmcar</groupId>
  <artifactId>crmcar</artifactId>
  <version>1.0-SNAPSHOT</version>
  <packaging>war</packaging>

  <name>crmcar Maven Webapp</name>
  <!-- FIXME change it to the project's website -->
  <url>http://www.example.com</url>
  <properties>
    <project.build.sourceEncoding>UTF- 8</project.build.sourceEncoding>
    <maven.compiler.source>1.8</maven.compiler.source>
    <maven.compiler.target>1.8</maven.compiler.target>
    <!--spring版本锁定-->
    <spring.version>5.0.2.RELEASE</spring.version>
    <slf4j.version>1.6.6</slf4j.version>
    <log4j.version>1.2.12</log4j.version>
    <mysql.version>5.1.6</mysql.version>
    <mybatis.version>3.4.5</mybatis.version>
  </properties>


  <dependencies>
  <!--引⼊pagehelper分⻚插件-->
  <dependency>
    <groupId>com.github.pagehelper</groupId>
    <artifactId>pagehelper</artifactId>
    <version>5.1.2</version>
  </dependency>
  <!--spring、springMVC-->
  <dependency>
    <groupId>org.aspectj</groupId>
    <artifactId>aspectjweaver</artifactId>
    <version>1.6.8</version>
  </dependency>
  <dependency>
    <groupId>org.springframework</groupId>
    <artifactId>spring-context</artifactId>
    <version>${spring.version}</version>
  </dependency>
  <dependency>
    <groupId>org.springframework</groupId>
    <artifactId>spring-web</artifactId>
    <version>${spring.version}</version>
  </dependency>
  <dependency>
    <groupId>org.springframework</groupId>
    <artifactId>spring-webmvc</artifactId>
    <version>${spring.version}</version>
  </dependency>
  <dependency>
    <groupId>org.springframework</groupId>
    <artifactId>spring-aop</artifactId>
    <version>${spring.version}</version>
  </dependency>
  <dependency>
    <groupId>org.springframework</groupId>
    <artifactId>spring-test</artifactId>
    <version>${spring.version}</version>
  </dependency>
  <dependency>
    <groupId>org.springframework</groupId>
    <artifactId>spring-tx</artifactId>
    <version>${spring.version}</version>
  </dependency>
  <dependency>
    <groupId>org.springframework</groupId>
    <artifactId>spring-jdbc</artifactId>
    <version>${spring.version}</version>
  </dependency>
  <dependency>
    <groupId>junit</groupId>
    <artifactId>junit</artifactId>
    <version>4.12</version>
    <scope>compile</scope>
  </dependency>
  <dependency>
    <groupId>mysql</groupId>
    <artifactId>mysql-connector-java</artifactId>
    <version>${mysql.version}</version>
  </dependency>
  <dependency>
  <groupId>javax.servlet</groupId>
  <artifactId>servlet-api</artifactId>
  <version>2.5</version>
  <scope>provided</scope>
  </dependency>
  <dependency>
    <groupId>javax.servlet.jsp</groupId>
    <artifactId>jsp-api</artifactId>
    <version>2.0</version>
    <scope>provided</scope>
  </dependency>
  <dependency>
    <groupId>jstl</groupId>
    <artifactId>jstl</artifactId>
    <version>1.2</version>
  </dependency>
  <!-- log start -->
  <dependency>
    <groupId>log4j</groupId>
    <artifactId>log4j</artifactId>
    <version>${log4j.version}</version>
  </dependency>
  <dependency>
    <groupId>org.slf4j</groupId>
    <artifactId>slf4j-api</artifactId>
    <version>${slf4j.version}</version>
  </dependency>
  <dependency>
    <groupId>org.slf4j</groupId>
    <artifactId>slf4j-log4j12</artifactId>
    <version>${slf4j.version}</version>
  </dependency>
  <dependency>
  <groupId>org.mybatis</groupId>
  <artifactId>mybatis</artifactId>
    <version>${mybatis.version}</version>
  </dependency>
  <!--spring整合mybatis-->
  <dependency>
    <groupId>org.mybatis</groupId>
    <artifactId>mybatis-spring</artifactId>
    <version>2.0.1</version>
  </dependency>
  <dependency>
    <groupId>com.mchange</groupId>
    <artifactId>c3p0</artifactId>
    <version>0.9.2</version>
  </dependency>
  <!--返回json字符串的⽀持-->
  <dependency>
    <groupId>com.fasterxml.jackson.core</groupId>
    <artifactId>jackson-databind</artifactId>
    <version>2.9.1</version>
  </dependency>
  <dependency>
    <groupId>com.fasterxml.jackson.core</groupId>
    <artifactId>jackson-core</artifactId>
    <version>2.9.0</version>
  </dependency>
  <dependency>
    <groupId>com.fasterxml.jackson.core</groupId>
    <artifactId>jackson-annotations</artifactId>
    <version>2.9.0</version>
  </dependency>
  <!--⽂件上传-->
  <dependency><groupId>commons-io</groupId>
    <artifactId>commons-io</artifactId>
    <version>2.6</version>
  </dependency>
  <dependency>
    <groupId>commons-fileupload</groupId>
    <artifactId>commons-fileupload</artifactId>
    <version>1.3.3</version>
  </dependency>
  <dependency>
    <groupId>commons-logging</groupId>
    <artifactId>commons-logging</artifactId>
    <version>1.2</version>
  </dependency>
  <dependency>
    <groupId>javax.servlet</groupId>
    <artifactId>javax.servlet-api</artifactId>
    <version>3.1.0</version>
  </dependency>
  <dependency>
    <groupId>org.springframework</groupId>
    <artifactId>spring-aspects</artifactId>
    <version>4.3.7.RELEASE</version>
  </dependency>
  <!--druid数据库连接池-->
  <dependency>
    <groupId>com.alibaba</groupId>
    <artifactId>druid</artifactId>
    <version>1.1.20</version>
  </dependency>
  <!--定时任务-->
    <dependency>
      <groupId>org.quartz-scheduler</groupId>
      <artifactId>quartz</artifactId>
      <version>2.3.1</version>
    </dependency>
    <!--POI excel导出-->
    <dependency>
      <groupId>org.apache.poi</groupId>
      <artifactId>poi</artifactId>
      <version>4.1.0</version>
    </dependency>
    <!--hutool-->
    <dependency>
      <groupId>cn.hutool</groupId>
      <artifactId>hutool-all</artifactId>
      <version>4.6.8</version>
    </dependency>
    <dependency>
      <groupId>org.projectlombok</groupId>
      <artifactId>lombok</artifactId>
      <version>1.16.12</version>
    </dependency>

  </dependencies>

  <build>
    <finalName>crmcar</finalName>
    <pluginManagement><!-- lock down plugins versions to avoid using Maven defaults (may be moved to parent pom) -->
      <plugins>
        <plugin>
          <artifactId>maven-clean-plugin</artifactId>
          <version>3.1.0</version>
        </plugin>
        <!-- see http://maven.apache.org/ref/current/maven-core/default-bindings.html#Plugin_bindings_for_war_packaging -->
        <plugin>
          <artifactId>maven-resources-plugin</artifactId>
          <version>3.0.2</version>
        </plugin>
        <plugin>
          <artifactId>maven-compiler-plugin</artifactId>
          <version>3.8.0</version>
        </plugin>
        <plugin>
          <artifactId>maven-surefire-plugin</artifactId>
          <version>2.22.1</version>
        </plugin>
        <plugin>
          <artifactId>maven-war-plugin</artifactId>
          <version>3.2.2</version>
        </plugin>
        <plugin>
          <artifactId>maven-install-plugin</artifactId>
          <version>2.5.2</version>
        </plugin>
        <plugin>
          <artifactId>maven-deploy-plugin</artifactId>
          <version>2.8.2</version>
        </plugin>
      </plugins>
    </pluginManagement>
  </build>
</project>
1.3.3配置⽂件
jdbc.properties
jdbc.driverClass=com.mysql.jdbc.Driver
jdbc.jdbcUrl=jdbc:mysql://localhost:3306/rental?useUnicode=true&characterEncoding=UTF-8&useSSL=false
jdbc.user=root
jdbc.password=123456
log4j.properties
# Global logging configuration
log4j.rootLogger=DEBUG, stdout
# MyBatis logging configuration...
log4j.logger.org.mybatis.example.BlogMapper=TRACE
# Console output...
log4j.appender.stdout=org.apache.log4j.ConsoleAppender
log4j.appender.stdout.layout=org.apache.log4j.PatternLayout
log4j.appender.stdout.layout.ConversionPattern=%5p [%t] - %m%n
application-dao.xml
<?xml version="1.0" encoding="UTF-8"?>
<beans xmlns="http://www.springframework.org/schema/beans"
       xmlns:xsi="http://www.w3.org/2001/XMLSchema-instance"
       xmlns:context="http://www.springframework.org/schema/context"
       xmlns:aop="http://www.springframework.org/schema/aop"
       xsi:schemaLocation="http://www.springframework.org/schema/beans http://www.springframework.org/schema/beans/spring-beans.xsd
		http://www.springframework.org/schema/context http://www.springframework.org/schema/context/spring-context.xsd
		http://www.springframework.org/schema/aop http://www.springframework.org/schema/aop/spring-aop.xsd">
    <!--引入jdbc.properties-->
    <bean id="PlaceholderConfigurer" class="org.springframework.context.support.PropertySourcesPlaceholderConfigurer">
        <property name="locations" value="classpath:jdbc.properties"></property>
    </bean>

    <!--引入c3p0数据源-->
    <bean id="dataSource1" class="com.mchange.v2.c3p0.ComboPooledDataSource">
        <!--注入属性-->
        <property name="driverClass" value="${jdbc.driverClass}"></property>
        <property name="jdbcUrl" value="${jdbc.jdbcUrl}"></property>
        <property name="user" value="${jdbc.user}"></property>
        <property name="password" value="${jdbc.password}"></property>
        <!--初始化连接池大小-->
        <property name="initialPoolSize" value="5"></property>
        <!--设置最大连接数-->
        <property name="maxPoolSize" value="50"></property>
        <!--设置最小连接数-->
        <property name="minPoolSize" value="10"></property>
     </bean>


    <!--引入druid数据源-->
    <bean id="dataSource" class="com.alibaba.druid.pool.DruidDataSource">
        <!--注入属性-->
        <property name="driverClassName" value="${jdbc.driverClass}"></property>
        <property name="url" value="${jdbc.jdbcUrl}"></property>
        <property name="username" value="${jdbc.user}"></property>
        <property name="password" value="${jdbc.password}"></property>
        <!--初始化连接池大小-->
        <property name="initialSize" value="5"></property>
        <!--设置最大连接数-->
        <property name="maxActive" value="20"></property>
        <!--设置等待时间-->
        <property name="maxWait" value="500"></property>
    </bean>

    <!-- 声明SqlSessionFactoryBean,在这个类的内部,创建SqlSessionFactory对象,之后就可以获取SqlSession对象 -->
    <bean id="SqlSessionFactory" class="org.mybatis.spring.SqlSessionFactoryBean">
        <!-- 指定数据源 -->
        <property name="dataSource" ref="dataSource"/>
        <!-- 指定mybatis主配置文件 -->
        <property name="configLocation" value="classpath:mybatis-config.xml"/>
        <!-- 指定Mapper.xml -->
        <property name="mapperLocations">
            <array>
                <value>classpath:mapper/*/*Mapper.xml</value>
            </array>
        </property>
    </bean>
    <!--扫描mapper接口-->
    <bean class="org.mybatis.spring.mapper.MapperScannerConfigurer">
        <!--注入mapper接口所在的包-->
        <property name="basePackage" value="com.doujiang.bus.mapper,com.doujiang.sys.mapper,com.doujiang.stat.mapper"></property>
        <!--注入SqlSessionFactory-->
        <property name="sqlSessionFactoryBeanName" value="SqlSessionFactory"></property>
    </bean>


</beans>
application-service.xml
<?xml version="1.0" encoding="UTF-8"?>
<beans xmlns="http://www.springframework.org/schema/beans"
       xmlns:xsi="http://www.w3.org/2001/XMLSchema-instance"
       xmlns:context="http://www.springframework.org/schema/context"
       xmlns:aop="http://www.springframework.org/schema/aop"
       xmlns:tx="http://www.springframework.org/schema/tx"
       xsi:schemaLocation="http://www.springframework.org/schema/beans http://www.springframework.org/schema/beans/spring-beans.xsd
		http://www.springframework.org/schema/context http://www.springframework.org/schema/context/spring-context.xsd
		http://www.springframework.org/schema/aop http://www.springframework.org/schema/aop/spring-aop.xsd
		http://www.springframework.org/schema/tx http://www.springframework.org/schema/tx/spring-tx.xsd">


    <!-- 开始注解扫描,扫描 service -->
    <context:component-scan base-package="com.doujiang.bus.service.impl" />
    <context:component-scan base-package="com.doujiang.stat.service.impl" />
    <context:component-scan base-package="com.doujiang.sys.service.impl" />

    <!--声明事务管理器-->
    <bean id="transactionManager" class="org.springframework.jdbc.datasource.DataSourceTransactionManager">
        <!-- 数据源 -->
        <property name="dataSource" ref="dataSource"></property>
    </bean>

    <!--事务传播行为,spring中的通知-->
    <!--普通开发 -->
    <!-- 通知 -->
    <tx:advice id="advice" transaction-manager="transactionManager">
        <tx:attributes>
            <!-- 传播行为 -->
            <!-- REQUIRED:如果有事务,则会在事务中执行;如果没有事务,则会开启一个新的事务 -->
            <tx:method name="save*" propagation="REQUIRED" />
            <tx:method name="insert*" propagation="REQUIRED" />
            <tx:method name="add*" propagation="REQUIRED" />
            <tx:method name="create*" propagation="REQUIRED" />
            <tx:method name="delete*" propagation="REQUIRED" />
            <tx:method name="update*" propagation="REQUIRED" />
            <!-- SUPPORTS:如果有事务,则会在事务中执行;如果没有事务,则不会启动事务 -->
            <tx:method name="find*" propagation="SUPPORTS" read-only="true" />
            <tx:method name="select*" propagation="SUPPORTS" read-only="true" />
            <tx:method name="get*" propagation="SUPPORTS" read-only="true" />
        </tx:attributes>
    </tx:advice>

    <!-- 切面AOP -->
    <aop:config>
        <!-- 定义在 service 包或者子包里的任意方法的执行 -->
        <aop:pointcut id="pc1" expression="execution(* com.doujiang.sys.service.impl.*.*(..))"/>
        <aop:pointcut id="pc2" expression="execution(* com.doujiang.stat.service.impl.*.*(..))"/>
        <aop:pointcut id="pc3" expression="execution(* com.doujiang.bus.service.impl.*.*(..))"/>
        <!--编写通知,织入切点-->
        <aop:advisor advice-ref="advice" pointcut-ref="pc1" />
        <aop:advisor advice-ref="advice" pointcut-ref="pc2" />
        <aop:advisor advice-ref="advice" pointcut-ref="pc3" />
    </aop:config>
</beans>
applicationContext.xml
<?xml version="1.0" encoding="UTF-8"?>
<beans xmlns="http://www.springframework.org/schema/beans"
       xmlns:xsi="http://www.w3.org/2001/XMLSchema-instance"
       xmlns:context="http://www.springframework.org/schema/context"
       xmlns:aop="http://www.springframework.org/schema/aop"
       xsi:schemaLocation="http://www.springframework.org/schema/beans http://www.springframework.org/schema/beans/spring-beans.xsd
		http://www.springframework.org/schema/context http://www.springframework.org/schema/context/spring-context.xsd
		http://www.springframework.org/schema/aop http://www.springframework.org/schema/aop/spring-aop.xsd">

<!--告知spring在创建容器的时候进行包扫描-->
<context:component-scan base-package="com.doujiang.sys,com.doujiang.bus,com.doujiang.stat"></context:component-scan>
<!--加载dao,service的配置文件-->
<import resource="classpath:application-dao.xml"></import>
<import resource="classpath:application-service.xml"></import>


</beans>
springmvc.xml
<?xml version="1.0" encoding="UTF-8"?>
<beans xmlns="http://www.springframework.org/schema/beans"
       xmlns:xsi="http://www.w3.org/2001/XMLSchema-instance"
       xmlns:context="http://www.springframework.org/schema/context"
       xmlns:mvc="http://www.springframework.org/schema/mvc"
       xsi:schemaLocation="http://www.springframework.org/schema/mvc http://www.springframework.org/schema/mvc/spring-mvc.xsd
		http://www.springframework.org/schema/beans http://www.springframework.org/schema/beans/spring-beans.xsd
		http://www.springframework.org/schema/context http://www.springframework.org/schema/context/spring-context.xsd">

    <!-- 配置controller扫描包,多个包之间用,分隔 -->
    <context:component-scan base-package="com.doujiang.stat.controller" />
    <context:component-scan base-package="com.doujiang.sys.controller" />
    <context:component-scan base-package="com.doujiang.bus.controller" />

    <!-- 配置处理器映射器,配置处理器适配器 -->
    <mvc:annotation-driven />
     <!--<bean class="org.springframework.web.servlet.mvc.method.annotation.RequestMappingHandlerMapping"
        />
     <bean class="org.springframework.web.servlet.mvc.method.annotation.RequestMappingHandlerAdapter">
        <property name="webBindingInitializer" ref="customBinder"></property> </bean>-->


    <!-- 配置视图解析器 -->
    <bean class="org.springframework.web.servlet.view.InternalResourceViewResolver">
        <property name="viewClass" value="org.springframework.web.servlet.view.JstlView" />
        <!-- 配置逻辑视图的前缀 -->
        <property name="prefix" value="/WEB-INF/view/" />
        <!-- 配置逻辑视图的后缀 -->
        <property name="suffix" value=".jsp" />
    </bean>


    <!--配置静态文件放行-->
    <mvc:default-servlet-handler />

</beans>
mybatis-config.xml
<?xml version="1.0" encoding="UTF-8" ?>
<!DOCTYPE configuration
PUBLIC "-//mybatis.org//DTD Config 3.0//EN"
"http://mybatis.org/dtd/mybatis-3-config.dtd">
<configuration>
<!-- 设置:定义mybatis的一些全局性设置 -->
<settings>
<!-- 具体的参数名和参数值 -->
<!--例如:驼峰命名-->
<setting name="mapUnderscoreToCamelCase" value="true"/>
</settings>
<!-- 类型名称:为一些类定义别名 -->
<typeAliases>
<package name="com.doujiang.domain"></package>
</typeAliases>
<!-- <!– 类型处理器:定义Java类型与数据库中的数据类型之间的转换关系 –>
<typeHandlers></typeHandlers>
<!– 对象工厂 –>
<objectFactory type=""></objectFactory>-->
<!-- 插件:mybatis的插件,插件可以修改mybatis的内部运行规则(分页组件) -->
<plugins>
<plugin interceptor="com.github.pagehelper.PageInterceptor"></plugin>
</plugins>
<!--<!– 环境:配置mybatis的环境 –>
<environments default="">
<!– 环境变量:可以配置多个环境变量,比如使用多数据源时,就需要配置多个环境变量 –>
<environment id="">
<!– 事务管理器 –>
<transactionManager type=""></transactionManager>
<!– 数据源 –>
<dataSource type=""></dataSource>
</environment>
</environments>
<!– 数据库厂商标识 –>
<databaseIdProvider type=""></databaseIdProvider>
<!– 映射器:指定映射文件或者映射类 –>
<mappers></mappers>-->
</configuration>web.xml
<?xml version="1.0" encoding="UTF-8"?>
<web-app xmlns="http://xmlns.jcp.org/xml/ns/javaee"
         xmlns:xsi="http://www.w3.org/2001/XMLSchema-instance"
         xsi:schemaLocation="http://xmlns.jcp.org/xml/ns/javaee http://xmlns.jcp.org/xml/ns/javaee/web-app_3_1.xsd"
         version="3.1">
  <display-name>Archetype Created Web Application</display-name>
  <!---配置编码过滤器-->
  <filter>
    <filter-name>EncodeingFilter</filter-name>
    <filter-class>org.springframework.web.filter.CharacterEncodingFilter</filter-class>
    <init-param>
      <param-name>encoding</param-name>
      <param-value>UTF-8</param-value>
    </init-param>
  </filter>
  <filter-mapping>
    <filter-name>EncodeingFilter</filter-name>
    <servlet-name>springmvc</servlet-name>
  </filter-mapping>

 <!--监听器可以监听就是在 application,session,request
  三个对象创建、销毁或者往其中添加修改删除属性时自动执行代码的功能组件。-->
  <listener>
    <listener-class>org.springframework.web.context.ContextLoaderListener</listener-class>
  </listener>
  <context-param>
    <param-name>contextConfigLocation</param-name>
    <param-value>classpath:applicationContext.xml</param-value>
  </context-param>

<!--前端控制器-->
  <servlet>
    <servlet-name>springmvc</servlet-name>
    <servlet-class>org.springframework.web.servlet.DispatcherServlet</servlet-class>
    <init-param>
      <param-name>contextConfigLocation</param-name>
      <param-value>classpath:WEB-INF/view/system/logInfo/springmvc.xml</param-value>
    </init-param>
    <load-on-startup>1</load-on-startup>
  </servlet>
  <servlet-mapping>
    <servlet-name>springmvc</servlet-name>
    <url-pattern>*.action</url-pattern>
  </servlet-mapping>


</web-app>
1.3.4引⼊静态资源

1.4通⽤模块实现

关于项⽬中⽤到的描述信息,状态信息项⽬在接⼝中封装常量,⽅便我们以后调⽤
SysConstant
package com.doujiang.sys.constant;

/**
 * @Author:谢江
 * @name :SysConstant
 * @Date:2023/12/17 21:23
 */

/*
* 常量接口
* */
public interface SysConstant {
    //用户登录相关常量
    String USER_LOGIN_ERROR_MSG="⽤户名或码不正确";
    String USER_LOGIN_CODE_ERROR_MSG = "验证码不正确";
    /**
     *可用状态
     */
    Integer AVAILABLE_TRUE = 1;
    Integer AVAILABLE_FALSE = 0;
    /**
     * ⽤户类型
     */
    Integer USER_TYPE_SUPER = 1;
    Integer USER_TYPE_NORMAL = 2;
    /**
     * 是否展开
     */
    Integer SPREAD_TRUE = 1;
    Integer SPREAD_FALSE = 0;
    /**
     *操作状态
     *
     */
    String ADD_SUCCESS="添加成功";
    String ADD_ERROR="添加失败";
    String UPDATE_SUCCESS="修改成功";
    String UPDATE_ERROR="修改失败";
    String DELETE_SUCCESS="删除成功";
    String DELETE_ERROR="删除失败";
    String RESET_SUCCESS="重置成功";
    String RESET_ERROR="重置失败";
    String DISPATCH_SUCCESS="分配成功";
    String DISPATCH_ERROR="分配失败";
    Integer CODE_SUCCESS = 0;//操作成功
    Integer CODE_ERROR = -1;//操作失败
    /**
     * 公⽤常量
     */
    Integer CODE_ZERO = 0;
    Integer CODE_ONE = 1;
    Integer CODE_TWO = 2;
    Integer CODE_THREE = 3;
    /**
     * ⽤户默认密码
     */
    String USER_DEFAULT_PWD="123456";
    /**
     * 临时⽂件标记
     */
    String FILE_UPLOAD_TEMP = "_temp";
    /**
     * 默认图⽚地址
     */
    Object DEFAULT_CAR_IMG = "images/defaultcarimage.jpg";
    /**
     * 单号的前缀
     */
    String CAR_ORDER_CZ = "CZ";
    String CAR_ORDER_JC = "JC";
/**
 * * 归还状态
 */
Integer RENT_BACK_FALSE = 0; //未归还
    Integer RENT_BACK_TRUE = 1; //已归还
    /**
     * 出租状态
     */
    Integer RENT_CAR_TRUE = 1; //已出租
    Integer RENT_CAR_FALSE = 0; //未出租
}
 服务器返回数据类型我们统⼀封装到ResultObj对象中,并且提供静态⽅法返回常量信息。
package com.doujiang.sys.utils;

import com.doujiang.sys.constant.SysConstant;
import lombok.Data;

/**
 * @Author:豆浆
 * @name :ResultObj
 * @Date:2023/12/17 21:31
 */
/*
*统一的返回对象
*服务器返回数据类型我们统⼀封装到ResultObj对象中,并且提供静态⽅法返回常量信息
* */
/*<dependency>
<groupId>org.projectlombok</groupId>
<artifactId>lombok</artifactId>
<version>1.16.12</version>
</dependency>
get/set方法
*/
@Data
public class ResultObj {
    private Integer code;
    private String msg;

    public ResultObj(Integer code, String msg) {
        this.code = code;
        this.msg = msg;
    }
    private ResultObj(Integer code) {
        this.code = code;
    }

    public ResultObj(String msg) {
        this.msg = msg;
    }

    /**
     * 添加成功
     */
    public static final ResultObj ADD_SUCCESS = new
            ResultObj(SysConstant.CODE_SUCCESS,SysConstant.ADD_SUCCESS);
    /**
     * 添加失败
     */
    public static final ResultObj ADD_ERROR = new
            ResultObj(SysConstant.CODE_ERROR,SysConstant.ADD_ERROR);
    /**
     * 更新成功
    */
    public static final ResultObj UPDATE_SUCCESS = new
            ResultObj(SysConstant.CODE_SUCCESS,SysConstant.UPDATE_SUCCESS);
    /**
     * 更新失败
     */
    public static final ResultObj UPDATE_ERROR = new
            ResultObj(SysConstant.CODE_ERROR,SysConstant.UPDATE_ERROR);
    /**
     * 删除成功
     */
    public static final ResultObj DELETE_SUCCESS = new
            ResultObj(SysConstant.CODE_SUCCESS,SysConstant.DELETE_SUCCESS);
    /**
     * 删除失败
     */
    public static final ResultObj DELETE_ERROR = new
            ResultObj(SysConstant.CODE_ERROR,SysConstant.DELETE_ERROR);
    /**
     * 重置成功
     */
    public static final ResultObj RESET_SUCCESS = new
            ResultObj(SysConstant.CODE_SUCCESS,SysConstant.RESET_SUCCESS);
    /**
     * 重置失败
     */
    public static final ResultObj RESET_ERROR = new
            ResultObj(SysConstant.CODE_ERROR,SysConstant.RESET_ERROR);
    /**
     * 分配成功
     */
    public static final ResultObj DISPATCH_SUCCESS = new
            ResultObj(SysConstant.CODE_SUCCESS,SysConstant.DISPATCH_SUCCESS);
    /**
     * 分配失败
     */
    public static final ResultObj DISPATCH_ERROR = new
            ResultObj(SysConstant.CODE_ERROR,SysConstant.DISPATCH_ERROR);
    /**
     * 状态码0 成功
     */
    public static final ResultObj STATUS_TRUE = new
            ResultObj(SysConstant.CODE_SUCCESS);
    /**
     * 状态码-1 失败
     */
    public static final ResultObj STATUS_FALSE = new
            ResultObj(SysConstant.CODE_ERROR);

    /*public Integer getCode() {
        return code;
    }
    public void setCode(Integer code) {
        this.code = code;
    }
    public String getMsg() {
        return msg;
    }
    public void setMsg(String msg) {
        this.msg = msg;
    }*/
}
1.5项⽬环境测试
1.5.1测试⽬标
通过转账案例来测试ssm环境及ResultObj可以正常返回
1.5.2测试⽅式
1)创建account账户表
CREATE DATABASE IF NOT EXISTS `rental` DEFAULT CHARSET='utf8';
USE `rental`;

CREATE TABLE IF NOT EXISTS account (
 username VARCHAR(32),
 money DOUBLE
);
INSERT INTO account VALUES ('jerry',1000);
INSERT INTO account VALUES('tom',1000);2)编写AccountMapper接⼝

package com.doujiang.sys.mapper;

import org.apache.ibatis.annotations.Param;

/**
 * @Author:豆浆
 * @name :AccountMapper
 * @Date:2023/12/17 21:54
 */
public interface AccountMapper {
    //转⼊钱
    public void transferIn(@Param("name") String name, @Param("money")double money);
    //转出钱
    public void transferOut(@Param("name") String name, @Param("money")double money);
}
3)编写AccountMapper.xml 映射⽂件

<?xml version="1.0" encoding="UTF-8"?>
<!DOCTYPE mapper PUBLIC "-//mybatis.org//DTD Mapper 3.0//EN" "http://mybatis.org/dtd/mybatis-3-mapper.dtd">
<mapper namespace="com.doujiang.sys.mapper.AccountMapper">
    <!-- 转⼊ -->
    <update id="transferIn" >
      update account set money = money + #{money} where
    username = #{name}
     </update>
        <!-- 转出 -->
    <update id="transferOut" >
      update account set money = money - #{money} where
    username = #{name}
     </update>
</mapper>4)写AccountService

package com.doujiang.bus.service;

/**
 * @Author:豆浆
 * @name :IAccountService
 * @Date:2023/12/17 22:01
 */
public interface IAccountService {
    //转账
    public int updateTransfer(String inName,String outName,double money);
}
5)编写AccountServiceImpl
package com.doujiang.bus.service.impl;

import com.doujiang.bus.service.IAccountService;
import com.doujiang.sys.mapper.AccountMapper;
import org.springframework.beans.factory.annotation.Autowired;
import org.springframework.stereotype.Service;
import org.springframework.transaction.annotation.Transactional;

/**
 * @Author:豆浆
 * @name :AccountServiceImpl
 * @Date:2023/12/17 22:02
 */
 @Service
@Transactional //事务控制
 public class AccountServiceImpl implements IAccountService {
     @Autowired
     private AccountMapper mapper;
     @Override
     public int updateTransfer(String inName,String outName,double money) {
         try{
             //调⽤转⼊
             mapper.transferIn(inName,money);
             //调⽤转出
             mapper.transferOut(outName,money);
             return 0;
         }catch (Exception e){
             System.out.println(e);
             return 1;
         }
     }
 }
6)Controller层代码测试类
package com.doujiang.bus.controller;

import com.doujiang.bus.service.IAccountService;
import com.doujiang.sys.utils.ResultObj;
import org.springframework.beans.factory.annotation.Autowired;
import org.springframework.stereotype.Controller;
import org.springframework.transaction.annotation.Transactional;
import org.springframework.web.bind.annotation.RequestMapping;
import org.springframework.web.bind.annotation.ResponseBody;

/**
 * @Author:豆浆
 * @name :AccountController
 * @Date:2023/12/17 22:05
 */
@Controller
@RequestMapping("/account")
public class AccountController {
    @Autowired
    private IAccountService service;
    @RequestMapping("transfer")
    @ResponseBody
    @Transactional
    public ResultObj accountTransfer(String inName, String outName, double money) {
        int status = service.updateTransfer(inName, outName, money);
        //如果执⾏转账成功
        if (status > 0) {
            return ResultObj.STATUS_TRUE;
        } else {
            return ResultObj.STATUS_FALSE;
        }
    }
}
7)结果


第2章 基础管理模块
2.1 ⽤户登录
2.1.1 需求分析
当⽤户在浏览器上输⼊请求登录⻚⾯地址时,⽤户跳转到登录⻚⾯, ⽤户输⼊完⽤户

2.1.2 数据库表关系

sys_user表
#sys_user
CREATE DATABASE rentalCar DEFAULT c`sys_user`harset='utf8';
USE rentalCarl;
DROP TABLE IF EXISTS `sys_user`;
CREATE TABLE `sys_user` (
`userid` INT(11) NOT NULL AUTO_INCREMENT COMMENT '用户id',
`loginname` VARCHAR(255) DEFAULT NULL COMMENT '登录名称',
`identity` VARCHAR(255) DEFAULT NULL COMMENT '身份证号码',
`realname` VARCHAR(255) DEFAULT NULL COMMENT '真实姓名',
`sex` INT(255) DEFAULT NULL COMMENT '性别(0女1男)',
`address` VARCHAR(255) DEFAULT NULL COMMENT '地址',
`phone` VARCHAR(255) DEFAULT NULL COMMENT '电话号码',
`pwd` VARCHAR(255) DEFAULT NULL COMMENT '密码(密文)',
`position` VARCHAR(255) DEFAULT NULL COMMENT '职位',
`type` INT(255) DEFAULT '2' COMMENT '1,超级管理员,2,系统用户',
`available` INT(255) DEFAULT NULL COMMENT '是否可用(1可用 0不可
用)',
PRIMARY KEY (`userid`) USING BTREE
) ENGINE=INNODB AUTO_INCREMENT=9 DEFAULT CHARSET=utf8
ROW_FORMAT=COMPACT;
/*Data for the table `sys_user` */
INSERT INTO
`sys_user`(`userid`,`loginname`,`identity`,`realname`,`sex`,`address`,`phone`,`pwd`,`position`,`type`,`available`)
VALUES豆浆
(1,'doujiang','4313341334413','',1,'重庆','13520109202','e10adc3949ba59abbe56e057f20f883e','CEO',1,1),
(2,'lisi','43311341311314341','李四',1,'重
庆','1341314113131','e10adc3949ba59abbe56e057f20f883e','职员',2,1),
(3,'xiaoming','45113141331131131','小明',0,'四
川','13451333131','e10adc3949ba59abbe56e057f20f883e','职员',2,1),
(4,'laowang','41113113331133','老王',1,'四
川','13511333113','e10adc3949ba59abbe56e057f20f883e','职员',2,1);
2.1.3 接⼝设计
http://localhost:8080/RentalCar/login/toLogin.action2)⽣成验证码地址
http://localhost:8080/RentalCar/login/getCode.actionhttp://localhost:8080/RentalCar/login/login.action| 参数名 | 参数说明 | 备注 |
| UserVo | ⽤户视图对象 | 封装⽤户前台展示信息 |
- 响应数据String
- 通过return String字符串完成⻚⾯跳转
- 登录成功return system/main/index
- 登录失败return system/main/login
2.1.4 代码实现
1)实体User类
package com.doujiang.sys.domain;

import lombok.AllArgsConstructor;
import lombok.Data;
import lombok.NoArgsConstructor;

/**
 * @Author:豆浆
 * @name :User
 * @Date:2023/12/18 19:44
 */
@Data
@AllArgsConstructor
@NoArgsConstructor
public class User {
    //⽤户id
    private Integer userid;
    //登录名称
    private String loginname;
    //身份证号码
    private String identity;
    //真实姓名
    private String realname;
    //性别
    private Integer sex;
    //地址
    private String address;
    //电话
    private String phone;
    //密码
    private String pwd;
    //职位
    private String position;
    //⽤户类型
    private Integer type;
    //是否可⽤
    private Integer available;
    public Integer getUserid() {
        return userid;
    }
}
package com.doujiang.sys.domain;

/**
 * @Author:豆浆
 * @name :Uservo
 * @Date:2023/12/18 19:47
 */
public class Uservo extends User {
    /**
     * 分⻚参数
     */
    private Integer page;   //那一页
    private Integer limit;  //每一页显示几个
    private String code;    //编码
    /**
     * 接受多个⻆⾊的id
     */
    private Integer [] ids;

    public Integer getPage() {
        return page;
    }

    public void setPage(Integer page) {
        this.page = page;
    }

    public Integer getLimit() {
        return limit;
    }

    public void setLimit(Integer limit) {
        this.limit = limit;
    }

    public String getCode() {
        return code;
    }

    public void setCode(String code) {
        this.code = code;
    }

    public Integer[] getIds() {
        return ids;
    }

    public void setIds(Integer[] ids) {
        this.ids = ids;
    }
}
3)webUtils ⼯具类 , 该类提供⼀些静态通⽤⽅法
package com.doujiang.sys.utils;

import org.springframework.web.context.request.RequestContextHolder;
import org.springframework.web.context.request.ServletRequestAttributes;

import javax.servlet.http.HttpServletRequest;
import javax.servlet.http.HttpServletResponse;
import javax.servlet.http.HttpSession;

/**
 * @Author:豆浆
 * @name :WebUtils
 * @Date:2023/12/18 19:52
 */

//webUtils ⼯具类 , 该类提供⼀些静态通⽤⽅法
public class WebUtils {
    public static ServletRequestAttributes
    getServletRequestAttributes() {
        return (ServletRequestAttributes)
                RequestContextHolder.getRequestAttributes();
    }

    /**
     * 得到当前线程的请求对象
     * @return
     */
    public static HttpServletRequest getHttpServletRequest() {
        return getServletRequestAttributes().getRequest();
    }

    /**
     * 得到当前线程的响应对象
     */
    public static HttpServletResponse getHttpServletResponse() {
        return getServletRequestAttributes().getResponse();
    }

    /**
     * 得到session对象
     */
    public static HttpSession getHttpSession() {
        return getHttpServletRequest().getSession();
    }

    /**
     * 得到servletContext对象
     */
    public static String getServletContext() {
        return getHttpServletRequest().getServletPath();
    }
}
package com.doujiang.sys.controller;

import cn.hutool.captcha.CaptchaUtil;
import cn.hutool.captcha.LineCaptcha;
import com.doujiang.sys.constant.SysConstant;
import com.doujiang.sys.domain.User;
import com.doujiang.sys.domain.Uservo;
import com.doujiang.sys.service.IUserService;
import com.doujiang.sys.utils.WebUtils;
import org.springframework.beans.factory.annotation.Autowired;
import org.springframework.stereotype.Controller;
import org.springframework.ui.Model;
import org.springframework.web.bind.annotation.RequestMapping;

import javax.imageio.ImageIO;
import javax.servlet.ServletOutputStream;
import javax.servlet.http.HttpServletResponse;
import javax.servlet.http.HttpSession;
import java.io.IOException;

/**
 * @Author:豆浆
 * @name :LoginController
 * @Date:2023/12/18 19:56
 */

@Controller
@RequestMapping("login")
public class LoginController {

    @Autowired
    private IUserService userService;
    @RequestMapping("toLogin")
    public String toLogin(){
        return "system/main/login";
    }


    /**
     * 登陆方法
     */
    @RequestMapping("login")
    public String login(Uservo userVo, Model model){
        //获取验证码
        String code =WebUtils.getHttpSession().getAttribute("code").toString();
        //判断用户数的验证码和session中的验证码是否一致
        if(userVo.getCode().equals(code)){
            //如果验证码一致,就要验证用户名或密码是否正确
            User user = userService.login(userVo);
            System.out.println("user = " + user);
            if(null!=user){
                //放⼊到session
                //如果用户存在说明登录成功,需要跳转到index页面
                WebUtils.getHttpSession().setAttribute("user",user);
                return "system/main/index";
            }else {
                //没有查到用户,说明用户名和密码错误,需要跳转到login页面
                model.addAttribute("error",SysConstant.USER_LOGIN_ERROR_MSG);
                return "system/main/login";
            }
        }else {
            //验证码错误,跳转到index页面
            model.addAttribute("error",SysConstant.USER_LOGIN_CODE_ERROR_MSG);
            return "system/main/login";
        }
    }


    //获取验证码
    @RequestMapping("getCode")
    public void getCode(HttpServletResponse response, HttpSession
            session) throws IOException {
        //定义图形验证码的⻓和宽,符号,干扰线
        LineCaptcha lineCaptcha = CaptchaUtil.createLineCaptcha(116,36,4,5);

        //生成的验证码放到session
        session.setAttribute("code",lineCaptcha.getCode());
        //获取输出流
        ServletOutputStream outputStream =
                response.getOutputStream();
        //将数据以图片的方式输出
        ImageIO.write(lineCaptcha.getImage(),"JPEG",outputStream);
    }


}
package com.doujiang.sys.service;

import com.doujiang.sys.domain.Uservo;
import com.doujiang.sys.domain.User;

/**
 * @Author:豆浆
 * @name :IUserService
 * @Date:2023/12/18 20:34
 */
public interface IUserService {
    User login(Uservo uservo);
}
package com.doujiang.sys.service.impl;

import com.doujiang.sys.domain.User;
import com.doujiang.sys.domain.Uservo;
import com.doujiang.sys.mapper.UserMapper;
import com.doujiang.sys.service.IUserService;
import org.springframework.beans.factory.annotation.Autowired;
import org.springframework.stereotype.Service;
import org.springframework.util.DigestUtils;

/**
 * @Author:豆浆
 * @name :UserServiceImpl
 * @Date:2023/12/18 20:41
 */
@Service
public class UserServiceImpl implements IUserService {
    @Autowired
    private UserMapper userMapper;
    /*
     *用户登录的核心方法
     * */
    @Override
    public User login(Uservo uservo) {

        //明⽂
        //⽣成密⽂
        //根据用户名和密码查询
        //先uservo中用户输入的密码进行md5加密操作
        String pwd = DigestUtils.md5DigestAsHex(uservo.getPwd().getBytes());
        uservo.setPwd(pwd);
        //调用userMapper接口中的查询方法
        return userMapper.login(uservo);
    }
}
package com.doujiang.sys.mapper;

import com.doujiang.sys.domain.User;
import com.doujiang.sys.domain.Uservo;

/**
 * @Author:豆浆
 * @name :UserMapper
 * @Date:2023/12/18 20:52
 */
public interface UserMapper {

    User login(Uservo uservo);
}
<?xml version="1.0" encoding="UTF-8"?>
<!DOCTYPE mapper PUBLIC "-//mybatis.org//DTD Mapper 3.0//EN" "http://mybatis.org/dtd/mybatis-3-mapper.dtd">
<mapper namespace="com.doujiang.sys.mapper.UserMapper">

    <!--定义返回类形resultMap-->
    <resultMap id="BaseResultMap"
               type="com.doujiang.sys.domain.User">
        <id column="userid" jdbcType="INTEGER" property="userid" />
        <result column="loginname" jdbcType="VARCHAR" property="loginname" />
        <result column="identity" jdbcType="VARCHAR" property="identity" />
        <result column="realname" jdbcType="VARCHAR" property="realname" />
        <result column="sex" jdbcType="INTEGER" property="sex" />
        <result column="address" jdbcType="VARCHAR" property="address"/>
        <result column="phone" jdbcType="VARCHAR" property="phone" />
        <result column="pwd" jdbcType="VARCHAR" property="pwd" />
        <result column="position" jdbcType="VARCHAR" property="position" />
        <result column="type" jdbcType="INTEGER" property="type" />
        <result column="available" jdbcType="INTEGER" property="available" />
    </resultMap>

    <sql id="Base_Column_List">
    userid, loginname, identity, realname, sex, address, phone,
    pwd, position, type,available
    </sql>

    <!-- ⽤户登陆 -->
    <select id="login" resultMap="BaseResultMap">
        select
        <include refid="Base_Column_List" />
        from sys_user
        where loginname=#{loginname} and pwd=#{pwd}
    </select>
</mapper><%@ page language="java" contentType="text/html; charset=UTF-8"
pageEncoding="UTF-8"%>
<!DOCTYPE html>
<html class="loginHtml">
<head>
<meta charset="utf-8">
<title>登录-汽车出租系统</title>
<meta name="renderer" content="webkit">
<meta http-equiv="X-UA-Compatible" content="IE=edge,chrome=1">
<meta name="viewport" content="width=device-width, initial-scale=1, maximum-scale=1">
<meta name="apple-mobile-web-app-status-bar-style" content="black">
<meta name="apple-mobile-web-app-capable" content="yes">
<meta name="format-detection" content="telephone=no">
<link rel="icon" href="${pageContext.request.contextPath}/resources/favicon.ico">
<link rel="stylesheet" href="${pageContext.request.contextPath}/resources/layui/css/layui.css" media="all" />
<link rel="stylesheet" href="${pageContext.request.contextPath}/resources/css/public.css" media="all" />
</head>
<body class="loginBody">
<br><br>
<h1 align="center" style="color:LightSteelBlue ; font-size: 50px">豆浆汽车租赁系统</h1>
<br><br>
<form class="layui-form" id="loginFrm" method="post" action="${pageContext.request.contextPath}/login/login.action">
<div class="login_face"><img src="${pageContext.request.contextPath}/resources/images/face.jpg" class="userAvatar"></div>
<div class="layui-form-item input-item">
<label for="loginname">用户名</label>
<input type="text" placeholder="请输入用户名" autocomplete="off" name="loginname" id="loginname" class="layui-input" lay-verify="required">
</div>
<div class="layui-form-item input-item">
<label for="pwd">密码</label>
<input type="password" placeholder="请输入密码" autocomplete="off" name="pwd" id="pwd" class="layui-input" lay-verify="required">
</div>
<div class="layui-form-item input-item" id="imgCode">
<label for="code">验证码</label>
<input type="text" placeholder="请输入验证码" autocomplete="off" name="code" id="code" class="layui-input">
<img src="${pageContext.request.contextPath}/login/getCode.action" onclick="this.src=this.src+'?'">
</div>
<div class="layui-form-item">
<button class="layui-btn layui-block" lay-filter="login" lay-submit>登录</button>
</div>
<div class="layui-form-item layui-row" style="text-align: center;color: red;">
${error}
<!-- <a href="javascript:;" class="seraph icon-qq layui-col-xs4 layui-col-sm4 layui-col-md4 layui-col-lg4"></a>
<a href="javascript:;" class="seraph icon-wechat layui-col-xs4 layui-col-sm4 layui-col-md4 layui-col-lg4"></a>
<a href="javascript:;" class="seraph icon-sina layui-col-xs4 layui-col-sm4 layui-col-md4 layui-col-lg4"></a> -->
</div>
</form>
<script type="text/javascript" src="${pageContext.request.contextPath}/resources/layui/layui.js"></script>
<script type="text/javascript" src="${pageContext.request.contextPath}/resources/js/cache.js"></script>
<script type="text/javascript">
layui.use(['form','layer','jquery'],function() {
var form = layui.form,
layer = parent.layer === undefined ? layui.layer :
top.layer
$ = layui.jquery;
//登录按钮提交表单
form.on("submit(login)",function(data){
$(this).text("登录中...").attr("disabled","disabled").addClass("layui-disabled");
//设置提交
setTimeout(function(){
$("#loginFrm").submit();
},1000);
//阻止默认的提交方式
return false;
})
//表单输⼊效果
$(".loginBody .input-item").click(function(e){
e.stopPropagation();
$(this).addClass("layui-input-focus").find(".layui-input").focus();
})
$(".loginBody .layui-form-item .layui-input").focus(function(){
$(this).parent().addClass("layui-input-focus");
})
$(".loginBody .layui-form-item .layui-input").blur(function(){
$(this).parent().removeClass("layui-input-focus");
if($(this).val() != ''){$(this).parent().addClass("layui-input-active");
}else{
$(this).parent().removeClass("layui-input-active");
}
})
})
</script>
</body>
</html>
package com.doujiang.sys.controller;

import org.springframework.stereotype.Controller;
import org.springframework.web.bind.annotation.RequestMapping;

/**
 * @Author:豆浆
 * @name :DeskController
 * @Date:2023/12/18 21:35
 */
@Controller
@RequestMapping("desk")
public class DeskController {
    /*
    * 跳转到工作台页面
    * */
    @RequestMapping("toDeskManager")
    public String toDeskManager(){
        return "system/main/deskManger";
    }

}
			<div class="layui-tab-content clildFrame">
				<div class="layui-tab-item layui-show">
					<iframe src="${pageContext.request.contextPath}/desk/toDeskManager.action"></iframe>
				</div>
			</div>
		</div>
2.1.5 登录效果

2.2 客户管理
2.2.1 需求分析

2.2.2 数据库表关系

#bus_customer
CREATE TABLE IF NOT EXISTS `bus_customer` (
 `identity` VARCHAR (255),
 `custname` VARCHAR (255),
 `sex` DOUBLE ,
 `address` VARCHAR (255),
 `phone` VARCHAR (255),
 `career` VARCHAR (255),
 `createtime` DATETIME
);
INSERT INTO `bus_customer` (`identity`, `custname`, `sex`,`address`, `phone`, `career`, `createtime`) VALUES
('421087133414144412','张小明','1','北京','13456788987','程序员','2022-11-07 14:52:24');
INSERT INTO `bus_customer` (`identity`, `custname`, `sex`,`address`, `phone`, `career`, `createtime`) VALUES
('43131334113331131','王小五','1','武汉','13888888888','科长','2022-11-07 14:52:24');
INSERT INTO `bus_customer` (`identity`, `custname`, `sex`,`address`, `phone`, `career`, `createtime`) VALUES
('431321199291331131','张三','1','南京','13431334113','程序员','2022-11-07 14:52:24');
INSERT INTO `bus_customer` (`identity`, `custname`, `sex`,`address`, `phone`, `career`, `createtime`) VALUES
('431321199291331132','孙策','1','长沙','134131314131','船长','2022-11-07 14:52:24');
INSERT INTO `bus_customer` (`identity`, `custname`, `sex`,`address`, `phone`, `career`, `createtime`) VALUES
('431341134191311311','李四','0','西安','13451313113','CEO','2022-10-07 14:52:24');
INSERT INTO `bus_customer` (`identity`, `custname`, `sex`,`address`, `phone`, `career`, `createtime`) VALUES
('431341134191311314','王长明','1','郑州','13413131113','CEO','2022-11-11 14:52:24');
2.2.3 跳转客户管理接⼝设计
- 请求⽅式:get
- 请求参数: ⽆
- 响应数据String
- business/customer/customerManager
2.2.3 代码实现
package com.doujiang.bus.controller;

import org.springframework.stereotype.Controller;
import org.springframework.web.bind.annotation.RequestMapping;

/**
 * @Author:豆浆
 * @name :BusController
 * @Date:2023/12/18 22:00
 */
@Controller
@RequestMapping("bus")
public class BusController {
    /*
    *跳转到客户管理页面
    * */
    @RequestMapping("toCustomerManager")
     public String toCustomerMapper(){

        return "business/customer/customerManager";
}</bean>
<!--扫描mapper接口-->
<bean class="org.mybatis.spring.mapper.MapperScannerConfigurer">
<!--注入mapper接口所在的包-->
<property name="basePackage" value="com.doujiang.bus.mapper,com.doujiang.sys.mapper,com.doujiang.stat.mapper"></property>
<!--注入SqlSessionFactory-->
<property name="sqlSessionFactoryBeanName" value="SqlSessionFactory"></property>
</bean> <!-- 开始注解扫描,扫描 service -->
<context:component-scan base-package="com.doujiang.bus.service.impl" /><!-- 配置controller扫描包,多个包之间用,分隔 -->
<context:component-scan base-package="com.doujiang.bus.controller" />2.2.4 客户查询功能
2.2.4.1 查询客户管理需求分析

2.2.4.2 查询客户接⼝设计
- 请求⽅式:get
- 请求参数
|
参数名
| 参数说明 | 备注 |
|
CustomerVo
| 客户视图对象 | 封装客户前台展示信息 |
- 响应数据
|
参数名
| 参数说明 | 备注 |
| DataGridView | layui数据表格的数据对象 | 前台展示数据对象 |
2.2.4.3 查询后台代码实现
package com.doujiang.sys.utils;

import java.util.Map;

/**
 * @Author:豆浆
 * @name :DataGridView
 * @Date:2023/12/19 15:12
 */
public class DataGridView {
    /**
     * 封装layui数据表格的数据对象
     */
    private Integer code=0;//编码
    private String msg="";
    private Long count;//数量
    private Object data;

    public DataGridView(Map<String, Object> map) {
    }

    public DataGridView(Integer code) {
        this.code = code;
    }

    public DataGridView(Long count, Object data) {
        this.count = count;
        this.data = data;
    }

    public DataGridView(Integer code, String msg, Long count, Object data) {
        this.code = code;
        this.msg = msg;
        this.count = count;
        this.data = data;
    }

    public Integer getCode() {
        return code;
    }

    public void setCode(Integer code) {
        this.code = code;
    }

    public String getMsg() {
        return msg;
    }

    public void setMsg(String msg) {
        this.msg = msg;
    }

    public Long getCount() {
        return count;
    }

    public void setCount(Long count) {
        this.count = count;
    }

    public Object getData() {
        return data;
    }

    public void setData(Object data) {
        this.data = data;
    }
}
package com.doujiang.bus.domain;

import com.fasterxml.jackson.annotation.JsonFormat;

import java.util.Date;

/**
 * @Author:豆浆
 * @name :Customer
 * @Date:2023/12/19 15:01
 */

public class Customer {
    private String identity;//身份证
    private String custname;
    private Integer sex;
    private String address;
    private String phone;
    private String career;//职业
    //指定格式
    @JsonFormat(pattern = "yyyy-MM-dd HH:mm:ss",timezone = "GMT+8")
    private Date createtime;//时间

    public String getIdentity() {
        return identity;
    }

    public void setIdentity(String identity) {
        this.identity = identity;
    }

    public String getCustname() {
        return custname;
    }

    public void setCustname(String custname) {
        this.custname = custname;
    }

    public Integer getSex() {
        return sex;
    }

    public void setSex(Integer sex) {
        this.sex = sex;
    }

    public String getAddress() {
        return address;
    }

    public void setAddress(String address) {
        this.address = address;
    }

    public String getPhone() {
        return phone;
    }

    public void setPhone(String phone) {
        this.phone = phone;
    }

    public String getCareer() {
        return career;
    }

    public void setCareer(String career) {
        this.career = career;
    }

    public Date getCreatetime() {
        return createtime;
    }

    public void setCreatetime(Date createtime) {
        this.createtime = createtime;
    }
}
package com.doujiang.bus.vo;

import com.doujiang.bus.domain.Customer;

/**
 * @Author:豆浆
 * @name :CustomerVo
 * @Date:2023/12/19 15:08
 */
public class CustomerVo extends Customer {
    /**
     * 分⻚参数
     */
    private Integer page;//那一页
    private Integer limit;//每一页显示几个
    //接受多个id
    private String [] ids;

    public Integer getPage() {
        return page;
    }

    public void setPage(Integer page) {
        this.page = page;
    }

    public Integer getLimit() {
        return limit;
    }

    public void setLimit(Integer limit) {
        this.limit = limit;
    }

    public String[] getIds() {
        return ids;
    }

    public void setIds(String[] ids) {
        this.ids = ids;
    }
}
package com.doujiang.bus.controller;

import com.doujiang.bus.service.ICustomerService;
import com.doujiang.bus.vo.CustomerVo;
import com.doujiang.sys.utils.DataGridView;
import com.doujiang.sys.utils.ResultObj;
import org.springframework.beans.factory.annotation.Autowired;
import org.springframework.stereotype.Controller;
import org.springframework.web.bind.annotation.RequestMapping;
import org.springframework.web.bind.annotation.ResponseBody;

import java.util.Date;

/**
 * @Author:豆浆
 * @name :CustomerController
 * @Date:2023/12/19 15:15
 */
@Controller
@RequestMapping("customer")
public class CustomerController {

    @Autowired
    private ICustomerService customerService;

    /*
     * 查询客户信息
     * */
    @RequestMapping("loadAllCustomer")
    @ResponseBody
    public DataGridView loadAllCustomer(CustomerVo customerVo){

        return customerService.queryAllCustomer(customerVo);
}package com.doujiang.bus.service;
import com.doujiang.bus.vo.CustomerVo;
import com.doujiang.sys.utils.DataGridView;
/**
* @Author:豆浆
* @name :ICustomerService
* @Date:2023/12/19 15:22
*/
public interface ICustomerService {
/**
* 查询所有客户
* @param customerVo
* @return
*/
public DataGridView queryAllCustomer(CustomerVo customerVo);
/*
* 添加客户信息
* */
void addCustomer(CustomerVo customerVo);package com.doujiang.bus.service.impl;
import com.doujiang.bus.domain.Customer;
import com.doujiang.bus.mapper.CustomerMapper;
import com.doujiang.bus.service.ICustomerService;
import com.doujiang.bus.vo.CustomerVo;
import com.doujiang.sys.utils.DataGridView;
import com.github.pagehelper.Page;
import com.github.pagehelper.PageHelper;
import org.springframework.beans.factory.annotation.Autowired;
import org.springframework.stereotype.Service;
import java.util.List;
/**
* @Author:豆浆
* @name :CustomerServiceImpl
* @Date:2023/12/19 15:24
*/
@Service
public class CustomerServiceImpl implements ICustomerService {
@Autowired
private CustomerMapper customerMapper;
/**
* 查询所有客户信息 分⻚pagehelper
* @param customerVo
* @return
*/
@Override
public DataGridView queryAllCustomer(CustomerVo customerVo) {
//查询所有客户信息 分⻚查询pagehelper
Page<Object> page = PageHelper.startPage(customerVo.getPage(),customerVo.getLimit());
List<Customer> data = customerMapper.queryAllCustomer(customerVo);
return new DataGridView(page.getTotal(),data);
}
package com.doujiang.bus.mapper;

import com.doujiang.bus.domain.Customer;
import com.doujiang.bus.vo.CustomerVo;

import java.util.List;

/**
 * @Author:豆浆
 * @name :CustomerMapper
 * @Date:2023/12/19 15:29
 */

public interface CustomerMapper {

    List<Customer> queryAllCustomer(CustomerVo customerVo);
}<?xml version="1.0" encoding="UTF-8"?>
<!DOCTYPE mapper PUBLIC "-//mybatis.org//DTD Mapper 3.0//EN" "http://mybatis.org/dtd/mybatis-3-mapper.dtd">
<mapper namespace="com.doujiang.bus.mapper.CustomerMapper">
<!--定义返回类形resultMap-->
<resultMap id="BaseResultMap" type="com.doujiang.bus.domain.Customer">
<id column="identity" jdbcType="VARCHAR" property="identity"/>
<result column="custname" jdbcType="VARCHAR" property="custname"/>
<result column="sex" jdbcType="INTEGER" property="sex"/>
<result column="address" jdbcType="VARCHAR" property="address"/>
<result column="phone" jdbcType="VARCHAR" property="phone"/>
<result column="career" jdbcType="VARCHAR" property="career"/>
<result column="createtime" jdbcType="TIMESTAMP" property="createtime"/>
</resultMap>
<sql id="Base_Column_List">
identity, custname, sex, address, phone, career, createtime
</sql>
<select id="queryAllCustomer" resultMap="BaseResultMap">
select
<include refid="Base_Column_List"/>
from bus_customer
<where>
<if test="identity!=null and identity!=''">
and identity LIKE concat("%",#{identity},"%")
</if>
<if test="custname!=null and custname!=''">
and custname LIKE concat("%",#{custname},"%")
</if>
<if test="phone!=null and phone!=''">
and phone LIKE concat("%",#{phone},"%")
</if>
<if test="career!=null and career!=''">
and career LIKE concat("%",#{career},"%")
</if>
<if test="address!=null and address!=''">
and address LIKE concat("%",#{address},"%")
</if>
<if test="sex!=null">
and sex=#{sex}
</if>
</where>
order by createtime desc
</select>2.2.4.4 查询客户前台代码实现
<%@ page contentType="text/html;charset=UTF-8" language="java" %>
<html>
<head>
    <meta charset="utf-8">
    <title>客户管理</title>
    <meta name="renderer" content="webkit">
    <meta http-equiv="X-UA-Compatible" content="IE=edge,chrome=1">
    <meta http-equiv="Access-Control-Allow-Origin" content="*">
    <meta name="viewport" content="width=device-width, initial-scale=1, maximum-scale=1">
    <meta name="apple-mobile-web-app-status-bar-style" content="black">
    <meta name="apple-mobile-web-app-capable" content="yes">
    <meta name="format-detection" content="telephone=no">
    <%--<link rel="icon" href="favicon.ico">--%>
    <link rel="stylesheet" href="${pageContext.request.contextPath}/resources/layui/css/layui.css" media="all"/>
    <link rel="stylesheet" href="${pageContext.request.contextPath}/resources/css/public.css" media="all"/>
    <link rel="stylesheet" href="${pageContext.request.contextPath}/resources/layui_ext/dtree/dtree.css">
    <link rel="stylesheet" href="${pageContext.request.contextPath}/resources/layui_ext/dtree/font/dtreefont.css">
</head>
<body class="childrenBody">

<!-- 搜索条件开始 -->
<fieldset class="layui-elem-field layui-field-title" style="margin-top: 20px;">
    <legend>查询条件</legend>
</fieldset>
<form class="layui-form" method="post" id="searchFrm">

    <div class="layui-form-item">
        <div class="layui-inline">
            <label class="layui-form-label">客户姓名:</label>
            <div class="layui-input-inline" style="padding: 5px">
                <input type="text" name="custname" autocomplete="off" class="layui-input layui-input-inline"
                       placeholder="请输入客户名称" style="height: 30px;border-radius: 10px">
            </div>
        </div>
        <div class="layui-inline">
            <label class="layui-form-label">身份证号:</label>
            <div class="layui-input-inline" style="padding: 5px">
                <input type="text" name="identity" autocomplete="off" class="layui-input layui-input-inline"
                       placeholder="请输入身份证号" style="height: 30px;border-radius: 10px">
            </div>
        </div>
        <div class="layui-inline">
            <label class="layui-form-label">客户地址:</label>
            <div class="layui-input-inline" style="padding: 5px">
                <input type="text" name="address" autocomplete="off" class="layui-input layui-input-inline"
                       placeholder="请输入客户地址" style="height: 30px;border-radius: 10px">
            </div>
        </div>
    </div>
    <div class="layui-form-item">
        <div class="layui-inline">
            <label class="layui-form-label">客户电话:</label>
            <div class="layui-input-inline" style="padding: 5px">
                <input type="text" name="phone" autocomplete="off" class="layui-input layui-input-inline"
                       placeholder="请输入客户电话" style="height: 30px;border-radius: 10px">
            </div>
        </div>
        <div class="layui-inline">
            <label class="layui-form-label">客户职业:</label>
            <div class="layui-input-inline" style="padding: 5px">
                <input type="text" name="career" autocomplete="off" class="layui-input layui-input-inline"
                       placeholder="请输入客户职业" style="height: 30px;border-radius: 10px">
            </div>
        </div>
        <div class="layui-inline">
            <label class="layui-form-label">性别:</label>
            <div class="layui-input-inline">
                <input type="radio" name="sex" value="1" title="男">
                <input type="radio" name="sex" value="0" title="女">
            </div>
            <button type="button"
                    class="layui-btn layui-btn-normal layui-icon layui-icon-search layui-btn-radius layui-btn-sm"
                    id="doSearch" style="margin-top: 4px">查询
            </button>
            <button type="reset"
                    class="layui-btn layui-btn-warm layui-icon layui-icon-refresh layui-btn-radius layui-btn-sm"
                    style="margin-top: 4px">重置
            </button>
        </div>
    </div>

</form>

<!-- 数据表格开始 -->
<table class="layui-hide" id="customerTable" lay-filter="customerTable"></table>
<div id="customerToolBar" style="display: none;">
    <button type="button" class="layui-btn layui-btn-sm layui-btn-radius" lay-event="add">增加</button>
    <button type="button" class="layui-btn layui-btn-danger layui-btn-sm layui-btn-radius" lay-event="deleteBatch">
        批量删除
    </button>
</div>
<div id="customerBar" style="display: none;">
    <a class="layui-btn layui-btn-xs layui-btn-radius" lay-event="edit">编辑</a>
    <a class="layui-btn layui-btn-danger layui-btn-xs layui-btn-radius" lay-event="del">删除</a>
</div>

<!-- 添加和修改的弹出层-->
<div style="display: none;padding: 20px" id="saveOrUpdateDiv">
    <form class="layui-form" lay-filter="dataFrm" id="dataFrm">
        <div class="layui-form-item">
            <div class="layui-inline">
                <label class="layui-form-label">客户姓名:</label>
                <div class="layui-input-inline">
                    <input type="text" name="custname" lay-verify="required" placeholder="请输入客户姓名" autocomplete="off"
                           class="layui-input">
                </div>
            </div>
            <div class="layui-inline">
                <label class="layui-form-label">身份证号:</label>
                <div class="layui-input-inline">
                    <input type="text" name="identity" lay-verify="required" placeholder="请输入客户姓名" autocomplete="off"
                           class="layui-input">
                </div>
            </div>
        </div>
        <div class="layui-form-item">
            <div class="layui-inline">
                <label class="layui-form-label">客户地址:</label>
                <div class="layui-input-inline">
                    <input type="text" name="address" placeholder="请输入客户地址" autocomplete="off" class="layui-input">
                </div>
            </div>
            <div class="layui-inline">
                <label class="layui-form-label">客户职业:</label>
                <div class="layui-input-inline">
                    <input type="text" name="career" placeholder="请输入客户职业" autocomplete="off" class="layui-input">
                </div>
            </div>
        </div>
        <div class="layui-form-item">
            <div class="layui-inline">
                <label class="layui-form-label">客户电话:</label>
                <div class="layui-input-inline">
                    <input type="text" name="phone" lay-verify="required|phone" placeholder="请输入客户电话" autocomplete="off"
                           class="layui-input">
                </div>
            </div>
            <div class="layui-inline">
                <label class="layui-form-label">客户性别:</label>
                <div class="layui-input-inline">
                    <input type="radio" name="sex" value="1" checked="checked" title="男">
                    <input type="radio" name="sex" value="0" title="女">
                </div>
            </div>
        </div>
        <div class="layui-form-item">
            <div class="layui-input-block" style="text-align: center;padding-right: 120px">
                <button type="button"
                        class="layui-btn layui-btn-normal layui-btn-md layui-icon layui-icon-release layui-btn-radius"
                        lay-filter="doSubmit" lay-submit="">提交
                </button>
                <button type="reset"
                        class="layui-btn layui-btn-warm layui-btn-md layui-icon layui-icon-refresh layui-btn-radius">重置
                </button>
            </div>
        </div>
    </form>
</div>

<script src="${pageContext.request.contextPath}/resources/layui/layui.js"></script>
<script type="text/javascript">
    var tableIns;
    layui.use(['jquery','layer','form','table'],function (){
        var $ = layui.jquery;
        var layer = layui.layer;
        var form = layui.form;
        var table = layui.table;

        //渲染数据表格
        tableIns = table.render({
            elem: "#customerTable" , //渲染的目标表格
            url: "${pageContext.request.contextPath}/customer/loadAllCustomer.action", //数据接口url
            titile: "客户数据表" , //数据的标题
            toolbar: "#customerToolBar" , //表格工具条
            height: "full-210",
            cellMinWidth: 100 , //设置列的最小默认宽度
            page: true , //开启分页
            cols: [[ //表头设置
                {type: 'checkbox' , fixed: 'left'},

               /* identity   431341134191311311
                custname   李四
                sex   0
                address  西安
                phone  13451313113
                career  CEO
                createtime  2022-10-07 14:52:24*/

                {field: "identity" ,title:"身份证号码", align:"center" ,width: "200"},
                {field: "custname" ,title:"客户姓名", align:"center" ,width: "125"},
                {field: "address" ,title:"客户地址", align:"center" ,width: "125"},
                {field: "career" ,title:"客户职业", align:"center" ,width: "150"},
                {field: "phone" ,title:"客户电话", align:"center" ,width: "150"},
                {field: "sex" ,title:"性别", align:"center" ,width: "120" ,templet: function (d){
                    return d.sex == '1' ? '<font color=blue>男</font>' : '<font color="red">女</font>'
                    }},
                {field: "createtime" ,title:"录入时间", align:"center" ,width: "200"},
                {fixed: "right", title:"操作", toolbar:"#customerBar",align: "center",width: "150"},
            ]],
            done: function (data,curr,count){
                //不是第一页时,如果当前返回的数据是0,那么就返回上一页
                if(data.data.length ==0 && curr !=1){
                    tableIns.reload({
                        page:{
                            curr: curr-1
                        }
                    })
                }
            }
        })

        //按条件模糊查询
        //找到查询的按钮,添加一个单击事件
        $("#doSearch").click(function (){
            //获取查询表单的的参数
            var params = $("#searchFrm").serialize();
            tableIns.reload({
                url:"${pageContext.request.contextPath}/customer/loadAllCustomer.action?"+params,
                page:{curr: 1}
            })
        })


        //监听头部工具栏事件
        table.on("toolbar(customerTable)",function (obj){
            switch (obj.event){
                case 'add' :
                    openAddCustomer();
                    break;
                case 'deleteBatch' :
                    deleteBatch();
                    break;
            }
        })


        //打开添加页面
        var url;
        var mainIndex;
        function openAddCustomer(){
            mainIndex =  layer.open({
                type: 1,
                title: "添加客户",
                content: $("#saveOrUpdateDiv"),
                area: ["700px","320px"],
                success: function (index){
                    //清空表单数据
                    $("#dataFrm")[0].reset();
                    url="${pageContext.request.contextPath}/customer/addCustomer.action";
                }
            })
        }
        //批量删除用户
        function deleteBatch(){
            //得到选中的数据⾏
            var checkStatus = table.checkStatus('customerTable');
            var data = checkStatus.data;
            layer.alert(data.length);
            var params = "";
            $.each(data, function (i, item) {
                if (i == 0) {
                    params += "ids=" + item.identity;
                } else {params += "&ids=" + item.identity;
                }
            });
            layer.confirm('真的要删除这些客户么?', function (index) {
                //向服务端发送删除指令
                $.post("${pageContext.request.contextPath}/customer/deleteBatchCustomer.action", params, function (res) {
                layer.msg(res.msg);
                //刷新数据表格
                tableIns.reload();
            })
            });
        }

        //提交保存客户数据
        form.on("submit(doSubmit)",function (obj){
            //获取序列化参数
            var params = $("#dataFrm").serialize();
            //发送请求请求后台接口
            $.post(url,params,function (obj){
                layer.msg(obj.msg);
                //关闭弹出层
                layer.close(mainIndex);
                //刷新表格
                tableIns.reload();
            })
        })


        //监听行工具栏事件
        table.on("tool(customerTable)",function (obj){
            //获取当前行的数据
            var data = obj.data;
            if(obj.event == 'del'){
                layer.confirm("您确认删除["+data.custname+"]这个用户信息吗?",function (index){
                    //如果用户点击确认删除
                    $.get("${pageContext.request.contextPath}/customer/deleteCustomer.action",{identity: data.identity},function (res){
                        layer.msg(res.msg);
                        //刷新表格数据
                        tableIns.reload();
                    })
                })
            }else if (obj.event == 'edit'){
                //编写一个方法, 打开一个窗口,回显客户数据
                openUpdateCustomer(data);
            }
        })


        function openUpdateCustomer(data){
            mainIndex = layer.open({
                type: 1,
                title: "修改客户信息",
                content: $("#saveOrUpdateDiv"),
                area: ["700px","320px"],
                success: function (index){
                    //打开窗口的时候,数据要放到form表单中, 做回显
                    form.val("dataFrm",data);
                    //设置url
                    url = "${pageContext.request.contextPath}/customer/updateCustomer.action";
                }
            })
        }


        //批量删除客户信息
        function deleteBatch(){
            //得到选中的行信息
           var checkStatus =  table.checkStatus("customerTable");
           var data = checkStatus.data; //拿到行数据
           //定义要发送给后台的参数  ids=123123&231231
           var params = "";
            $.each(data ,function (i , item){
                if(i == 0){
                    params += "ids="+item.identity;
                }else{
                    params += "&ids="+item.identity;
                }
            });
            layer.confirm("您确认要删除这些客户吗?",function (index){
                //发送异步请求删除
                $.get("${pageContext.request.contextPath}/customer/deleteBatchCustomer.action",params,function (res){
                    layer.msg(res.msg);
                    //刷新表格
                    tableIns.reload();
                })
            })
        }
    })

</script>
</body>
</html>
2.2.5 添加客户功能
2.2.5.1 需求分析

2.2.5.2 添加客户接⼝设计
- 请求⽅式:get
- 请求参数:http://localhost:8080/RentalCar/customer/addCustomer.action
|
参数名
| 参数说明 | 备注 |
| CustomerVo | 客户视图对象 |
- 响应数据
|
参数名
| 参数说明 | 备注 |
|
ResultObj
| 统⼀封装数据对象 |
2.2.5.3 添加客户后台代码实现
/*
     * 添加用户
     * */
    @RequestMapping("addCustomer")
    @ResponseBody
    public ResultObj addCustomer(CustomerVo customerVo){
        try{
            customerVo.setCreatetime(new Date());
            this.customerService.addCustomer(customerVo);
            return ResultObj.ADD_SUCCESS;
        }catch (Exception e){
            e.printStackTrace();
            return ResultObj.ADD_ERROR;
        }
} /*
* 添加客户信息
* */
void addCustomer(CustomerVo customerVo);/*
* 添加客户信息
* */
@Override
public void addCustomer(CustomerVo customerVo) {
customerMapper.insertSelective(customerVo);
}5. CustMapper 持久层接⼝
void insertSelective(CustomerVo customerVo);<!--添加客户信息-->
<insert id="insertSelective" parameterType="com.doujiang.bus.domain.Customer">
insert into bus_customer
<trim prefix="(" suffix=")" suffixOverrides=",">
<if test="identity != null">
identity,
</if>
<if test="custname != null">
custname,
</if>
<if test="sex != null">
sex,
</if>
<if test="address != null">
address,
</if>
<if test="phone != null">
phone,
</if>
<if test="career != null">
career,
</if>
<if test="createtime != null">
createtime,
</if>
</trim>
<trim prefix="values (" suffix=")" suffixOverrides=",">
<if test="identity != null">
#{identity,jdbcType=VARCHAR},
</if>
<if test="custname != null">
#{custname,jdbcType=VARCHAR},
</if>
<if test="sex != null">
#{sex,jdbcType=INTEGER},
</if>
<if test="address != null">
#{address,jdbcType=VARCHAR},
</if>
<if test="phone != null">
#{phone,jdbcType=VARCHAR},
</if>
<if test="career != null">
#{career,jdbcType=VARCHAR},
</if>
<if test="createtime != null">
#{createtime,jdbcType=TIMESTAMP},
</if>
</trim>
</insert>2.2.4.5 添加客户前台代码
        //监听头部工具栏事件
        table.on("toolbar(customerTable)",function (obj){
            switch (obj.event){
                case 'add' :
                    openAddCustomer();
                    break;
                case 'deleteBatch' :
                    deleteBatch();
                    break;
            }
        })


        //打开添加页面
        var url;
        var mainIndex;
        function openAddCustomer(){
            mainIndex =  layer.open({
                type: 1,
                title: "添加客户",
                content: $("#saveOrUpdateDiv"),
                area: ["700px","320px"],
                success: function (index){
                    //清空表单数据
                    $("#dataFrm")[0].reset();
                    url="${pageContext.request.contextPath}/customer/addCustomer.action";
                }
            })
        }

        //提交保存客户数据
        form.on("submit(doSubmit)",function (obj){
            //获取序列化参数
            var params = $("#dataFrm").serialize();
            //发送请求请求后台接口
            $.post(url,params,function (obj){
                layer.msg(obj.msg);
                //关闭弹出层
                layer.close(mainIndex);
                //刷新表格
                tableIns.reload();
            })
        })
2.2.6 删除客户功能
2.2.6.1 需求分析
2.2.6.2 删除客户接⼝设计
- 删除客户接⼝路径:http://localhost:8080/RentalCar/customer/deleteCustomer.action
- 请求⽅式:get
- 请求参数:
|
参数名
| 参数说明 | 备注 |
| identity | 客户身份证 | String |
- 响应数据
|
参数名
| 参数说明 | 备注 |
|
ResultObj
|
统⼀封装数据对象
| String |
2.2.6.3 删除客户后台代码实现
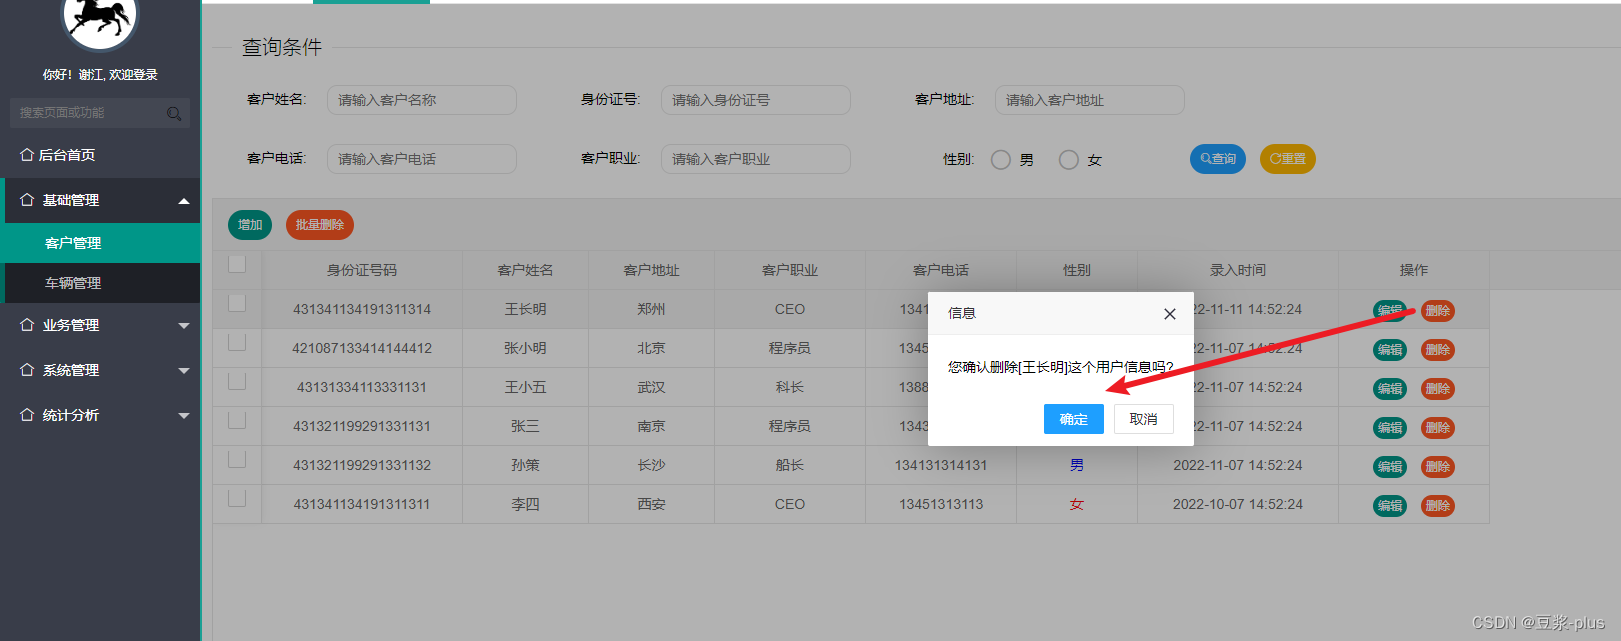
2.2.6.4 删除客户前台代码
//监听行工具栏事件
        table.on("tool(customerTable)",function (obj){
            //获取当前行的数据
            var data = obj.data;
            if(obj.event == 'del'){
                layer.confirm("您确认删除["+data.custname+"]这个用户信息吗?",function (index){
                    //如果用户点击确认删除
                    $.get("${pageContext.request.contextPath}/customer/deleteCustomer.action",{identity: data.identity},function (res){
                        layer.msg(res.msg);
                        //刷新表格数据
                        tableIns.reload();
                    })
                })
            }else if (obj.event == 'edit'){
                //编写一个方法, 打开一个窗口,回显客户数据
                openUpdateCustomer(data);
            }
        })
2.2.7 修改客户功能
2.2.7.1 需求分析

2.2.7.2 修改客户接⼝设计
- 删除客户接⼝路径:http://localhost:8080/RentalCar/customer//updateCustomer.action
- 请求⽅式:get
- 请求参数:
|
参数名
| 参数说明 | 备注 |
|
CustomerVo
|
客户视图对象
| String |
- 响应数据
|
参数名
| 参数说明 | 备注 |
|
ResultObj
|
统⼀封装数据对象
| String |
2.2.7.3修改客户后台代码实现
2.2.7.4修改客户前台代码
        //监听行工具栏事件
        table.on("tool(customerTable)",function (obj){
            //获取当前行的数据
            var data = obj.data;
            if(obj.event == 'del'){
                layer.confirm("您确认删除["+data.custname+"]这个用户信息吗?",function (index){
                    //如果用户点击确认删除
                    $.get("${pageContext.request.contextPath}/customer/deleteCustomer.action",{identity: data.identity},function (res){
                        layer.msg(res.msg);
                        //刷新表格数据
                        tableIns.reload();
                    })
                })
            }else if (obj.event == 'edit'){
                //编写一个方法, 打开一个窗口,回显客户数据
                openUpdateCustomer(data);
            }
        })


        function openUpdateCustomer(data){
            mainIndex = layer.open({
                type: 1,
                title: "修改客户信息",
                content: $("#saveOrUpdateDiv"),
                area: ["700px","320px"],
                success: function (index){
                    //打开窗口的时候,数据要放到form表单中, 做回显
                    form.val("dataFrm",data);
                    //设置url
                    url = "${pageContext.request.contextPath}/customer/updateCustomer.action";
                }
            })
}2.2.8批量删除客户功能
2.2.8.1 需求分析

2.2.8.2 批量删除客户接⼝设计
- 删除客户接⼝路径:http://localhost:8080/RentalCar/customer/batchDeleteCustomer.action
- 请求⽅式:get
- 请求参数:
|
参数名
| 参数说明 | 备注 |
|
CustomerVo
|
客户视图对象
|
- 响应数据
|
参数名
| 参数说明 | 备注 |
|
ResultObj
|
统⼀封装数据对象
|
2.2.8.3 删除客户后台代码实现
2.2.8.4 批量删除客户前台代码
//监听头部工具栏事件
        table.on("toolbar(customerTable)",function (obj){
            switch (obj.event){
                case 'add' :
                    openAddCustomer();
                    break;
                case 'deleteBatch' :
                    deleteBatch();
                    break;
            }
        })

//批量删除客户信息
        function deleteBatch(){
            //得到选中的行信息
           var checkStatus =  table.checkStatus("customerTable");
           var data = checkStatus.data; //拿到行数据
           //定义要发送给后台的参数  ids=123123&231231
           var params = "";
            $.each(data ,function (i , item){
                if(i == 0){
                    params += "ids="+item.identity;
                }else{
                    params += "&ids="+item.identity;
                }
            });
            layer.confirm("您确认要删除这些客户吗?",function (index){
                //发送异步请求删除
                $.get("${pageContext.request.contextPath}/customer/deleteBatchCustomer.action",params,function (res){
                    layer.msg(res.msg);
                    //刷新表格
                    tableIns.reload();
                })
            })
        }
    })


 3840
3840


 被折叠的 条评论
为什么被折叠?
被折叠的 条评论
为什么被折叠?
 到【灌水乐园】发言


