


目录
3.2 stage2:通过C语言分board_init_f 和 board_init_r 两个阶段完成外设的初始化
一. U-boot源码目录分析
| 类型 | 名字 | 描述 | 备注 |
| 文件夹 | api | 与硬件无关的 API 函数。 | |
| arch | 与架构体系有关的代码。(I.MX6ULL是ARMV7架构,而现在手机等,以及瑞米派(Cortex-A55)是使用的ARMV8架构) | ||
| board | 不同板子(开发板)的定制代码。 | ||
| cmd | 命令相关代码。 | ||
| common | 通用代码。 | ||
| configs | 配置文件。 | ||
| disk | 磁盘分区相关代码 | ||
| doc | 文档。 | ||
| drivers | 驱动代码。 | ||
| dts | 设备树。 | ||
| examples | 例代码。 | ||
| fs | 文件系统。 | ||
| include | 头文件。 | ||
| lib | 库文件。 | ||
| Licenses | 许可证相关文件。 | ||
| net | 网络相关代码 | ||
| post | 上电自检程序。 | ||
| scripts | 脚本文件。 | ||
| test | 测试代码。 | ||
| tools | 工具文件夹。 |
二. U-Boot顶层Makefile详解
2.1 查看版本号
VERSION = 2016
PATCHLEVEL = 03
SUBLEVEL =
EXTRAVERSION =
NAME =
2.2 MAKEFLAGS 变量
make是支持递归调用的,也就是在Makefile中使用"make"命令来执行其他的Makefile文件中,一般都是子目录中的Makefile文件,假如在当前目录下存在一个“subdir”子目录,这个 子目录中又有其对应的 Makefile 文件,那么这个工程在编译的时候其主目录中的 Makefile 就可 以调用子目录中的 Makefile,以此来完成所有子目录的编译。主目录的 Makefile 可以使用如下 代码来编译这个子目录:
$(MAKE) -C subdir
$(MAKE)就是调用“make”命令,-C 指定子目录。有时候我们需要向子 make 传递变量, 这个时候使用“export”来导出要传递给子 make 的变量即可,如果不希望哪个变量传递给子 make 的话就使用“unexport”来声明不导出
export VARIABLE …… //导出变量给子 make 。
unexport VARIABLE…… //不导出变量给子 make。
有两个特殊的变量:“SHELL”和“MAKEFLAGS”,这两个变量除非使用“unexport”声明, 否则的话在整个make的执行过程中,它们的值始终自动的传递给子make。在uboot的主Makefile 中有如下代码:
MAKEFLAGS += -rR --include-dir=$(CURDIR)
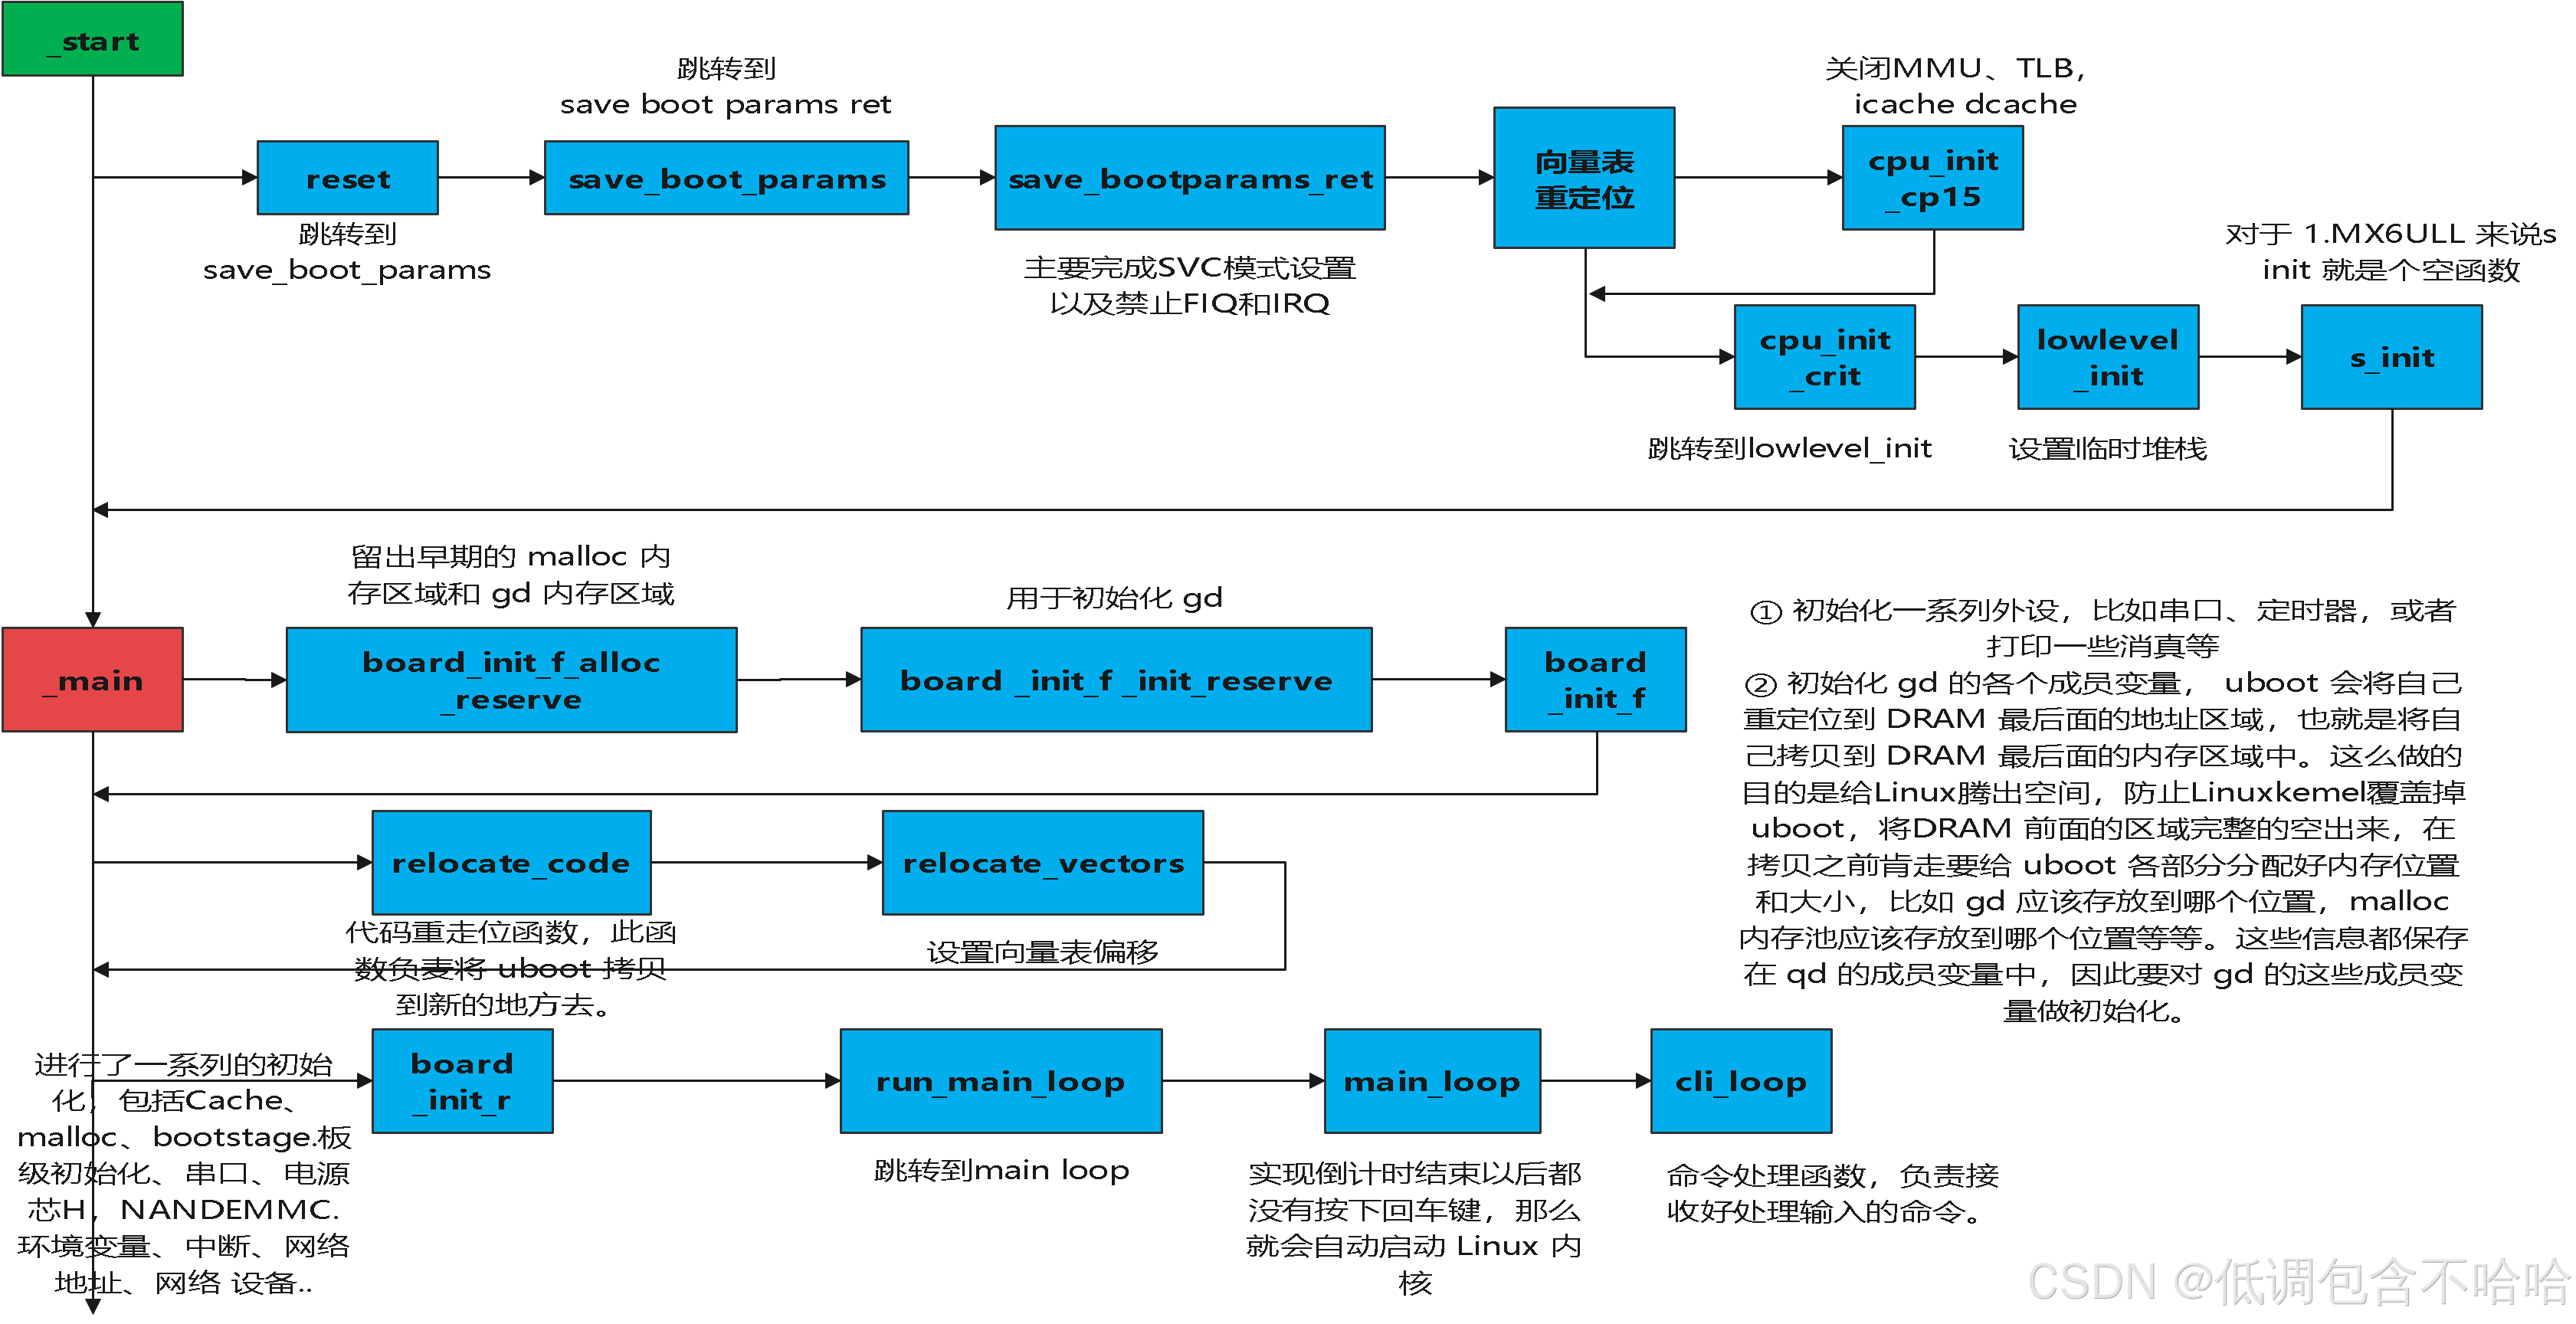
三. U-Boot启动流程详解
上文我们知道了uboot的编译流程,接下来我们来理清uboot是如何启动的。从中我们可以掌握一些外设是在那里被初始化的。
uboot的启动大致可分为两个阶段:
stage1: 使用汇编完成CPU的初始化
stage2:通过C语言分为board_init_f和board_init_r两个阶段完成外设的初始化
3.1 stage1:使用汇编完成CPU的初始化
首先我们分析u-boot.lds可以找到程序的入口是_start
/*
 * Copyright (c) 2004-2008 Texas Instruments
 *
 * (C) Copyright 2002
 * Gary Jennejohn, DENX Software Engineering, <garyj@denx.de>
 *
 * SPDX-License-Identifier:	GPL-2.0+
 */

#include <config.h>

OUTPUT_FORMAT("elf32-littlearm", "elf32-littlearm", "elf32-littlearm")
OUTPUT_ARCH(arm)
ENTRY(_start)
SECTIONS
{
#if defined(CONFIG_ARMV7_SECURE_BASE) && defined(CONFIG_ARMV7_NONSEC)
	/*
	 * If CONFIG_ARMV7_SECURE_BASE is true, secure code will not
	 * bundle with u-boot, and code offsets are fixed. Secure zone
	 * only needs to be copied from the loading address to
	 * CONFIG_ARMV7_SECURE_BASE, which is the linking and running
	 * address for secure code.
	 *
	 * If CONFIG_ARMV7_SECURE_BASE is undefined, the secure zone will
	 * be included in u-boot address space, and some absolute address
	 * were used in secure code. The absolute addresses of the secure
	 * code also needs to be relocated along with the accompanying u-boot
	 * code.
	 *
	 * So DISCARD is only for CONFIG_ARMV7_SECURE_BASE.
	 */
	/DISCARD/ : { *(.rel._secure*) }
#endif
	. = 0x00000000;

	. = ALIGN(4);
	.text :
	{
		*(.__image_copy_start)
		*(.vectors)
		CPUDIR/start.o (.text*)
		*(.text*)
	}

#ifdef CONFIG_ARMV7_NONSEC

#ifndef CONFIG_ARMV7_SECURE_BASE
#define CONFIG_ARMV7_SECURE_BASE
#endif

	.__secure_start : {
		. = ALIGN(0x1000);
		*(.__secure_start)
	}

	.secure_text CONFIG_ARMV7_SECURE_BASE :
		AT(ADDR(.__secure_start) + SIZEOF(.__secure_start))
	{
		*(._secure.text)
	}

	. = LOADADDR(.__secure_start) +
		SIZEOF(.__secure_start) +
		SIZEOF(.secure_text);

	__secure_end_lma = .;
	.__secure_end : AT(__secure_end_lma) {
		*(.__secure_end)
		LONG(0x1d1071c);	/* Must output something to reset LMA */
	}
#endif

	. = ALIGN(4);
	.rodata : { *(SORT_BY_ALIGNMENT(SORT_BY_NAME(.rodata*))) }

	. = ALIGN(4);
	.data : {
		*(.data*)
	}

	. = ALIGN(4);

	. = .;

	. = ALIGN(4);
	.u_boot_list : {
		KEEP(*(SORT(.u_boot_list*)));
	}

	. = ALIGN(4);

	.image_copy_end :
	{
		*(.__image_copy_end)
	}

	.rel_dyn_start :
	{
		*(.__rel_dyn_start)
	}

	.rel.dyn : {
		*(.rel*)
	}

	.rel_dyn_end :
	{
		*(.__rel_dyn_end)
	}

	.end :
	{
		*(.__end)
	}

	_image_binary_end = .;

	/*
	 * Deprecated: this MMU section is used by pxa at present but
	 * should not be used by new boards/CPUs.
	 */
	. = ALIGN(4096);
	.mmutable : {
		*(.mmutable)
	}

/*
 * Compiler-generated __bss_start and __bss_end, see arch/arm/lib/bss.c
 * __bss_base and __bss_limit are for linker only (overlay ordering)
 */

	.bss_start __rel_dyn_start (OVERLAY) : {
		KEEP(*(.__bss_start));
		__bss_base = .;
	}

	.bss __bss_base (OVERLAY) : {
		*(.bss*)
		 . = ALIGN(4);
		 __bss_limit = .;
	}

	.bss_end __bss_limit (OVERLAY) : {
		KEEP(*(.__bss_end));
	}

	.dynsym _image_binary_end : { *(.dynsym) }
	.dynbss : { *(.dynbss) }
	.dynstr : { *(.dynstr*) }
	.dynamic : { *(.dynamic*) }
	.plt : { *(.plt*) }
	.interp : { *(.interp*) }
	.gnu.hash : { *(.gnu.hash) }
	.gnu : { *(.gnu*) }
	.ARM.exidx : { *(.ARM.exidx*) }
	.gnu.linkonce.armexidx : { *(.gnu.linkonce.armexidx.*) }
}
定位到 _start(arch/arm/lib/vectors.S),_start 后面是中断向量表
_start:

#ifdef CONFIG_SYS_DV_NOR_BOOT_CFG
	.word	CONFIG_SYS_DV_NOR_BOOT_CFG
#endif

	b	reset
	ldr	pc, _undefined_instruction
	ldr	pc, _software_interrupt
	ldr	pc, _prefetch_abort
	ldr	pc, _data_abort
	ldr	pc, _not_used
	ldr	pc, _irq
	ldr	pc, _fiq
跳转到 reset 函数,reset 函数在 arch/arm/cpu/armv7/start.S 里面.程序跳转到 save_boot_params,内容只有跳转到save_boot_params_ret,继续定位到 save_boot_params_ret,主要完成SVC模式设置已经禁止FIQ和IRQ
save_boot_params_ret:
    /*
    * disable interrupts (FIQ and IRQ), also set the cpu to SVC32
    * mode, except if in HYP mode already
    */
    mrs r0, cpsr
    and r1, r0, #0x1f @ mask mode bits
    teq r1, #0x1a @ test for HYP mode
    bicne r0, r0, #0x1f @ clear all mode bits
    orrne r0, r0, #0x13 @ set SVC mode
    orr r0, r0, #0xc0 @ disable FIQ and IRQ
    msr cpsr,r0
继续往下走,此处 #define CR_V (1 << 13) ,也就是说将 SCTLR 寄存器中的 bit13 清零, SCTLR 寄存器中的 bit13 为向量表控制位,此处清零是为了接下来的向量表重定位.
r0 寄存器的值(向量表值)写入到 CP15 的 c12 寄存器中,也就是 VBAR 寄存器。
因此此处就是设置向量表重定位的
/*
 * Setup vector:
 * (OMAP4 spl TEXT_BASE is not 32 byte aligned.
 * Continue to use ROM code vector only in OMAP4 spl)
 */
#if !(defined(CONFIG_OMAP44XX) && defined(CONFIG_SPL_BUILD))
	/* Set V=0 in CP15 SCTLR register - for VBAR to point to vector */
	mrc	p15, 0, r0, c1, c0, 0	@ Read CP15 SCTLR Register
	bic	r0, #CR_V		@ V = 0
	mcr	p15, 0, r0, c1, c0, 0	@ Write CP15 SCTLR Register

	/* Set vector address in CP15 VBAR register */
	ldr	r0, =_start
	mcr	p15, 0, r0, c12, c0, 0	@Set VBAR
#endif
继续往下走,没有定义 CONFIG_SKIP_LOWLEVEL_INIT 时执行下面的内容,条件成立,程序跳转到 cpu_init_cp15
	/* the mask ROM code should have PLL and others stable */
#ifndef CONFIG_SKIP_LOWLEVEL_INIT
	bl	cpu_init_cp15
	bl	cpu_init_crit
#endif

	bl	_main
定位到 cpu_init_cp15,都是与CP15协处理器有关,主要实现的功能是关闭MMU和TLB,以及一些对cache的操作,关闭 icache dcache,接着程序跳转到 cpu_init_crit
/*************************************************************************
 *
 * cpu_init_cp15
 *
 * Setup CP15 registers (cache, MMU, TLBs). The I-cache is turned on unless
 * CONFIG_SYS_ICACHE_OFF is defined.
 *
 *************************************************************************/
ENTRY(cpu_init_cp15)
	/*
	 * Invalidate L1 I/D
	 */
	mov	r0, #0			@ set up for MCR
	mcr	p15, 0, r0, c8, c7, 0	@ invalidate TLBs
	mcr	p15, 0, r0, c7, c5, 0	@ invalidate icache
	mcr	p15, 0, r0, c7, c5, 6	@ invalidate BP array
	mcr     p15, 0, r0, c7, c10, 4	@ DSB
	mcr     p15, 0, r0, c7, c5, 4	@ ISB

	/*
	 * disable MMU stuff and caches
	 */
	mrc	p15, 0, r0, c1, c0, 0
	bic	r0, r0, #0x00002000	@ clear bits 13 (--V-)
	bic	r0, r0, #0x00000007	@ clear bits 2:0 (-CAM)
	orr	r0, r0, #0x00000002	@ set bit 1 (--A-) Align
	orr	r0, r0, #0x00000800	@ set bit 11 (Z---) BTB
#ifdef CONFIG_SYS_ICACHE_OFF
	bic	r0, r0, #0x00001000	@ clear bit 12 (I) I-cache
#else
	orr	r0, r0, #0x00001000	@ set bit 12 (I) I-cache
#endif
	mcr	p15, 0, r0, c1, c0, 0

#ifdef CONFIG_ARM_ERRATA_716044
	mrc	p15, 0, r0, c1, c0, 0	@ read system control register
	orr	r0, r0, #1 << 11	@ set bit #11
	mcr	p15, 0, r0, c1, c0, 0	@ write system control register
#endif

#if (defined(CONFIG_ARM_ERRATA_742230) || defined(CONFIG_ARM_ERRATA_794072))
	mrc	p15, 0, r0, c15, c0, 1	@ read diagnostic register
	orr	r0, r0, #1 << 4		@ set bit #4
	mcr	p15, 0, r0, c15, c0, 1	@ write diagnostic register
#endif

#ifdef CONFIG_ARM_ERRATA_743622
	mrc	p15, 0, r0, c15, c0, 1	@ read diagnostic register
	orr	r0, r0, #1 << 6		@ set bit #6
	mcr	p15, 0, r0, c15, c0, 1	@ write diagnostic register
#endif

.......

	mov	pc, r5			@ back to my caller
ENDPROC(cpu_init_cp15)
我们定位到 cpu_init_crit ,可以看出函数 cpu_init_crit 内部仅仅是调用了函数 lowlevel_init
#ifndef CONFIG_SKIP_LOWLEVEL_INIT
/*************************************************************************
 *
 * CPU_init_critical registers
 *
 * setup important registers
 * setup memory timing
 *
 *************************************************************************/
ENTRY(cpu_init_crit)
	/*
	 * Jump to board specific initialization...
	 * The Mask ROM will have already initialized
	 * basic memory. Go here to bump up clock rate and handle
	 * wake up conditions.
	 */
	b	lowlevel_init		@ go setup pll,mux,memory
ENDPROC(cpu_init_crit)
#endif
定位到 lowlevel_init (arch/arm/cpu/armv7/lowlevel_init.S )首先设置 SP 指针为 CONFIG_SYS_INIT_SP_ADDR,经过宏定义可以找到 sp 指向了 0X91FF00,这属于 IMX6UL/IMX6ULL 的内部 RAM,紧接着做一个8字节对齐。继续往下,SP减去 #GD_SIZE = 248,紧接着做一个8字节对齐,此时 sp 的地址为 0X0091FF00-248=0X0091FE08,将SP保存到R9,ip 和 lr 入栈,程序跳转到 s_init
ENTRY(lowlevel_init)
	/*
	 * Setup a temporary stack. Global data is not available yet.
	 */
	ldr	sp, =CONFIG_SYS_INIT_SP_ADDR
	bic	sp, sp, #7 /* 8-byte alignment for ABI compliance */
#ifdef CONFIG_SPL_DM
	mov	r9, #0
#else
	/*
	 * Set up global data for boards that still need it. This will be
	 * removed soon.
	 */
#ifdef CONFIG_SPL_BUILD
	ldr	r9, =gdata
#else
	sub	sp, sp, #GD_SIZE
	bic	sp, sp, #7
	mov	r9, sp
#endif
#endif
	/*
	 * Save the old lr(passed in ip) and the current lr to stack
	 */
	push	{ip, lr}

	/*
	 * Call the very early init function. This should do only the
	 * absolute bare minimum to get started. It should not:
	 *
	 * - set up DRAM
	 * - use global_data
	 * - clear BSS
	 * - try to start a console
	 *
	 * For boards with SPL this should be empty since SPL can do all of
	 * this init in the SPL board_init_f() function which is called
	 * immediately after this.
	 */
	bl	s_init
	pop	{ip, pc}
ENDPROC(lowlevel_init)
lowlevel_init 函数后面调用 s_init 函数.我们定位到 s_init(arch/arm/cpu/armv7/mx6/soc.c),首先会判断当前 CPU 类型,如果 CPU 为 MX6SX、 MX6UL、 MX6ULL 或 MX6SLL中 的 任 意 一 种 , 那 么 就 会 直 接 返 回 , 相 当 于 s_init 函 数 什 么 都 没 做 。 所 以 对 于I.MX6UL/I.MX6ULL 来说, s_init 就是个空函数。从 s_init 函数退出以后进入函数 lowlevel_init,但是 lowlevel_init 函数也执行完成了,返回到了函数 cpu_init_crit,函数 cpu_init_crit 也执行完成了,最终返回到 save_boot_params_ret,程序跳转到 _main。
void s_init(void)
{
	struct anatop_regs *anatop = (struct anatop_regs *)ANATOP_BASE_ADDR;
	struct mxc_ccm_reg *ccm = (struct mxc_ccm_reg *)CCM_BASE_ADDR;
	u32 mask480;
	u32 mask528;
	u32 reg, periph1, periph2;

	if (is_cpu_type(MXC_CPU_MX6SX) || is_cpu_type(MXC_CPU_MX6UL) ||
	    is_cpu_type(MXC_CPU_MX6ULL) || is_cpu_type(MXC_CPU_MX6SLL))
		return;

	/* Due to hardware limitation, on MX6Q we need to gate/ungate all PFDs
	 * to make sure PFD is working right, otherwise, PFDs may
	 * not output clock after reset, MX6DL and MX6SL have added 396M pfd
	 * workaround in ROM code, as bus clock need it
	 */

	mask480 = ANATOP_PFD_CLKGATE_MASK(0) |
		ANATOP_PFD_CLKGATE_MASK(1) |
		ANATOP_PFD_CLKGATE_MASK(2) |
		ANATOP_PFD_CLKGATE_MASK(3);
	mask528 = ANATOP_PFD_CLKGATE_MASK(1) |
		ANATOP_PFD_CLKGATE_MASK(3);

	reg = readl(&ccm->cbcmr);
	periph2 = ((reg & MXC_CCM_CBCMR_PRE_PERIPH2_CLK_SEL_MASK)
		>> MXC_CCM_CBCMR_PRE_PERIPH2_CLK_SEL_OFFSET);
	periph1 = ((reg & MXC_CCM_CBCMR_PRE_PERIPH_CLK_SEL_MASK)
		>> MXC_CCM_CBCMR_PRE_PERIPH_CLK_SEL_OFFSET);

	/* Checking if PLL2 PFD0 or PLL2 PFD2 is using for periph clock */
	if ((periph2 != 0x2) && (periph1 != 0x2))
		mask528 |= ANATOP_PFD_CLKGATE_MASK(0);

	if ((periph2 != 0x1) && (periph1 != 0x1) &&
		(periph2 != 0x3) && (periph1 != 0x3))
		mask528 |= ANATOP_PFD_CLKGATE_MASK(2);

	writel(mask480, &anatop->pfd_480_set);
	writel(mask528, &anatop->pfd_528_set);
	writel(mask480, &anatop->pfd_480_clr);
	writel(mask528, &anatop->pfd_528_clr);
}
定位到 _main;此时uboot进入到stage2
定位到 _main;此时uboot进入到stage2
定位到 _main;此时uboot进入到stage2
3.2 stage2:通过C语言分board_init_f 和 board_init_r 两个阶段完成外设的初始化
_main 函数定义在文件 arch/arm/lib/crt0.S 中,函数内容如下:
/*
 *  crt0 - C-runtime startup Code for ARM U-Boot
 *
 *  Copyright (c) 2012  Albert ARIBAUD <albert.u.boot@aribaud.net>
 *
 * SPDX-License-Identifier:	GPL-2.0+
 */

#include <config.h>
#include <asm-offsets.h>
#include <linux/linkage.h>
#ifdef CONFIG_CPU_V7M
#include <asm/armv7m.h>
#endif

/*
 * This file handles the target-independent stages of the U-Boot
 * start-up where a C runtime environment is needed. Its entry point
 * is _main and is branched into from the target's start.S file.
 *
 * _main execution sequence is:
 *
 * 1. Set up initial environment for calling board_init_f().
 *    This environment only provides a stack and a place to store
 *    the GD ('global data') structure, both located in some readily
 *    available RAM (SRAM, locked cache...). In this context, VARIABLE
 *    global data, initialized or not (BSS), are UNAVAILABLE; only
 *    CONSTANT initialized data are available. GD should be zeroed
 *    before board_init_f() is called.
 *
 * 2. Call board_init_f(). This function prepares the hardware for
 *    execution from system RAM (DRAM, DDR...) As system RAM may not
 *    be available yet, , board_init_f() must use the current GD to
 *    store any data which must be passed on to later stages. These
 *    data include the relocation destination, the future stack, and
 *    the future GD location.
 *
 * 3. Set up intermediate environment where the stack and GD are the
 *    ones allocated by board_init_f() in system RAM, but BSS and
 *    initialized non-const data are still not available.
 *
 * 4a.For U-Boot proper (not SPL), call relocate_code(). This function
 *    relocates U-Boot from its current location into the relocation
 *    destination computed by board_init_f().
 *
 * 4b.For SPL, board_init_f() just returns (to crt0). There is no
 *    code relocation in SPL.
 *
 * 5. Set up final environment for calling board_init_r(). This
 *    environment has BSS (initialized to 0), initialized non-const
 *    data (initialized to their intended value), and stack in system
 *    RAM (for SPL moving the stack and GD into RAM is optional - see
 *    CONFIG_SPL_STACK_R). GD has retained values set by board_init_f().
 *
 * 6. For U-Boot proper (not SPL), some CPUs have some work left to do
 *    at this point regarding memory, so call c_runtime_cpu_setup.
 *
 * 7. Branch to board_init_r().
 *
 * For more information see 'Board Initialisation Flow in README.
 */

/*
 * entry point of crt0 sequence
 */

ENTRY(_main)

/*
 * Set up initial C runtime environment and call board_init_f(0).
 */

#if defined(CONFIG_SPL_BUILD) && defined(CONFIG_SPL_STACK)
	ldr	sp, =(CONFIG_SPL_STACK)
#else
	ldr	sp, =(CONFIG_SYS_INIT_SP_ADDR)
#endif
#if defined(CONFIG_CPU_V7M)	/* v7M forbids using SP as BIC destination */
	mov	r3, sp
	bic	r3, r3, #7
	mov	sp, r3
#else
	bic	sp, sp, #7	/* 8-byte alignment for ABI compliance */
#endif
	mov	r0, sp
	bl	board_init_f_alloc_reserve
	mov	sp, r0
	/* set up gd here, outside any C code */
	mov	r9, r0
	bl	board_init_f_init_reserve

	mov	r0, #0
	bl	board_init_f

#if ! defined(CONFIG_SPL_BUILD)

/*
 * Set up intermediate environment (new sp and gd) and call
 * relocate_code(addr_moni). Trick here is that we'll return
 * 'here' but relocated.
 */

	ldr	sp, [r9, #GD_START_ADDR_SP]	/* sp = gd->start_addr_sp */
#if defined(CONFIG_CPU_V7M)	/* v7M forbids using SP as BIC destination */
	mov	r3, sp
	bic	r3, r3, #7
	mov	sp, r3
#else
	bic	sp, sp, #7	/* 8-byte alignment for ABI compliance */
#endif
	ldr	r9, [r9, #GD_BD]		/* r9 = gd->bd */
	sub	r9, r9, #GD_SIZE		/* new GD is below bd */

	adr	lr, here
	ldr	r0, [r9, #GD_RELOC_OFF]		/* r0 = gd->reloc_off */
	add	lr, lr, r0
#if defined(CONFIG_CPU_V7M)
	orr	lr, #1				/* As required by Thumb-only */
#endif
	ldr	r0, [r9, #GD_RELOCADDR]		/* r0 = gd->relocaddr */
	b	relocate_code
here:
/*
 * now relocate vectors
 */

	bl	relocate_vectors

/* Set up final (full) environment */

	bl	c_runtime_cpu_setup	/* we still call old routine here */
#endif
#if !defined(CONFIG_SPL_BUILD) || defined(CONFIG_SPL_FRAMEWORK)
# ifdef CONFIG_SPL_BUILD
	/* Use a DRAM stack for the rest of SPL, if requested */
	bl	spl_relocate_stack_gd
	cmp	r0, #0
	movne	sp, r0
	movne	r9, r0
# endif
	ldr	r0, =__bss_start	/* this is auto-relocated! */

#ifdef CONFIG_USE_ARCH_MEMSET
	ldr	r3, =__bss_end		/* this is auto-relocated! */
	mov	r1, #0x00000000		/* prepare zero to clear BSS */

	subs	r2, r3, r0		/* r2 = memset len */
	bl	memset
#else
	ldr	r1, =__bss_end		/* this is auto-relocated! */
	mov	r2, #0x00000000		/* prepare zero to clear BSS */

clbss_l:cmp	r0, r1			/* while not at end of BSS */
#if defined(CONFIG_CPU_V7M)
	itt	lo
#endif
	strlo	r2, [r0]		/* clear 32-bit BSS word */
	addlo	r0, r0, #4		/* move to next */
	blo	clbss_l
#endif

#if ! defined(CONFIG_SPL_BUILD)
	bl coloured_LED_init
	bl red_led_on
#endif
	/* call board_init_r(gd_t *id, ulong dest_addr) */
	mov     r0, r9                  /* gd_t */
	ldr	r1, [r9, #GD_RELOCADDR]	/* dest_addr */
	/* call board_init_r */
#if defined(CONFIG_SYS_THUMB_BUILD)
	ldr	lr, =board_init_r	/* this is auto-relocated! */
	bx	lr
#else
	ldr	pc, =board_init_r	/* this is auto-relocated! */
#endif
	/* we should not return here. */
#endif

ENDPROC(_main)
首先让 SP 指向 CONFIG_SYS_INIT_SP_ADDR (0X0091FF00)并做 8字节对齐 将sp存入R0,程序跳转到board_init_f_alloc_reserve ,我们定位到 board_init_f_alloc_reserve (common/init/board_init.c)
ulong board_init_f_alloc_reserve(ulong top)
{
	/* Reserve early malloc arena */
#if defined(CONFIG_SYS_MALLOC_F)
	top -= CONFIG_SYS_MALLOC_F_LEN;
#endif
	/* LAST : reserve GD (rounded up to a multiple of 16 bytes) */
	top = rounddown(top-sizeof(struct global_data), 16);

	return top;
}
函数 board_init_f_alloc_reserve 主要是留出早期的 malloc 内存区域和 gd 内存区域 (gd为global data 的简称,是被定义为存放全局变量的一个指针),由于 CONFIG_SYS_MALLOC_F_LEN 由宏定义为 0x400 ,此时 函数的返回值 top = CONFIG_SYS_INIT_SP_ADDR - CONFIG_SYS_MALLOC_F_LEN - sizeof(struct global_data) = 0X0091FF00 - 0x400 - 32B(256) = 0X0091FA00 ,接着将 r0 寄存器的值写到寄存器 r9 里面,因为 r9 寄存器存放着全局变量 gd 的地址,也就是 gd 指向 0X0091FA00。调用函数 board_init_f_init_reserve(common/init/board_init.c),定位到函数
void board_init_f_init_reserve(ulong base)
{
	struct global_data *gd_ptr;
#ifndef _USE_MEMCPY
	int *ptr;
#endif

	/*
	 * clear GD entirely and set it up.
	 * Use gd_ptr, as gd may not be properly set yet.
	 */

	gd_ptr = (struct global_data *)base;
	/* zero the area */
#ifdef _USE_MEMCPY
	memset(gd_ptr, '\0', sizeof(*gd));
#else
	for (ptr = (int *)gd_ptr; ptr < (int *)(gd_ptr + 1); )
		*ptr++ = 0;
#endif
	/* set GD unless architecture did it already */
#if !defined(CONFIG_ARM)
	arch_setup_gd(gd_ptr);
#endif
	/* next alloc will be higher by one GD plus 16-byte alignment */
	base += roundup(sizeof(struct global_data), 16);

	/*
	 * record early malloc arena start.
	 * Use gd as it is now properly set for all architectures.
	 */

#if defined(CONFIG_SYS_MALLOC_F)
	/* go down one 'early malloc arena' */
	gd->malloc_base = base;
	/* next alloc will be higher by one 'early malloc arena' size */
	base += CONFIG_SYS_MALLOC_F_LEN;
#endif
}
可以看出,此函数用于初始化 gd,其实就是清零处理。另外,此函数还设置了gd->malloc_base 为 gd 基地址+gd 大小=0X0091FA00+248=0X0091FAF8,在做 16 字节对齐,最终 gd->malloc_base=0X0091FB00,这个也就是 early malloc 的起始地址。回到 _main,继续向下,先清空 R0,接着程序跳转到 board_init_f (common/board_f.c )
void board_init_f(ulong boot_flags)
{
#ifdef CONFIG_SYS_GENERIC_GLOBAL_DATA
	/*
	 * For some archtectures, global data is initialized and used before
	 * calling this function. The data should be preserved. For others,
	 * CONFIG_SYS_GENERIC_GLOBAL_DATA should be defined and use the stack
	 * here to host global data until relocation.
	 */
	gd_t data;

	gd = &data;

	/*
	 * Clear global data before it is accessed at debug print
	 * in initcall_run_list. Otherwise the debug print probably
	 * get the wrong vaule of gd->have_console.
	 */
	zero_global_data();
#endif

	gd->flags = boot_flags;
	gd->have_console = 0;

	if (initcall_run_list(init_sequence_f))
		hang();

#if !defined(CONFIG_ARM) && !defined(CONFIG_SANDBOX) && \
		!defined(CONFIG_EFI_APP)
	/* NOTREACHED - jump_to_copy() does not return */
	hang();
#endif

	/* Light up LED1 */
	imx6_light_up_led1();
}
因为没有定义CONFIG_SYS_GENERIC_GLOBAL_DATA,初始化 gd->flags=boot_flags=0,设置 gd->have_console=0,接着通过函数 initcall_run_list 来运行初始化序列 init_sequence_f 里面的一些列函数, init_sequence_f 里面包含了一系列的初始化函数,主要是用来
① 初始化一系列外设,比如串口、定时器,或者打印一些消息等。
② 初始化 gd 的各个成员变量, uboot 会将自己重定位到 DRAM 最后面的地址区域,也就是将自己拷贝到 DRAM 最后面的内存区域中。这么做的目的是给 Linux 腾出空间,防止 Linuxkernel 覆盖掉 uboot,将 DRAM 前面的区域完整的空出来。在拷贝之前肯定要给 uboot 各部分分配好内存位置和大小,比如 gd 应该存放到哪个位置, malloc 内存池应该存放到哪个位置等等。这些信息都保存在 gd 的成员变量中,因此要对 gd 的这些成员变量做初始化。
回到 _main 继续往下走
#if ! defined(CONFIG_SPL_BUILD)

/*
 * Set up intermediate environment (new sp and gd) and call
 * relocate_code(addr_moni). Trick here is that we'll return
 * 'here' but relocated.
 */

	ldr	sp, [r9, #GD_START_ADDR_SP]	/* sp = gd->start_addr_sp */
#if defined(CONFIG_CPU_V7M)	/* v7M forbids using SP as BIC destination */
	mov	r3, sp
	bic	r3, r3, #7
	mov	sp, r3
#else
	bic	sp, sp, #7	/* 8-byte alignment for ABI compliance */
#endif
	ldr	r9, [r9, #GD_BD]		/* r9 = gd->bd */
	sub	r9, r9, #GD_SIZE		/* new GD is below bd */

	adr	lr, here
	ldr	r0, [r9, #GD_RELOC_OFF]		/* r0 = gd->reloc_off */
	add	lr, lr, r0
#if defined(CONFIG_CPU_V7M)
	orr	lr, #1				/* As required by Thumb-only */
#endif
	ldr	r0, [r9, #GD_RELOCADDR]		/* r0 = gd->relocaddr */
	b	relocate_code
here:
/*
 * now relocate vectors
 */

	bl	relocate_vectors

/* Set up final (full) environment */

	bl	c_runtime_cpu_setup	/* we still call old routine here */
#endif
首先重新设置一下 sp,sp = gd->start_addr_sp = 0X9EF44E90,0X9EF44E90 是 DDR 中的地址,说明新的 sp 和 gd 将会存放到 DDR 中,而不是内部的 RAM 了。做一个8字节对齐后,获取 gd->bd 的地址赋给 r9,此时 r9 存放的是老的 gd,这里通过获取 gd->bd 的地址来计算出新的 gd 的位置,新的 gd 在 bd 下面,所以 r9 减去 gd 的大小就是新的 gd 的位置,获取到新的 gd的位置以后赋值给 r9。读取 gd->reloc_off 的值复制给 r0 寄存器,设置 lr 寄存器为 here,lr 寄存器的值加上 r0 寄存器的值,重新赋值给 lr 寄存器。读取 gd->relocaddr 的值赋给 r0 寄存器,此时 r0 寄存器就保存着 uboot 要拷贝的目的地址,为 0X9FF47000。 调用函数 relocate_code( arch/arm/lib/relocate.S ),也就是代码重定位函数,此函数负责将 uboot 拷贝到新的地方去。定位到 relocate_code
ENTRY(relocate_code)
	ldr	r1, =__image_copy_start	/* r1 <- SRC &__image_copy_start */
	subs	r4, r0, r1		/* r4 <- relocation offset */
	beq	relocate_done		/* skip relocation */
	ldr	r2, =__image_copy_end	/* r2 <- SRC &__image_copy_end */

copy_loop:
	ldmia	r1!, {r10-r11}		/* copy from source address [r1]    */
	stmia	r0!, {r10-r11}		/* copy to   target address [r0]    */
	cmp	r1, r2			/* until source end address [r2]    */
	blo	copy_loop

	/*
	 * fix .rel.dyn relocations
	 */
	ldr	r2, =__rel_dyn_start	/* r2 <- SRC &__rel_dyn_start */
	ldr	r3, =__rel_dyn_end	/* r3 <- SRC &__rel_dyn_end */
fixloop:
	ldmia	r2!, {r0-r1}		/* (r0,r1) <- (SRC location,fixup) */
	and	r1, r1, #0xff
	cmp	r1, #23			/* relative fixup? */
	bne	fixnext

	/* relative fix: increase location by offset */
	add	r0, r0, r4
	ldr	r1, [r0]
	add	r1, r1, r4
	str	r1, [r0]
fixnext:
	cmp	r2, r3
	blo	fixloop

relocate_done:

#ifdef __XSCALE__
	/*
	 * On xscale, icache must be invalidated and write buffers drained,
	 * even with cache disabled - 4.2.7 of xscale core developer's manual
	 */
	mcr	p15, 0, r0, c7, c7, 0	/* invalidate icache */
	mcr	p15, 0, r0, c7, c10, 4	/* drain write buffer */
#endif
	/* ARMv4- don't know bx lr but the assembler fails to see that */

#ifdef __ARM_ARCH_4__
	mov	pc, lr
#else
	bx	lr
#endif

ENDPROC(relocate_code)
首先,R1 = __image_copy_start=0X87800000,r0=0X9FF47000,这个地址就是 uboot 拷贝的目标首地址。 r4=r0-r1=0X9FF47000-0X87800000=0X18747000,因此 r4 保存偏移量。r0-r1 等于 0,说明 源地址和目的地址是一样的,不需要拷贝了,执行 relocate_done 函数。r2=__image_copy_end, r2 中保存拷贝之前的代码结束地址,函数 copy_loop 完成代码拷贝工作。从__image_copy_start 开始,ldmia r1!, {r10-r11} 读取 uboot 代码保存到 r10 和 r11 中,一次就只拷贝这 2 个 32 位的数据。拷贝完成以后 r1 的值会更新,保存下一个要拷贝的数据地址。stmia r0!, {r10-r11} 将 r10 和 r11 的数据写到 r0 开始的地方,也就是目的地址。写完以后 r0 的值会更新,更新为下一个要写入的数据地址,直到 R1=R2,拷贝完成。下面的内容主要是完成重定位.rel.dyn 段。
接着回到 here,程序跳转到 relocate_vectors ( arch/arm/lib/relocate.S )
ENTRY(relocate_vectors)
#ifdef CONFIG_CPU_V7M
	/*
	 * On ARMv7-M we only have to write the new vector address
	 * to VTOR register.
	 */
	ldr	r0, [r9, #GD_RELOCADDR]	/* r0 = gd->relocaddr */
	ldr	r1, =V7M_SCB_BASE
	str	r0, [r1, V7M_SCB_VTOR]
#else
#ifdef CONFIG_HAS_VBAR
	/*
	 * If the ARM processor has the security extensions,
	 * use VBAR to relocate the exception vectors.
	 */
	ldr	r0, [r9, #GD_RELOCADDR]	/* r0 = gd->relocaddr */
	mcr     p15, 0, r0, c12, c0, 0  /* Set VBAR */
#else
	/*
	 * Copy the relocated exception vectors to the
	 * correct address
	 * CP15 c1 V bit gives us the location of the vectors:
	 * 0x00000000 or 0xFFFF0000.
	 */
	ldr	r0, [r9, #GD_RELOCADDR]	/* r0 = gd->relocaddr */
	mrc	p15, 0, r2, c1, c0, 0	/* V bit (bit[13]) in CP15 c1 */
	ands	r2, r2, #(1 << 13)
	ldreq	r1, =0x00000000		/* If V=0 */
	ldrne	r1, =0xFFFF0000		/* If V=1 */
	ldmia	r0!, {r2-r8,r10}
	stmia	r1!, {r2-r8,r10}
	ldmia	r0!, {r2-r8,r10}
	stmia	r1!, {r2-r8,r10}
#endif
#endif
	bx	lr

ENDPROC(relocate_vectors)
如果定义了 CONFIG_HAS_VBAR 的话就执行此语句,这个是向量表偏移, CortexA7 是支持向量表偏移的。而且,在.config 里面定义了 CONFIG_HAS_VBAR,因此会执行这个分支。R0=gd->relocaddr,也就是重定位后 uboot 的首地址,向量表肯定是从这个地址开始存放的。将 r0 的值写入到 CP15 的 VBAR 寄存器中,也就是将新的向量表首地址写入到寄存器 VBAR 中,设置向量表偏移。回到 _main,程序调用函数 c_runtime_cpu_setup,主要检查ICache, If I-cache is enabled invalidate it。回到 _main,继续往下:
#if !defined(CONFIG_SPL_BUILD) || defined(CONFIG_SPL_FRAMEWORK)
# ifdef CONFIG_SPL_BUILD
	/* Use a DRAM stack for the rest of SPL, if requested */
	bl	spl_relocate_stack_gd
	cmp	r0, #0
	movne	sp, r0
	movne	r9, r0
# endif
	ldr	r0, =__bss_start	/* this is auto-relocated! */

#ifdef CONFIG_USE_ARCH_MEMSET
	ldr	r3, =__bss_end		/* this is auto-relocated! */
	mov	r1, #0x00000000		/* prepare zero to clear BSS */

	subs	r2, r3, r0		/* r2 = memset len */
	bl	memset
#else
	ldr	r1, =__bss_end		/* this is auto-relocated! */
	mov	r2, #0x00000000		/* prepare zero to clear BSS */

clbss_l:cmp	r0, r1			/* while not at end of BSS */
#if defined(CONFIG_CPU_V7M)
	itt	lo
#endif
	strlo	r2, [r0]		/* clear 32-bit BSS word */
	addlo	r0, r0, #4		/* move to next */
	blo	clbss_l
#endif

#if ! defined(CONFIG_SPL_BUILD)
	bl coloured_LED_init
	bl red_led_on
#endif
	/* call board_init_r(gd_t *id, ulong dest_addr) */
	mov     r0, r9                  /* gd_t */
	ldr	r1, [r9, #GD_RELOCADDR]	/* dest_addr */
	/* call board_init_r */
#if defined(CONFIG_SYS_THUMB_BUILD)
	ldr	lr, =board_init_r	/* this is auto-relocated! */
	bx	lr
#else
	ldr	pc, =board_init_r	/* this is auto-relocated! */
#endif
	/* we should not return here. */
#endif

ENDPROC(_main)
首先清除BSS段,因为下面要调用board_init_r,函数的两个参数分别为 gd_t *id、 ulong dest_addr; 接着将 R9 保存到 R0、读取 gd->relocaddr 保存到 R1,调用 board_init_r(common/board_r.c),定位到此处
void board_init_r(gd_t *new_gd, ulong dest_addr)
{
#ifdef CONFIG_NEEDS_MANUAL_RELOC
	int i;
#endif

#ifdef CONFIG_AVR32
	mmu_init_r(dest_addr);
#endif

#if !defined(CONFIG_X86) && !defined(CONFIG_ARM) && !defined(CONFIG_ARM64)
	gd = new_gd;
#endif

#ifdef CONFIG_NEEDS_MANUAL_RELOC
	for (i = 0; i < ARRAY_SIZE(init_sequence_r); i++)
		init_sequence_r[i] += gd->reloc_off;
#endif

	if (initcall_run_list(init_sequence_r))
		hang();

	/* NOTREACHED - run_main_loop() does not return */
	hang();
}
与前面相同地,调用 initcall_run_list 函数来执行初始化序列 init_sequence_r, init_sequence_r 是一个函数集合,进行了一系列的初始化,包括Cache、malloc、bootstage、板级初始化、串口、电源芯片、NAND/EMMC、环境变量、中断、网络地址、网络 设备…接着执行 run_main_loop(common/board_r.c ),主要内容是循环执行 main_loop();定位到函数(common/main.c )
/* We come here after U-Boot is initialised and ready to process commands */
void main_loop(void)
{
	const char *s;

	bootstage_mark_name(BOOTSTAGE_ID_MAIN_LOOP, "main_loop");

#ifndef CONFIG_SYS_GENERIC_BOARD
	puts("Warning: Your board does not use generic board. Please read\n");
	puts("doc/README.generic-board and take action. Boards not\n");
	puts("upgraded by the late 2014 may break or be removed.\n");
#endif

#ifdef CONFIG_VERSION_VARIABLE
	setenv("ver", version_string);  /* set version variable */
#endif /* CONFIG_VERSION_VARIABLE */

	cli_init();

	run_preboot_environment_command();

#if defined(CONFIG_UPDATE_TFTP)
	update_tftp(0UL, NULL, NULL);
#endif /* CONFIG_UPDATE_TFTP */

	s = bootdelay_process();
	if (cli_process_fdt(&s))
		cli_secure_boot_cmd(s);

	autoboot_command(s);

	cli_loop();
}
uboot 启动以后会进入 3 秒倒计时,如果在 3 秒倒计时结束之前按下按下回车键,那么就会进入 uboot 的命令模式,如果倒计时结束以后都没有按下回车键,那么就会自动启动 Linux 内核 ,这个功能就是由 run_main_loop 函数来完成的 。最后跳转到 cli_loop 函数,这个就是命令处理函数,负责接收好处理输入的命令。
总结
四. U-boot 引导内核启动
uboot 启动内核主要是使用 bootz 命令

通过层层的函数调用,最重要的是 kernel_entry() 它是真正完成内核的启动的函数,重点介绍一下这个函数,首先定位到 boot_jump_linux() 再次函数里面进行了它的调用
static void boot_jump_linux(bootm_headers_t *images, int flag)
{
#ifdef CONFIG_ARM64
	void (*kernel_entry)(void *fdt_addr, void *res0, void *res1,
			void *res2);
	int fake = (flag & BOOTM_STATE_OS_FAKE_GO);

	kernel_entry = (void (*)(void *fdt_addr, void *res0, void *res1,
				void *res2))images->ep;

	debug("## Transferring control to Linux (at address %lx)...\n",
		(ulong) kernel_entry);
	bootstage_mark(BOOTSTAGE_ID_RUN_OS);

	announce_and_cleanup(fake);

	if (!fake) {
		do_nonsec_virt_switch();
		kernel_entry(images->ft_addr, NULL, NULL, NULL);
	}
#else
	unsigned long machid = gd->bd->bi_arch_number;
	char *s;
	void (*kernel_entry)(int zero, int arch, uint params);
	unsigned long r2;
	int fake = (flag & BOOTM_STATE_OS_FAKE_GO);

	kernel_entry = (void (*)(int, int, uint))images->ep;

	s = getenv("machid");
	if (s) {
		if (strict_strtoul(s, 16, &machid) < 0) {
			debug("strict_strtoul failed!\n");
			return;
		}
		printf("Using machid 0x%lx from environment\n", machid);
	}

	debug("## Transferring control to Linux (at address %08lx)" \
		"...\n", (ulong) kernel_entry);
	bootstage_mark(BOOTSTAGE_ID_RUN_OS);
	announce_and_cleanup(fake);

	if (IMAGE_ENABLE_OF_LIBFDT && images->ft_len)
		r2 = (unsigned long)images->ft_addr;
	else
		r2 = gd->bd->bi_boot_params;

	if (!fake) {
#ifdef CONFIG_ARMV7_NONSEC
		if (armv7_boot_nonsec()) {
			armv7_init_nonsec();
			secure_ram_addr(_do_nonsec_entry)(kernel_entry,
							  0, machid, r2);
		} else
#endif
			kernel_entry(0, machid, r2);
	}
#endif
}
kernel_entry()是由 Linux内核定义的,函数有三个参数,
分别是 zero,arch,params,void (*kernel_entry)(int zero, int arch, uint params);
第一个参数 zero 同样为 0;第二个参数为机器 ID; 第三个参数 ATAGS 或者设备树(DTB)首地址, ATAGS 是传统的方法,用
于传递一些命令行信息啥的,如果使用设备树的话就要传递设备树(DTB)。
我们可以看到第三个参数是 r2,并且在之前对 r2 进行了相应的设置,为什么要这样做呢, Linux 内核一开始是汇编代码,因此函数 kernel_entry 就是个汇编函数。向汇编函数传递参数要使用 r0、 r1 和 r2(参数数量不超过 3 个的时候),所以 r2 寄存器就是函数 kernel_entry 的第三个参数。
如果使用设备树的话, r2 应该是设备树的起始地址,而设备树地址保存在 images的 ftd_addr 成员变量中。
如果不使用设备树的话, r2 应该是 uboot 传递给 Linux 的参数起始地址,也就是环境变量 bootargs 的值。
调用 kernel_entry 函数进入 Linux 内核,此行将一去不复返, uboot 的使命也就完成了!
五. U-boot的移植
移植uboot其实就是改写NXP原厂的uboot.
5.1 添加开发板默认配置文件
5.2 添加开发板对应的头文件
5.3 添加开发板对应的板级文件夹
uboot中每个板子都有一个对应的文件夹来存放板级文件,比如开发板上外设驱动文件等等。NXP 的 I.MX 系列芯片的所有板级文件夹都存放在 board/freescale 目录下,在这个目录下有个名为mx6ullevk的文件夹,这个文件夹就是 NXP 官方 I.MX6ULL EVK 开发板的板级文件夹.
5.4 修改U-Boot图形配置界面
5.5 LCD驱动、网络驱动的修改
六. 配置uboot环境变量
uboot里面有两个很重要的很重要的环境变量 bootargs 和 bootcmd,我们在运行uboot时往往需要先规定这两个环境变量的值,让uboot以某种规则启动内核。可以在uboot命令行中配置,也可以直接在uboot的配置文件中修改。
6.1 关于bootargs的配置
bootargs中保存着uboot传递给Linux内核的参数,主要包含以下几个:
console:用来设置Linux终端,即设置与Linux交互的方式,如我们一般选择串口作为终端,那么console设置为/dev/ttymxc0;
root:用来设置根文件的位置,若设置为/dev/mmcblk1p2,则表示设置根文件位置为EMMC的分区2。root后面有“rootwait rw”,表示等待mmc设备初始化完成以后再挂载,并且根文件系统是可读可写的;
rootfstype:用来指定根文件系统的类型,如果根文件系统为ext 格式的话此选项无所谓。
我们可以通过下面这句话配置板子以串口为终端、设置根文件.
6.2 关于bootcmd的配置
bootcmd 保存着 uboot 默认命令,uboot 倒计时结束以后就会执行 bootcmd 中的命令。这些命令一般都是用来启动 Linux 内核的,比如读取 EMMC 或 者 NAND Flash 中的 Linux 内核镜像文件和设备树文件到 DRAM 中,然后启动 Linux 内核。如果 EMMC 或者 NAND 中没有保存 bootcmd 的值,那么 uboot 就会使用默认的值,板子第一次运行 uboot 的时候都会使用默认值来设置 bootcmd 环境变量。


 被折叠的 条评论
为什么被折叠?
被折叠的 条评论
为什么被折叠?
 到【灌水乐园】发言


