


一、三种常见布局
布局与控键的关系:
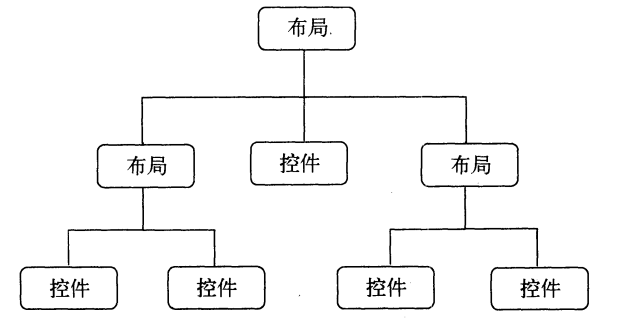
1、LinearLayout
<?xml version="1.0" encoding="utf-8"?>
<LinearLayout xmlns:android="http://schemas.android.com/apk/res/android"
    xmlns:tools="http://schemas.android.com/tools"
    android:layout_width="match_parent"
    android:layout_height="match_parent"
    android:orientation="vertical"
    tools:context=".MainActivity">

    <Button
        android:id="@+id/Button1"
        android:layout_width="wrap_content"
        android:layout_height="wrap_content"
        android:text="button1" />

    <Button
        android:id="@+id/Button2"
        android:layout_width="wrap_content"
        android:layout_height="wrap_content"
        android:text="button2" />

    <Button
        android:id="@+id/Button3"
        android:layout_width="wrap_content"
        android:layout_height="wrap_content"
        android:text="button3" />

</LinearLayout>
**android:orientation=“vertical”**属性修改排列方式:
vertical:竖直
horizontal:水平
[外链图片转存失败,源站可能有防盗链机制,建议将图片保存下来直接上传(img-OQ8sONIj-1689774572497)(/home/lukecc0/.config/Typora/typora-user-images/image-20230719193519378.png)]
1.1 layout_gravity修改控件的位置:
<?xml version="1.0" encoding="utf-8"?>
<LinearLayout xmlns:android="http://schemas.android.com/apk/res/android"
    xmlns:tools="http://schemas.android.com/tools"
    android:layout_width="match_parent"
    android:layout_height="match_parent"
    android:orientation="horizontal"
    tools:context=".MainActivity">

    <Button
        android:id="@+id/Button1"
        android:layout_width="wrap_content"
        android:layout_height="wrap_content"
        android:layout_gravity="top"
        android:text="button1" />

    <Button
        android:id="@+id/Button2"
        android:layout_width="wrap_content"
        android:layout_height="wrap_content"
        android:layout_gravity="center"
        android:text="button2" />

    <Button
        android:id="@+id/Button3"
        android:layout_width="wrap_content"
        android:layout_height="wrap_content"
        android:layout_gravity="bottom"
        android:text="button3" />

</LinearLayout>

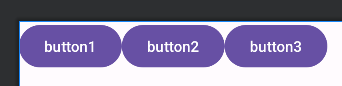
1.2 layout.weight按比例指定控件大小
接下来我们学习下LinearLayout中的另一个重要属性一android:layout weight。这个属性允许我们使用比例的方式来指定控件的大小,它在手机屏幕的适配性方面可以起到非常重要的作用。比如我们正在编写一个消息发送界面,需要一个文本编辑框和一个发送按钮,修改activity_main.xml中的代码,如下所示:
<?xml version="1.0" encoding="utf-8"?>
<LinearLayout xmlns:android="http://schemas.android.com/apk/res/android"
    xmlns:tools="http://schemas.android.com/tools"
    android:layout_width="match_parent"
    android:layout_height="match_parent"
    android:orientation="horizontal"
    tools:context=".MainActivity">

    <EditText
        android:id="@+id/edit"
        android:layout_width="0dp"
        android:layout_height="wrap_content"
        android:layout_weight="3"/>

    <Button
        android:id="@+id/Button1"
        android:layout_width="0dp"
        android:layout_height="wrap_content"
        android:text="send"
        android:layout_weight="2"/>

</LinearLayout>
你会发现,这里竟然将EditText和Button的宽度都指定成了0dp,这样文本编辑框和按钮还能显示出来吗?不用担心,由于我们使用了android:layout.weight属性,此时控件的宽度就不应该再由android:layout width来决定,这里指定成0dp是一种比较规范的写法。另外,dp是Android中用于指定控件大小、间距等属性的单位,后面我们还会经常用到它。
然后在EditText和Button里都将android:layout_weight属性的值指定为1,这表示EditText和Button将在水平方向平分宽度。
为什么将android:layout_weight属性的值同时指定为1就会平分屏幕宽度呢?其实原理也很简单,系统会先把LinearLayout下所有控件指定的layout_weight值相加,得到一个总值,然后每个控件所占大小的比例就是用该控件的layout_we1ght值除以刚才算出的总值。因此如果想让EditText占据屏幕宽度的3/5,Button占据屏幕宽度的2/5,只需要将EditText的ayout.weight改成3,Button的layout._weight改成2就可以了。
该段落摘抄《第一行代码 Android》
2、RelativeLayout
<?xml version="1.0" encoding="utf-8"?>
<RelativeLayout xmlns:android="http://schemas.android.com/apk/res/android"
    xmlns:tools="http://schemas.android.com/tools"
    android:layout_width="match_parent"
    android:layout_height="match_parent"
    android:orientation="horizontal"
    tools:context=".MainActivity">


    <Button
        android:id="@+id/Button1"
        android:layout_width="wrap_content"
        android:layout_height="wrap_content"
        android:layout_alignParentStart="true"
        android:layout_alignParentTop="true"
        android:text="1" />
    <Button
        android:id="@+id/Button2"
        android:layout_width="wrap_content"
        android:layout_height="wrap_content"
        android:layout_alignParentEnd="true"
        android:layout_alignParentTop="true"
        android:text="2" />
    <Button
        android:id="@+id/Button3"
        android:layout_width="wrap_content"
        android:layout_height="wrap_content"
        android:layout_centerInParent="true"
        android:text="3" />
    <Button
        android:id="@+id/Button4"
        android:layout_width="wrap_content"
        android:layout_height="wrap_content"
        android:layout_alignParentStart="true"
        android:layout_alignParentBottom="true"
        android:text="4" />
    <Button
        android:id="@+id/Button5"
        android:layout_width="wrap_content"
        android:layout_height="wrap_content"
        android:layout_alignParentEnd="true"
        android:layout_alignParentBottom="true"
        android:text="5" />


</RelativeLayout>

- android:layout_alignParentTop=“true” 上
- android:layout_alignParentBottom=“true” 下
- android:layout_alignParentStart=“true” 左
- android:layout_alignParentEnd=“true” 右边
- android:layout_centerInParent=“true” 中间
注意:android:layout_alignParentLeft="true",android:layout_alignParentRingt="true"在新版本的 Android 中已经弃用,推荐使用android:layout_alignParentStart="true", android:layout_alignParentEnd="true"代替。这样可以在支持 RTL(从右到左)布局的设备上也能起作用。
上面的例子根据父布局定位,我们也可以根据控件定位
<?xml version="1.0" encoding="utf-8"?>
<RelativeLayout xmlns:android="http://schemas.android.com/apk/res/android"
    xmlns:tools="http://schemas.android.com/tools"
    android:layout_width="match_parent"
    android:layout_height="match_parent"
    tools:context=".MainActivity">


    <Button
        android:id="@+id/Button3"
        android:layout_width="wrap_content"
        android:layout_height="wrap_content"
        android:layout_centerInParent="true"
        android:text="3" />

    <Button
        android:id="@+id/Button1"
        android:layout_width="wrap_content"
        android:layout_height="wrap_content"
        android:layout_above="@+id/Button3"
        android:layout_toStartOf="@+id/Button3"
        android:text="1" />

    <Button
        android:id="@+id/Button2"
        android:layout_width="wrap_content"
        android:layout_height="wrap_content"
        android:layout_above="@+id/Button3"
        android:layout_toEndOf="@+id/Button3"
        android:text="2" />

    <Button
        android:id="@+id/Button4"
        android:layout_width="wrap_content"
        android:layout_height="wrap_content"
        android:layout_toStartOf="@+id/Button3"
        android:layout_below="@+id/Button3"
        android:text="4" />
    <Button
        android:id="@+id/Button5"
        android:layout_width="wrap_content"
        android:layout_height="wrap_content"
        android:layout_toEndOf="@+id/Button3"
        android:layout_below="@+id/Button3"
        android:text="5" />


</RelativeLayout>

注意,当一个控件去引用另一个控件的d时,该控件一定要定义在引用控件的后面,
不然会出现找不到d的情况。
- android:layout_below=“@+id/Button3” 上
- android:layout_above=“@+id/Button3” 下
- android:layout_toStartOf=“@+id/Button3” 左
- android:layout_toEndOf=“@+id/Button3” 右
RelativeLayout中还有另外一组相对于控件进行定位的属性,android:layout alignStart表示让一个控件的左边缘和另一个控件的左边缘对齐,android:layout_alignEnd表示让一个控件的右边缘和另一个控件的右边缘对齐。此外,还有android:layout_alignTop和android:layout_alignBottom,道理都是一样的.
3、FrameLayout
<?xml version="1.0" encoding="utf-8"?>
<FrameLayout xmlns:android="http://schemas.android.com/apk/res/android"
    xmlns:tools="http://schemas.android.com/tools"
    android:layout_width="match_parent"
    android:layout_height="match_parent"
    android:orientation="horizontal"
    tools:context=".MainActivity">

    <Button
        android:id="@+id/Button1"
        android:layout_width="wrap_content"
        android:layout_height="wrap_content"
        android:layout_gravity="start"
        android:text="1" />

    <Button
        android:id="@+id/Button2"
        android:layout_width="wrap_content"
        android:layout_height="wrap_content"
        android:layout_gravity="end"
        android:text="2" />

</FrameLayout>
layout_gravity属性指定控件在布局的位置


 2561
2561


 被折叠的 条评论
为什么被折叠?
被折叠的 条评论
为什么被折叠?
 到【灌水乐园】发言


