


思路:
1.在visionpro中将视觉部分处理完毕实现该有的效果(我这里案例是零件的瑕疵检测)
2.导出ToolBlock
3.在winform通过c#代码实现UI
一.VisonPro的ToolBlock导出
1.vp中瑕疵检测的功能实现
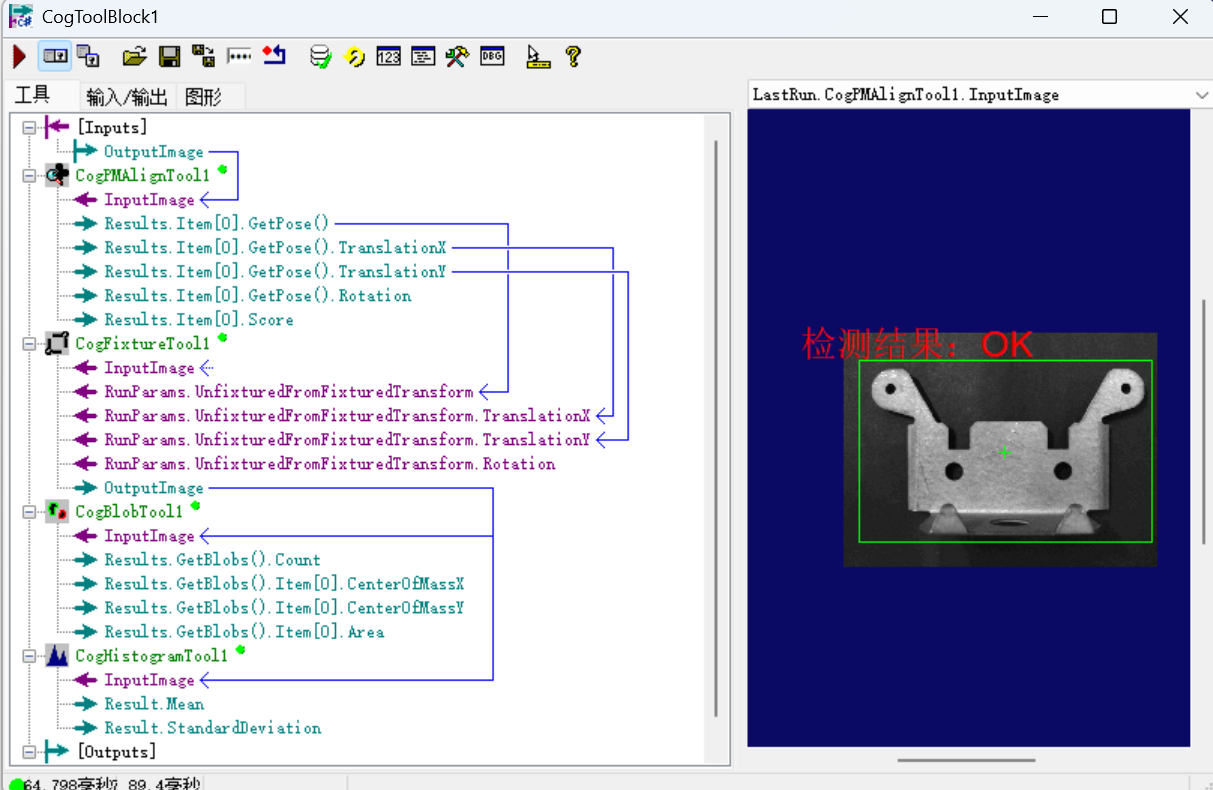
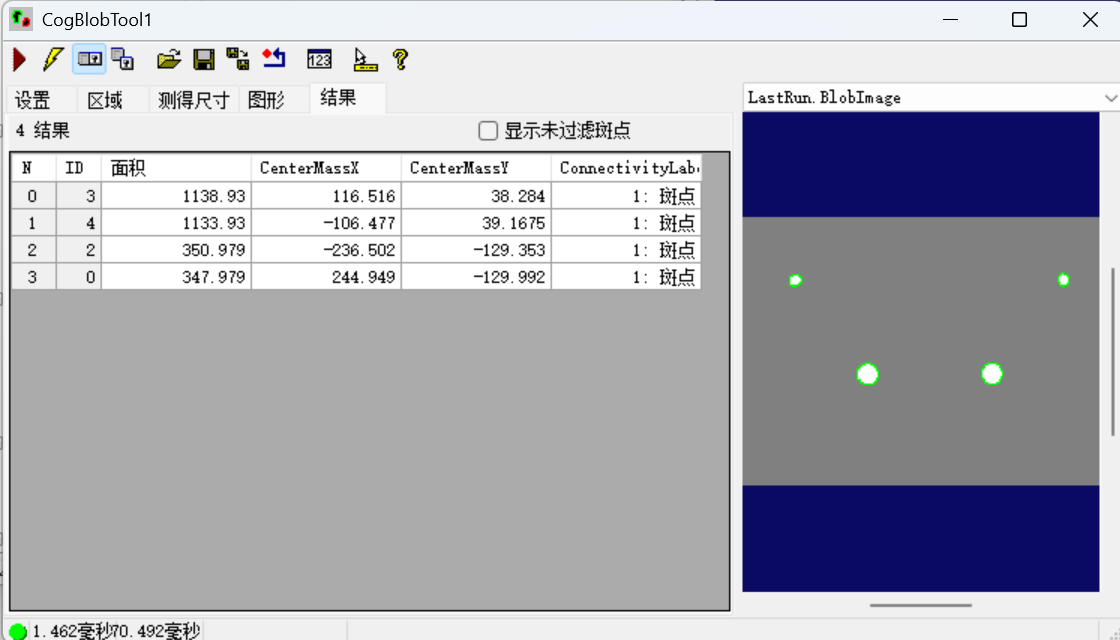
检测四个圆是否有瑕疵
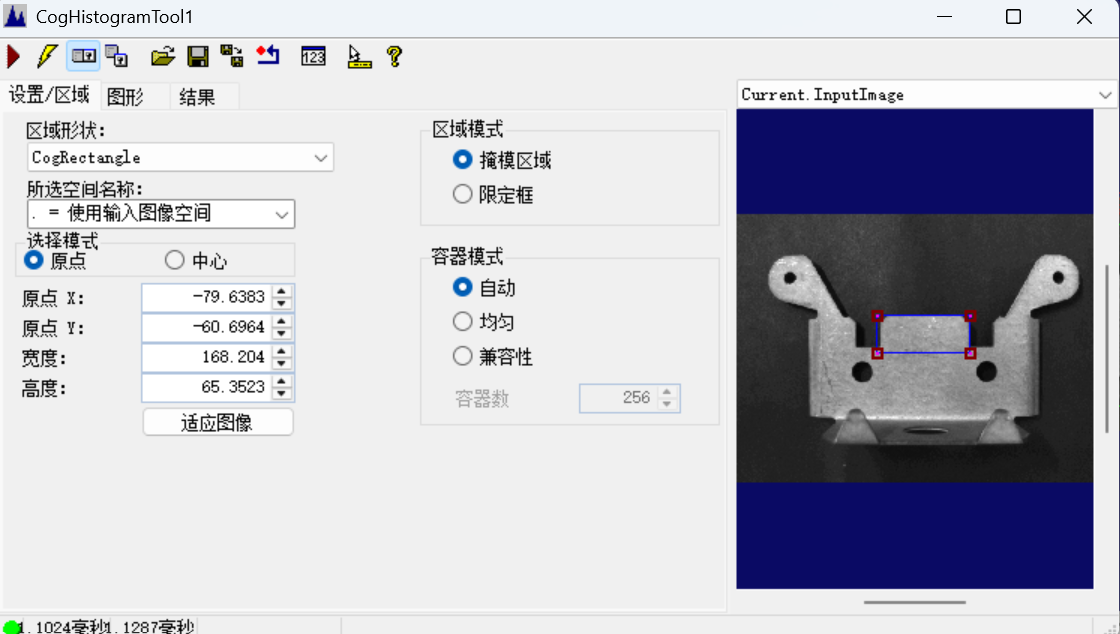
检测顶头是否有瑕疵
#region namespace imports
using System;
using System.Collections;
using System.Drawing;
using System.IO;
using System.Windows.Forms;
using Cognex.VisionPro;
using Cognex.VisionPro.ToolBlock;
using Cognex.VisionPro3D;
using Cognex.VisionPro.PMAlign;
using Cognex.VisionPro.CalibFix;
using Cognex.VisionPro.Blob;
using Cognex.VisionPro.ImageProcessing;
#endregion

public class CogToolBlockAdvancedScript : CogToolBlockAdvancedScriptBase
{
  #region Private Member Variables
  private Cognex.VisionPro.ToolBlock.CogToolBlock mToolBlock;

  CogGraphicLabel myLabel = new CogGraphicLabel();

  #endregion

  /// <summary>
  /// Called when the parent tool is run.
  /// Add code here to customize or replace the normal run behavior.
  /// </summary>
  /// <param name="message">Sets the Message in the tool's RunStatus.</param>
  /// <param name="result">Sets the Result in the tool's RunStatus</param>
  /// <returns>True if the tool should run normally,
  ///          False if GroupRun customizes run behavior</returns>
  public override bool GroupRun(ref string message, ref CogToolResultConstants result)
  {
    // To let the execution stop in this script when a debugger is attached, uncomment the following lines.
    // #if DEBUG
    // if (System.Diagnostics.Debugger.IsAttached) System.Diagnostics.Debugger.Break();
    // #endif


    // Run each tool using the RunTool function
    foreach(ICogTool tool in mToolBlock.Tools)
      mToolBlock.RunTool(tool, ref message, ref result);

   CogBlobTool c = mToolBlock.Tools["CogBlobTool1"] as CogBlobTool;
     CogHistogramTool c1 = mToolBlock.Tools["CogHistogramTool1"] as CogHistogramTool;


    string a;
    if(c.Results.GetBlobs().Count == 4 && c1.Result.Mean > 100)
    {
       a ="OK";
    }
    else
    {
      a = "NG";
    }

    mToolBlock.Outputs["res"].Value = a;

    //为label设置上卡尺的信息
    myLabel.SetXYText(150, 50,"检测结果:"+a);
    myLabel.Color = CogColorConstants.Red;
    myLabel.Font = new Font("楷体:", 18);


    return false;
  }

  #region When the Current Run Record is Created
  /// <summary>
  /// Called when the current record may have changed and is being reconstructed
  /// </summary>
  /// <param name="currentRecord">
  /// The new currentRecord is available to be initialized or customized.</param>
  public override void ModifyCurrentRunRecord(Cognex.VisionPro.ICogRecord currentRecord)
  {
  }
  #endregion

  #region When the Last Run Record is Created
  /// <summary>
  /// Called when the last run record may have changed and is being reconstructed
  /// </summary>
  /// <param name="lastRecord">
  /// The new last run record is available to be initialized or customized.</param>
  public override void ModifyLastRunRecord(Cognex.VisionPro.ICogRecord lastRecord)
  {
    //一代表要渲染的图型,二代表运行记录,表示这次渲染接着上一次渲染的结果继续
    //三代表显示的位置,四代表此次操作的标记,可以为空
    mToolBlock.AddGraphicToRunRecord(myLabel, lastRecord, "CogPMAlignTool1.InputImage", "");
  }
  #endregion

  #region When the Script is Initialized
  /// <summary>
  /// Perform any initialization required by your script here
  /// </summary>
  /// <param name="host">The host tool</param>
  public override void Initialize(Cognex.VisionPro.ToolGroup.CogToolGroup host)
  {
    // DO NOT REMOVE - Call the base class implementation first - DO NOT REMOVE
    base.Initialize(host);


    // Store a local copy of the script host
    this.mToolBlock = ((Cognex.VisionPro.ToolBlock.CogToolBlock)(host));
  }
  #endregion

}
通过ToolBlock中的c#高级脚本将OK和NG进行区分然后将值传入到output中,方便我们后续在winfrom中获取到ok和ng数据
2.将ToolBlock导出
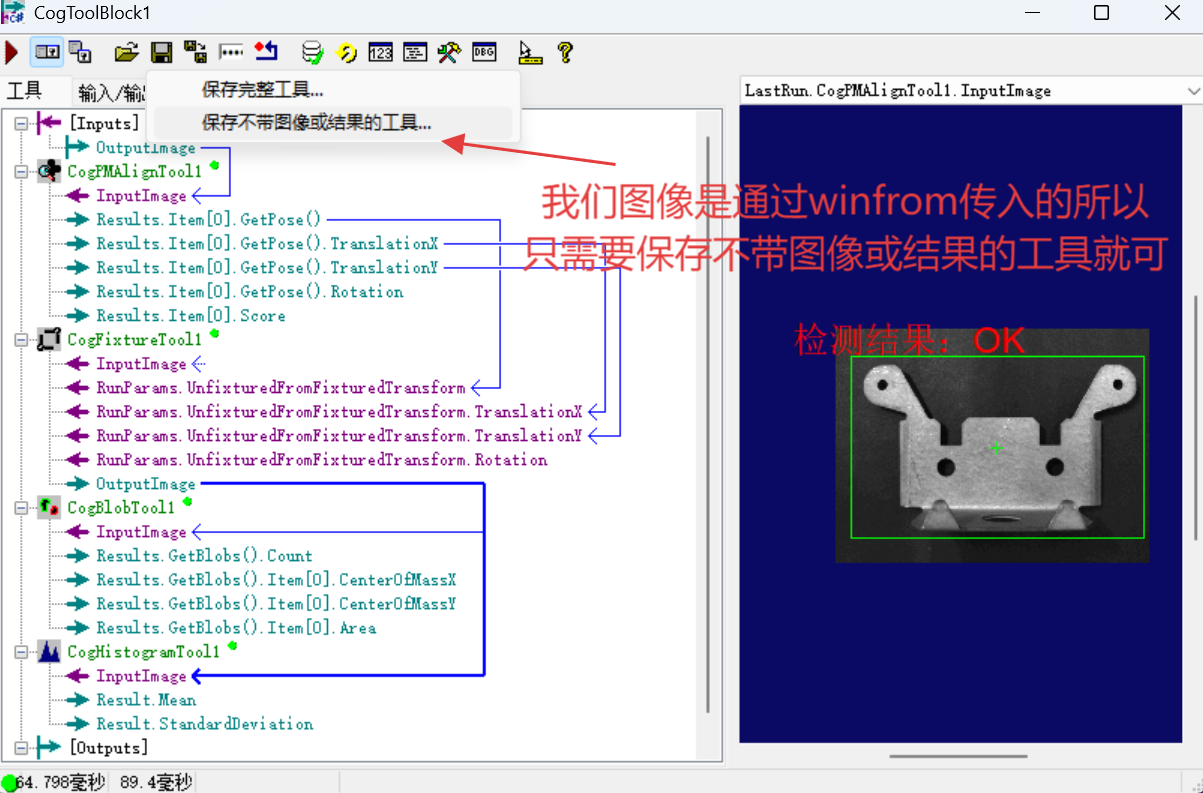
通过图上步骤将ToolBlock保存下来
注意:文件后缀要是.vpp格式!!!!!!!别保存错了,错了会调用失败!
二.进入Visual Studio
1.创建窗体应用

这里也要注意创建的是.NET Framework的窗体应用
2.配置编程环境
(1).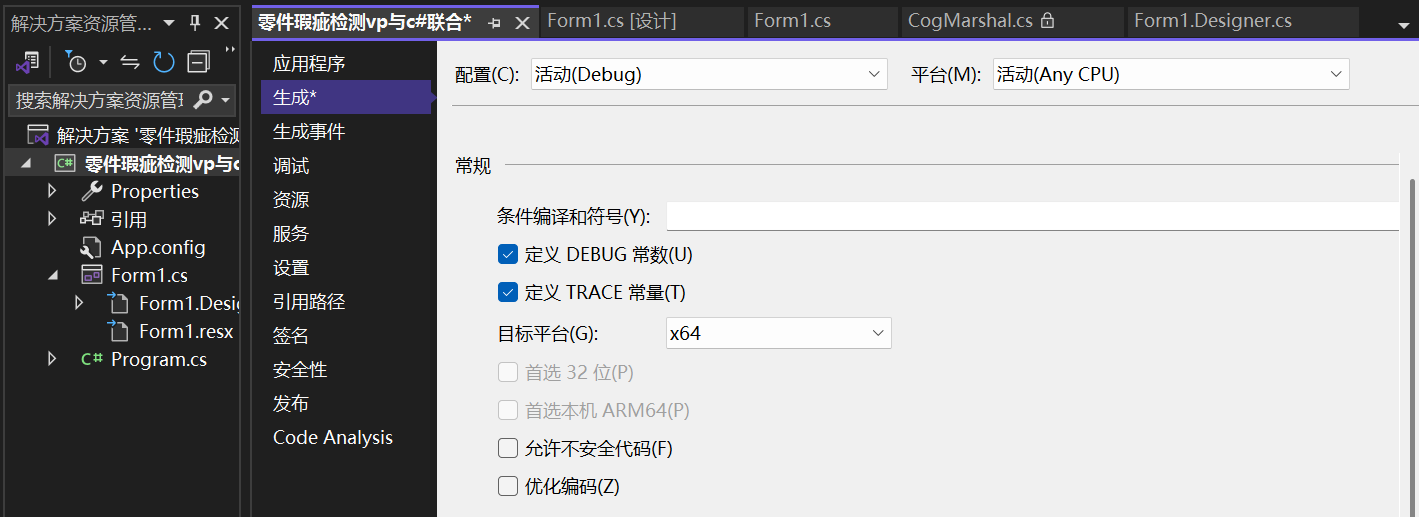
将目标平台改为x64
(2).
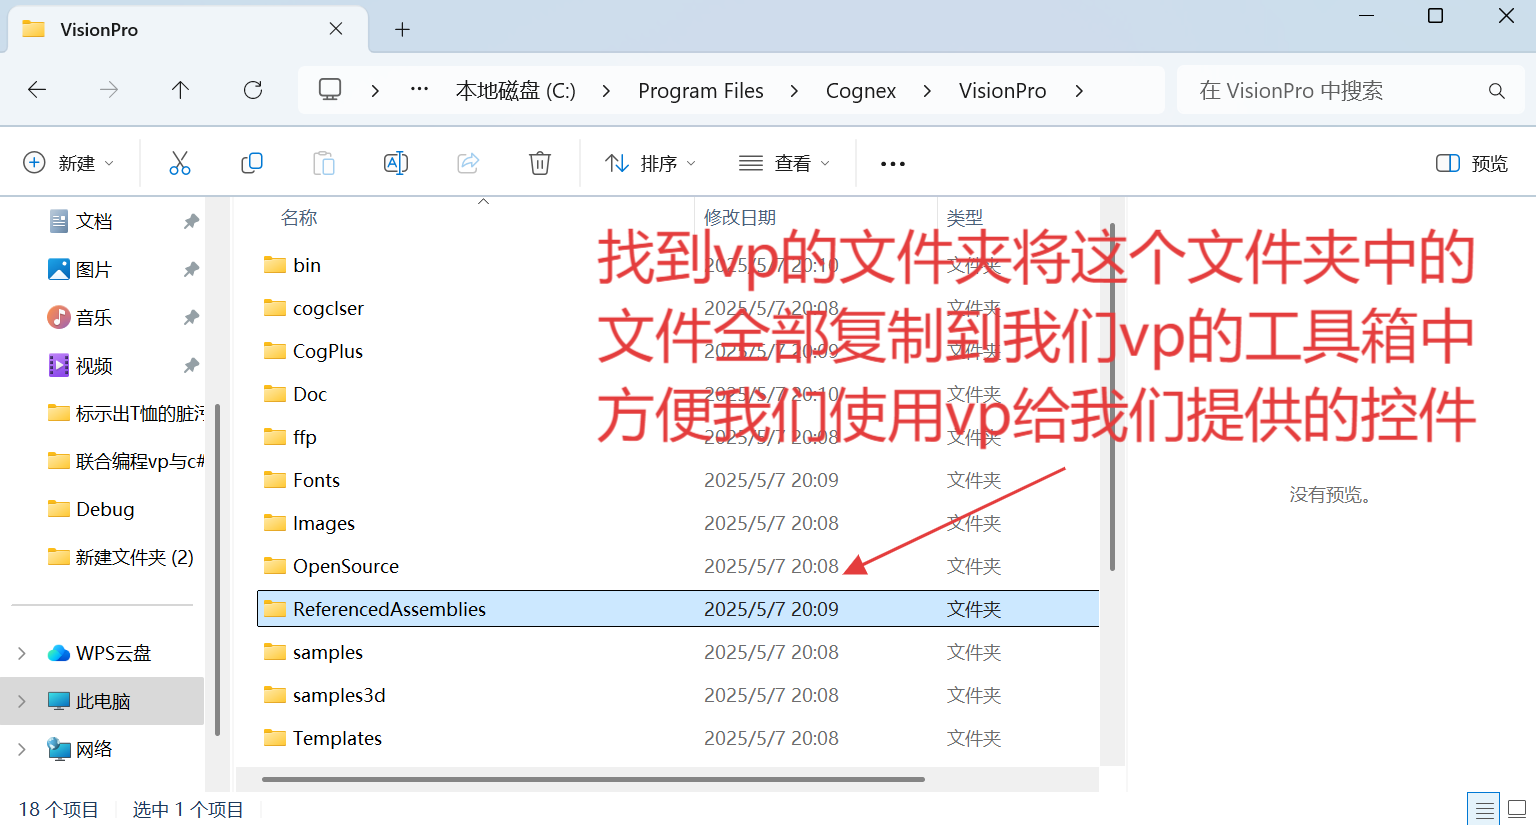
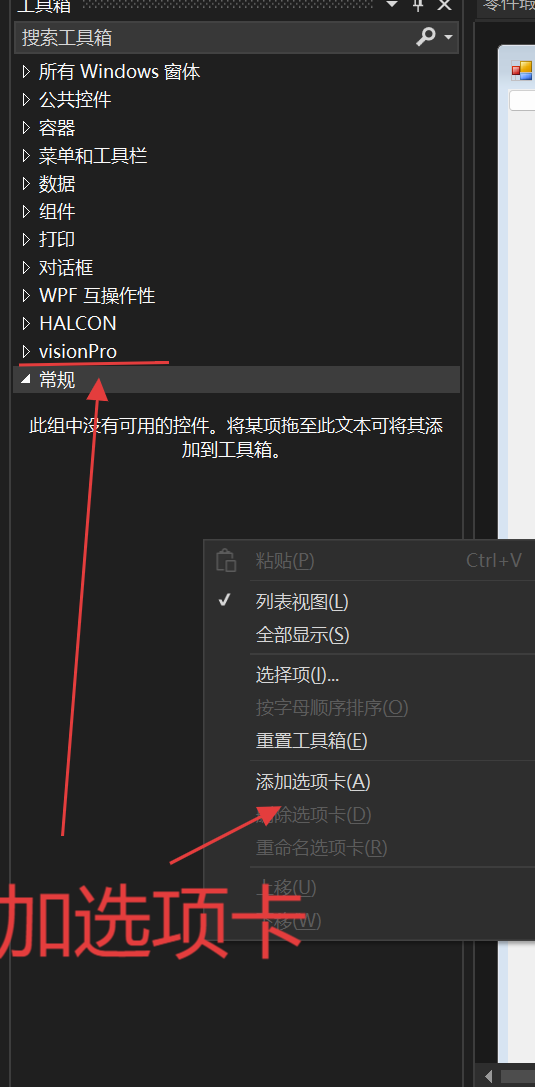
然后将图一内的文件拖入我们添加的选项卡中
注意:尽量将文件夹靠近工具箱拖入可任意更容易成功;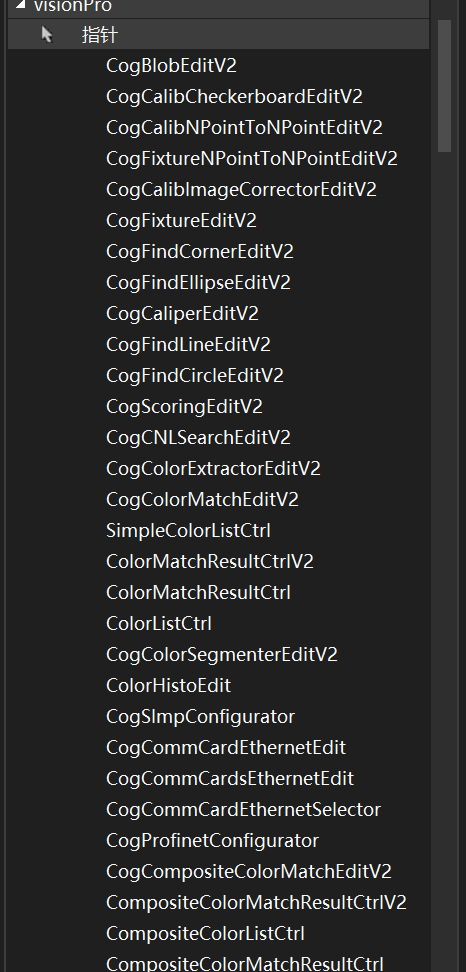
这里面就是vp为我们提供的控件
(3).
将我们保存的ToolBlock的vpp文件和图像资源放入我们的DeBug目录下方便我们们后面路径的描述

3.Winfrom界面的布局

思路:1.先将图片读取到cogRecordDisplay1中
2.然后将读取到的图片传给CogToolBlockEditV21进行检测获取到检测结果
3.创建OK和NG文件夹将OK和NG图像分别存入两个文件夹中
4.c#代码的实现
(1).引入我们需要的命名空间
using Cognex.VisionPro;
using Cognex.VisionPro.ToolBlock;
using Cognex.VisionPro.ImageFile;
(2).创建ToolBlock和将图像加载实例
  CogToolBlock mToolblock;

  CogImageFileTool fileTool = new CogImageFileTool();
(3).加载vpp文件到CogToolBlockEditV21控件中
 private void Form1_Load(object sender, EventArgs e)
 {
     try
     {
         string path = Directory.GetCurrentDirectory() + "\\零件瑕疵检测(ToolBlock).vpp";
         mToolblock = new CogToolBlock();
         mToolblock = (CogToolBlock)CogSerializer.LoadObjectFromFile(path);
         MessageBox.Show("加载vpp成功!");
         cogToolBlockEditV21.Subject = mToolblock;


     }
     catch(Exception ex)
     {
         MessageBox.Show(ex.Message);
     }
 }
(4).将图像名按数字排序方便遍历读取,点击按钮button1后读取图像到cogRecordDisplay1并启动CogToolBlockEditV21进行检测输出检测结果
 private void button1_Click(object sender, EventArgs e)
 {
     //读取照片
     string path =$"C:\\Users\\14350\\Desktop\\SHIJUE\\联合编程vp与c#\\零件瑕疵检测vp与c#联合\\零件瑕疵检测vp与c#联合\\bin\\Debug\\img\\{i}.bmp";
         fileTool.Operator.Open(path, CogImageFileModeConstants.Read);
         fileTool.Run();
           cogRecordDisplay1.Image= fileTool.OutputImage;
         i++;
     if (i == 11)
     {
         i = 1;
     }
     mToolblock.Inputs["OutputImage"].Value = cogRecordDisplay1.Image;
     mToolblock.Run();
     SaveImage();

 }
(5).封装SeveImage方法保存检测后的图像
  private void SaveImage()
  {
     //获取到检测结果
    string result =mToolblock.Outputs["res"].Value.ToString();

      if (result == "OK")
      {
          string path = Directory.GetCurrentDirectory() + @"\OK";

      string fileName = $"OK\\{DateTime.Now.ToString("HHmmss")}.bmp";

          if (!Directory.Exists(path))
          {
              Directory.CreateDirectory(path);
          }
          fileTool.InputImage = cogRecordDisplay1.Image;
          fileTool.Operator.Open(fileName, CogImageFileModeConstants.Write);
          fileTool.Run();

      }
      else
      {
          string path = Directory.GetCurrentDirectory() + @"\NG";

          string fileName = $"NG\\{DateTime.Now.ToString("HHmmss")}.bmp";

          if (!Directory.Exists(path))
          {
              Directory.CreateDirectory(path);
          }
          fileTool.InputImage = cogRecordDisplay1.Image;
          fileTool.Operator.Open(fileName, CogImageFileModeConstants.Write);
          fileTool.Run();
      }


  }
三.c#的源代码
using System;
using System.Collections.Generic;
using System.ComponentModel;
using System.Data;
using System.Drawing;
using System.IO;
using System.Linq;
using System.Text;
using System.Threading.Tasks;
using System.Windows.Forms;
using Cognex.VisionPro;
using Cognex.VisionPro.ToolBlock;
using Cognex.VisionPro.ImageFile;

namespace 零件瑕疵检测vp与c_联合
{
    public partial class Form1 : Form
    {
        public Form1()
        {
            InitializeComponent();
        }

        CogToolBlock mToolblock;

        CogImageFileTool fileTool = new CogImageFileTool();

        private void Form1_Load(object sender, EventArgs e)
        {
            try
            {
                string path = Directory.GetCurrentDirectory() + "\\零件瑕疵检测(ToolBlock).vpp";
                mToolblock = new CogToolBlock();
                mToolblock = (CogToolBlock)CogSerializer.LoadObjectFromFile(path);
                MessageBox.Show("加载vpp成功!");
                cogToolBlockEditV21.Subject = mToolblock;


            }
            catch(Exception ex)
            {
                MessageBox.Show(ex.Message);
            }
        }

        private void cogDisplay1_Enter(object sender, EventArgs e)
        {

        }
        int i = 1;
        private void button1_Click(object sender, EventArgs e)
        {
            //读取照片
            string path =$"C:\\Users\\14350\\Desktop\\SHIJUE\\联合编程vp与c#\\零件瑕疵检测vp与c#联合\\零件瑕疵检测vp与c#联合\\bin\\Debug\\img\\{i}.bmp";
                fileTool.Operator.Open(path, CogImageFileModeConstants.Read);
                fileTool.Run();
                  cogRecordDisplay1.Image= fileTool.OutputImage;
                i++;
            if (i == 11)
            {
                i = 1;
            }
            mToolblock.Inputs["OutputImage"].Value = cogRecordDisplay1.Image;
            mToolblock.Run();
            SaveImage();

        }


        private void SaveImage()
        {
           //获取到检测结果
          string result =mToolblock.Outputs["res"].Value.ToString();

            if (result == "OK")
            {
                string path = Directory.GetCurrentDirectory() + @"\OK";

            string fileName = $"OK\\{DateTime.Now.ToString("HHmmss")}.bmp";

                if (!Directory.Exists(path))
                {
                    Directory.CreateDirectory(path);
                }
                fileTool.InputImage = cogRecordDisplay1.Image;
                fileTool.Operator.Open(fileName, CogImageFileModeConstants.Write);
                fileTool.Run();

            }
            else
            {
                string path = Directory.GetCurrentDirectory() + @"\NG";

                string fileName = $"NG\\{DateTime.Now.ToString("HHmmss")}.bmp";

                if (!Directory.Exists(path))
                {
                    Directory.CreateDirectory(path);
                }
                fileTool.InputImage = cogRecordDisplay1.Image;
                fileTool.Operator.Open(fileName, CogImageFileModeConstants.Write);
                fileTool.Run();
            }


        }


    }
}
四.总结
vp与c#的联合编程主要在vp中将功能实现,然后在winform中获取到检测的结果实现窗体的布局实现交互。


 499
499

 被折叠的 条评论
为什么被折叠?
被折叠的 条评论
为什么被折叠?
 到【灌水乐园】发言


