1. 实验目的
- 通过“示例:带有多层感知器的姓氏分类”,掌握多层感知器在多层分类中的应用
- 掌握每种类型的神经网络层对它所计算的数据张量的大小和形状的影响
2. 问题背景
在之前我们通过观察感知器来介绍神经网络的基础,感知器是现存最简单的神经网络。但感知器的一个历史性的缺点是它不能学习数据中存在的一些非常重要的模式。由于单层感知器的线性性质,它不能解决异或(XOR)问题。因此我们在此实验中探索两种前馈神经网络:多层感知器和卷积神经网络,用于解决线性不可分问题。
3. The Multilayer Perceptron(多层感知器)
3.1 概述
最简单的MLP,如图1所示,由三个表示阶段和两个线性层组成。第一阶段是输入向量。这是给定给模型的向量。给定输入向量,第一个线性层计算一个隐藏向量——表示的第二阶段。隐藏向量之所以这样被调用,是因为它是位于输入和输出之间的层的输出。使用这个隐藏的向量,第二个线性层计算一个输出向量。输出向量是类数量的大小。
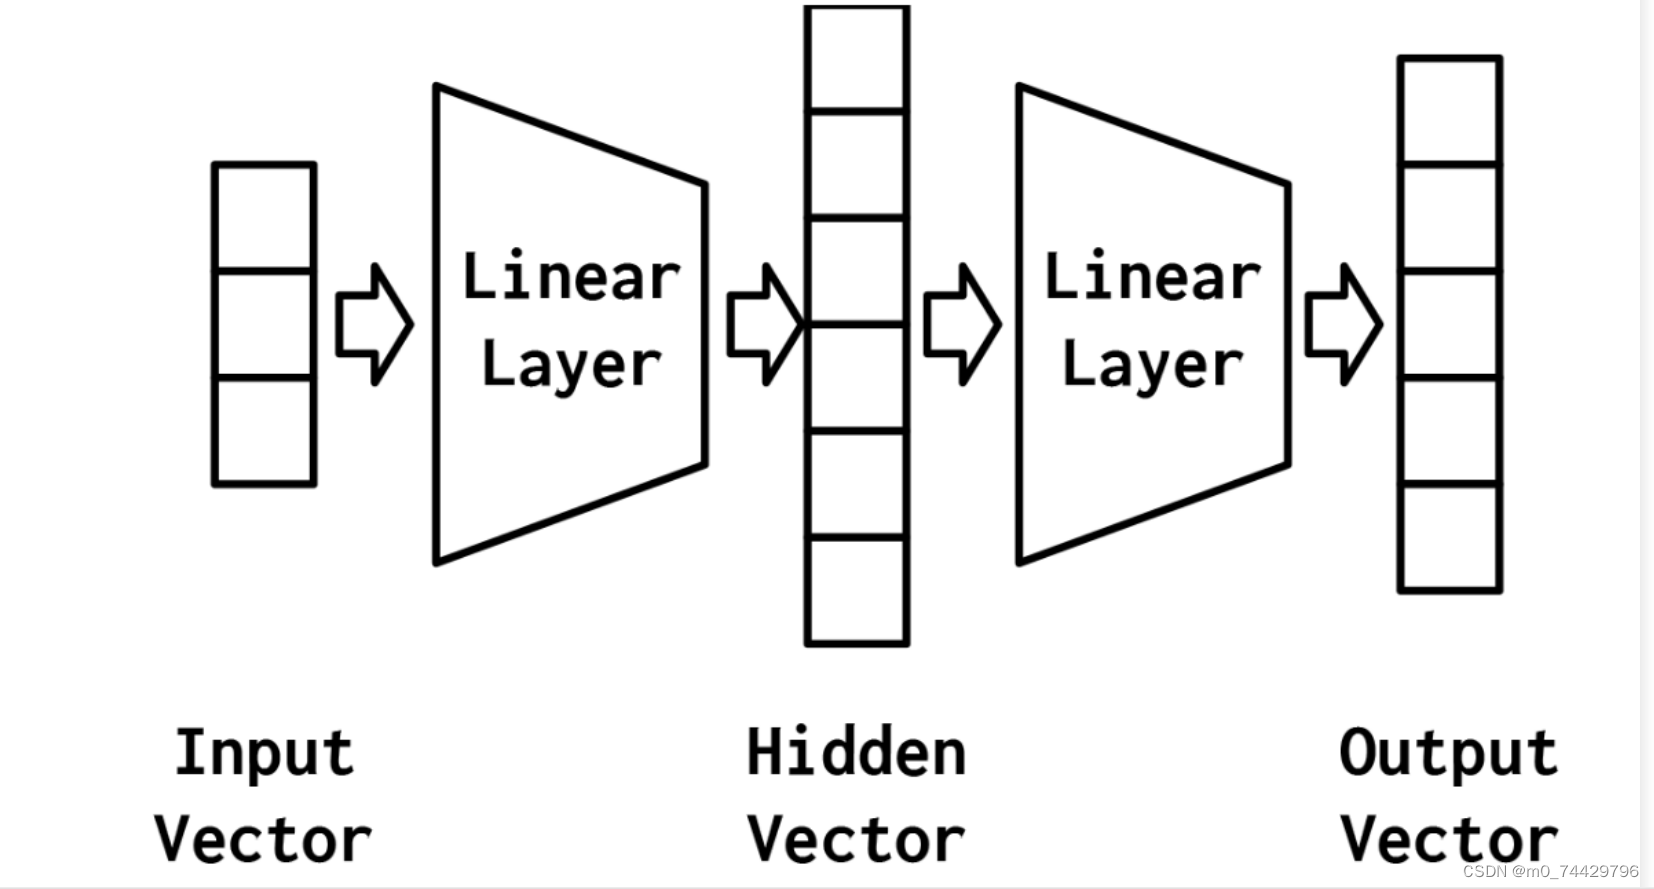
图1 一种具有两个线性层和三个表示阶段(输入向量、隐藏向量和输出向量)的MLP的可视化表示
多层感知器能够解决非线性问题的关键在于其包含一个或多个隐藏层。这些隐藏层使网络能够在不同层次上学习和表示数据的复杂特征。通过引入隐藏层,网络摆脱了线性分离的限制,能够捕捉输入数据中的非线性关系。
让我们通过一个例子来观察单层感知器和MLP在解决XOR问题上的方法差异。在这个例子中,我们在一个二元分类任务中训练感知器和MLP:星和圆。每个数据点是一个二维坐标。在不深入研究实现细节的情况下,最终的模型预测如图2所示。在这个图中,错误分类的数据点用黑色填充,而正确分类的数据点没有填充。
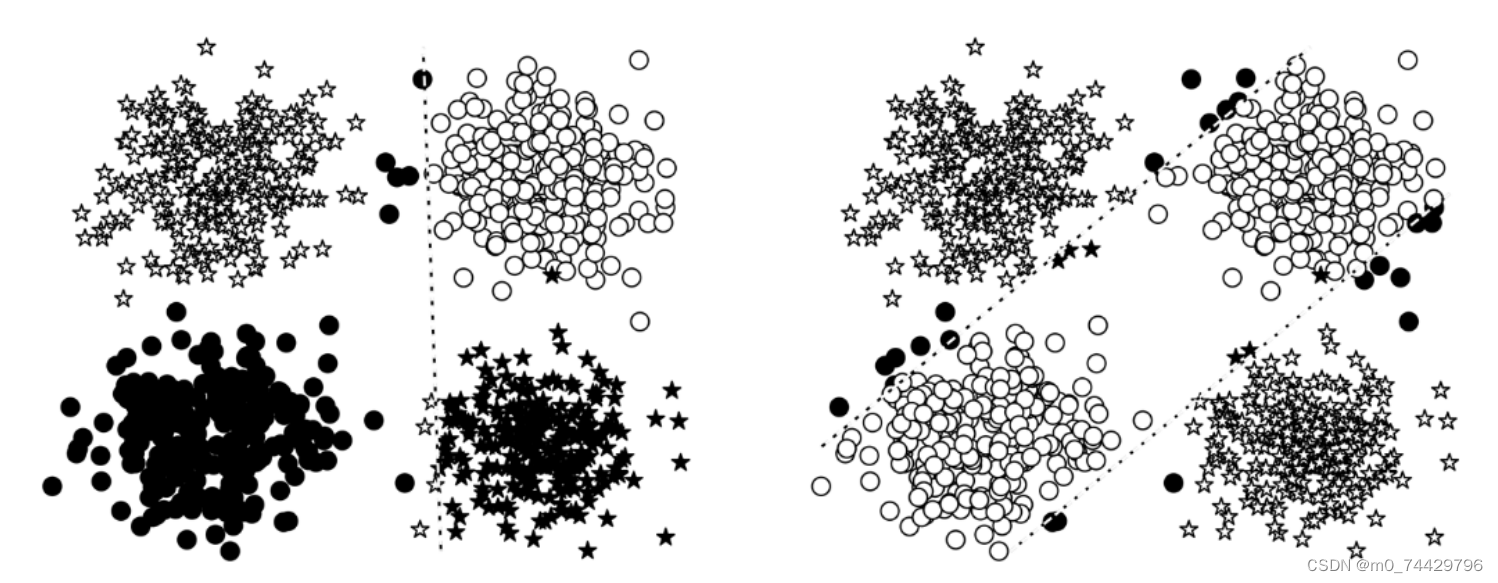
图2 单层感知器(左)和多层感知器(右)的模型预测结果
通过图示可以发现,单层感知器在处理异或问题上有困难,而MLP能够学习到一个对星和圆进行精确分类的决策边界。这是因为两者处理数据的过程不同。我们可以通过观察输入和中间表示来理解两者处理非线性问题的机制。对于MLP,如图3所示,原始数据输入,包含两种类型的点(圆和星),它们在输入空间中混合在一起,无法用一条直线分开。经过第一个线性变换后,虽然不能分离圆形和星形,但可以在某种程度上调整它们的位置。在第一个非线性模块,非线性变换将数据映射到一个新的空间,使得不同类别的数据点分布更加分散。在第二个线性变换中,数据点被重新组织,变得线性可分。也就是说,圆和星数据点现在可以通过一条直线(或超平面)分开。

图3 从左到右:(1)网络的输入;(2)第一个线性模块的输出;(3)第一个非线性模块的输出;(4)第二个线性模块的输出。
相反,如图4所示,单层感知器没有额外的一层来处理数据的形状,使数据变成线性可分的。 因此不能将圆和星分开。
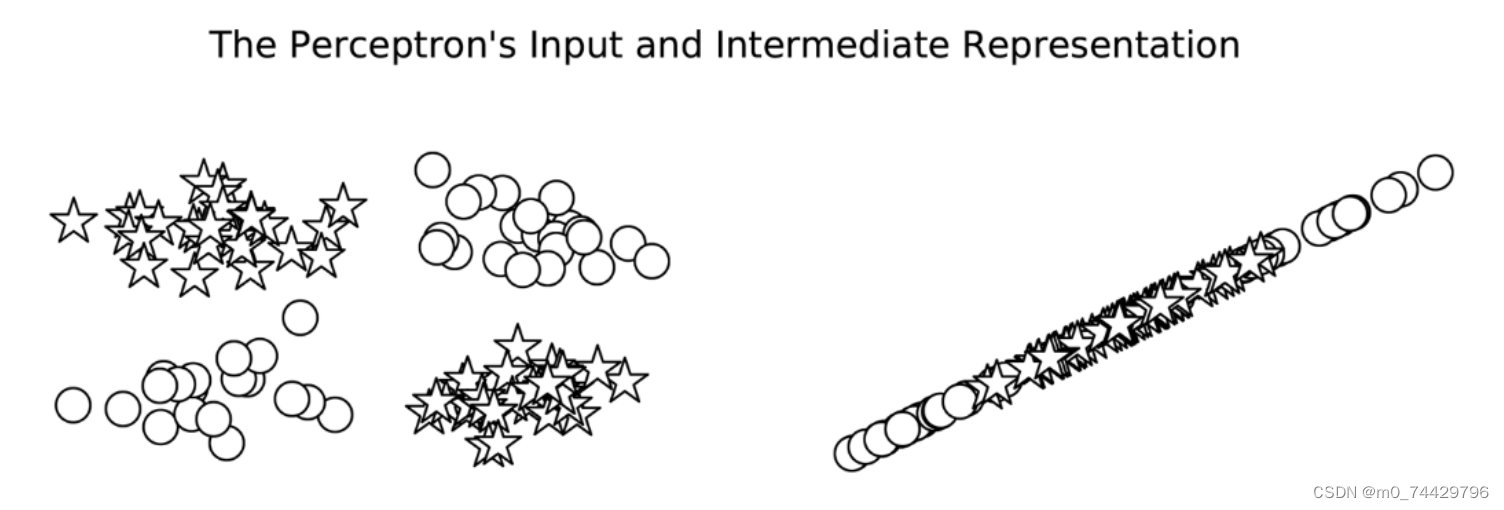
图4 单层感知器的输入和输出表示
3.2 使用PyTorch实现MLPs
在3.1节,我们已经简单知道了MLP的原理,这一节,我们将介绍PyTorch中的一个实现。
我们用 PyTorch 的两个线性模块实例化了这个MLP。线性对象被命名为 fc1 和 fc2,它们遵循一个通用约定,即将线性模块称为“完全连接层”,简称为“fc 层”。除了这两个线性层外,还要在两个线性层之间使用 ReLU 激活函数。使用两个线性层之间的非线性是必要的,因为没有它,两个线性层在数学上等价于一个线性层,这样就无法建模复杂的模式。
MLP 的实现只需要定义前向传播。PyTorch 会根据模型的定义和前向传递的实现,自动计算如何进行反向传递和梯度更新。
import torch.nn as nn
import torch.nn.functional as F

class MultilayerPerceptron(nn.Module):
    def __init__(self, input_dim, hidden_dim, output_dim):
        """
        Args:
            input_dim (int): the size of the input vectors
            hidden_dim (int): the output size of the first Linear layer
            output_dim (int): the output size of the second Linear layer
        """
        super(MultilayerPerceptron, self).__init__()
        self.fc1 = nn.Linear(input_dim, hidden_dim) # 定义第一个全连接层
        self.fc2 = nn.Linear(hidden_dim, output_dim) # 定义第二个全连接层

    def forward(self, x_in, apply_softmax=False):
        """The forward pass of the MLP

        Args:
            x_in (torch.Tensor): an input data tensor.
                x_in.shape should be (batch, input_dim)
            apply_softmax (bool): a flag for the softmax activation
                should be false if used with the Cross Entropy losses
        Returns:
            the resulting tensor. tensor.shape should be (batch, output_dim)
        """
        intermediate = F.relu(self.fc1(x_in))# 应用 ReLU 激活函数到第一个全连接层的输出
        output = self.fc2(intermediate)# 计算第二个全连接层的输出

        if apply_softmax:
            output = F.softmax(output, dim=1)# 如果需要,应用 softmax 激活函数
        return output
下面我们将使用前面定义的 MultilayerPerceptron 类来实例化一个 MLP
batch_size = 2 # number of samples input at once
input_dim = 3
hidden_dim = 100
output_dim = 4

# Initialize model
# 初始化多层感知器模型
mlp = MultilayerPerceptron(input_dim, hidden_dim, output_dim)
print(mlp)# 打印模型结构
我们可以通过传递一些随机输入来快速测试模型的“连接”。
import torch
# 打印张量类型,形状,值
def describe(x):
    print("Type: {}".format(x.type()))
    print("Shape/size: {}".format(x.shape))
    print("Values: \n{}".format(x))

x_input = torch.rand(batch_size, input_dim)# 生成随机输入数据张量,形状为 (batch_size, input_dim)
describe(x_input)# 描述输入张量
y_output = mlp(x_input, apply_softmax=False)# 通过多层感知器模型进行前向传播,不应用 softmax 激活函数
describe(y_output)
因为模型还没有经过训练,所以输出是随机的。在花费时间训练模型之前,这样做是一个有用的完整性检查。
我们也可以使用softmax函数,将输出的值向量转换为概率,即将apply_softmax标志设置为True
y_output = mlp(x_input, apply_softmax=True)# 通过多层感知器模型进行前向传播,应用 softmax 激活函数
describe(y_output)
使用 Softmax 函数将值向量转换为概率分布是为了在分类任务中能够得到每个类别的概率,从而可以对输入数据进行分类。Softmax 将模型的输出转换为容易解释和使用的概率形式,使得后续的损失计算和分类决策更加方便和合理。
3.3 将MLP应用到姓氏分类任务
3.3.1 实现姓氏数据集类
from torch.utils.data import Dataset, DataLoader
import pandas as pd
import numpy as np

class SurnameDataset(Dataset):
    # Implementation is nearly identical to Section 3.5
    def __init__(self, surname_df, vectorizer):
        """
        Args:
            name_df (pandas.DataFrame): the dataset
            vectorizer (SurnameVectorizer): vectorizer instatiated from dataset
        """
        self.surname_df = surname_df
        self._vectorizer = vectorizer
        self.train_df = self.surname_df[self.surname_df.split=='train']
        self.train_size = len(self.train_df)

        self.val_df = self.surname_df[self.surname_df.split=='val']
        self.validation_size = len(self.val_df)

        self.test_df = self.surname_df[self.surname_df.split=='test']
        self.test_size = len(self.test_df)

        self._lookup_dict = {'train': (self.train_df, self.train_size),
                             'val': (self.val_df, self.validation_size),
                             'test': (self.test_df, self.test_size)}

        self.set_split('train')

        # Class weights
        class_counts = surname_df.nationality.value_counts().to_dict()
        def sort_key(item):
            return self._vectorizer.nationality_vocab.lookup_token(item[0])
        sorted_counts = sorted(class_counts.items(), key=sort_key)
        frequencies = [count for _, count in sorted_counts]
        self.class_weights = 1.0 / torch.tensor(frequencies, dtype=torch.float32)


    @classmethod
    def load_dataset_and_make_vectorizer(cls, surname_csv):
        """Load dataset and make a new vectorizer from scratch

        Args:
            surname_csv (str): location of the dataset
        Returns:
            an instance of SurnameDataset
        """
        surname_df = pd.read_csv(surname_csv)
        train_surname_df = surname_df[surname_df.split=='train']
        return cls(surname_df, SurnameVectorizer.from_dataframe(train_surname_df))

    @classmethod
    def load_dataset_and_load_vectorizer(cls, surname_csv, vectorizer_filepath):
        """Load dataset and the corresponding vectorizer.
        Used in the case in the vectorizer has been cached for re-use

        Args:
            surname_csv (str): location of the dataset
            vectorizer_filepath (str): location of the saved vectorizer
        Returns:
            an instance of SurnameDataset
        """
        surname_df = pd.read_csv(surname_csv)
        vectorizer = cls.load_vectorizer_only(vectorizer_filepath)
        return cls(surname_df, vectorizer)

    @staticmethod
    def load_vectorizer_only(vectorizer_filepath):
        """a static method for loading the vectorizer from file

        Args:
            vectorizer_filepath (str): the location of the serialized vectorizer
        Returns:
            an instance of SurnameDataset
        """
        with open(vectorizer_filepath) as fp:
            return SurnameVectorizer.from_serializable(json.load(fp))

    def save_vectorizer(self, vectorizer_filepath):
        """saves the vectorizer to disk using json

        Args:
            vectorizer_filepath (str): the location to save the vectorizer
        """
        with open(vectorizer_filepath, "w") as fp:
            json.dump(self._vectorizer.to_serializable(), fp)

    def get_vectorizer(self):
        """ returns the vectorizer """
        return self._vectorizer

    def set_split(self, split="train"):
        """ selects the splits in the dataset using a column in the dataframe """
        self._target_split = split
        self._target_df, self._target_size = self._lookup_dict[split]

    def __len__(self):
        return self._target_size

    def __getitem__(self, index):
        """the primary entry point method for PyTorch datasets

        Args:
            index (int): the index to the data point
        Returns:
            a dictionary holding the data point's features (x_data) and label (y_target)
        """
        row = self._target_df.iloc[index]

        surname_matrix = \
            self._vectorizer.vectorize(row.surname)

        nationality_index = \
            self._vectorizer.nationality_vocab.lookup_token(row.nationality)

        return {'x_surname': surname_matrix,
                'y_nationality': nationality_index}

    def get_num_batches(self, batch_size):
        """Given a batch size, return the number of batches in the dataset

        Args:
            batch_size (int)
        Returns:
            number of batches in the dataset
        """
        return len(self) // batch_size


def generate_batches(dataset, batch_size, shuffle=True,
                     drop_last=True, device="cpu"):
    """
    A generator function which wraps the PyTorch DataLoader. It will
      ensure each tensor is on the write device location.
    """
    dataloader = DataLoader(dataset=dataset, batch_size=batch_size,
                            shuffle=shuffle, drop_last=drop_last)

    for data_dict in dataloader:
        out_data_dict = {}
        for name, tensor in data_dict.items():
            out_data_dict[name] = data_dict[name].to(device)
        yield out_data_dict
3.3.2 Vocabulary类的实现
为了使用字符对姓氏进行分类,我们需要使用词汇表、向量化器和DataLoader将姓氏字符串转换为向量化的minibatches。
Vocabulary类用于处理文本并提取词汇以进行映射,主要协调两个 Python 字典,这两个字典在令牌(在本例中是字符)和整数之间形成一个双射;也就是说,第一个字典将字符映射到整数索引,第二个字典将整数索引映射到字符。add_token方法用于向词汇表中添加新的令牌,lookup_token方法用于检索索引,lookup_index方法用于检索给定索引的令牌。
class Vocabulary(object):
    """Class to process text and extract vocabulary for mapping"""

    def __init__(self, token_to_idx=None, add_unk=True, unk_token="<UNK>"):
        """
        Args:
            token_to_idx (dict): a pre-existing map of tokens to indices
            add_unk (bool): a flag that indicates whether to add the UNK token
            unk_token (str): the UNK token to add into the Vocabulary
        """
# 初始化 token_to_idx 字典
        if token_to_idx is None:
            token_to_idx = {}
        self._token_to_idx = token_to_idx
# 从 token_to_idx 创建 idx_to_token 字典
        self._idx_to_token = {idx: token
                              for token, idx in self._token_to_idx.items()}
        # 设置 add_unk 和 unk_token 属性
        self._add_unk = add_unk
        self._unk_token = unk_token

        self.unk_index = -1
        if add_unk: # 如果 add_unk 为 True,则将UNK标记添加到词汇表中
            self.unk_index = self.add_token(unk_token)


    def to_serializable(self):
        """ returns a dictionary that can be serialized """
        return {'token_to_idx': self._token_to_idx,
                'add_unk': self._add_unk,
                'unk_token': self._unk_token}

    @classmethod
    def from_serializable(cls, contents):
        """ instantiates the Vocabulary from a serialized dictionary """
        return cls(**contents)

    def add_token(self, token):
        """Update mapping dicts based on the token.

        Args:
            token (str): the item to add into the Vocabulary
        Returns:
            index (int): the integer corresponding to the token
        """
        try:
            index = self._token_to_idx[token]
        except KeyError: # 如果标记不存在,则将其添加到词汇表中
            index = len(self._token_to_idx)
            self._token_to_idx[token] = index
            self._idx_to_token[index] = token
        return index

    def add_many(self, tokens):
        """Add a list of tokens into the Vocabulary

        Args:
            tokens (list): a list of string tokens
        Returns:
            indices (list): a list of indices corresponding to the tokens
        """
        return [self.add_token(token) for token in tokens]

    def lookup_token(self, token):
        """Retrieve the index associated with the token
          or the UNK index if token isn't present.

        Args:
            token (str): the token to look up
        Returns:
            index (int): the index corresponding to the token
        Notes:
            `unk_index` needs to be >=0 (having been added into the Vocabulary)
              for the UNK functionality
        """
        if self.unk_index >= 0:
            return self._token_to_idx.get(token, self.unk_index)
        else:
            return self._token_to_idx[token]

    def lookup_index(self, index):
        """Return the token associated with the index

        Args:
            index (int): the index to look up
        Returns:
            token (str): the token corresponding to the index
        Raises:
            KeyError: if the index is not in the Vocabulary
        """
        if index not in self._idx_to_token:
            raise KeyError("the index (%d) is not in the Vocabulary" % index)
        return self._idx_to_token[index]

    def __str__(self):
        return "<Vocabulary(size=%d)>" % len(self)

    def __len__(self):
        return len(self._token_to_idx)
3.3.3 SurnameVectorizer类的实现
SurnameVectorizer类负责应用词汇表并将姓氏转换为向量。我们为以前未遇到的字符指定一个特殊的令牌,即UNK。
class SurnameVectorizer(object):
    """ The Vectorizer which coordinates the Vocabularies and puts them to use"""
    def __init__(self, surname_vocab, nationality_vocab):
        self.surname_vocab = surname_vocab
        self.nationality_vocab = nationality_vocab

    def vectorize(self, surname):
        """Vectorize the provided surname

        Args:
            surname (str): the surname
        Returns:
            one_hot (np.ndarray): a collapsed one-hot encoding
        """
        vocab = self.surname_vocab
        one_hot = np.zeros(len(vocab), dtype=np.float32)
        for token in surname:
            one_hot[vocab.lookup_token(token)] = 1
        return one_hot

    @classmethod
    def from_dataframe(cls, surname_df):
        """Instantiate the vectorizer from the dataset dataframe

        Args:
            surname_df (pandas.DataFrame): the surnames dataset
        Returns:
            an instance of the SurnameVectorizer
        """
        surname_vocab = Vocabulary(unk_token="@")
        nationality_vocab = Vocabulary(add_unk=False)

        for index, row in surname_df.iterrows():
            for letter in row.surname:
                surname_vocab.add_token(letter)
            nationality_vocab.add_token(row.nationality)

        return cls(surname_vocab, nationality_vocab)
3.3.4 SurnameClassifier类的实现
SurnameClassifier是本实验前面介绍的MLP的实现。第一个线性层将输入向量映射到中间向量,并对该向量应用非线性。第二线性层将中间向量映射到预测向量。
import torch.nn as nn
import torch.nn.functional as F

class SurnameClassifier(nn.Module):
    """ A 2-layer Multilayer Perceptron for classifying surnames """
    def __init__(self, input_dim, hidden_dim, output_dim):
        """
        Args:
            input_dim (int): the size of the input vectors
            hidden_dim (int): the output size of the first Linear layer
            output_dim (int): the output size of the second Linear layer
        """
        super(SurnameClassifier, self).__init__()
        self.fc1 = nn.Linear(input_dim, hidden_dim)
        self.fc2 = nn.Linear(hidden_dim, output_dim)

    def forward(self, x_in, apply_softmax=False):
        """The forward pass of the classifier

        Args:
            x_in (torch.Tensor): an input data tensor.
                x_in.shape should be (batch, input_dim)
            apply_softmax (bool): a flag for the softmax activation
                should be false if used with the Cross Entropy losses
        Returns:
            the resulting tensor. tensor.shape should be (batch, output_dim)
        """
        intermediate_vector = F.relu(self.fc1(x_in))
        prediction_vector = self.fc2(intermediate_vector)

        if apply_softmax:
            prediction_vector = F.softmax(prediction_vector, dim=1)

        return prediction_vector
选择性地应用 softmax 操作是为了在训练和推理阶段之间切换:
- 训练阶段:我们直接使用未归一化的 logits 计算交叉熵损失。
- 推理阶段:我们应用 softmax 得到类别的概率分布。
这种设计提高了数值稳定性和计算效率,同时简化了训练过程中的代码编写。
3.3.5 args的定义
我们定义一个Namespace 对象 args,用于存储一系列训练机器学习模型(特别是一个姓氏分类模型)所需的参数和配置信息。
from argparse import Namespace
args = Namespace(
    # Data and path information
    surname_csv="/home/jovyan/surnames_with_splits.csv",
    vectorizer_file="vectorizer.json",
    model_state_file="model.pth",
    save_dir="model_storage/ch4/surname_mlp",
    # Model hyper parameters
    hidden_dim=300,
    # Training  hyper parameters
    seed=1337,
    num_epochs=100,
    early_stopping_criteria=5,
    learning_rate=0.001,
    batch_size=64,
    # Runtime options omitted for space
)
# Check CUDA
if not torch.cuda.is_available():
    args.cuda = False

args.device = torch.device("cuda" if args.cuda else "cpu")
print("Using CUDA: {}".format(args.cuda))
3.3.6 实例化数据集、模型、损失函数和优化器
def make_train_state(args):
    return {'stop_early': False,
            'early_stopping_step': 0,
            'early_stopping_best_val': 1e8,
            'learning_rate': args.learning_rate,
            'epoch_index': 0,
            'train_loss': [],
            'train_acc': [],
            'val_loss': [],
            'val_acc': [],
            'test_loss': -1,
            'test_acc': -1,
            'model_filename': args.model_state_file}
import torch
import torch.nn as nn
import torch.optim as optim
dataset = SurnameDataset.load_dataset_and_make_vectorizer(args.surname_csv)
vectorizer = dataset.get_vectorizer()

classifier = SurnameClassifier(input_dim=len(vectorizer.surname_vocab),
                               hidden_dim=args.hidden_dim,
                               output_dim=len(vectorizer.nationality_vocab))

classifier = classifier.to(args.device)

loss_func = nn.CrossEntropyLoss(dataset.class_weights)
optimizer = optim.Adam(classifier.parameters(), lr=args.learning_rate)
train_state = make_train_state(args)
def compute_accuracy(y_pred, y_target):
    y_pred_indices = y_pred.max(dim=1)[1]
    n_correct = torch.eq(y_pred_indices, y_target).sum().item()
    return n_correct / len(y_pred_indices) * 100
3.3.7 训练循环
利用训练数据,计算模型输出、损失和梯度。然后,使用梯度来更新模型。
# the training routine is these 5 steps:

# --------------------------------------
    for epoch_index in range(args.num_epochs):
        train_state['epoch_index'] = epoch_index

        # Iterate over training dataset

        # setup: batch generator, set loss and acc to 0, set train mode on

        dataset.set_split('train')
        batch_generator = generate_batches(dataset,
                                           batch_size=args.batch_size,
                                           device=args.device)
        running_loss = 0.0
        running_acc = 0.0
        classifier.train()

        for batch_index, batch_dict in enumerate(batch_generator):
            # the training routine is these 5 steps:

            # --------------------------------------
            # step 1. zero the gradients
            optimizer.zero_grad()

            # step 2. compute the output
            y_pred = classifier(batch_dict['x_surname'])

            # step 3. compute the loss
            loss = loss_func(y_pred, batch_dict['y_nationality'])
            loss_t = loss.item()
            running_loss += (loss_t - running_loss) / (batch_index + 1)

            # step 4. use loss to produce gradients
            loss.backward()

            # step 5. use optimizer to take gradient step
            optimizer.step()
            # -----------------------------------------
            # compute the accuracy
            acc_t = compute_accuracy(y_pred, batch_dict['y_nationality'])
            running_acc += (acc_t - running_acc) / (batch_index + 1)


        train_state['train_loss'].append(running_loss)
        train_state['train_acc'].append(running_acc)

        # Iterate over val dataset

        # setup: batch generator, set loss and acc to 0; set eval mode on
        dataset.set_split('val')
        batch_generator = generate_batches(dataset,
                                           batch_size=args.batch_size,
                                           device=args.device)
        running_loss = 0.
        running_acc = 0.
        classifier.eval()

        for batch_index, batch_dict in enumerate(batch_generator):

            # compute the output
            y_pred =  classifier(batch_dict['x_surname'])

            # step 3. compute the loss
            loss = loss_func(y_pred, batch_dict['y_nationality'])
            loss_t = loss.item()
            running_loss += (loss_t - running_loss) / (batch_index + 1)
        train_state['val_loss'].append(running_loss)
        train_state['val_acc'].append(running_acc)
3.3.8 模型评估和预测
我们可以对一个新姓氏进行分类,函数接受一个姓氏,返回一个包含预测的国籍和对应概率的字典 。
def predict_nationality(name, classifier, vectorizer):
    vectorized_name = vectorizer.vectorize(name)
    vectorized_name = torch.tensor(vectorized_name).view(1, -1)
    result = classifier(vectorized_name, apply_softmax=True)

    probability_values, indices = result.max(dim=1)
    index = indices.item()

    predicted_nationality = vectorizer.nationality_vocab.lookup_index(index)
    probability_value = probability_values.item()

    return {'nationality': predicted_nationality,
            'probability': probability_value}
我们也可以定义一个函数predict_topk_nationality,与predict_nationality函数返回最可能的国籍及对应概率不同,这个函数可以返回前 k 个可能的国籍及其对应的概率。
def predict_topk_nationality(name, classifier, vectorizer, k=5):
    vectorized_name = vectorizer.vectorize(name)
    vectorized_name = torch.tensor(vectorized_name).view(1, -1)
    prediction_vector = classifier(vectorized_name, apply_softmax=True)
    probability_values, indices = torch.topk(prediction_vector, k=k)

    # returned size is 1,k
    probability_values = probability_values.detach().numpy()[0]
    indices = indices.detach().numpy()[0]

    results = []
    for prob_value, index in zip(probability_values, indices):
        nationality = vectorizer.nationality_vocab.lookup_index(index)
        results.append({'nationality': nationality,
                        'probability': prob_value})

    return results
3.3.9 模型正则化
为了防止过拟合问题,我们需要对模型引入正则化,除了权值正则化外,我们也可以使用结构正则化——dropout。
dropout
简单来说,dropout 是在训练期间随机将一部分神经元的输出置为零的过程。
在每次训练迭代中,以一定的概率(通常是 0.5)随机地将神经元的输出置为零,这些神经元在该次迭代中被“丢弃”。这样做的结果是,网络不能够过度依赖任何一个神经元,从而使得网络更加鲁棒。由于随机失活会使得网络的结构在每次迭代中都会有所不同,因此可以被视为对训练集的不同随机抽样。这有助于减少神经网络对训练数据的过拟合,提高了模型的泛化能力。
我们给出一个带dropout的MLP实现
import torch.nn as nn
import torch.nn.functional as F

class MultilayerPerceptron(nn.Module):
    def __init__(self, input_dim, hidden_dim, output_dim):
        """
        Args:
            input_dim (int): the size of the input vectors
            hidden_dim (int): the output size of the first Linear layer
            output_dim (int): the output size of the second Linear layer
        """
        super(MultilayerPerceptron, self).__init__()
        self.fc1 = nn.Linear(input_dim, hidden_dim)
        self.fc2 = nn.Linear(hidden_dim, output_dim)

    def forward(self, x_in, apply_softmax=False):
        """The forward pass of the MLP

        Args:
            x_in (torch.Tensor): an input data tensor.
                x_in.shape should be (batch, input_dim)
            apply_softmax (bool): a flag for the softmax activation
                should be false if used with the Cross Entropy losses
        Returns:
            the resulting tensor. tensor.shape should be (batch, output_dim)
        """
        intermediate = F.relu(self.fc1(x_in))
        output = self.fc2(F.dropout(intermediate, p=0.5))

        if apply_softmax:
            output = F.softmax(output, dim=1)
        return output
需要注意的是,dropout只适用于训练期间,不适用于评估期间。因为在测试时,我们希望得到一个确定的预测结果,而不是每次预测都随机丢弃一些神经元。
4. Convolutional Neural Networks(卷积神经网络)
4.1 概述
卷积神经网络(CNN),是一种非常适合检测空间子结构(从而创建有意义的空间关系)的神经网络。CNN 通过使用少量的权重来扫描输入数据张量来实现这一点。通过这种扫描,它们生成表示子结构检测(或未检测)的输出张量。
从图5可以看出,核是一个小的方阵,它被系统地应用于输入矩阵的不同位置。输入矩阵与单个卷积核(也称为特征映射)在输入矩阵的每个位置进行卷积操作。在每个应用程序中,卷积核对应位置的值乘以输入矩阵的值,然后将这些乘积相加起来。
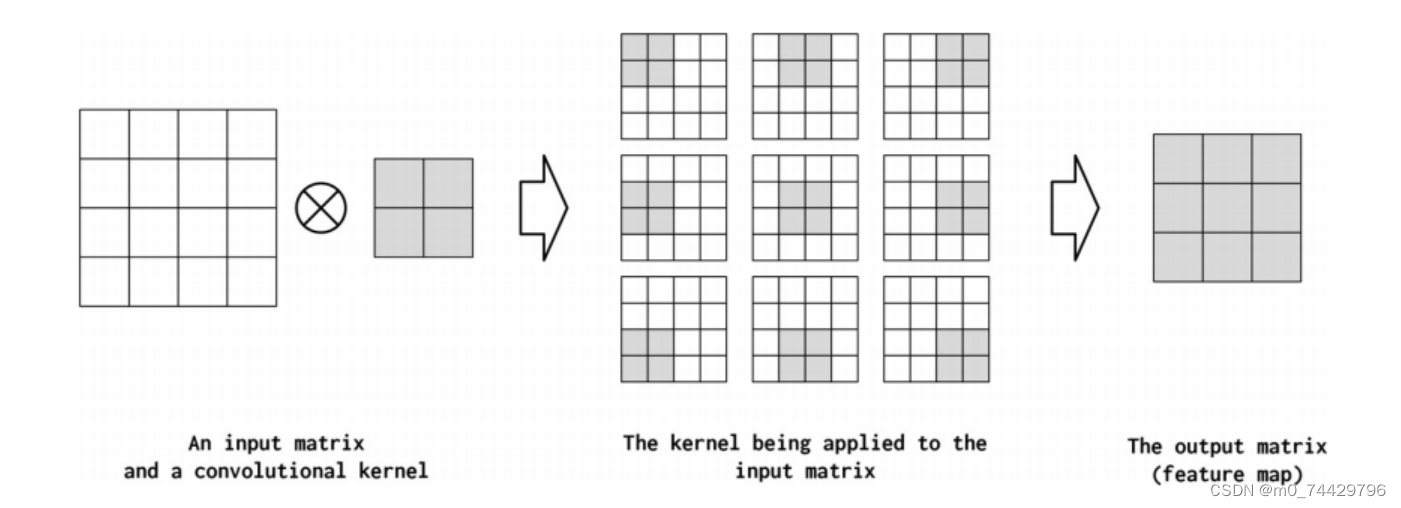
图5 二维卷积运算
4.1.1 超参数
卷积核通常有如下超参数配置:
-
kernel_size(核大小):核矩阵的宽度称为核大小,它控制卷积核的形状。增加核的大小,会减少输出的大小。在图5中,核大小为2,输出矩阵是3x3。而在图6中,核大小为3,输出矩阵是2x2。在 NLP 应用中,核大小的行为可以类比于通过查看单词组来捕获语言模式的 n-gram 行为。使用较小的核大小可以捕获较小的、频繁出现的模式,而较大的核大小则可能会捕获更大但更不频繁出现的模式。
 图6
图6 -
stride(步长):指定卷积核在输入数据张量中相乘的位置。在图5中,步长为1,每次卷积核向右移动一个单位。输出张量可以通过增加步长的方式被有意的压缩来总结信息。如图7所示。
 图7 步长为2
 -
padding(填充):控制在输入数据张量的边缘周围添加多少零值。填充的作用在于抵消卷积操作对特征映射总大小的缩小,确保输出特征映射的大小与输入特征映射的大小相匹配。在图5中,没有进行填充,即为 0。而在图8中,对输入矩阵进行填充。
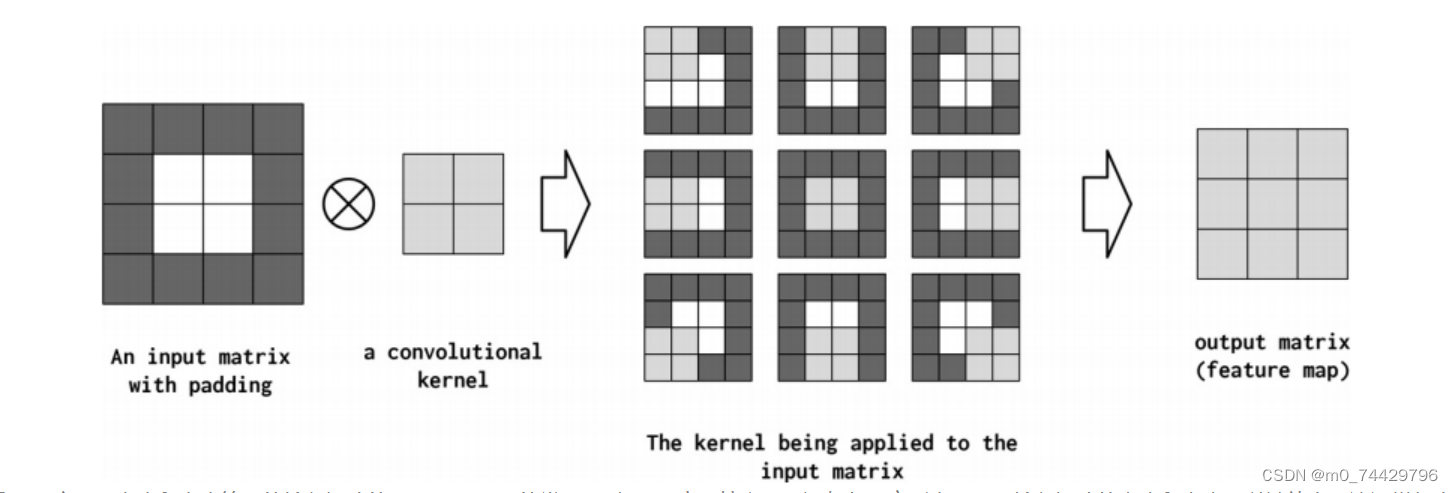 图8
图8 -
dilation(膨胀):当应用到输入数据张量时,指定乘法相距多远。在图5中,膨胀为 1,即不进行扩张。而在图9中,膨胀为2,意味着当卷积核应用于输入矩阵时,核的元素之间相距两个空格。增加膨胀意味着卷积核中的元素之间的间隔增大,这会影响到卷积操作对输入数据的采样方式,从而影响了输出特征的提取。

图9
4.1.2 卷积运算的维数
在PyTorch中,卷积可以是一维、二维或三维的,分别由Conv1d、Conv2d和Conv3d模块实现。
一维卷积非常适用于时间序列数据,其中每个时间步都有一个特征向量。在这种情况下,我们可以在时间序列的维度上学习模式。在自然语言处理(NLP)中,卷积操作通常是一维的,用于处理文本序列。
二维卷积尝试捕捉数据沿两个方向的时空模式,例如,在图像处理中沿着高度和宽度维度。这是为什么二维卷积在图像处理中非常流行的原因。
在三维卷积中,模式是沿着数据中的三个维度进行捕获的。例如,在视频数据中,信息是三维的,其中二维表示图像的帧,时间维度表示帧的序列。
4.1.3 通道
通道(channel)是指沿输入中的每个点的特征维度。例如,在图像中,对应于RGB组件的图像中的每个像素有三个通道。在使用卷积时,文本数据也可以采用类似的概念。从概念上讲,如果文本文档中的“像素”是单词,那么通道的数量就是词汇表的大小。如果我们更细粒度地考虑字符的卷积,通道的数量就是字符集的大小。卷积操作可以在输出(out_channels)中产生多个通道,可以将其视为卷积运算符将输入特征维“映射”到输出特征维。

图10 两个输入矩阵(两个输入通道)和一个输出矩阵(输出通道)
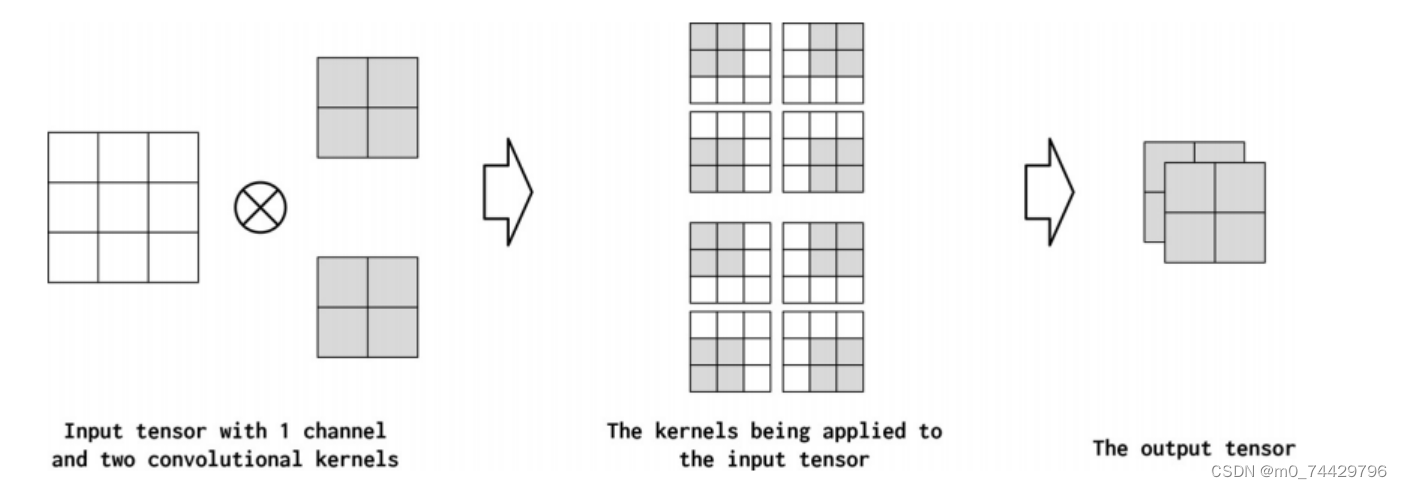
图11 一个输入矩阵(一个输入通道)和两个卷积的卷积运算核(两个输出通道)
4.2 将CNN应用到姓氏分类任务
所有 CNN 应用程序都遵循类似的模式:首先是一组卷积层,它们用于提取特征图(也称为特征映射),然后将这些特征映射作为上游处理的输入。在分类任务中,上游处理通常会使用线性层(全连接层)进行最终的分类。
4.2.1 构建特征向量
首先将 PyTorch 的 Conv1d 类的一个实例应用到了三维数据张量上。
import torch
import torch.nn as nn

batch_size = 2
one_hot_size = 10
sequence_width = 7
data = torch.randn(batch_size, one_hot_size, sequence_width)
conv1 = nn.Conv1d(in_channels=one_hot_size, out_channels=16,
               kernel_size=3)
intermediate1 = conv1(data)
print(data.size())
print(intermediate1.size())
构建一个简单的卷积神经网络,并逐步对输入数据进行多次卷积操作,以提取更高级别的特征。
conv2 = nn.Conv1d(in_channels=16, out_channels=32, kernel_size=3)
conv3 = nn.Conv1d(in_channels=32, out_channels=64, kernel_size=3)

intermediate2 = conv2(intermediate1)
intermediate3 = conv3(intermediate2)

print(intermediate2.size())
print(intermediate3.size())
y_output = intermediate3.squeeze()
print(y_output.size())
除了卷积操作外,还有另外两种方法,可以将张量简化为每个数据点的一个特征向量。
第一种方法:使用PyTorch的view()方法将所有向量平展成单个向量。
# Method 2 of reducing to feature vectors
print(intermediate1.view(batch_size, -1).size())
第二种方法:使用一些数学运算来总结向量中的信息,最常见的操作是算术平均值。
# Method 3 of reducing to feature vectors
print(torch.mean(intermediate1, dim=2).size())
4.2.2 实现姓氏数据集类
与前文MLP中的姓氏数据集类相比,CNN中的数据集类在__getitem__需要一些更改,因为CNN中的数据集由onehot向量矩阵组成,而不是MLP中的一个收缩的onehot向量。
class SurnameDataset(Dataset):
    # ... existing implementation from Section 3.3.2

    def __getitem__(self, index):
        row = self._target_df.iloc[index]

        surname_matrix = \
            self._vectorizer.vectorize(row.surname, self._max_seq_length)

        nationality_index = \
             self._vectorizer.nationality_vocab.lookup_token(row.nationality)

        return {'x_surname': surname_matrix,
                'y_nationality': nationality_index}
4.2.3 SurnameVectorizer类的实现
词汇表和DataLoader的实现方式与MLP相同,而SurnameVectorizer类的vectorize()方法和矢量化器需要一些改变,以适应CNN模型的需要。我们需要使用onehot矩阵,计算姓氏的最大长度并将其保存为max_surname_length。
class SurnameVectorizer(object):
    """ The Vectorizer which coordinates the Vocabularies and puts them to use"""
    def vectorize(self, surname):
        """
        Args:
            surname (str): the surname
        Returns:
            one_hot_matrix (np.ndarray): a matrix of one-hot vectors
        """

        one_hot_matrix_size = (len(self.character_vocab), self.max_surname_length)
        one_hot_matrix = np.zeros(one_hot_matrix_size, dtype=np.float32)

        for position_index, character in enumerate(surname):
            character_index = self.character_vocab.lookup_token(character)
            one_hot_matrix[character_index][position_index] = 1

        return one_hot_matrix

    @classmethod
    def from_dataframe(cls, surname_df):
        """Instantiate the vectorizer from the dataset dataframe

        Args:
            surname_df (pandas.DataFrame): the surnames dataset
        Returns:
            an instance of the SurnameVectorizer
        """
        character_vocab = Vocabulary(unk_token="@")
        nationality_vocab = Vocabulary(add_unk=False)
        max_surname_length = 0

        for index, row in surname_df.iterrows():
            max_surname_length = max(max_surname_length, len(row.surname))
            for letter in row.surname:
                character_vocab.add_token(letter)
            nationality_vocab.add_token(row.nationality)

        return cls(character_vocab, nationality_vocab, max_surname_length)
4.2.4 SurnameClassifier类的实现
SurnameClassifier类使用了sequence和ELU PyTorch模块。序列模块是一个方便的包装器,用于封装线性操作序列,使得模型定义更加简洁。在这里,我们使用 Sequential 封装了一系列 Conv1d 应用程序。ELU 是一种类似于 ReLU 的非线性函数,但与 ReLU 不同的是,它不会将负值裁剪为0,而是对负值进行幂运算。
import torch.nn as nn
import torch.nn.functional as F

class SurnameClassifier(nn.Module):
    def __init__(self, initial_num_channels, num_classes, num_channels):
        """
        Args:
            initial_num_channels (int): size of the incoming feature vector
            num_classes (int): size of the output prediction vector
            num_channels (int): constant channel size to use throughout network
        """
        super(SurnameClassifier, self).__init__()

        self.convnet = nn.Sequential(
            nn.Conv1d(in_channels=initial_num_channels,
                      out_channels=num_channels, kernel_size=3),
            nn.ELU(),
            nn.Conv1d(in_channels=num_channels, out_channels=num_channels,
                      kernel_size=3, stride=2),
            nn.ELU(),
            nn.Conv1d(in_channels=num_channels, out_channels=num_channels,
                      kernel_size=3, stride=2),
            nn.ELU(),
            nn.Conv1d(in_channels=num_channels, out_channels=num_channels,
                      kernel_size=3),
            nn.ELU()
        )
        self.fc = nn.Linear(num_channels, num_classes)

    def forward(self, x_surname, apply_softmax=False):
        """The forward pass of the classifier

        Args:
            x_surname (torch.Tensor): an input data tensor.
                x_surname.shape should be (batch, initial_num_channels,
                                           max_surname_length)
            apply_softmax (bool): a flag for the softmax activation
                should be false if used with the Cross Entropy losses
        Returns:
            the resulting tensor. tensor.shape should be (batch, num_classes)
        """
        features = self.convnet(x_surname).squeeze(dim=2)
        prediction_vector = self.fc(features)

        if apply_softmax:
            prediction_vector = F.softmax(prediction_vector, dim=1)

        return prediction_vector
4.2.5 训练循环
与MLP相似,CNN需要实例化数据集、模型、损失函数和优化器 ,利用训练数据,计算模型输出、损失和梯度。然后,使用梯度来更新模型。但是输入参数是不同的。
args = Namespace(
    # Data and Path information
    surname_csv="data/surnames/surnames_with_splits.csv",
    vectorizer_file="vectorizer.json",
    model_state_file="model.pth",
    save_dir="model_storage/ch4/cnn",
    # Model hyper parameters
    hidden_dim=100,
    num_channels=256,
    # Training hyper parameters
    seed=1337,
    learning_rate=0.001,
    batch_size=128,
    num_epochs=100,
    early_stopping_criteria=5,
    dropout_p=0.1,
    # Runtime omitted for space ...
)
4.2.6 模型评估和预测
与MLP相似,但CNN的predict_nationality函数和predict_topk_nationality函数需要做出一些更改:我们没有使用视图方法重塑新创建的数据张量以添加批处理维度,而是使用PyTorch的unsqueeze()函数在批处理应该在的位置添加大小为1的维度。
def predict_nationality(surname, classifier, vectorizer):
    """Predict the nationality from a new surname

    Args:
        surname (str): the surname to classifier
        classifier (SurnameClassifer): an instance of the classifier
        vectorizer (SurnameVectorizer): the corresponding vectorizer
    Returns:
        a dictionary with the most likely nationality and its probability
    """
    vectorized_surname = vectorizer.vectorize(surname)
    vectorized_surname = torch.tensor(vectorized_surname).unsqueeze(0)
    result = classifier(vectorized_surname, apply_softmax=True)

    probability_values, indices = result.max(dim=1)
    index = indices.item()

    predicted_nationality = vectorizer.nationality_vocab.lookup_index(index)
    probability_value = probability_values.item()

    return {'nationality': predicted_nationality, 'probability': probability_value}
5. CNN其他相关主题
5.1 Pooling(池化)操作
Pooling是一种将高维特征映射转化为低维特征映射的操作。在卷积神经网络中,卷积的输出被称为特征映射,其中的每个值都总结了输入数据中的某些区域信息。由于卷积计算通常具有重叠性,因此产生的特征映射中可能存在冗余信息。Pooling通过对特征映射的局部区域应用池操作(例如 sum、mean 或 max),将高维特征映射汇总为低维特征映射,从而降低模型的计算复杂度,并且可以减少冗余信息的影响。此外,Pooling还可以改善特征映射的统计强度,将较大但较弱的特征映射转换为较小但更强的特征映射。
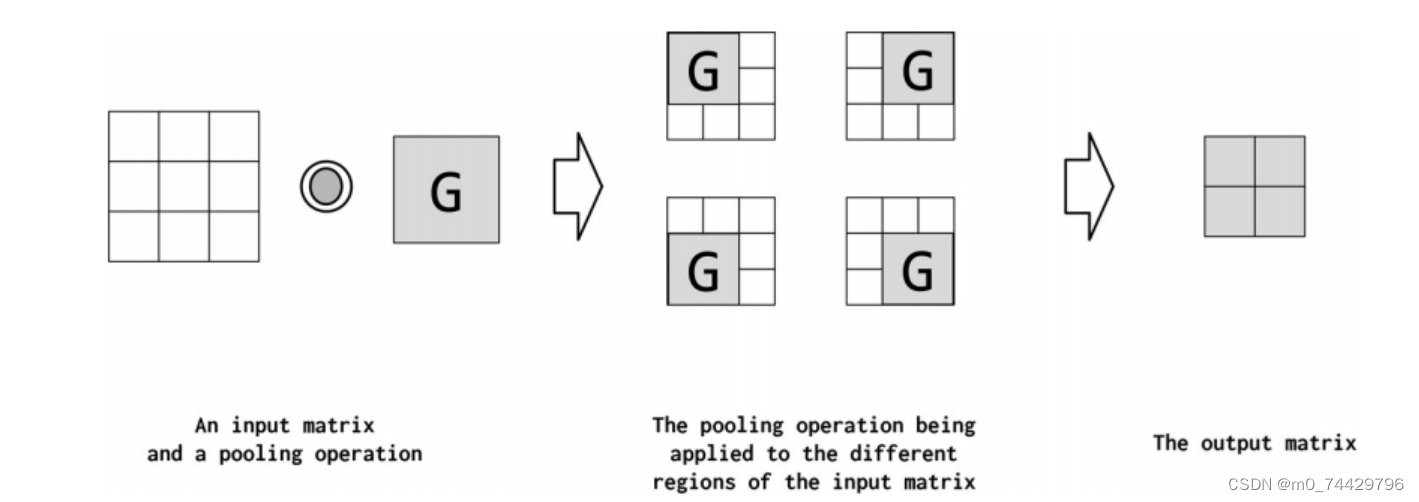
图12
5.2 Batch Normalization (BatchNorm)
批处理标准化(Batch Normalization)是设计神经网络时经常采用的一种技术。BatchNorm 对 CNN 的输出进行转换,通过将激活值缩放为零均值和单位方差来实现。它用于对每个批次的数据进行 Z-transform,使得每个批次的数据具有相似的均值和方差,从而减少了数据的波动对模型训练的影响。BatchNorm 允许模型对参数的初始化不那么敏感,并且简化了学习速率的调整。在 PyTorch 中,批处理标准化是在 nn 模块中定义的。下列代码展示了一个具有批处理标准化的 Conv1D 层。
class SurnameClassifier(nn.Module):

    def __init__(self):
        super(SurnameClassifier, self).__init__()        # ...
        self.conv1 = nn.Conv1d(in_channels=1, out_channels=10,
                               kernel_size=5,
                               stride=1)
        self.conv1_bn = nn.BatchNorm1d(num_features=10)
        # ...

    def forward(self, x):
       # ...
       x = F.relu(self.conv1(x))
       x = self.conv1_bn(x)
       # ...
5.3 Network-in-Network Connections (1x1 Convolutions)
网络中的网络(Network-in-Network,NiN)连接使用了 kernel_size=1 的卷积核,具有一些独特的特性。简单来说,1x1 卷积就像是在通道之间应用的一个全连接的线性层,这在将多通道特征映射转换为较浅的特征映射时非常有用。因此,NiN 或 1x1 卷积提供了一种经济高效的方式,可以合并参数较少的额外非线性层。在图13中,展示了一个应用于输入矩阵的 NiN 连接示例,它将两个通道的特征映射简化为一个通道。

图13
5.4 Residual Connections/Residual Block
CNNs中最重要的趋势之一是Residual connection(残差连接),它支持真正深层的网络(超过100层)。它也称为skip connection(跳跃连接)。
残差连接(Residual connection)是指在神经网络中引入跳跃连接,以允许信息在网络中直接从一个层传递到另一个层,而无需经过多个层的处理。
具体来说,对于给定的网络层,如果其输入为 x,输出为 H(x),那么残差连接的输出为 x+H(x)。这样的连接允许模型学习残差函数 H(x) 而不是直接学习原始的映射函数 H(x)。如果 H(x) 学习到了一个接近于零的映射,那么网络就可以很容易地学习将 x 映射到 x,从而提高了训练的效率。
残差连接的引入有助于解决梯度消失和梯度爆炸等问题,使得网络更容易训练,同时也有助于加速收敛速度。
如果将卷积函数表示为conv,则residual block的输出如下:

然而,这个操作有一个隐含的技巧,如图14所示。对于要添加到卷积输出中的输入,它们必须具有相同的形状。为了实现这一点,标准做法是在卷积之前应用填充操作。在图14中,填充尺寸为1,卷积核大小为3。
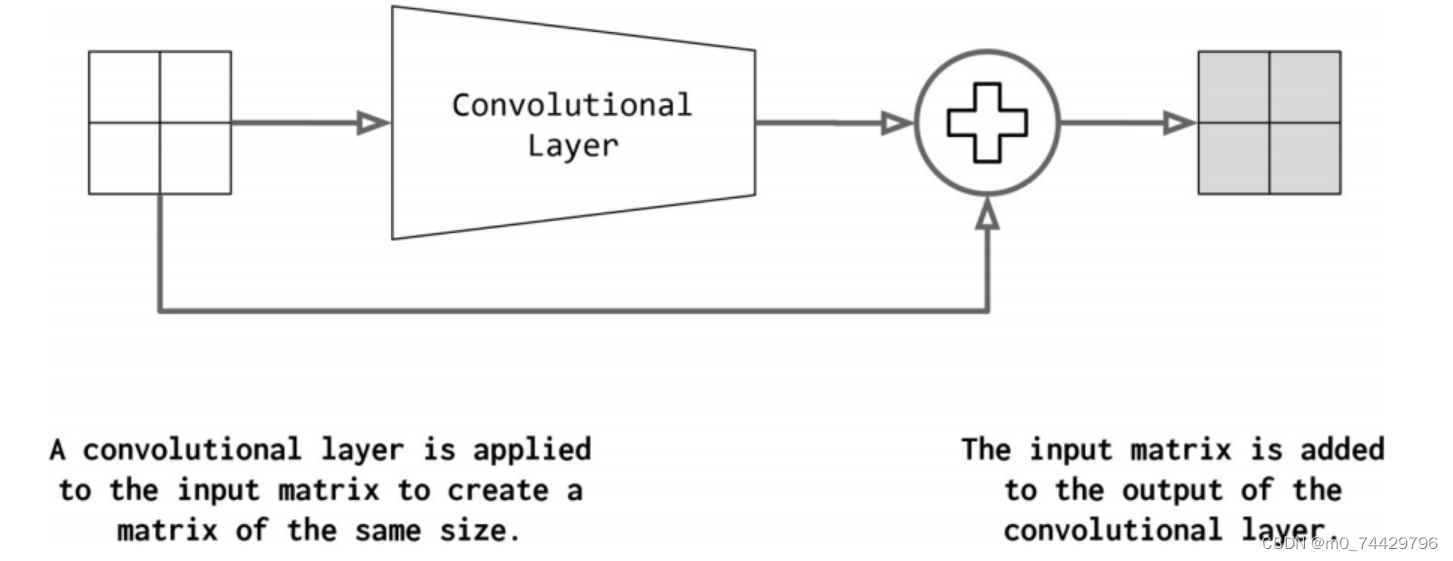
图14


 1184
1184

 被折叠的 条评论
为什么被折叠?


