


这周抽空研究了一下SurfaceFlinger,发现真正复杂的并不是SurfaceFlinger本身,而是android的display显示系统,网上关于这部分的介绍有不少,本不打算写的,但是发现还是记录一下研究代码的过程比较好,一是能够帮助自己理清思路,另一个原因就是以后当这块内容忘记的时候,能快速的通过这个记录捡起来。
一. android显示系统的建立
SurfaceFlinger对于显示的管理是通过一个或多个GraphicPlane对象(目前android只实现了一个)来管理的,
@SurfaceFlinger.h
- GraphicPlane mGraphicPlanes[1];

1. FrameBuffer的建立
framebuffer,确切的是说是linux下的framebuffer,,它是linux图形显示系统中一个与图形硬件无关的抽象层,user完全不用考虑我们的硬件设备,而仅仅使用framebuffer就可以实现对屏幕的操作。
android的framebuffer并没有被SurfaceFlinger直接使用,而是在framebuffer外做了一层包装,这个包装就是FramebufferNativeWindow,我们来看一下FramebufferNativeWindow的创建过程。
我们的framebuffer是由一个设备符fbDev来表示的,它是FramebufferNativeWindow的一个成员,我们来分析一下对fbDev的处理过程。
1.1. fbDev设备符
1.1.1 gralloc library
在这之前,先介绍一下gralloc library,它的形态如grallocBOARDPLATFORM.so, BOARDPLATFORM可以从属性ro.board.platform中获得,这篇文章中我们以Qualcomm msmx7x30为例,也就是gralloc.msm7x30.so中,它的源路径在hardware/msm7k/libgralloc-qsd8k。
framebuffer的初始化需要通过HAL gralloc.msm7x30.so 来完成与底层硬件驱动的适配,但是gralloc library并不是平台无关的,不同的vendor可能会实现自己的gralloc library,因此为了保证在创建framebuffer时能够平台无关,android只能是动态的判断并使用当前的gralloc library,android通过从gralloc library中再抽象出一个hw_module_t结构来供使用,它为framebuffer的初始化提供了需要的gralloc.msm7x30.so业务。因此通过这个hw_module_t结构我们就不需要知道当前系统使用的到底是哪个gralloc library。按规定,所有gralloc library中的这个结构体被命名为HAL_MODULE_INFO_SYM(HMI)。当前分析的系统中,HAL_MODULE_INFO_SYM在hardware/msm7k/libgralloc-qsd8k/galloc.cpp。
1.1.2 打开fbDev设备符
下面看如何打开 打开fbDev设备符。通过HAL_MODULE_INFO_SYM提供的gralloc.msm7x30.so的接口我们调用到了fb_device_open()@hardware/msm7k/libgralloc-qsd8kframebuffer.cpp。
- int fb_device_open(hw_module_t const* module, const char* name,
- hw_device_t** device)
- {
- int status = -EINVAL;
- if (!strcmp(name, GRALLOC_HARDWARE_FB0)) {
- alloc_device_t* gralloc_device;
- status = gralloc_open(module, &gralloc_device);
- /* initialize our state here */
- fb_context_t *dev = (fb_context_t*)malloc(sizeof(*dev));
- memset(dev, 0, sizeof(*dev));
- /* initialize the procs */
- dev->device.common.tag = HARDWARE_DEVICE_TAG;
- private_module_t* m = (private_module_t*)module;
- status = mapFrameBuffer(m);
- }
在这个函数中,主要为fbDev设备符指定一个fb_context_t实例,并通过函数mapFrameBuffer()对设备节点/dev/graphics/fb0进行操作,操作的目的有:
1.获得屏幕设备的信息,并将屏幕信息保存在HAL_MODULE_INFO_SYM(上面代码中的module)中。
2. 向/dev/graphics/fb0请求page flip模式,page flip模式需要至少2个屏幕大小的buffer,page flip模式在后面介绍。目前android系统中设置为2个屏幕大小的buffer。当然屏幕设备可能不支持page flip模式。
mapFrameBufferLocked()@hardware/msm7k/libgralloc-qsd8k/framebuffer.cpp
- /*
- * Request NUM_BUFFERS screens (at lest 2 for page flipping)
- */
- info.yres_virtual = info.yres * NUM_BUFFERS;
- uint32_t flags = PAGE_FLIP;
- if (ioctl(fd, FBIOPUT_VSCREENINFO, &info) == -1) {
- info.yres_virtual = info.yres;
- flags &= ~PAGE_FLIP;
- LOGW("FBIOPUT_VSCREENINFO failed, page flipping not supported");
- }
3. 映射屏幕设备缓存区给fbDev设备符。
mapFrameBufferLocked()@hardware/msm7k/libgralloc-qsd8k/framebuffer.cpp
- /*
- * map the framebuffer
- */
- int err;
- size_t fbSize = roundUpToPageSize(finfo.line_length * info.yres_virtual);
- module->framebuffer = new private_handle_t(dup(fd), fbSize,
- private_handle_t::PRIV_FLAGS_USES_PMEM);
- module->numBuffers = info.yres_virtual / info.yres;
- module->bufferMask = 0;
- void* vaddr = mmap(0, fbSize, PROT_READ|PROT_WRITE, MAP_SHARED, fd, 0);
- if (vaddr == MAP_FAILED) {
- LOGE("Error mapping the framebuffer (%s)", strerror(errno));
- return -errno;
- }
- module->framebuffer->base = intptr_t(vaddr);
- memset(vaddr, 0, fbSize);
1.2 grDev设备符
在为framebuffer,也就是FramebufferNativeWindow申请内存之前,我们还要介绍一个概念,就是grDev设备符。它虽然也叫设备符,但是它和具体的设备没有直接关系,我们看它的类型就是知道了alloc_device_t,没错,grDev设备符就是为了FramebufferNativeWindow管理内存使用的。为FramebufferNativeWindow提供了申请/释放内存的接口。
1.3 FramebufferNativeWindow内存管理
- sp<NativeBuffer> buffers[2];
1.3.1 屏幕设备支持page filp模式
- // create a "fake" handles for it
- intptr_t vaddr = intptr_t(m->framebuffer->base);
- private_handle_t* hnd = new private_handle_t(dup(m->framebuffer->fd), size,
- private_handle_t::PRIV_FLAGS_USES_PMEM |
- private_handle_t::PRIV_FLAGS_FRAMEBUFFER);
- // find a free slot
- for (uint32_t i=0 ; i<numBuffers ; i++) {
- if ((bufferMask & (1LU<<i)) == 0) {
- m->bufferMask |= (1LU<<i);
- break;
- }
- vaddr += bufferSize;
- }
- hnd->base = vaddr;
- hnd->offset = vaddr - intptr_t(m->framebuffer->base);
- *pHandle = hnd;
1.3.2 屏幕设备不支持page flip模式
gralloc_alloc_framebuffer_locked()@hardware/msm7k/libgralloc-qsd8k/gpu.cpp
- const uint32_t bufferMask = m->bufferMask;
- const uint32_t numBuffers = m->numBuffers;
- const size_t bufferSize = m->finfo.line_length * m->info.yres;
- if (numBuffers == 1) {
- // If we have only one buffer, we never use page-flipping. Instead,
- // we return a regular buffer which will be memcpy'ed to the main
- // screen when post is called.
- int newUsage = (usage & ~GRALLOC_USAGE_HW_FB) | GRALLOC_USAGE_HW_2D;
- return gralloc_alloc_buffer(bufferSize, newUsage, pHandle);
- }
2. 打开Overlay
- if (hw_get_module(OVERLAY_HARDWARE_MODULE_ID, &module) == 0) {
- overlay_control_open(module, &mOverlayEngine);
- }
3. 选择OpenGL ES library(也即软/硬件加速)
- 0 0 android
- 0 1 adreno200
- libGLESv1_CM_adreno200.so
- libGLESv2_adreno200.so
- libEGL_adreno200.so
3.1 OpenGL初始化
frameworks/base/opengl/libs/EGL/egl.cpp
- static egl_connection_t gEGLImpl[IMPL_NUM_IMPLEMENTATIONS];
- enum {
- IMPL_HARDWARE = 0,
- IMPL_SOFTWARE,
- IMPL_NUM_IMPLEMENTATIONS
- };
- libGLESv1_CM_adreno200.so
- libGLESv2_adreno200.so
- libEGL_adreno200.so
3.2 EGL和GLES api
- enum {
- EGL = 0x01,
- GLESv1_CM = 0x02,
- GLESv2 = 0x04
- };

3.3.1 系统默认pixel format
- if(info.bits_per_pixel == 32) {
- /*
- * Explicitly request RGBA_8888
- */
- /* Note: the GL driver does not have a r=8 g=8 b=8 a=0 config, so if we do
- * not use the MDP for composition (i.e. hw composition == 0), ask for
- * RGBA instead of RGBX. */
- if (property_get("debug.sf.hw", property, NULL) > 0 && atoi(property) == 0)
- module->fbFormat = HAL_PIXEL_FORMAT_RGBX_8888;
- else if(property_get("debug.composition.type", property, NULL) > 0 && (strncmp(property, "mdp", 3) == 0))
- module->fbFormat = HAL_PIXEL_FORMAT_RGBX_8888;
- else
- module->fbFormat = HAL_PIXEL_FORMAT_RGBA_8888;
- } else {
- /*
- * Explicitly request 5/6/5
- */
- module->fbFormat = HAL_PIXEL_FORMAT_RGB_565;
- }
3.3.2 config初始化
所有的OpenGL库提供的config,同样需要将软硬两种模式的各自的OpenGL config提取出来供系统使用,如同OpenGL api地址一样。OpenGL config提取出来后保存在另外一个全局变量- static egl_display_t gDisplay[NUM_DISPLAYS];
- // EGLDisplay are global, not attached to a given thread
- const unsigned int NUM_DISPLAYS = 1;
- <strong> </strong> // sort our configurations so we can do binary-searches
- qsort( dp->configs,
- dp->numTotalConfigs,
- sizeof(egl_config_t), cmp_configs);<strong>
- </strong>
3.3.3 config选择
3.3.3.1 满足属性要求
- // initialize EGL
- EGLint attribs[] = {
- EGL_SURFACE_TYPE, EGL_WINDOW_BIT,
- EGL_NONE, 0,
- EGL_NONE
- };
3.3.3.2 满足RGBA要求
- static GGLFormat const gPixelFormatInfos[] =
- { // Alpha Red Green Blue
- { 0, 0, {{ 0, 0, 0, 0, 0, 0, 0, 0 }}, 0 }, // PIXEL_FORMAT_NONE
- { 4, 32, {{32,24, 8, 0, 16, 8, 24,16 }}, GGL_RGBA }, // PIXEL_FORMAT_RGBA_8888
- EGLConfig* const configs = (EGLConfig*)malloc(sizeof(EGLConfig)*numConfigs);
- if (eglChooseConfig(dpy, attrs, configs, numConfigs, &n) == EGL_FALSE) {
- free(configs);
- return BAD_VALUE;
- }
- const int fbSzA = fbFormatInfo.getSize(PixelFormatInfo::INDEX_ALPHA);
- const int fbSzR = fbFormatInfo.getSize(PixelFormatInfo::INDEX_RED);
- const int fbSzG = fbFormatInfo.getSize(PixelFormatInfo::INDEX_GREEN);
- const int fbSzB = fbFormatInfo.getSize(PixelFormatInfo::INDEX_BLUE);
- int i;
- EGLConfig config = NULL;
- for (i=0 ; i<n ; i++) {
- EGLint r,g,b,a;
- EGLConfig curr = configs[i];
- eglGetConfigAttrib(dpy, curr, EGL_RED_SIZE, &r);
- eglGetConfigAttrib(dpy, curr, EGL_GREEN_SIZE, &g);
- eglGetConfigAttrib(dpy, curr, EGL_BLUE_SIZE, &b);
- eglGetConfigAttrib(dpy, curr, EGL_ALPHA_SIZE, &a);
- if (fbSzA <= a && fbSzR <= r && fbSzG <= g && fbSzB <= b) {
- config = curr;
- break;
- }
- }
4. 创建main surface
5. 创建 OpenGL ES 上下文
An OpenGL context represents many things. A context stores all of the state associated with this instance of OpenGL. It represents the (potentially visible) default framebufferthat rendering commands will draw to when not drawing to a framebuffer object. Think of a context as an object that holds all of OpenGL; when a context is destroyed, OpenGL is destroyed.
http://www.opengl.org/wiki/OpenGL_context
具体的创建过程专业术语太多,也没有仔细研究不再介绍。
6. 绑定context和surface
6.1 多线程支持
- ogles_context_t* current = (ogles_context_t*)getGlThreadSpecific();
- if (gl) {
- egl_context_t* c = egl_context_t::context(gl);
- if (c->flags & egl_context_t::IS_CURRENT) {
- if (current != gl) {
- // it is an error to set a context current, if it's already
- // current to another thread
- return -1;
- }
- } else {
- if (current) {
- // mark the current context as not current, and flush
- glFlush();
- egl_context_t::context(current)->flags &= ~egl_context_t::IS_CURRENT;
- }
- }
- if (!(c->flags & egl_context_t::IS_CURRENT)) {
- // The context is not current, make it current!
- setGlThreadSpecific(gl);
- c->flags |= egl_context_t::IS_CURRENT;
- }
- // cur_c has to be valid here (but could be terminated)
- if (ctx != EGL_NO_CONTEXT) {
- setGlThreadSpecific(c->cnx->hooks[c->version]);
- setContext(ctx);
- _c.acquire();
- } else {
- setGlThreadSpecific(&gHooksNoContext);
- setContext(EGL_NO_CONTEXT);
- }
6.2 设置surface和context之间的关系
- // Unbind the context from this thread
- eglMakeCurrent(display, EGL_NO_SURFACE, EGL_NO_SURFACE, EGL_NO_CONTEXT);
- // initialize primary screen
- // (other display should be initialized in the same manner, but
- // asynchronously, as they could come and go. None of this is supported
- // yet).
- const GraphicPlane& plane(graphicPlane(dpy));
- const DisplayHardware& hw = plane.displayHardware();
- const uint32_t w = hw.getWidth();
- const uint32_t h = hw.getHeight();
- const uint32_t f = hw.getFormat();
- hw.makeCurrent();
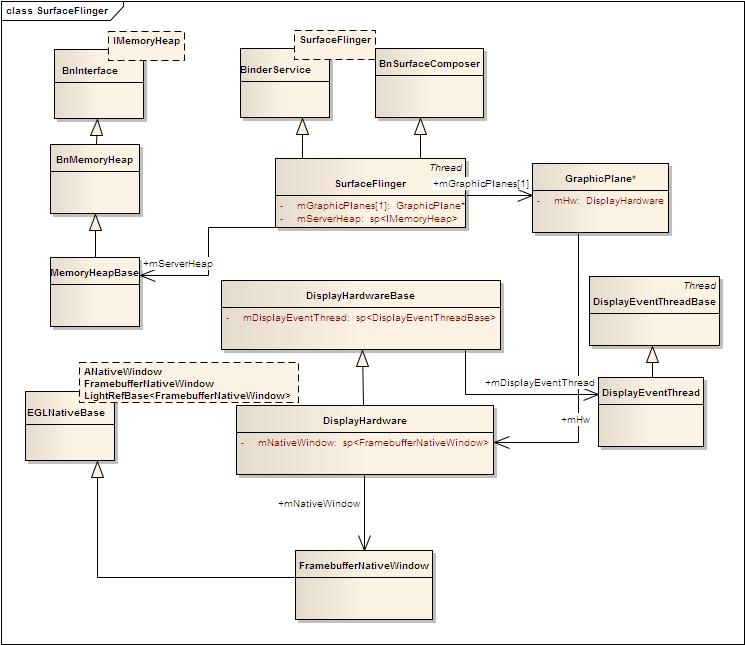
下图为这个图形系统的类图结构。
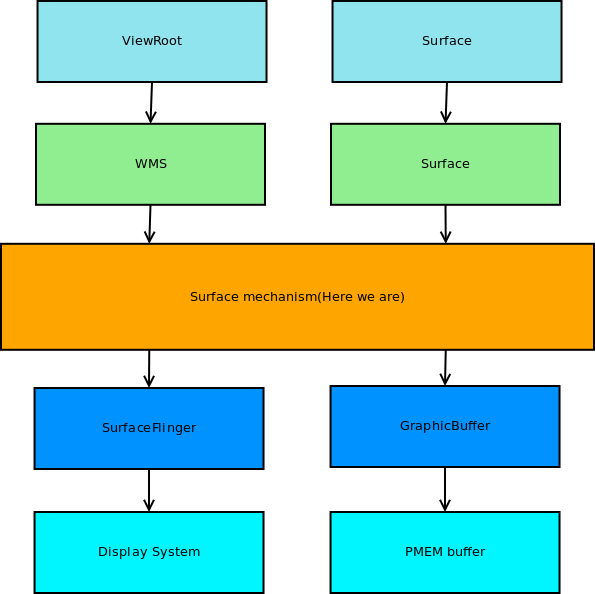
接下来研究一下framework是如何与surfaceflinger进行业务交互的。
1)如何创建surface
2)如何显示窗口等等
所有的这一切都是通过系统服务WindowManagerService与surfaceflinger来进行的。
Android中的Surface机制这一块代码写的比较难理解,光叫Surface的类就有3个,因此本篇文章从两部分来分析。
首先,想要理解Surface机制,还是需要首先理清各个类之间的关系。
其次,在理解了整个Surface机制的类关系之后,到时我们再结合前一篇文章中对显示系统的介绍,研究一下一个Surface是如何和显示系统建立起联系来的,这个联系主要是指Surface的显示buffer的存储管理。
在下篇文章中,再分析SurfaceFlinger是如何将已经存储了窗口图形数据的Surface Buffer显示到显示系统中。
1. Surface机制的静态关系
将这一部分叫做Surface机制,是有别于SurfaceFlinger而言的,android的图形系统中,作为C/S模型两端的WMS和SurfaceFlinger是图形系统业务的核心,但是不把WMS和SurfaceFlinger中间的这层联系搞清楚的话,是很难理解整个图形系统的,在本文中我将两者之间的这个联系关系称之为Surface机制,它的主要任务就是创建一个Surface,ViewRoot在这个Surface上描绘当前的窗口,SurfaceFlinger将这个Surface flinger(扔)给显示系统将其呈现在硬件设备上。其实这里这个Surface在不同的模块中是以不同的形态存在的,唯一不变的就是其对应的显示Buffer。
1.1 ViewRoot和WMS共享Surface
我们知道每个Activity都会有一个ViewRootImpl作为Activity Window与WMS交互的接口,ViewRootImpl会绘制整个Activity的窗口View到Surface上,因此我们在ViewRootImpl中就有了创建Surface的需求。看一下代码中的Surface的定义:
ViewRootImpl.java
- // These can be accessed by any thread, must be protected with a lock.
- // Surface can never be reassigned or cleared (use Surface.clear()).
- private final Surface mSurface = new Surface();
Surface(SurfaceTexture surfaceTexture)@Surface.java
- /**
- * Create Surface from a {@link SurfaceTexture}.
- *
- * Images drawn to the Surface will be made available to the {@link
- * SurfaceTexture}, which can attach them an OpenGL ES texture via {@link
- * SurfaceTexture#updateTexImage}.
- *
- * @param surfaceTexture The {@link SurfaceTexture} that is updated by this
- * Surface.
- */
- public Surface(SurfaceTexture surfaceTexture) {
- if (DEBUG_RELEASE) {
- mCreationStack = new Exception();
- }
- mCanvas = new CompatibleCanvas();
- initFromSurfaceTexture(surfaceTexture);
- }
由上面可以看出在ViewRootImpl中定义的Surface只是一个空壳,那么真正的Surface是在哪里被初始化的呢?大管家WMS中!当ViewRootImpl请求WMS relayout时,会将ViewSurface中的Surface交给WMS初始化。在WMS中,对应每个WindowState对象,在relayout窗口时,同样会创建一个Surface,wms中的这个Surface会真正的初始化,然后再将这个WMS Surface复制给ViewRootImpl中的Surface。这么实现的目的就是保证ViewRootImpl和WMS共享同一个Surface。ViewRootImpl对Surface进行绘制,WMS对这个Surface进行初始化及管理。很和谐!
relayoutWindow@ViewRootImpl.java
- private int relayoutWindow(WindowManager.LayoutParams params, int viewVisibility,
- boolean insetsPending) throws RemoteException {
- ...
- int relayoutResult = sWindowSession.relayout(
- mWindow, mSeq, params,
- (int) (mView.getMeasuredWidth() * appScale + 0.5f),
- (int) (mView.getMeasuredHeight() * appScale + 0.5f),
- viewVisibility, insetsPending, mWinFrame,
- mPendingContentInsets, mPendingVisibleInsets,
- mPendingConfiguration, mSurface);
- //Log.d(TAG, "<<<<<< BACK FROM relayout");
- if (restore) {
- params.restore();
- }
- if (mTranslator != null) {
- mTranslator.translateRectInScreenToAppWinFrame(mWinFrame);
- mTranslator.translateRectInScreenToAppWindow(mPendingContentInsets);
- mTranslator.translateRectInScreenToAppWindow(mPendingVisibleInsets);
- }
- return relayoutResult;
- }
relayoutWindow()@WindowManagerService.java
- public int relayoutWindow(Session session, IWindow client, int seq,
- WindowManager.LayoutParams attrs, int requestedWidth,
- int requestedHeight, int viewVisibility, boolean insetsPending,
- Rect outFrame, Rect outContentInsets, Rect outVisibleInsets,
- Configuration outConfig, Surface outSurface) {
- boolean displayed = false;
- boolean inTouchMode;
- boolean configChanged;
- // if they don't have this permission, mask out the status bar bits
- synchronized(mWindowMap) {
- WindowState win = windowForClientLocked(session, client, false);
- if (viewVisibility == View.VISIBLE &&
- (win.mAppToken == null || !win.mAppToken.clientHidden)) {
- displayed = !win.isVisibleLw();
- ...
- try {
- Surface surface = win.createSurfaceLocked();
- if (surface != null) {
- outSurface.copyFrom(surface);
- win.mReportDestroySurface = false;
- win.mSurfacePendingDestroy = false;
- if (SHOW_TRANSACTIONS) Slog.i(TAG,
- " OUT SURFACE " + outSurface + ": copied");
- } else {
- // For some reason there isn't a surface. Clear the
- // caller's object so they see the same state.
- outSurface.release();
- }
- } catch (Exception e) {
- mInputMonitor.updateInputWindowsLw(true /*force*/);
- Slog.w(TAG, "Exception thrown when creating surface for client "
- + client + " (" + win.mAttrs.getTitle() + ")",
- e);
- Binder.restoreCallingIdentity(origId);
- return 0;
- }
- ...
- }
- }
1.2 SurfaceSession
SurfaceSession可以认为是创建Surface过程中,WMS和SurfaceFlinger之间的会话层,通过这个SurfaceSession实现了Surface的创建。
一个SurfaceSession表示一个到SurfaceFlinger的连接,通过它可以创建一个或多个Surface实例。

SurfaceSession是JAVA层的概念,@SurfaceSession.java。它对应的native实体是一个SurfaceComposerClient对象。
SurfaceComposerClient通过ComposerService类来获得SurfaceFlinger的IBinder接口ISurfaceComposer,但是光获得SurfaceFlinger的IBinder接口是不够的,要想请求SurfaceFlinger创建一个Surface,还需要向SurfaceFlinger获得一个IBinder接口ISurfaceComposerClient,通过这个ISurfaceComposerClient来请求SurfaceFlinger创建一个Surface,为什么这么绕呢,为什么不直接让SurfaceFlinger创建Surface呢?
站在SurfaceFlinger的角度来考虑,对于SurfaceFlinger来说,可能有多个Client来请求SurfaceFlinger的业务,每个Client可能会请求SurfaceFlinger创建多个Surface,那么SurfaceFlinger本地需要提供一套机制来保存每个client请求创建的Surface,SurfaceFlinger通过为每个client创建一个Client对象实现这个机制,并将这个Client的IBinder接口ISurfaceComposerClient返给SurfaceComposerClient对象。SurfaceComposerClient对象在通过ISurfaceComposerClient去请求创建Surface(ISurfaceComposerClient的功能只有创建和销毁Surface)。
@SurfaceFlinger.h
- class Client : public BnSurfaceComposerClient
- class SurfaceFlinger :
- public BinderService<SurfaceFlinger>,
- public BnSurfaceComposer,
- public IBinder::DeathRecipient,
- protected Thread
@SurfaceComposerClient.cpp
- void SurfaceComposerClient::onFirstRef() {
- sp<ISurfaceComposer> sm(getComposerService());
- if (sm != 0) {
- sp<ISurfaceComposerClient> conn = sm->createConnection();
- if (conn != 0) {
- mClient = conn;
- mStatus = NO_ERROR;
- }
- }
- }
在SurfaceFlinger中对应的执行代码为:
- sp<ISurfaceComposerClient> SurfaceFlinger::createConnection()
- {
- sp<ISurfaceComposerClient> bclient;
- sp<Client> client(new Client(this));
- status_t err = client->initCheck();
- if (err == NO_ERROR) {
- bclient = client;
- }
- return bclient;
- }
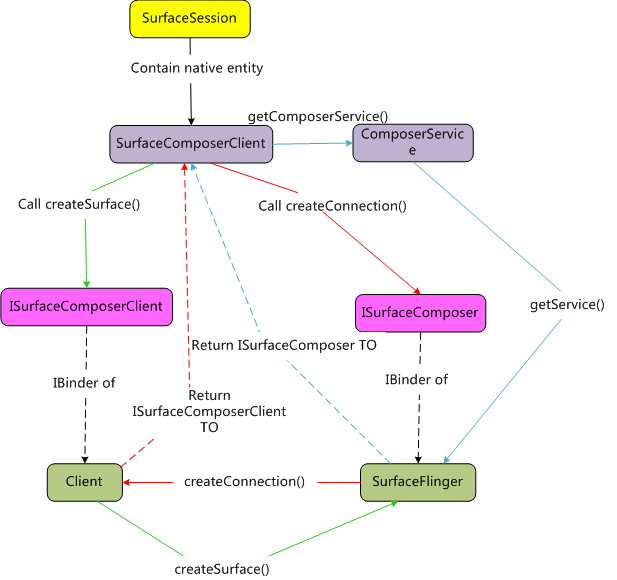
下图描述了整个SurfaceSession的内部结构与工作流程。
蓝色箭头是SurfaceComposerClient通过ComposerService获得SurfaceFlinger的IBinder接口ISurfaceComposer过程;
红色箭头表示SurfaceComposerClient通过IPC请求SurfaceFlinger创建Client的过程,并获得Client的IBinder接口ISurfaceComposerClient;
绿色箭头表示SurfaceComposerClient通过IPC请求Client创建Surface。
1.3 Surface的形态
上一节我们分析了SurfaceSession的静态结构,得知Surface的创建过程是通过SurfaceSession这个中间会话层去请求SurfaceFlinger去创建的,并且这篇文章中,我们说了半天Surface了,那么究竟我们要创建的Surface究竟是什么样的一个东西呢,它的具体形态是什么呢?这一小节我们就来分析以下Surface的形态。
1.3.1 client端Surface的形态
首先,我们看一下Surface在WMS中定义的代码
createSurfaceLocked()@WindowState.java
- Surface createSurfaceLocked() {
- if (mSurface == null) {
- ...
- try {
- final boolean isHwAccelerated = (mAttrs.flags &
- WindowManager.LayoutParams.FLAG_HARDWARE_ACCELERATED) != 0;
- final int format = isHwAccelerated ? PixelFormat.TRANSLUCENT : mAttrs.format;
- if (!PixelFormat.formatHasAlpha(mAttrs.format)) {
- flags |= Surface.OPAQUE;
- }
- mSurface = new Surface(
- mSession.mSurfaceSession, mSession.mPid,
- mAttrs.getTitle().toString(),
- 0, w, h, format, flags);
- if (SHOW_TRANSACTIONS || SHOW_SURFACE_ALLOC) Slog.i(WindowManagerService.TAG,
- " CREATE SURFACE "
- + mSurface + " IN SESSION "
- + mSession.mSurfaceSession
- + ": pid=" + mSession.mPid + " format="
- + mAttrs.format + " flags=0x"
- + Integer.toHexString(flags)
- + " / " + this);
- }
- ...
- }
- return mSurface;
- }
我们可以看到,它将SurfaceSession对象当作参数传递给了Surface的构造函数。往下看Surface的构造函数。
@Surface.java
- /** create a surface with a name @hide */
- public Surface(SurfaceSession s,
- int pid, String name, int display, int w, int h, int format, int flags)
- throws OutOfResourcesException {
- if (DEBUG_RELEASE) {
- mCreationStack = new Exception();
- }
- mCanvas = new CompatibleCanvas();
- init(s,pid,name,display,w,h,format,flags);
- mName = name;
- }
这个构造函数,不同于我们在ViewRootImpl中看到的Surface的构造函数,这个构造函数并不是一个空壳,它做了本地实体的初始化工作,因此这个Surface才是一个真正的Suface。
Native函数init(Surface_init@android_view_Surface.cpp)会调到SurfaceComposerClient::createSurface,再向下的过程在上一节的图中描述很清楚了,在此不作介绍了。同时,先不管SurfaceFlinger为SurfaceComposerClient创建的Surface到底是一个什么东西,我们先看看SurfaceComposerClient为WMS创建的是一个什么东西?
@SurfaceComposerClient.cpp
- sp<SurfaceControl> SurfaceComposerClient::createSurface(
- const String8& name,
- DisplayID display,
- uint32_t w,
- uint32_t h,
- PixelFormat format,
- uint32_t flags)
- {
- sp<SurfaceControl> result;
- if (mStatus == NO_ERROR) {
- ISurfaceComposerClient::surface_data_t data;
- sp<ISurface> surface = mClient->createSurface(&data, name, //mClient为BpSurfaceComposerClient
- display, w, h, format, flags);
- if (surface != 0) {
- result = new SurfaceControl(this, surface, data);
- }
- }
- return result;
- }
从上面的代码我们可以看出,SurfaceComposerClient为WMS返回的是一个SurfaceControl对象,这个SurfaceControl对象包含了surfaceFlinger为SurfaceComposerClient创建的surface,这个surfaceFlinge创建的Surface在Client端的形态为ISurface。这个过程下面分析SurfaceFlinger端的Surface形态时会看到。
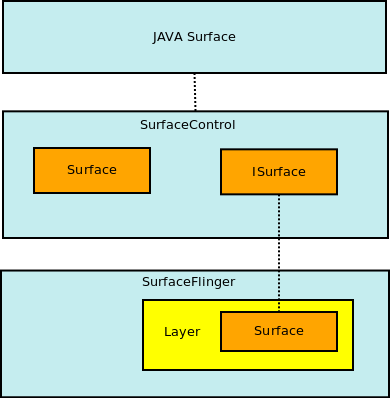
SurfaceControl类中还有一个非常重要的成员mSurfaceData<class Surface : public SurfaceTextureClient>,它的类型也叫做Surface,定义在frameworks/base/include/surfaceflinger/surface.h。这个Surface提供了显示Buffer的管理。在文章的后面再介绍。
@frameworks/base/libs/gui/Surface.cpp
- sp<Surface> SurfaceControl::getSurface() const
- {
- Mutex::Autolock _l(mLock);
- if (mSurfaceData == 0) {
- sp<SurfaceControl> surface_control(const_cast<SurfaceControl*>(this));
- mSurfaceData = new Surface(surface_control);
- }
- return mSurfaceData;
- }
1.3.2 SurfaceFlinger端Surface形态
- sp<ISurface> SurfaceFlinger::createSurface(
- ISurfaceComposerClient::surface_data_t* params,
- const String8& name,
- const sp<Client>& client,
- DisplayID d, uint32_t w, uint32_t h, PixelFormat format,
- uint32_t flags)
- {
- sp<LayerBaseClient> layer;
- sp<ISurface> surfaceHandle;
- if (int32_t(w|h) < 0) {
- LOGE("createSurface() failed, w or h is negative (w=%d, h=%d)",
- int(w), int(h));
- return surfaceHandle;
- }
- //LOGD("createSurface for pid %d (%d x %d)", pid, w, h);
- sp<Layer> normalLayer;
- switch (flags & eFXSurfaceMask) {
- case eFXSurfaceNormal:
- normalLayer = createNormalSurface(client, d, w, h, flags, format);
- layer = normalLayer;
- break;
- case eFXSurfaceBlur:
- // for now we treat Blur as Dim, until we can implement it
- // efficiently.
- case eFXSurfaceDim:
- layer = createDimSurface(client, d, w, h, flags);
- break;
- case eFXSurfaceScreenshot:
- layer = createScreenshotSurface(client, d, w, h, flags);
- break;
- }
- if (layer != 0) {
- layer->initStates(w, h, flags);
- layer->setName(name);
- ssize_t token = addClientLayer(client, layer);
- surfaceHandle = layer->getSurface();
- if (surfaceHandle != 0) {
- params->token = token;
- params->identity = layer->getIdentity();
- if (normalLayer != 0) {
- Mutex::Autolock _l(mStateLock);
- mLayerMap.add(layer->getSurfaceBinder(), normalLayer);
- }
- }
- setTransactionFlags(eTransactionNeeded);
- }
- return surfaceHandle;
- }
当client请求SurfaceFlinger创建Surface时,SurfaceFlinger首先根据WMS提供的窗口的属性来一个命名为Layer概念的对象,然后再根据Layer创建它的子类对象LayerBaseClient::BSurface。此时第三个名为Surface(BSurface)类出现了,下一节我们来介绍一下这个Layer的概念。
1.4 Layer
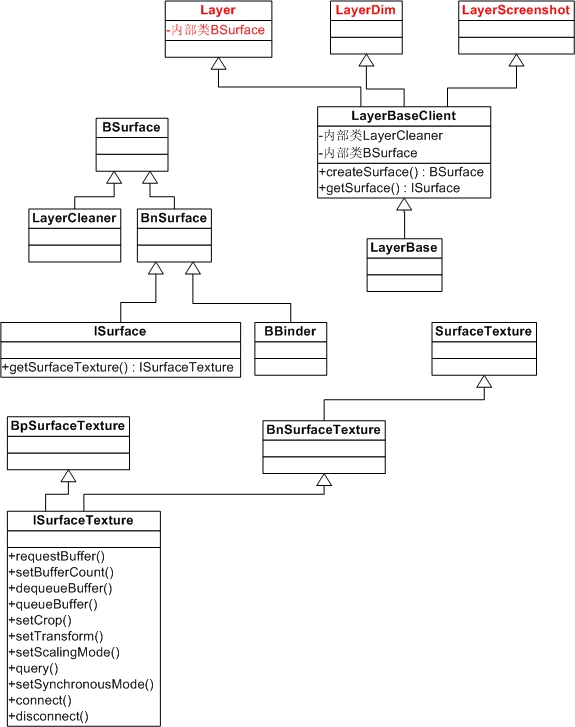
1.4.1 Layer的分类
目前,android4.0中有3中Layer类型,如上图所示。
1. Layer, 普通的Layer,它为每个Client端请求的Surface创建显示Buffer。
2. LayerDim,这种Layer不会创建显示Buffer,它只是将通过这个Layer将原来FrameBuffer上的数据进行暗淡处理;
3. LayerScreenshot,这种Layer不会创建显示Buffer,它只是将通过这个Layer将原来FrameBuffer上的数据进行抓取;
从这些Layer看出,我们分析的重点就是第一种Layer,下面我们着重分析一下普通的Layer。Layer的具体业务我们在下一篇文章中分析
1.4.2 Layer的管理
上文我们在分析SurfaceSession的时候,也分析过,一个Client可能会创建多个Surface,也就是要创建多个Layer,那么SurfaceFlinger端如何管理多个Layer呢?SurfaceFlinger维护了3个Vector来管理Layer<Client: DefaultKeyedVector< size_t, wp<LayerBaseClient> > mLayers;SurfaceFlinger:LayerVector layersSortedByZ;>。
第一种方式,我们知道SurfaceFlinger会为每个SurfaceSession创建一个Client对象,这第一种方式就是将所有为某一个SurfacSession创建的Layer保存在它对应的Client对象中。
SurfaceFlinger::createSurface()@SurfaceFlinger.cpp,调用路径如下:
SurfaceFlinger::addClientLayer->
client->attachLayer(lbc)->
mLayers.add(name, layer);
第二种方式,在SurfaceFlinger中以排序的方式保存下来。其调用路径如下:
SurfaceFlinger::addClientLayer->
SurfaceFlinger::addLayer_l->
mCurrentState.layersSortedByZ.add(layer)
第三种方式,将所有的创建的普通的Layer保存起来,以便Client Surface在请求实现Buffer时能够辨识Client Surface对应的Layer。
SurfaceFlinger::createSurface()@SurfaceFlinger.cpp
- surfaceHandle = layer->getSurface();
- if (surfaceHandle != 0) {
- params->token = token;
- params->identity = layer->getIdentity();
- if (normalLayer != 0) {
- Mutex::Autolock _l(mStateLock);
- mLayerMap.add(layer->getSurfaceBinder(), normalLayer);
- }
- }
2. Surface 显示Buffer的存储管理
在前文介绍Client端的Surface形态的内容时,我们提到SurfaceControl中还会维护一个名为Surface对象,它定义在 frameworks/base/libs/surfaceflinger/Surface.h中,它负责向LayerBaseClient::BSurface请求显示Buffer,同时将显示Buffer交给JAVA Surface的Canvas去绘制窗口,我们称这个Surface为Client Surface。
2.1 窗口绘制
draw()@ViewRoot.java
- Canvas canvas;
- try {
- int left = dirty.left;
- int top = dirty.top;
- int right = dirty.right;
- int bottom = dirty.bottom;
- final long lockCanvasStartTime;
- if (ViewDebug.DEBUG_LATENCY) {
- lockCanvasStartTime = System.nanoTime();
- }
- canvas = surface.lockCanvas(dirty);
- if (ViewDebug.DEBUG_LATENCY) {
- long now = System.nanoTime();
- Log.d(TAG, "Latency: Spent "
- + ((now - lockCanvasStartTime) * 0.000001f)
- + "ms waiting for surface.lockCanvas()");
- }
- if (left != dirty.left || top != dirty.top || right != dirty.right ||
- bottom != dirty.bottom) {
- mAttachInfo.mIgnoreDirtyState = true;
- }
- // TODO: Do this in native
- canvas.setDensity(mDensity);
上面的代码显示,JAVA Surface 会lock canvas。而Client Surface的创建就在这个过程中,即下面代码中的第一行getSurface().我们先不管Client Surface的创建,先看看Canvas是如何与Client Surface的显示Buffer关联的。
Surface_lockCanvas@android_view_Surface.cpp
- static jobject Surface_lockCanvas(JNIEnv* env, jobject clazz, jobject dirtyRect)
- {
- const sp<Surface>& surface(getSurface(env, clazz));
- if (!Surface::isValid(surface)) {
- doThrowIAE(env);
- return 0;
- }
- // get dirty region
- Region dirtyRegion;
- if (dirtyRect) {
- Rect dirty;
- dirty.left = env->GetIntField(dirtyRect, ro.l);
- dirty.top = env->GetIntField(dirtyRect, ro.t);
- dirty.right = env->GetIntField(dirtyRect, ro.r);
- dirty.bottom= env->GetIntField(dirtyRect, ro.b);
- if (!dirty.isEmpty()) {
- dirtyRegion.set(dirty);
- }
- } else {
- dirtyRegion.set(Rect(0x3FFF,0x3FFF));
- }
- Surface::SurfaceInfo info;
- status_t err = surface->lock(&info, &dirtyRegion);
- if (err < 0) {
- const char* const exception = (err == NO_MEMORY) ?
- OutOfResourcesException :
- "java/lang/IllegalArgumentException";
- jniThrowException(env, exception, NULL);
- return 0;
- }
- // Associate a SkCanvas object to this surface
- jobject canvas = env->GetObjectField(clazz, so.canvas);
- env->SetIntField(canvas, co.surfaceFormat, info.format);
- SkCanvas* nativeCanvas = (SkCanvas*)env->GetIntField(canvas, no.native_canvas);
- SkBitmap bitmap;
- ssize_t bpr = info.s * bytesPerPixel(info.format);
- bitmap.setConfig(convertPixelFormat(info.format), info.w, info.h, bpr);
- if (info.format == PIXEL_FORMAT_RGBX_8888) {
- bitmap.setIsOpaque(true);
- }
- if (info.w > 0 && info.h > 0) {
- bitmap.setPixels(info.bits);
- } else {
- // be safe with an empty bitmap.
- bitmap.setPixels(NULL);
- }
- nativeCanvas->setBitmapDevice(bitmap);
- SkRegion clipReg;
- if (dirtyRegion.isRect()) { // very common case
- const Rect b(dirtyRegion.getBounds());
- clipReg.setRect(b.left, b.top, b.right, b.bottom);
- } else {
- size_t count;
- Rect const* r = dirtyRegion.getArray(&count);
- while (count) {
- clipReg.op(r->left, r->top, r->right, r->bottom, SkRegion::kUnion_Op);
- r++, count--;
- }
- }
- nativeCanvas->clipRegion(clipReg);
- int saveCount = nativeCanvas->save();
- env->SetIntField(clazz, so.saveCount, saveCount);
- if (dirtyRect) {
- const Rect& bounds(dirtyRegion.getBounds());
- env->SetIntField(dirtyRect, ro.l, bounds.left);
- env->SetIntField(dirtyRect, ro.t, bounds.top);
- env->SetIntField(dirtyRect, ro.r, bounds.right);
- env->SetIntField(dirtyRect, ro.b, bounds.bottom);
- }
- return canvas;
- }
上面的代码,我们可以看出,Canvas的Bitmap设备设置了Client Surface的显示Buffer为其Bitmap pixel存储空间。
- bitmap.setPixels(info.bits);
这样Canvas的绘制空间就有了。下一步就该绘制窗口了。
draw()@ViewRootImpl.java
- try {
- canvas.translate(0, -yoff);
- if (mTranslator != null) {
- mTranslator.translateCanvas(canvas);
- }
- canvas.setScreenDensity(scalingRequired
- ? DisplayMetrics.DENSITY_DEVICE : 0);
- mAttachInfo.mSetIgnoreDirtyState = false;
- mView.draw(canvas);
- }
其中ViewRootImpl中的mView为整个窗口的View。它将Render自己和所有它的子View。
2.2 Client Surface的初始化(SurfaceControl中的Surface)
Client Surface的创建是从ViewRootImpl首次Lock canvas时进行的,这么做的目的可能也是为了节约空间,减少不必要的开支。
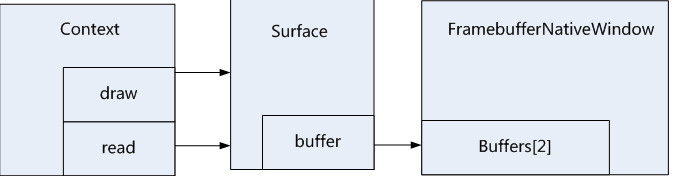
Client Surface的初始化和显示Buffer的管理过程比较复杂,下图给出了这一部分的一个静态结构图,有些东西从图上表现不出来,下面我简单的介绍一下。


 759
759

 被折叠的 条评论
为什么被折叠?
被折叠的 条评论
为什么被折叠?
 到【灌水乐园】发言


