


目前,已有众多开源 RAG 框架可供开发者作为经验指导,帮助他们轻松构建出色的问答系统、对话模型等智能应用。这些开源框架不仅降低了入门门槛,还为定制和扩展提供了坚实的基础。它们的特性、底层机制以及如何驱动现代 AI 应用都是值得研究的重要课题。
在本文中,我们将探索Kotaemon,这是一个创新的开源检索增强生成 (RAG) 框架,截至 2024 年 9 月 13 日,它在 GitHub 上已有 11.5K 颗星。
为了更深入的了解其核心技术,我分析了它的项目结构和代码,从而产生了这篇文章。
无论您是希望构建自定义 RAG 管道的开发人员,还是寻求无缝 QA 界面的最终用户,kotaemon 都能提供强大、灵活且用户友好的平台。让我们深入了解 kotaemon 如何改变文档 QA 的游戏规则。
本文的架构如图1所示。
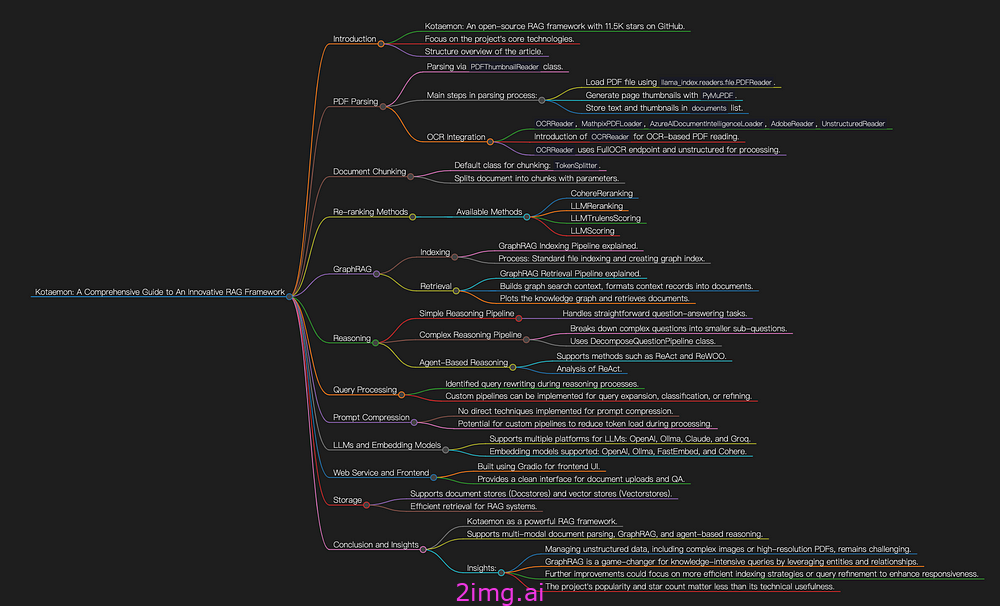
图 1:本文概述。图片由作者提供。
PDF 解析
PDF 文件作为非结构化文档的典型示例,在我看来是 RAG 管道解析过程中最关键的组件。因此,本文将首先关注 kotaemon 如何处理 PDF 解析。
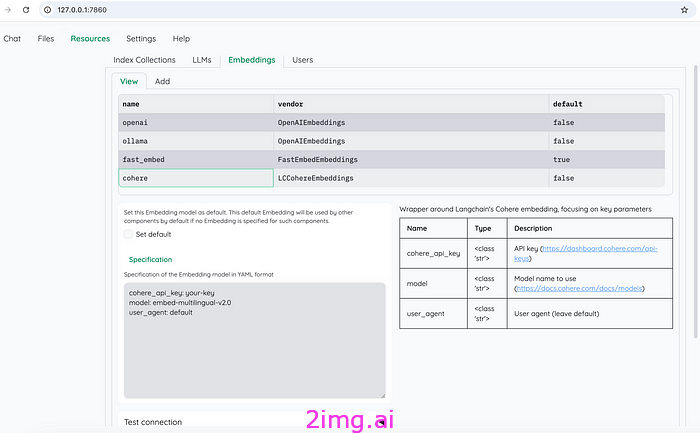
图 2:文件上传界面。作者截图。
当通过此接口上传PDF文件时,会触发load_data里面的函数class PDFThumbnailReader(PDFReader),以下是代码。
class PDFThumbnailReader(PDFReader):
    """PDF parser with thumbnail for each page."""

    def __init__(self) -> None:
        """
        Initialize PDFReader.
        """
        super().__init__(return_full_document=False)

    def load_data(
        self,
        file: Path,
        extra_info: Optional[Dict] = None,
        fs: Optional[AbstractFileSystem] = None,
    ) -> List[Document]:
        """Parse file."""
        documents = super().load_data(file, extra_info, fs)

        page_numbers_str = []
        filtered_docs = []
        is_int_page_number: dict[str, bool] = {}

        for doc in documents:
            if "page_label" in doc.metadata:
                page_num_str = doc.metadata["page_label"]
                page_numbers_str.append(page_num_str)
                try:
                    _ = int(page_num_str)
                    is_int_page_number[page_num_str] = True
                    filtered_docs.append(doc)
                except ValueError:
                    is_int_page_number[page_num_str] = False
                    continue

        documents = filtered_docs
        page_numbers = list(range(len(page_numbers_str)))

        print("Page numbers:", len(page_numbers))
        page_thumbnails = get_page_thumbnails(file, page_numbers)

        documents.extend(
            [
                Document(
                    text="Page thumbnail",
                    metadata={
                        "image_origin": page_thumbnail,
                        "type": "thumbnail",
                        "page_label": page_number,
                        **(extra_info if extra_info is not None else {}),
                    },
                )
                for (page_thumbnail, page_number) in zip(
                    page_thumbnails, page_numbers_str
                )
                if is_int_page_number[page_number]
            ]
        )

        return documents
主要步骤如下:
- 加载 PDF 文件
load_data:PDF 文本提取是通过中的函数进行的llama_index.readers.file.PDFReader。正如我之前的文章中提到的,llama_index 依赖pypdf来完成这项任务。 - 生成缩略图
get_page_thumbnails:对于每个页面,使用利用PyMuPDF (fitz)的函数创建一个缩略图。 - 存储数据:提取的文本、生成的缩略图以及任何相关元数据(例如页码、大小)都存储在名为的 Python 列表中
documents。 - 返回数据:最后
documents返回列表。
此外,如图3所示,该项目还提供了其他几种解析PDF的方法。
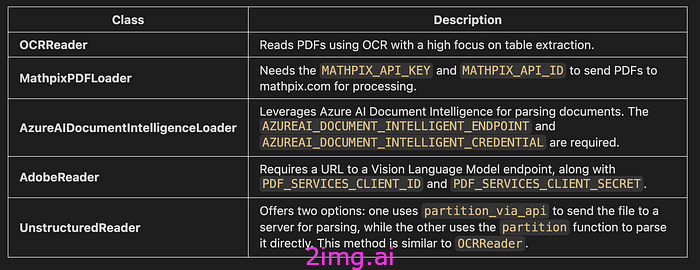
图 3:kotaemon 提供的附加文档加载器。图片由作者提供。
之前分析的class PDFThumbnailReader(PDFReader)似乎没有使用OCR模型。因此,我将介绍class OCRReader。
class OCRReader(BaseReader):
    """Read PDF using OCR, with high focus on table extraction

    Example:
        ```python
        >> from kotaemon.loaders import OCRReader
        >> reader = OCRReader()
        >> documents = reader.load_data("path/to/pdf")
        ```

    Args:
        endpoint: URL to FullOCR endpoint. If not provided, will look for
            environment variable `OCR_READER_ENDPOINT` or use the default
            `kotaemon.loaders.ocr_loader.DEFAULT_OCR_ENDPOINT`
            (http://127.0.0.1:8000/v2/ai/infer/)
        use_ocr: whether to use OCR to read text (e.g: from images, tables) in the PDF
            If False, only the table and text within table cells will be extracted.
    """

    def __init__(self, endpoint: Optional[str] = None, use_ocr=True):
        """Init the OCR reader with OCR endpoint (FullOCR pipeline)"""
        super().__init__()
        self.ocr_endpoint = endpoint or os.getenv(
            "OCR_READER_ENDPOINT", DEFAULT_OCR_ENDPOINT
        )
        self.use_ocr = use_ocr

    def load_data(
        self, file_path: Path, extra_info: Optional[dict] = None, **kwargs
    ) -> List[Document]:
        """Load data using OCR reader

        Args:
            file_path (Path): Path to PDF file
            debug_path (Path): Path to store debug image output
            artifact_path (Path): Path to OCR endpoints artifacts directory

        Returns:
            List[Document]: list of documents extracted from the PDF file
        """
        file_path = Path(file_path).resolve()

        # call the API from FullOCR endpoint
        if "response_content" in kwargs:
            # overriding response content if specified
            ocr_results = kwargs["response_content"]
        else:
            # call original API
            resp = tenacious_api_post(
                url=self.ocr_endpoint, file_path=file_path, table_only=not self.use_ocr
            )
            ocr_results = resp.json()["result"]

        debug_path = kwargs.pop("debug_path", None)
        artifact_path = kwargs.pop("artifact_path", None)

        # read PDF through normal reader (unstructured)
        pdf_page_items = read_pdf_unstructured(file_path)
        # merge PDF text output with OCR output
        tables, texts = parse_ocr_output(
            ocr_results,
            pdf_page_items,
            debug_path=debug_path,
            artifact_path=artifact_path,
        )
        extra_info = extra_info or {}

        # create output Document with metadata from table
        documents = [
            Document(
                text=strip_special_chars_markdown(table_text),
                metadata={
                    "table_origin": table_text,
                    "type": "table",
                    "page_label": page_id + 1,
                    **extra_info,
                },
                metadata_template="",
                metadata_seperator="",
            )
            for page_id, table_text in tables
        ]
        # create Document from non-table text
        documents.extend(
            [
                Document(
                    text=non_table_text,
                    metadata={"page_label": page_id + 1, **extra_info},
                )
                for page_id, non_table_text in texts
            ]
        )

return documents解析class OCRReaderPDF 时,首先使用我们自己的self.ocr_endpoint方法进行分析,然后unstructured.partition.auto.partition通过read_pdf_unstructured函数进行进一步处理。然后使用 合并两种方法的结果parse_ocr_output。
很明显,该类OCRReader继续依赖于非结构化库。
文档分块
一旦 PDF 被解析,文档就应该被分块。
默认情况下,kotaemon 使用进行class TokenSplitter分块。
class TokenSplitter(LlamaIndexDocTransformerMixin, BaseSplitter):
    def __init__(
        self,
        chunk_size: int = 1024,
        chunk_overlap: int = 20,
        separator: str = " ",
        **params,
    ):
        super().__init__(
            chunk_size=chunk_size,
            chunk_overlap=chunk_overlap,
            separator=separator,
            **params,
        )

    def _get_li_class(self):
        from llama_index.core.text_splitter import TokenTextSplitter

return TokenTextSplitter我们可以观察到,该类内部调用,通过指定、和llama_index.core.text_splitter.TokenTextSplitter等参数来分割文档。chunk_sizechunk_overlapseparator
重新排序
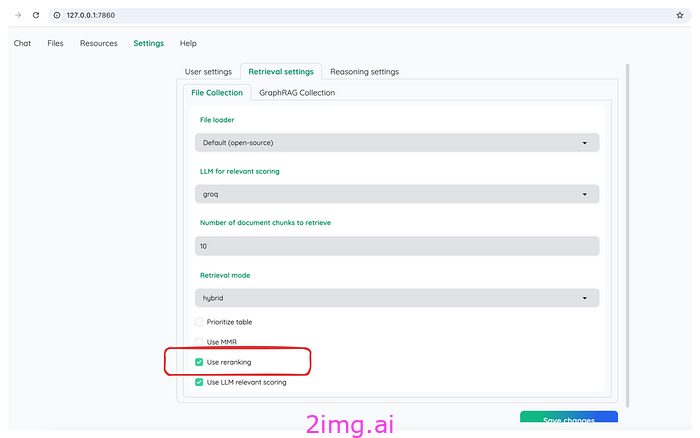
图 4:kotaemon 中的重新排名设置。作者截图。
Kotaemon 提供了四种重新排序算法:
- CohereReranking类:利用 Cohere API 进行重新排名。
- 类 LLMReranking:一个灵活的重新排序基类,提供使用 LLM 对检索到的结果进行重新排序的核心功能。此方法涉及调用 LLM 来执行指定的提示。
RERANK_PROMPT_TEMPLATE = """Given the following question and context,
return YES if the context is relevant to the question and NO if it isn't.

> Question: {question}
> Context:
>>>
{context}
>>>
> Relevant (YES / NO):"""- LLMTrulensScoring类:使用TruLens提示进行重新排名。
SYSTEM_PROMPT_TEMPLATE = PromptTemplate(
    """You are a RELEVANCE grader; providing the relevance of the given CONTEXT to the given QUESTION.
        Respond only as a number from 0 to 10 where 0 is the least relevant and 10 is the most relevant.

        A few additional scoring guidelines:

        - Long CONTEXTS should score equally well as short CONTEXTS.

        - RELEVANCE score should increase as the CONTEXTS provides more RELEVANT context to the QUESTION.

        - RELEVANCE score should increase as the CONTEXTS provides RELEVANT context to more parts of the QUESTION.

        - CONTEXT that is RELEVANT to some of the QUESTION should score of 2, 3 or 4. Higher score indicates more RELEVANCE.

        - CONTEXT that is RELEVANT to most of the QUESTION should get a score of 5, 6, 7 or 8. Higher score indicates more RELEVANCE.

        - CONTEXT that is RELEVANT to the entire QUESTION should get a score of 9 or 10. Higher score indicates more RELEVANCE.

        - CONTEXT must be relevant and helpful for answering the entire QUESTION to get a score of 10.

        - Never elaborate."""  # noqa: E501
)- LLMScoring类:根据文档与查询的相关性筛选文档。
GraphRAG
什么是 GraphRAG?
GraphRAG是一种结构化的分层 RAG 方法,与依赖纯文本片段或简单文本分块的简单方法形成鲜明对比。该过程包括从原始文本中提取知识图谱、构建社区层次结构、为这些社区生成摘要,并在执行基于 RAG 的任务时利用这些结构。
可视化与配置
图5是kotaemon中GraphRAG的可视化,我们可以看到文档对应的知识图谱。
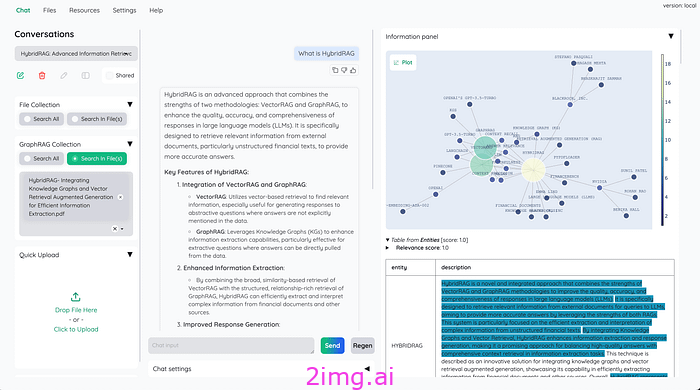
图 5:kotaemon 中的 GraphRAG 可视化。来源:kotaemon
GraphRAG 的配置界面如图 6 所示。它还显示 GraphRAG(GraphRAGIndex)和标准 RAG(FileIndex)处于平等地位。

图 6:GraphRAG 的配置界面。作者截图。
实现:索引管道
首先,运行pip list | grep graph检查 GraphRAG 是否已安装。如果没有,请运行进行安装pip install graphrag。
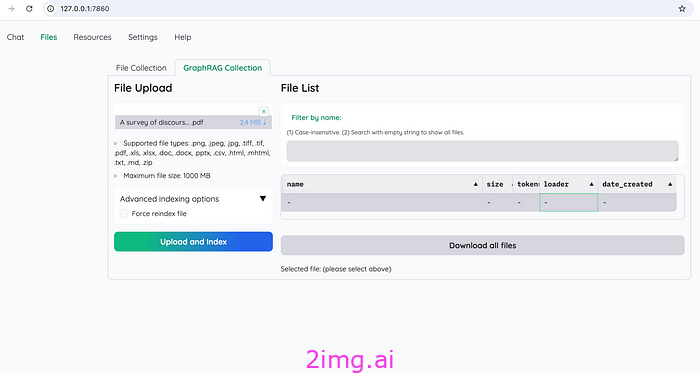
图 7:GraphRAG 的文件上传界面。作者截图。
在图7所示的界面中,选择一个PDF文件,点击“上传并索引”后,会触发stream该函数class GraphRAGIndexingPipeline,代码如下:
class GraphRAGIndexingPipeline(IndexDocumentPipeline):
    """GraphRAG specific indexing pipeline"""
    ...
    ...
    def call_graphrag_index(self, input_path: str):
        # Construct the command
        command = [
            "python",
            "-m",
            "graphrag.index",
            "--root",
            input_path,
            "--reporter",
            "rich",
            "--init",
        ]

        # Run the command
        yield Document(
            channel="debug",
            text="[GraphRAG] Creating index... This can take a long time.",
        )
        result = subprocess.run(command, capture_output=True, text=True)
        print(result.stdout)
        command = command[:-1]

        # Run the command and stream stdout
        with subprocess.Popen(command, stdout=subprocess.PIPE, text=True) as process:
            if process.stdout:
                for line in process.stdout:
                    yield Document(channel="debug", text=line)

    def stream(
        self, file_paths: str | Path | list[str | Path], reindex: bool = False, **kwargs
    ) -> Generator[
        Document, None, tuple[list[str | None], list[str | None], list[Document]]
    ]:
        file_ids, errors, all_docs = yield from super().stream(
            file_paths, reindex=reindex, **kwargs
        )

        # assign graph_id to file_ids
        graph_id = self.store_file_id_with_graph_id(file_ids)
        # call GraphRAG index with docs and graph_id
        graph_index_path = self.write_docs_to_files(graph_id, all_docs)
        yield from self.call_graphrag_index(graph_index_path)

        return file_ids, errors, all_docs
该函数的主要步骤stream如下:
- 使用 执行标准文件索引过程
yield from super().stream()。 - 通过调用将 分配
graph_id给。file_idsself.store_file_id_with_graph_id(file_ids) - 最后,使用和调用微软的GraphRAG来创建图形索引。
docsgraph_id
实现:检索管道
下面我们看一下检索过程。
class GraphRAGRetrieverPipeline(BaseFileIndexRetriever):
    """GraphRAG specific retriever pipeline"""
    ...
    ...

    def run(
        self,
        text: str,
    ) -> list[RetrievedDocument]:
        if not self.file_ids:
            return []
        context_builder = self._build_graph_search()

        local_context_params = {
            "text_unit_prop": 0.5,
            "community_prop": 0.1,
            "conversation_history_max_turns": 5,
            "conversation_history_user_turns_only": True,
            "top_k_mapped_entities": 10,
            "top_k_relationships": 10,
            "include_entity_rank": False,
            "include_relationship_weight": False,
            "include_community_rank": False,
            "return_candidate_context": False,
            "embedding_vectorstore_key": EntityVectorStoreKey.ID,
            # set this to EntityVectorStoreKey.TITLE i
            # f the vectorstore uses entity title as ids
            "max_tokens": 12_000,
            # change this based on the token limit you have on your model
            # (if you are using a model with 8k limit, a good setting could be 5000)
        }

        context_text, context_records = context_builder.build_context(
            query=text,
            conversation_history=None,
            **local_context_params,
        )
        documents = self.format_context_records(context_records)
        plot = self.plot_graph(context_records)

        return documents + [
            RetrievedDocument(
                text="",
                metadata={
                    "file_name": "GraphRAG",
                    "type": "plot",
                    "data": plot,
                },
            ),
        ]
管道如图 8 所示。
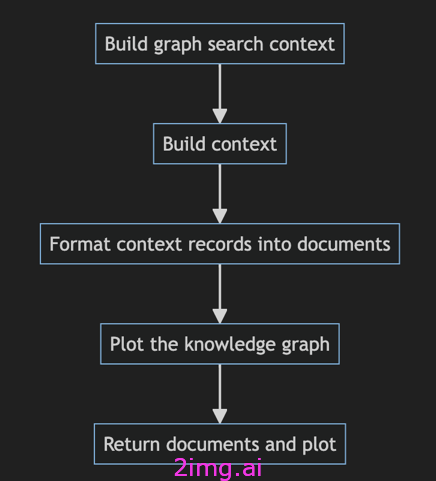
图 8:kotaemon 的 GraphRAG 检索流程。图片由作者提供。
主要步骤如下:
- 构建图搜索上下文:它调用
_build_graph_search函数来构建context_builder图搜索。此上下文构建器使用构建的图索引、实体、关系、报告和语义嵌入来生成上下文。 - 构建上下文:使用函数根据查询
context_builder.build_context生成上下文文本。context_records - 将上下文记录格式化为文档:调用
format_context_records函数将其格式化context_records为对象列表RetrievedDocument。这些文档包括实体、关系、报告和来源的内容。 - 绘制知识图谱:使用该
plot_graph方法提取关系context_records并生成知识图谱(关系的可视化表示)。 - 返回文档和图表:最后,函数返回一个文档列表,其中包括上下文文档(实体、关系、报告等)和知识图谱可视化。
推理
如图9所示,kotaemon主要实现了简单、复杂、react、rewoo四种推理方法。
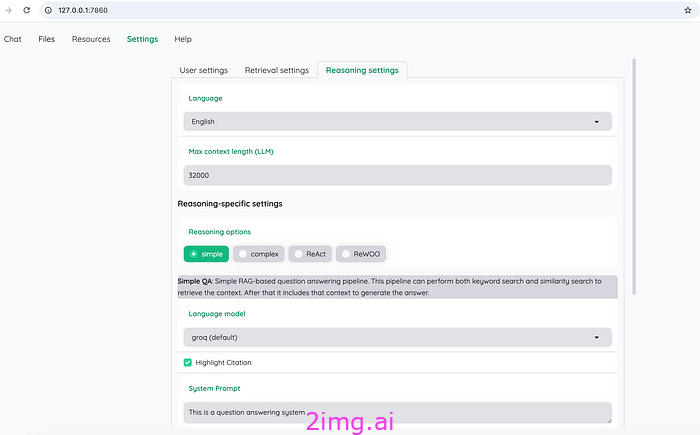
图 9:kotaemon 支持的推理方法:简单、复杂、react 和 rewoo。作者截图。
推理方法旨在增强系统处理和回答复杂查询的能力,特别是在多跳问答中,需要对多条信息进行推理。
推理框架使用不同的管道来确保系统能够将简单和复杂的任务分解为更小、更易于管理的组件来处理它们。
本节概述了主要推理流程的关键原理和代码。
    # Setup your new reasoning pipeline or modify existing one.
KH_REASONINGS = [
    "ktem.reasoning.simple.FullQAPipeline",
    "ktem.reasoning.simple.FullDecomposeQAPipeline",
    "ktem.reasoning.react.ReactAgentPipeline",
    "ktem.reasoning.rewoo.RewooAgentPipeline",
]
简单推理管道
该管道(class FullQAPipeline)是为简单的问答任务而设计的,其中可以通过单个检索和响应过程解决查询。
DEFAULT_REWRITE_PROMPT = (
    "Given the following question, rephrase and expand it "
    "to help you do better answering. Maintain all information "
    "in the original question. Keep the question as concise as possible. "
    "Give answer in {lang}\n"
    "Original question: {question}\n"
    "Rephrased question: "
)
但是简单的推理流程不涉及问题分解。
复杂推理管道
对于复杂问题,kotaemon 使用class FullDecomposeQAPipeline。它主要依靠 将class DecomposeQuestionPipeline大型复杂问题分解为较小的子问题,每个子问题都可以单独回答。
提示如下所示。
DECOMPOSE_SYSTEM_PROMPT_TEMPLATE = (
        "You are an expert at converting user complex questions into sub questions. "
        "Perform query decomposition using provided function_call. "
        "Given a user question, break it down into the most specific sub"
        " questions you can (at most 3) "
        "which will help you answer the original question. "
        "Each sub question should be about a single concept/fact/idea. "
        "If there are acronyms or words you are not familiar with, "
        "do not try to rephrase them."
    )
基于代理的推理
该系统支持基于代理的推理方法,例如ReAct和ReWOO,这使得它能够逐步推理并处理更动态的对话。这对于答案会随着更多信息的收集而演变的复杂对话非常有用。
例如,ReAct 遵循经典的“思考、行动、行动输入和观察”模型。相应的提示如下所示。
DEFAULT_QA_PROMPT = (
    "Answer the following questions as best you can. Give answer in {lang}. "
    "You have access to the following tools:\n"
    "{tool_description}\n"
    "Use the following format:\n\n"
    "Question: the input question you must answer\n"
    "Thought: you should always think about what to do\n\n"
    "Action: the action to take, should be one of [{tool_names}]\n\n"
    "Action Input: the input to the action, should be different from the action input "
    "of the same action in previous steps.\n\n"
    "Observation: the result of the action\n\n"
    "... (this Thought/Action/Action Input/Observation can repeat N times)\n"
    "#Thought: I now know the final answer\n"
    "Final Answer: the final answer to the original input question\n\n"
    "Begin! After each Action Input.\n\n"
    "Question: {instruction}\n"
    "Thought: {agent_scratchpad}\n"
)
查询处理
在 kotaemon 项目中,目前唯一确定的查询处理方法是前面提到的推理过程中的查询重写。尚未观察到查询扩展、分类或细化等其他功能。
如果需要查询处理,可以实现自定义管道。
即时压缩
目前,kotaemon 似乎没有采用提示压缩技术,例如减少标记数或总结提示以优化处理效率。
如果需要快速压缩,可以通过自定义管道来实现,以减少发送到 LLM 的令牌负载,尤其是在文档或对话历史记录较大的情况下。
(LLM) 和嵌入模型
如图10所示,Kotaemon支持四种类型的平台:OpenAI、Ollma、Claude和Groq。
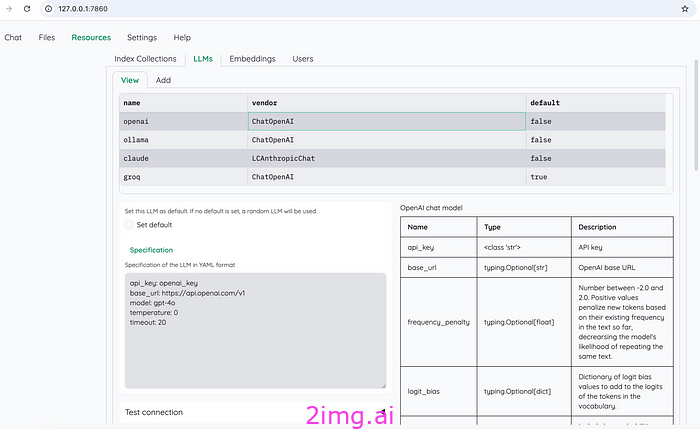
图 10:kotaemon 支持的 LLM:OpenAI、Ollma、Claude 和 Groq。作者截图。
如图 11 所示,嵌入模型还支持四个选项:OpenAI、Ollma、FastEmbed 和 Cohere。
图 11:kotaemon 支持的嵌入模型:OpenAI、Ollma、FastEmbed 和 Cohere。作者截图。
欲了解更多详细信息,请参阅此源文件。
Web 服务和前端
Kotaemon 的 Web 服务和前端是使用 Gradio 作为前端 UI 和在 Python 上运行的标准 Web 服务的组合实现的,包括对本地和基于云的 LLM 的支持。
前端使用 Gradio UI 构建,它提供了一个简洁、简约的用户界面。它允许用户上传文档、提出问题并与系统交互。
基于 Gradio 的 UI 与 Python 很好地集成,并提供了可定制的框架来显示 RAG 结果,包括文档预览和引用。
贮存
Kotaemon 的存储实现旨在处理文档存储 (docstores) 和向量存储 (vectorstores),支持基于文档的问答 (RAG) 系统的有效检索。图 12 是概览。
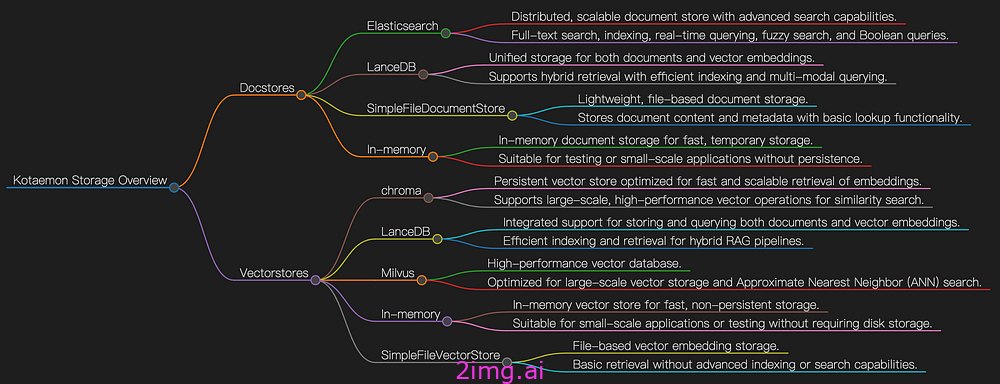
图 12:kotaemon 的存储方法。图片由作者提供。
文档库管理实际文档内容和元数据的存储。这些对于检索、更新和维护文档记录至关重要。
向量存储用于存储文档嵌入,以便进行快速基于相似性的搜索。
结论和见解
本文介绍了一个流行的开源 RAG 框架——kotaemon,重点介绍了其关键组件和相应代码。
Kotaemon 是一款功能强大的基于文档的 QA 和推理工具,提供出色的功能,例如支持云和本地 LLM、多模式文档解析、GraphRAG 和基于代理的推理。这些功能对于需要深入的、以文档为中心的 AI 应用程序的组织来说非常有价值。
分析这个项目让我有了以下见解。
- 文档解析:虽然 Kotaemon 支持多种文档类型,但处理复杂图像、图形或高分辨率 PDF 等非结构化数据仍然具有挑战性。未来在集成高级模型或外部处理步骤方面的改进可以增强其从此类数据源中提取有意义信息的能力。
- GraphRAG 的潜力:GraphRAG 的集成是一项突出的功能,允许对实体和关系进行更结构化的推理。这种方法可以显著提升系统的知识密集型查询的性能。该领域的进一步发展可能会使 kotaemon 成为复杂文档推理任务的前沿工具。
- 性能优化:性能是潜在改进的领域之一。增强索引过程并实施更高效的查询优化方法可以提高响应质量。
- 现实世界的影响:虽然该项目在 GitHub 上越来越受欢迎,表明人们对此很感兴趣,但其真正的价值在于其技术方面如何有助于解决各个行业的实际问题。通过专注于优化和可扩展性,kotaemon 有可能成为依赖基于文档的 AI 应用程序的组织的首选工具。


 6054
6054

 被折叠的 条评论
为什么被折叠?
被折叠的 条评论
为什么被折叠?
 到【灌水乐园】发言


