


大家好,小编为大家解答python图形绘制花朵代码的问题。很多人还不知道如何用python画一朵花,现在让我们一起来看看吧!
今天又是520🧐掌柜在网上收集了四种画玫瑰花的方法,希望有你喜欢的一种!
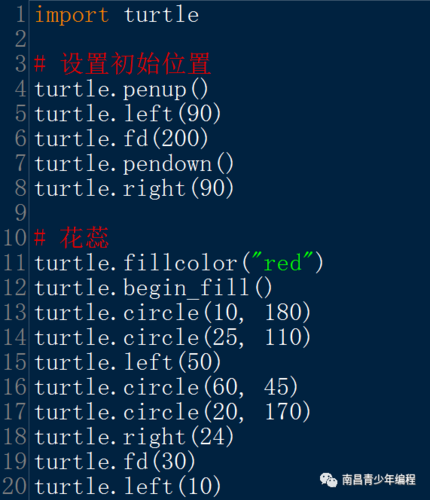
- 第一种:顶上慢画玫瑰花🌹
#第一种:画玫瑰的方法
from turtle import *
import time

#初始化玫瑰
#画布大小
setup(600,800,0,0)
speed(0)
penup() # 提起画笔
seth(90) #朝向90度
fd(340)  #向前移动指定的距离
seth(0)
pendown()  #放下画笔

#开始画
speed(5)      #画笔移动速度为5秒
begin_fill()  #开始填充
fillcolor('red') #为红色
circle(50,30)    #画一个半径为50,弧度为30的圆

for i in range(10):
    fd(1)
    left(10)    #逆时针转动画笔10度
circle(40,40)

for i in range(6):
    fd(1)
    left(3)
circle(80,40)

for i in range(20):
    fd(0.5)
    left(5)
circle(80,45)

for i in range(10):
    fd(2)
    left(1)
circle(80,25)

for i in range(20):
    fd(1)
    left(4)
circle(50,50)

time.sleep(0.1)

circle(120,55)

speed(3)

seth(-90)
fd(70)

right(150)   #顺时针转动画笔150度
fd(20)

left(140)
circle(140,90)

left(30)
circle(160,100)

left(130)
fd(25)

penup()
right(150)
circle(40,80)
pendown()

left(115)
fd(60)

penup()
left(180)
fd(60)
pendown()

end_fill()

right(120)
circle(-50,50)
circle(-20,90)

speed(1)
fd(75)

speed(1)
circle(90,110)

penup()
left(162)
fd(185)
left(170)
pendown()
circle(200,10)
circle(100,40)
circle(-52,115)
left(20)
circle(100,20)
circle(300,20)
speed(1)
fd(250)

penup()
speed(2)
left(180)
fd(250)
circle(-300,7)
right(80)
circle(200,5)
pendown()

left(60)
begin_fill()
fillcolor('green')
circle(-80,100)
right(90)
fd(10)
left(20)
circle(-63,127)
end_fill()

penup()
left(50)
fd(20)
left(180)

pendown()
circle(200,25)

penup()
right(150)

fd(180)

right(40)
pendown()
begin_fill()
fillcolor('green')
circle(-100,80)
right(150)
fd(10)
left(60)
circle(-80,98)
end_fill()

penup()
left(60)
fd(13)
left(180)

pendown()
speed(1)
circle(-200,23)

exitonclick() #当点击时退出
- 1
- 2
- 3
- 4
- 5
- 6
- 7
- 8
- 9
- 10
- 11
- 12
- 13
- 14
- 15
- 16
- 17
- 18
- 19
- 20
- 21
- 22
- 23
- 24
- 25
- 26
- 27
- 28
- 29
- 30
- 31
- 32
- 33
- 34
- 35
- 36
- 37
- 38
- 39
- 40
- 41
- 42
- 43
- 44
- 45
- 46
- 47
- 48
- 49
- 50
- 51
- 52
- 53
- 54
- 55
- 56
- 57
- 58
- 59
- 60
- 61
- 62
- 63
- 64
- 65
- 66
- 67
- 68
- 69
- 70
- 71
- 72
- 73
- 74
- 75
- 76
- 77
- 78
- 79
- 80
- 81
- 82
- 83
- 84
- 85
- 86
- 87
- 88
- 89
- 90
- 91
- 92
- 93
- 94
- 95
- 96
- 97
- 98
- 99
- 100
- 101
- 102
- 103
- 104
- 105
- 106
- 107
- 108
- 109
- 110
- 111
- 112
- 113
- 114
- 115
- 116
- 117
- 118
- 119
- 120
- 121
- 122
- 123
- 124
- 125
- 126
- 127
- 128
- 129
- 130
- 131
- 132
- 133
- 134
- 135
- 136
- 137
- 138
- 139
- 140
- 141
- 142
- 143
- 144
- 145
- 146
- 147
- 148
- 149
- 150
- 151
- 152
- 153
- 154
- 155
- 156
- 157
- 158
最后效果图: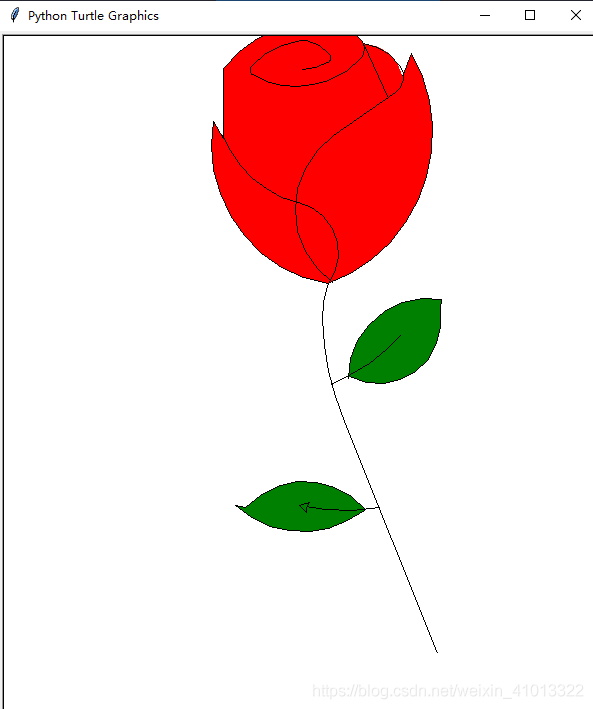
- 第二种:中间玫瑰秒画叶
#首先代码一开始要引入turtle库
#第二种:这个画在画布中间了比上面的好
import turtle as t

#定义一个曲线绘制函数,定义一个简单的绘制曲线的函数
def DegreeCurve(n, r, d = 1):
    for i in range(n):
        t.left(d)
        t.circle(r, abs(d))

#初始位置设定,对绘制的初始值进行相关设定
s = 0.2  #size
t.setup(450 * 5 * s, 750 * 5 * s)
t.pencolor('black')
t.fillcolor('red')
t.speed(100)
t.penup()
t.goto(0, 900 * s)
t.pendown()

#绘制花朵形状,此时开始绘制花的主体部分
t.begin_fill()
t.circle(200 * s, 30)
DegreeCurve(60, 50 * s)
t.circle(200 * s, 30)
DegreeCurve(4, 100 * s)
t.circle(200 * s, 50)
DegreeCurve(50, 50 *s)
t.circle(350 * s, 65)
DegreeCurve(40, 70 * s)
t.circle(150 *s, 50)
DegreeCurve(20, 50 *s, -1)
t.circle(400 * s, 60)
DegreeCurve(18, 50 * s)
t.fd(250 * s)
t.right(150)
t.circle(-500 * s, 12)
t.left(140)
t.circle(550 * s, 110)
t.left(27)
t.circle(650 * s, 100)
t.left(130)
t.circle(-300 * s, 20)
t.right(123)
t.circle(220 * s, 57)
t.end_fill()

#绘制花枝形状,绘制花的枝叶部分
t.left(120)
t.fd(280 * s)
t.left(115)
t.circle(300 * s, 33)
t.left(180)
t.circle(-300 * s, 33)
DegreeCurve(70, 225 * s, -1)
t.circle(350 * s, 104)
t.left(90)
t.circle(200 * s, 105)
t.circle(-500 * s, 63)
t.penup()
t.goto(170 * s, -30 * s)
t.pendown()
t.left(160)
DegreeCurve(20, 2500 * s)
DegreeCurve(220, 250 * s, -1)

#绘制一个绿色叶子
t.fillcolor('green')
t.penup()
t.goto(670 * s, -180 * s)
t.pendown()
t.right(140)
t.begin_fill()
t.circle(300 * s, 120)
t.left(60)
t.circle(300 * s, 120)
t.end_fill()
t.penup()
t.goto(180 * s, -550 * s)
t.pendown()
t.right(85)
t.circle(600 * s, 40)

#绘制另一个叶子
t.penup()
t.goto(-150 * s, -1000 * s)
t.pendown()
t.begin_fill()
t.rt(120)
t.circle(300 * s, 115)
t.left(75)
t.circle(300 * s, 100)
t.end_fill()
t.penup()
t.goto(430 * s, -1070 * s)
t.pendown()
t.right(30)
t.circle(-600 * s, 35)
t.done()
- 1
- 2
- 3
- 4
- 5
- 6
- 7
- 8
- 9
- 10
- 11
- 12
- 13
- 14
- 15
- 16
- 17
- 18
- 19
- 20
- 21
- 22
- 23
- 24
- 25
- 26
- 27
- 28
- 29
- 30
- 31
- 32
- 33
- 34
- 35
- 36
- 37
- 38
- 39
- 40
- 41
- 42
- 43
- 44
- 45
- 46
- 47
- 48
- 49
- 50
- 51
- 52
- 53
- 54
- 55
- 56
- 57
- 58
- 59
- 60
- 61
- 62
- 63
- 64
- 65
- 66
- 67
- 68
- 69
- 70
- 71
- 72
- 73
- 74
- 75
- 76
- 77
- 78
- 79
- 80
- 81
- 82
- 83
- 84
- 85
- 86
- 87
- 88
- 89
- 90
- 91
- 92
- 93
- 94
- 95
- 96
- 97
- 98
- 99
最后的效果图: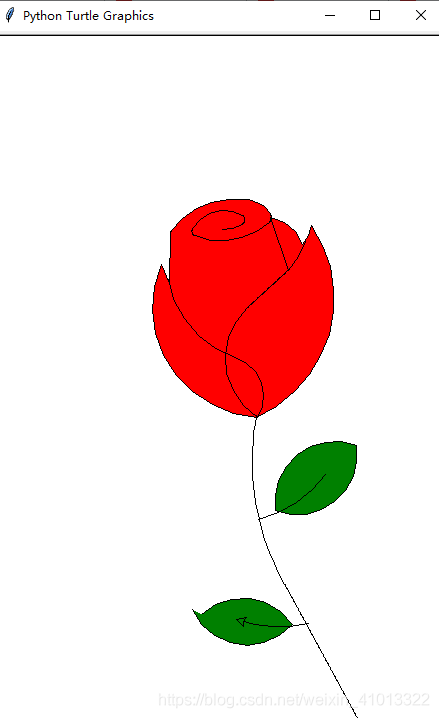
其实细心的朋友会发现这是一朵玫瑰😂只是画的位置不一样。火车头伪原创插件怎么用。。
- 第三种: 卷心对称横叶玫
#第三种:画法的玫瑰没有第二种的好看
import turtle


def initialization():
    turtle.setup(width=0.9, height=0.9)
    turtle.speed(10)


def flower():
    turtle.goto(0, 200)
    turtle.fillcolor("red")
    turtle.begin_fill()
    turtle.circle(10, 180)
    turtle.circle(25, 110)
    turtle.left(50)
    turtle.circle(60, 45)
    turtle.circle(20, 170)
    turtle.right(24)
    turtle.fd(30)
    turtle.left(10)
    turtle.circle(30, 110)
    turtle.fd(20)
    turtle.left(40)
    turtle.circle(90, 70)
    turtle.circle(30, 150)
    turtle.right(30)
    turtle.fd(15)
    turtle.circle(80, 90)
    turtle.left(15)
    turtle.fd(45)
    turtle.right(165)
    turtle.fd(20)
    turtle.left(155)
    turtle.circle(150, 80)
    turtle.left(50)
    turtle.circle(150, 90)
    turtle.end_fill()


def peta1():
    turtle.left(150)
    turtle.circle(-90, 70)
    turtle.left(20)
    turtle.circle(75, 105)
    turtle.setheading(60)
    turtle.circle(80, 98)
    turtle.circle(-90, 40)


def peta2():
    turtle.left(180)
    turtle.circle(90, 40)
    turtle.circle(-80, 98)
    turtle.setheading(-83)


def leaf1():
    turtle.fd(30)
    turtle.left(90)
    turtle.fd(25)
    turtle.left(45)
    turtle.fillcolor("green")
    turtle.begin_fill()
    turtle.circle(-80, 90)
    turtle.right(90)
    turtle.circle(-80, 90)
    turtle.end_fill()
    turtle.right(135)
    turtle.fd(60)
    turtle.left(180)
    turtle.fd(85)
    turtle.left(90)
    turtle.fd(80)


def leaf2():
    turtle.right(90)
    turtle.right(45)
    turtle.fillcolor("green")
    turtle.begin_fill()
    turtle.circle(80, 90)
    turtle.left(90)
    turtle.circle(80, 90)
    turtle.end_fill()
    turtle.left(135)
    turtle.fd(60)
    turtle.left(180)
    turtle.fd(60)
    turtle.right(90)
    turtle.circle(200, 60)


if __name__ == '__main__':
    initialization()
    flower()
    peta1()
    peta2()
    leaf1()
    leaf2()
- 1
- 2
- 3
- 4
- 5
- 6
- 7
- 8
- 9
- 10
- 11
- 12
- 13
- 14
- 15
- 16
- 17
- 18
- 19
- 20
- 21
- 22
- 23
- 24
- 25
- 26
- 27
- 28
- 29
- 30
- 31
- 32
- 33
- 34
- 35
- 36
- 37
- 38
- 39
- 40
- 41
- 42
- 43
- 44
- 45
- 46
- 47
- 48
- 49
- 50
- 51
- 52
- 53
- 54
- 55
- 56
- 57
- 58
- 59
- 60
- 61
- 62
- 63
- 64
- 65
- 66
- 67
- 68
- 69
- 70
- 71
- 72
- 73
- 74
- 75
- 76
- 77
- 78
- 79
- 80
- 81
- 82
- 83
- 84
- 85
- 86
- 87
- 88
- 89
- 90
- 91
- 92
- 93
- 94
- 95
- 96
- 97
- 98
- 99
- 100
最后的效果图: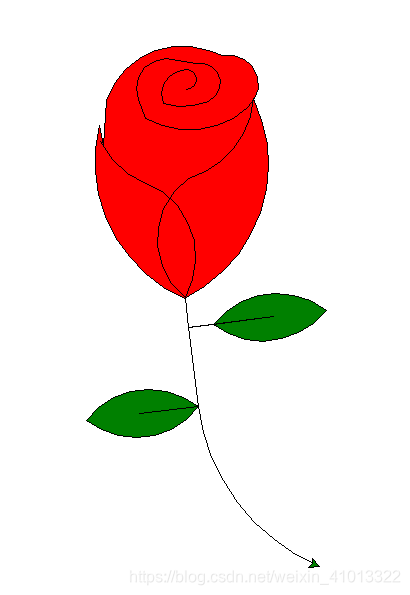
- 最后一种:描边盛开火玫瑰
#下面看第四种:据说最好看
import turtle as t

t.setup(800,800)
t.hideturtle()
t.speed(11)
t.penup()
t.goto(50,-450)
t.pensize(5)
t.pencolor("black")
t.seth(140)
t.pendown()
t.speed(10)
t.circle(-300,60)
t.fd(100)
#jiaodu80
#1ye
t.seth(10)
t.fd(50)
t.fillcolor("green")
t.begin_fill()
t.right(40)
t.circle(120,80)
t.left(100)
t.circle(120,80)
t.end_fill()
t.seth(10)
t.fd(90)
t.speed(11)
t.penup()
t.fd(-140)
t.seth(80)
#2ye
t.pendown()
t.speed(10)
t.fd(70)
t.seth(160)
t.fd(50)
t.fillcolor("green")
t.begin_fill()
t.right(40)
t.circle(120,80)
t.left(100)
t.circle(120,80)
t.end_fill()
t.seth(160)
t.fd(90)
t.speed(11)
t.penup()
t.fd(-140)
t.seth(80)
t.pendown()
t.speed(10)
#
t.fd(100)
#1ban
t.seth(-20)
t.fillcolor("crimson")
t.begin_fill()
t.circle(100,100)
t.circle(-110,70)
t.seth(179)
t.circle(223,76)
t.end_fill()
#2ban
t.speed(11)
t.fillcolor("red")
t.begin_fill()

t.left(180)
t.circle(-223,60)
t.seth(70)
t.speed(10)
t.circle(-213,15)#55
t.left(70)#125
t.circle(200,70)
t.seth(-80)
t.circle(-170,40)
t.circle(124,94)
t.end_fill()
#
t.speed(11)
t.penup()
t.right(180)
t.circle(-124,94)
t.circle(170,40)
t.pendown()
t.speed(10)

t.seth(-60)
t.circle(175,70)

t.seth(235)
t.circle(300,12)
t.right(180)
t.circle(-300,12)

t.seth(125)
t.circle(150,60)

t.seth(70)
t.fd(-20)
t.fd(20)

t.seth(-45)
t.circle(150,40)
t.seth(66)
t.fd(-18.5)
t.fd(18.5)

t.seth(140)
t.circle(150,27)
t.seth(60)
t.fd(-8)

t.speed(11)
t.penup()
t.left(20.8)
t.fd(-250.5)

#3ban

t.pendown()
t.speed(10)
t.fillcolor("crimson")
t.begin_fill()
t.seth(160)

t.circle(-140,85)
t.circle(100,70)
t.right(165)
t.circle(-200,32)
t.speed(11)
t.seth(-105)
t.circle(-170,14.5)
t.circle(123,94)
t.end_fill()
- 1
- 2
- 3
- 4
- 5
- 6
- 7
- 8
- 9
- 10
- 11
- 12
- 13
- 14
- 15
- 16
- 17
- 18
- 19
- 20
- 21
- 22
- 23
- 24
- 25
- 26
- 27
- 28
- 29
- 30
- 31
- 32
- 33
- 34
- 35
- 36
- 37
- 38
- 39
- 40
- 41
- 42
- 43
- 44
- 45
- 46
- 47
- 48
- 49
- 50
- 51
- 52
- 53
- 54
- 55
- 56
- 57
- 58
- 59
- 60
- 61
- 62
- 63
- 64
- 65
- 66
- 67
- 68
- 69
- 70
- 71
- 72
- 73
- 74
- 75
- 76
- 77
- 78
- 79
- 80
- 81
- 82
- 83
- 84
- 85
- 86
- 87
- 88
- 89
- 90
- 91
- 92
- 93
- 94
- 95
- 96
- 97
- 98
- 99
- 100
- 101
- 102
- 103
- 104
- 105
- 106
- 107
- 108
- 109
- 110
- 111
- 112
- 113
- 114
- 115
- 116
- 117
- 118
- 119
- 120
- 121
- 122
- 123
- 124
- 125
- 126
- 127
- 128
- 129
- 130
- 131
- 132
- 133
- 134
- 135
- 136
- 137
- 138
最后的效果图:
综上,确实最后一种最好看!😄好了,玫瑰花get了,对象✔🐘在哪里?
PS:里面的代码参数可以自行修改,画出你要的形状
参考资料:
玫瑰花绘制


 4086
4086


 被折叠的 条评论
为什么被折叠?
被折叠的 条评论
为什么被折叠?
 到【灌水乐园】发言


