


这篇文章是追随 Mujoco Github 仓库中官方教程的第三篇 《The rollout tutorial shows how to use the multithreaded rollout module》:
- 官方 Github 仓库:https://github.com/google-deepmind/mujoco
- 官方 Colab 链接: https://colab.research.google.com/github/google-deepmind/mujoco/blob/main/python/rollout.ipynb#scrollTo=0f9fbad1-59d0-40ac-b2b6-99f37313670f

官方和我自己的博客代码放在下面的链接中,所有以 [offical] 开头的文件都是官方笔记,所有以 [note] 开头的文件都是和博客对应的笔记:
链接: https://pan.baidu.com/s/1mFtyCtog0iVN_hrAIFoYFQ?pwd=83a4 提取码: 83a4
这篇教程中涉及到一个新的库 mujoco_mjx,mujoco_mjx 是 MuJoCo MJX(MuJoCo eXtended) 的 Python 接口,它是 mujoco 的一个改进版或扩展版本,由 Google DeepMind 团队维护,主要用于强化学习、机器人控制和物理仿真等任务。
mujoco_mjx 是对 mujoco 的 JAX-friendly 扩展版本。将 mujoco 的物理仿真与 Google 的 JAX 框架结合起来,实现了更高效的并行仿真和梯度计算。
- 常规 mojoco 是 面向单个环境仿真,不适合大规模并行仿真。
- 在强化学习中,经常需要 上千个环境同时仿真以加快训练,而
mujoco_mjx正是为此设计的。 - 它使用 JAX 的向量化和加速特性,将仿真变成 可微、可并行、可 GPU/TPU 加速 的操作。
1. 导入必要的包
因为引入了 mujoco_mjx 库,所以需要安装以下依赖:
(mujoco) $ pip install mujoco_mjx brax
还需要从 Github 仓库中拉取两个库mujoco、dm_control 并放在当前目录下
(mujoco) $ git clone https://github.com/google-deepmind/mujoco
(mujoco) $ git clone https://github.com/google-deepmind/dm_control
安装完依赖后导入比必要的库:
import distutils.util
import os
import subprocess
import mujoco

xla_flags = os.environ.get('XLA_FLAGS', '')
xla_flags += ' --xla_gpu_triton_gemm_any=True'
os.environ['XLA_FLAGS'] = xla_flags

import copy
import time
from multiprocessing import cpu_count
import threading
import numpy as np
import jax
import jax.numpy as jp

import mediapy as media
import matplotlib
import matplotlib.pyplot as plt

np.set_printoptions(precision=3, suppress=True, linewidth=100)

nthread = cpu_count()

from IPython.display import clear_output
clear_output()
定义两个模型文件和一个控制文件:
humanoid_path = 'mujoco/model/humanoid/humanoid.xml'
humanoid100_path = 'mujoco/model/humanoid/humanoid100.xml'

hopper_path ='dm_control/dm_control/suite/hopper.xml'
2. 定义辅助函数
def get_state(model, data, nbatch=1):
  full_physics = mujoco.mjtState.mjSTATE_FULLPHYSICS
  state = np.zeros((mujoco.mj_stateSize(model, full_physics),))
  mujoco.mj_getState(model, data, state, full_physics)
  return np.tile(state, (nbatch, 1))

def xy_grid(nbatch, ncols=10, spacing=0.05):
  nrows = nbatch // ncols
  assert nbatch == nrows * ncols
  xmax = (nrows-1)*spacing/2
  rows = np.linspace(-xmax, xmax, nrows)
  ymax = (ncols-1)*spacing/2
  cols = np.linspace(-ymax, ymax, ncols)
  x, y = np.meshgrid(rows, cols)
  return np.stack((x.flatten(), y.flatten())).T

def benchmark(f, x_list=[None], ntiming=1, f_init=None):
  x_times_list = []
  for x in x_list:
    times = []
    for i in range(ntiming):
      if f_init is not None:
        x_init = f_init(x)
      start = time.perf_counter()
      if f_init is not None:
        f(x, x_init)
      else:
        f(x)
      end = time.perf_counter()
      times.append(end - start)
    x_times_list.append(np.mean(times))
  return np.array(x_times_list)


def render_many(model, data, state, framerate, camera=-1, shape=(480, 640), transparent=False, light_pos=None):
  nbatch = state.shape[0]
  if not isinstance(model, mujoco.MjModel):
    model = list(model)
  if isinstance(model, list) and len(model) == 1:
    model = model * nbatch
  elif isinstance(model, list):
    assert len(model) == nbatch
  else:
    model = [model] * nbatch

  vopt = mujoco.MjvOption()
  vopt.flags[mujoco.mjtVisFlag.mjVIS_TRANSPARENT] = transparent
  pert = mujoco.MjvPerturb()
  catmask = mujoco.mjtCatBit.mjCAT_DYNAMIC

  frames = []
  with mujoco.Renderer(model[0], *shape) as renderer:
    for i in range(state.shape[1]):
      if len(frames) < i * model[0].opt.timestep * framerate:
        for j in range(state.shape[0]):
          mujoco.mj_setState(model[j], data, state[j, i, :], mujoco.mjtState.mjSTATE_FULLPHYSICS)
          mujoco.mj_forward(model[j], data)

          if j == 0:
            renderer.update_scene(data, camera, scene_option=vopt)
          else:
            mujoco.mjv_addGeoms(model[j], data, vopt, pert, catmask, renderer.scene)

        if light_pos is not None:
          light = renderer.scene.lights[renderer.scene.nlight]
          light.ambient = [0, 0, 0]
          light.attenuation = [1, 0, 0]
          light.castshadow = 1
          light.cutoff = 45
          light.diffuse = [0.8, 0.8, 0.8]
          light.dir = [0, 0, -1]
          light.directional = 0
          light.exponent = 10
          light.headlight = 0
          light.specular = [0.3, 0.3, 0.3]
          light.pos = light_pos
          renderer.scene.nlight += 1

        pixels = renderer.render()
        frames.append(pixels)
  return frames
3. 使用 rollout 函数
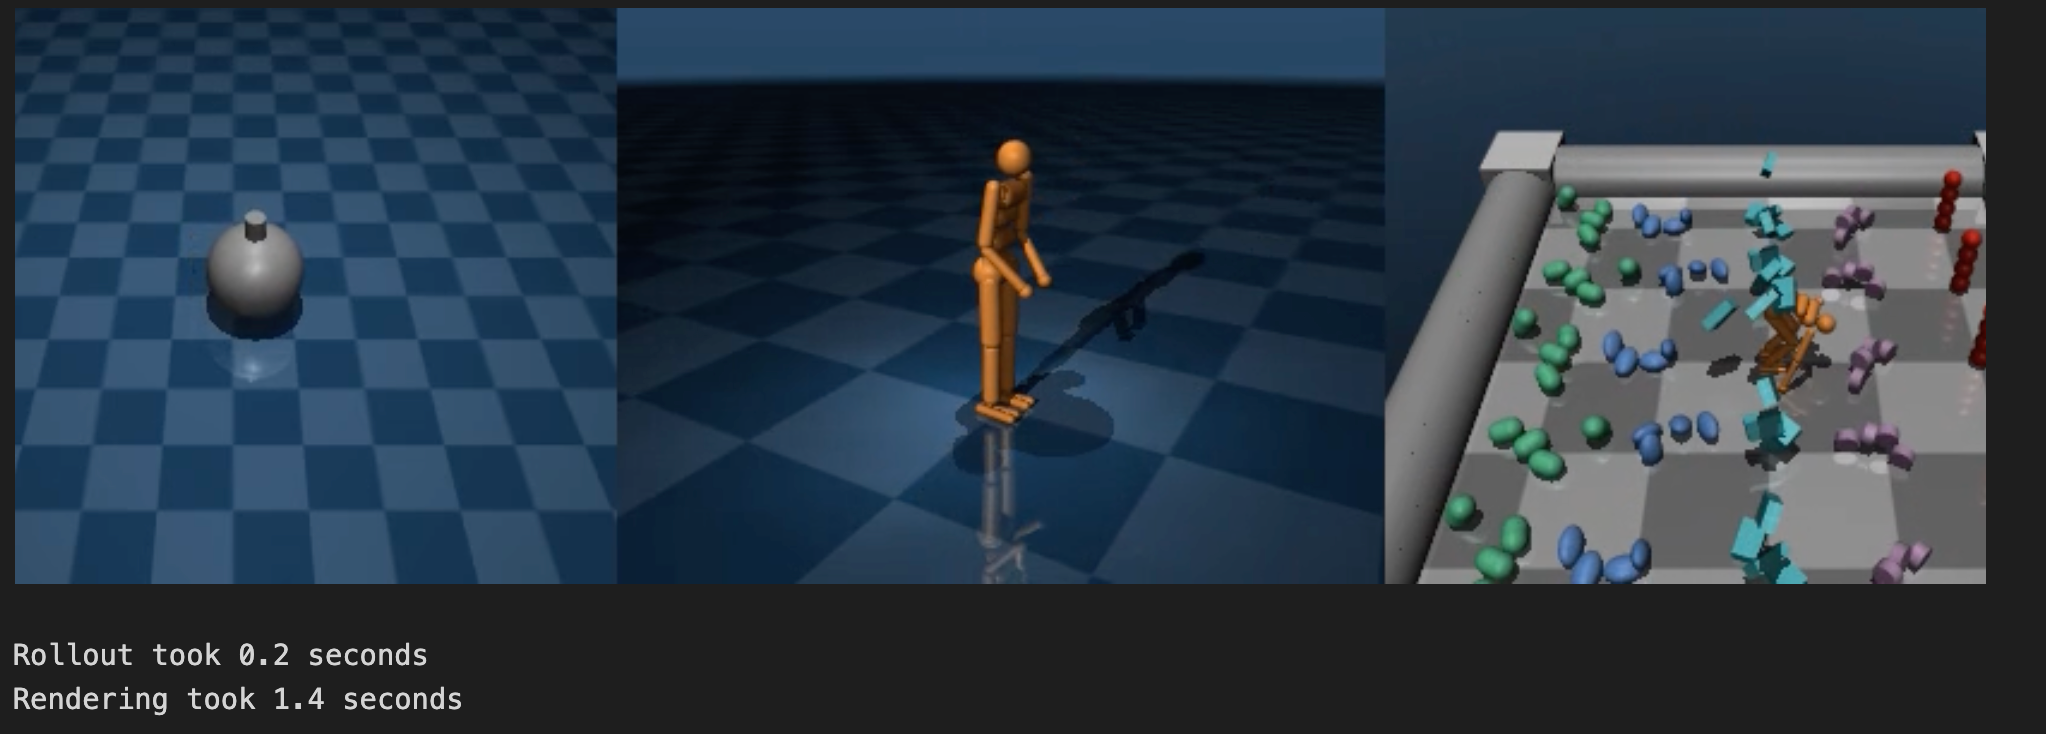
mujoco 库中的 rollout.rollout 函数可以 按固定步数批量运行模拟 ,能够在单线程或多线程模式下运行。相比之前的代码,rollout 函数的加速效果显著,因为 rollout 能够轻松启用轻量级线程池。下面加载 “tippe top”、“humanoid”、“humanoid100”模型,这些模型将在后续使用示例和基准测试中使用。
tippe top 模型是从之前的教程笔记中复制而来的;humanoid 模型和 humanoid100 是 mujoco 源码仓库中自带的。
3.1 Benchmarked 模型
下面这个benchmark模型用的是 RK4 即 四阶 Runge-Kutta 方法(Runge-Kutta 4th order),有关积分器更多信息可以查看官方文档:

【Note】:选对积分器非常重要,虽然学习初期可以使用默认的 Eular 积分器,但到后面一定要根据自己的实际情况选择最适的积分器,很多不熟练和奇奇怪怪的错误都是没有选对积分器或时间步长设置不合理导致的。
tippe_top = """
<mujoco model="tippe top">
  <option integrator="RK4"/>

  <asset>
    <texture name="grid" type="2d" builtin="checker" rgb1=".1 .2 .3"
     rgb2=".2 .3 .4" width="300" height="300"/>
    <material name="grid" texture="grid" texrepeat="40 40" reflectance=".2"/>
  </asset>

  <worldbody>
    <geom size="1 1 .01" type="plane" material="grid"/>
    <light pos="0 0 .6"/>
    <camera name="closeup" pos="0 -.1 .07" xyaxes="1 0 0 0 1 2"/>
    <camera name="distant" pos="0 -.4 .4" xyaxes="1 0 0 0 1 1"/>
    <body name="top" pos="0 0 .02">
      <freejoint name="top"/>
      <site name="top" pos="0 0 0"/>
      <geom name="ball" type="sphere" size=".02" />
      <geom name="stem" type="cylinder" pos="0 0 .02" size="0.004 .008"/>
      <geom name="ballast" type="box" size=".023 .023 0.005"  pos="0 0 -.015"
       contype="0" conaffinity="0" group="3"/>
    </body>
  </worldbody>

  <sensor>
    <gyro name="gyro" site="top"/>
  </sensor>

  <keyframe>
    <key name="spinning" qpos="0 0 0.02 1 0 0 0" qvel="0 0 0 0 1 200" />
  </keyframe>
</mujoco>
"""
依次创建模型:
# 创建顶层模型
top_model = mujoco.MjModel.from_xml_string(tippe_top)
top_data = mujoco.MjData(top_model)
mujoco.mj_resetDataKeyframe(top_model, top_data, 0) # 设置关键帧为0时刻
top_state = get_state(top_model, top_data)

# 创建humanoid模型
humanoid_model = mujoco.MjModel.from_xml_path(humanoid_path)
humanoid_data = mujoco.MjData(humanoid_model)
humanoid_data.qvel[2] = 4           # 给z方向一个速度让机器人跳起来
humanoid_state = get_state(humanoid_model, humanoid_data)

# 创建humanoid100模型
humanoid100_model = mujoco.MjModel.from_xml_path(humanoid100_path)
humanoid100_data = mujoco.MjData(humanoid100_model)
h100_state = get_state(humanoid100_model, humanoid100_data)
下面的代码中多次调用了 rollout() 函数,这个函数本质就是用来推动仿真的函数,只不过可以以指定状态为初始推动n步,如果你用mj_step() 的话也不是不行,就是没这个函数这么方便,特别是强化学习时用这个函数可以快速回到某个指定状态再训练策略。
start = time.time()
top_nstep = int(6 / top_model.opt.timestep)
top_state, _ = rollout.rollout(top_model, top_data, top_state, nstep=top_nstep)

humanoid_nstep = int(3 / humanoid_model.opt.timestep)
humanoid_state, _ = rollout.rollout(humanoid_model, humanoid_data, humanoid_state, nstep=humanoid_nstep)

humanoid100_nstep = int(3 / humanoid100_model.opt.timestep)
h100_state, _ = rollout.rollout(humanoid100_model, humanoid100_data, h100_state, nstep=humanoid100_nstep)

end = time.time()
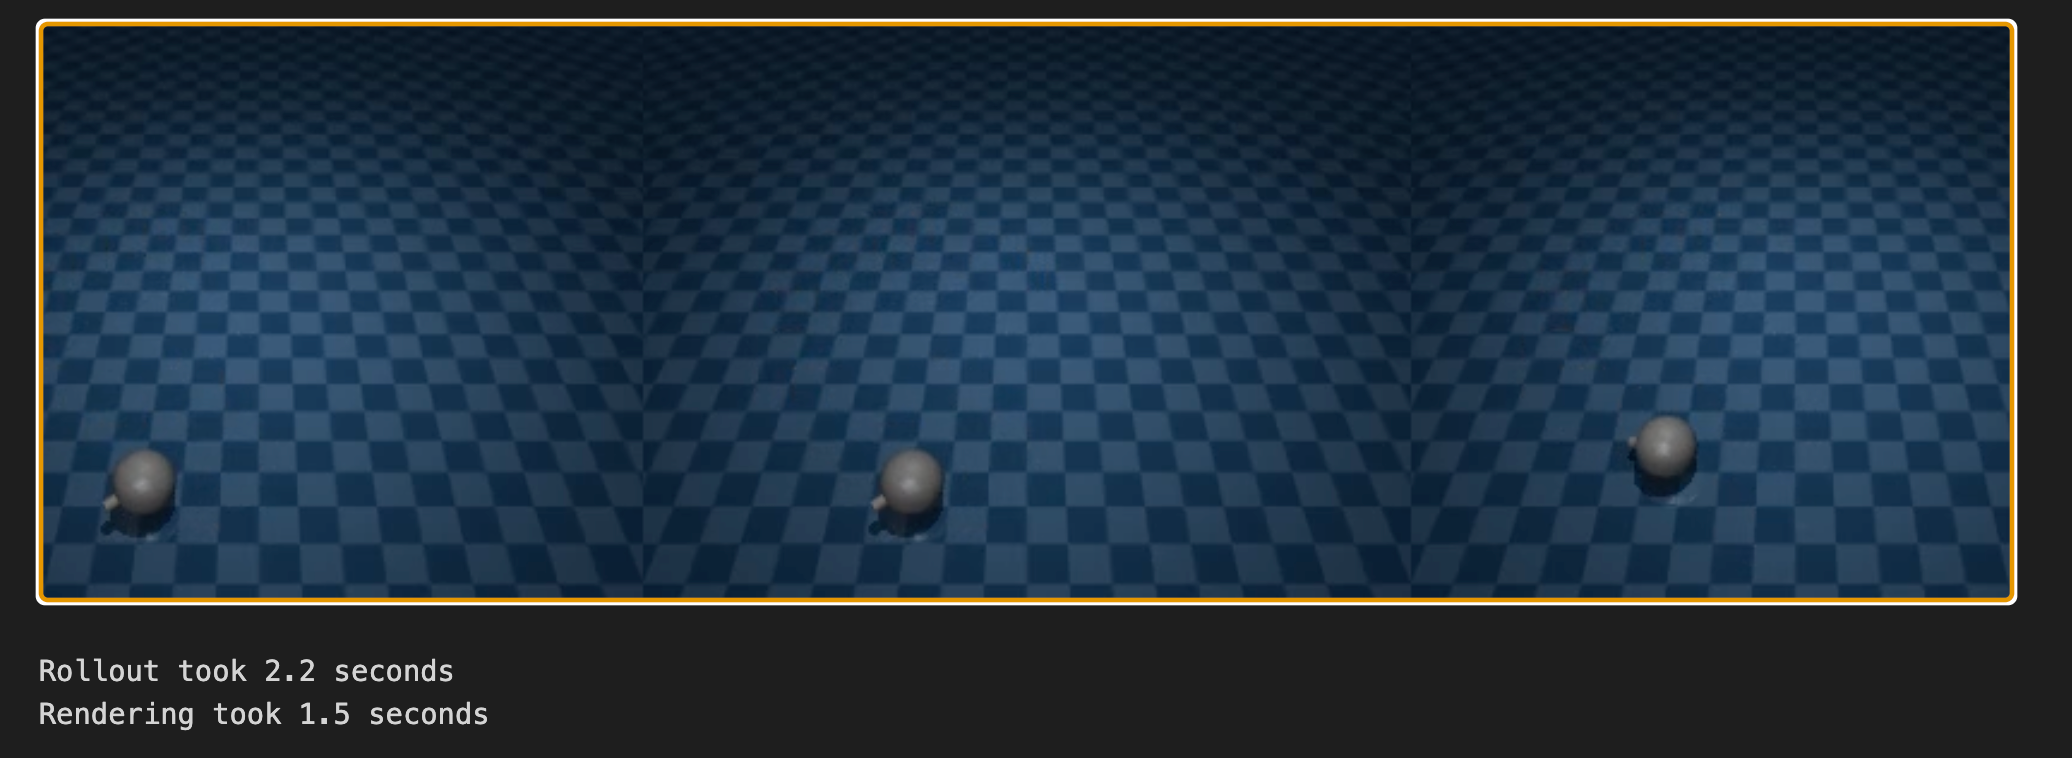
渲染视频:
start_render = time.time()
top_frames = render_many(top_model, top_data, top_state, framerate=60, shape=(240, 320))
humanoid_frames = render_many(humanoid_model, humanoid_data, humanoid_state, framerate=120, shape=(240, 320))
humanoid100_frames = render_many(humanoid100_model, humanoid100_data, h100_state, framerate=120, shape=(240, 320))

# humanoid_frames 和 huamnoid100_frames 半速显示
media.show_video(np.concatenate((top_frames, humanoid_frames, humanoid100_frames), axis=2), fps=60)
end_render = time.time()

print(f"Rollout took {end-start:.1f} seconds")
print(f"Rendering took {end_render-start_render:.1f} seconds")
在开始官方 Examples 之前需要对 rollout 有一些基础改建。rollout 会运行 nstep 步的 nbatch rollout,每个 MjModel 可以不同,但参数值必须相同。传递多个 MjData 可以启用多线程,每个 MjData 对应一个线程。
print(rollout.rollout.__doc__)
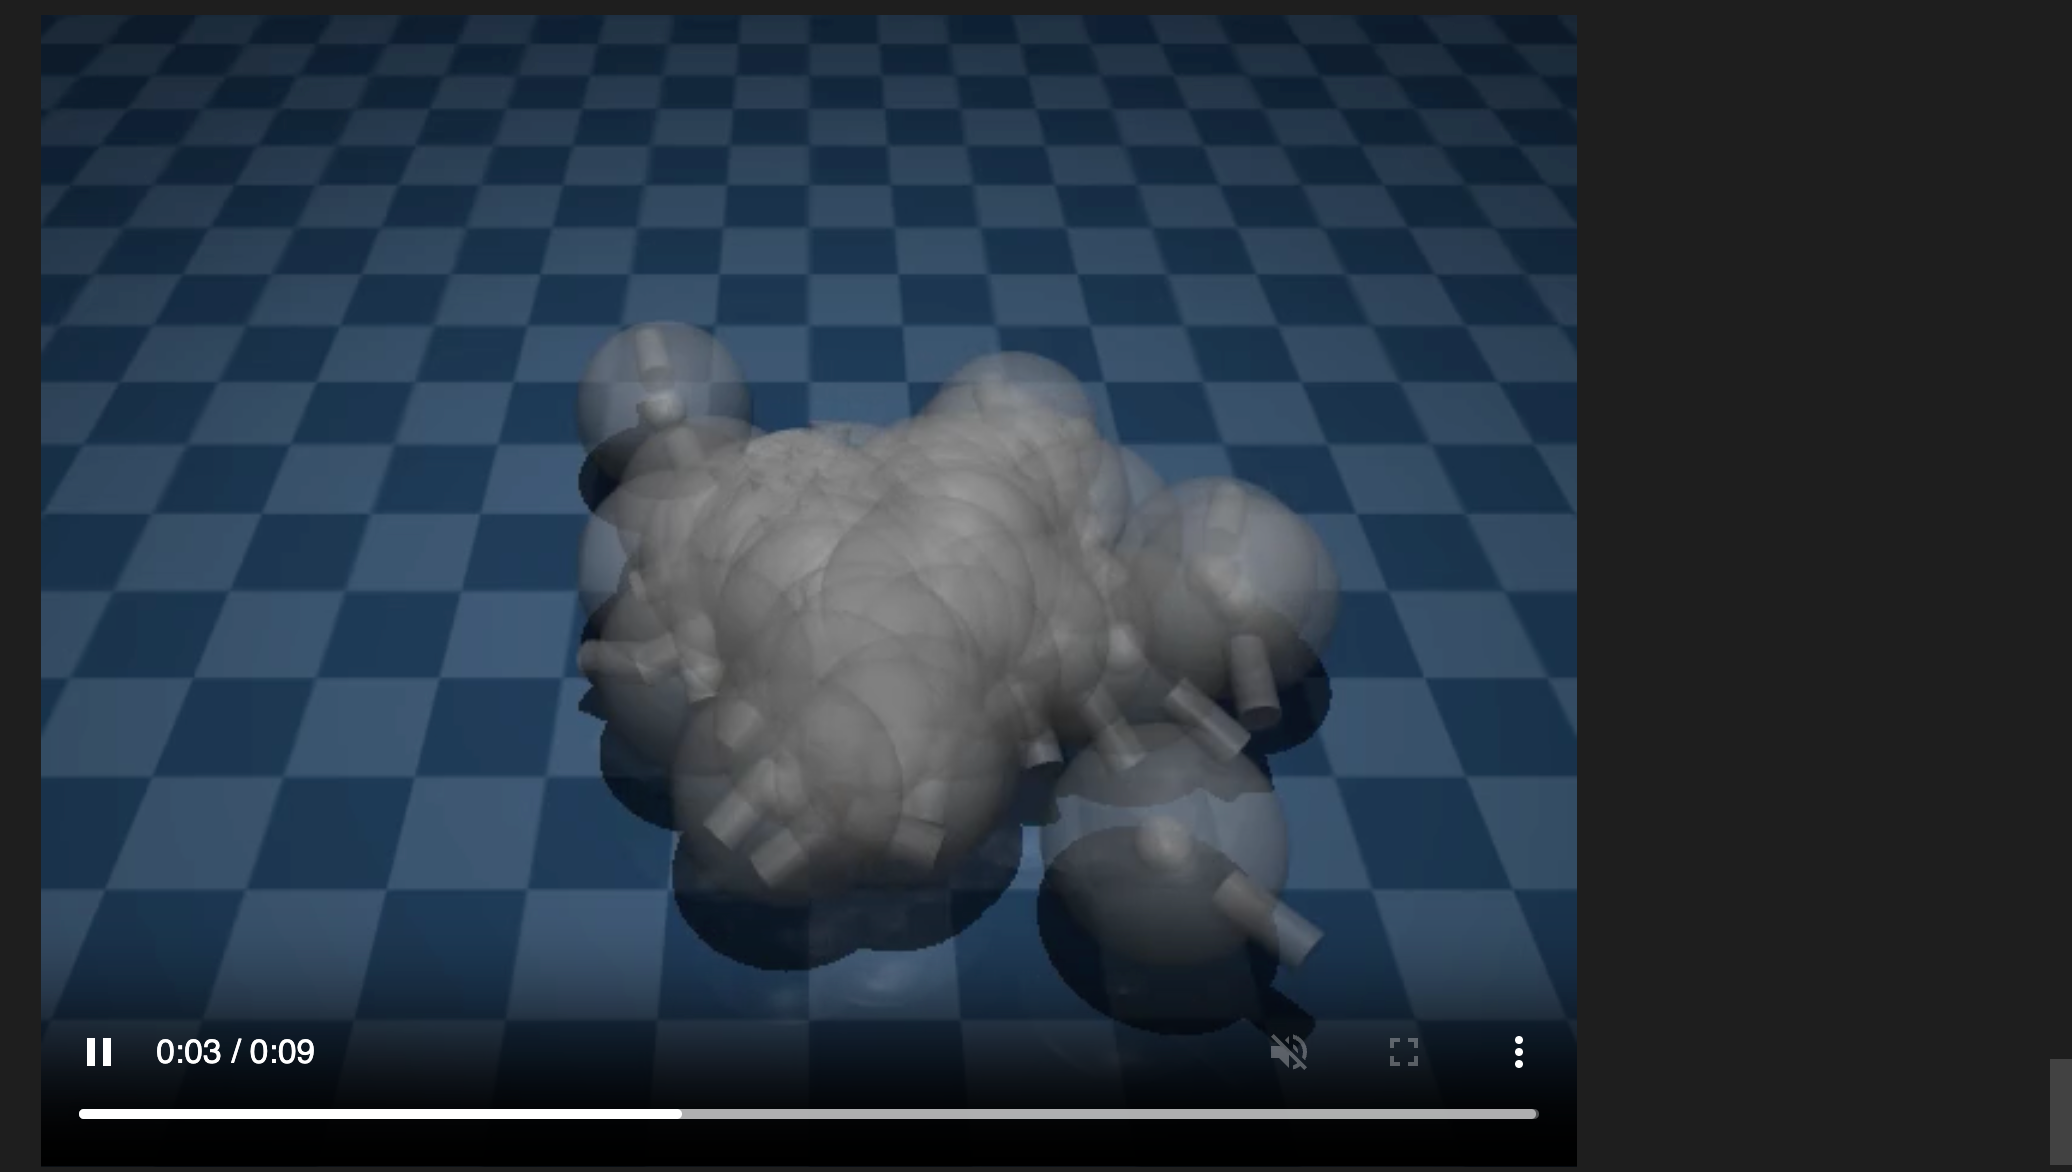
3.2 Example: 不同初始状态
下面的代码实现了 100 个初始旋转速度不同的 tippe top 仿真。为每个线程传递一个 MjData 即可启用 rollout 的多线程功能。
nbatch = 100    # 不同初始状态的个数

top_data = mujoco.MjData(top_model)
mujoco.mj_resetDataKeyframe(top_model, top_data, 0)
initial_states = get_state(top_model, top_data, nbatch)
initial_states[:, -1] *= np.linspace(0.5, 1.5, num=nbatch)
【Note】:下面的代码会直接将你的CPU跑满,如果你不想这么大的负载的话可以手动修改代码中的nthread ,这个表示线程数,但是因为我们的case本身比较简单所以其实还好啦。可如果你本身在运行某些计算的话建议还是改小一点。
nthread = 10    # 并行计算线程数

start = time.time()
top_datas = [copy.copy(top_data) for _ in range(nthread)]
state, sensordata = rollout.rollout(top_model, top_datas, initial_states, nstep=int(top_nstep * 1.5))
end = time.time()
根据仿真结果进行渲染
start_render = time.time()
framerate = 60
frames = render_many(top_model, top_data, state, framerate, transparent=True)
media.show_video(frames, fps=framerate)
end_render = time.time()

print(f"Rollout time: {end-start:.1f} seconds")
print(f"Rending time: {end_render-start_render:.1f} seconds")
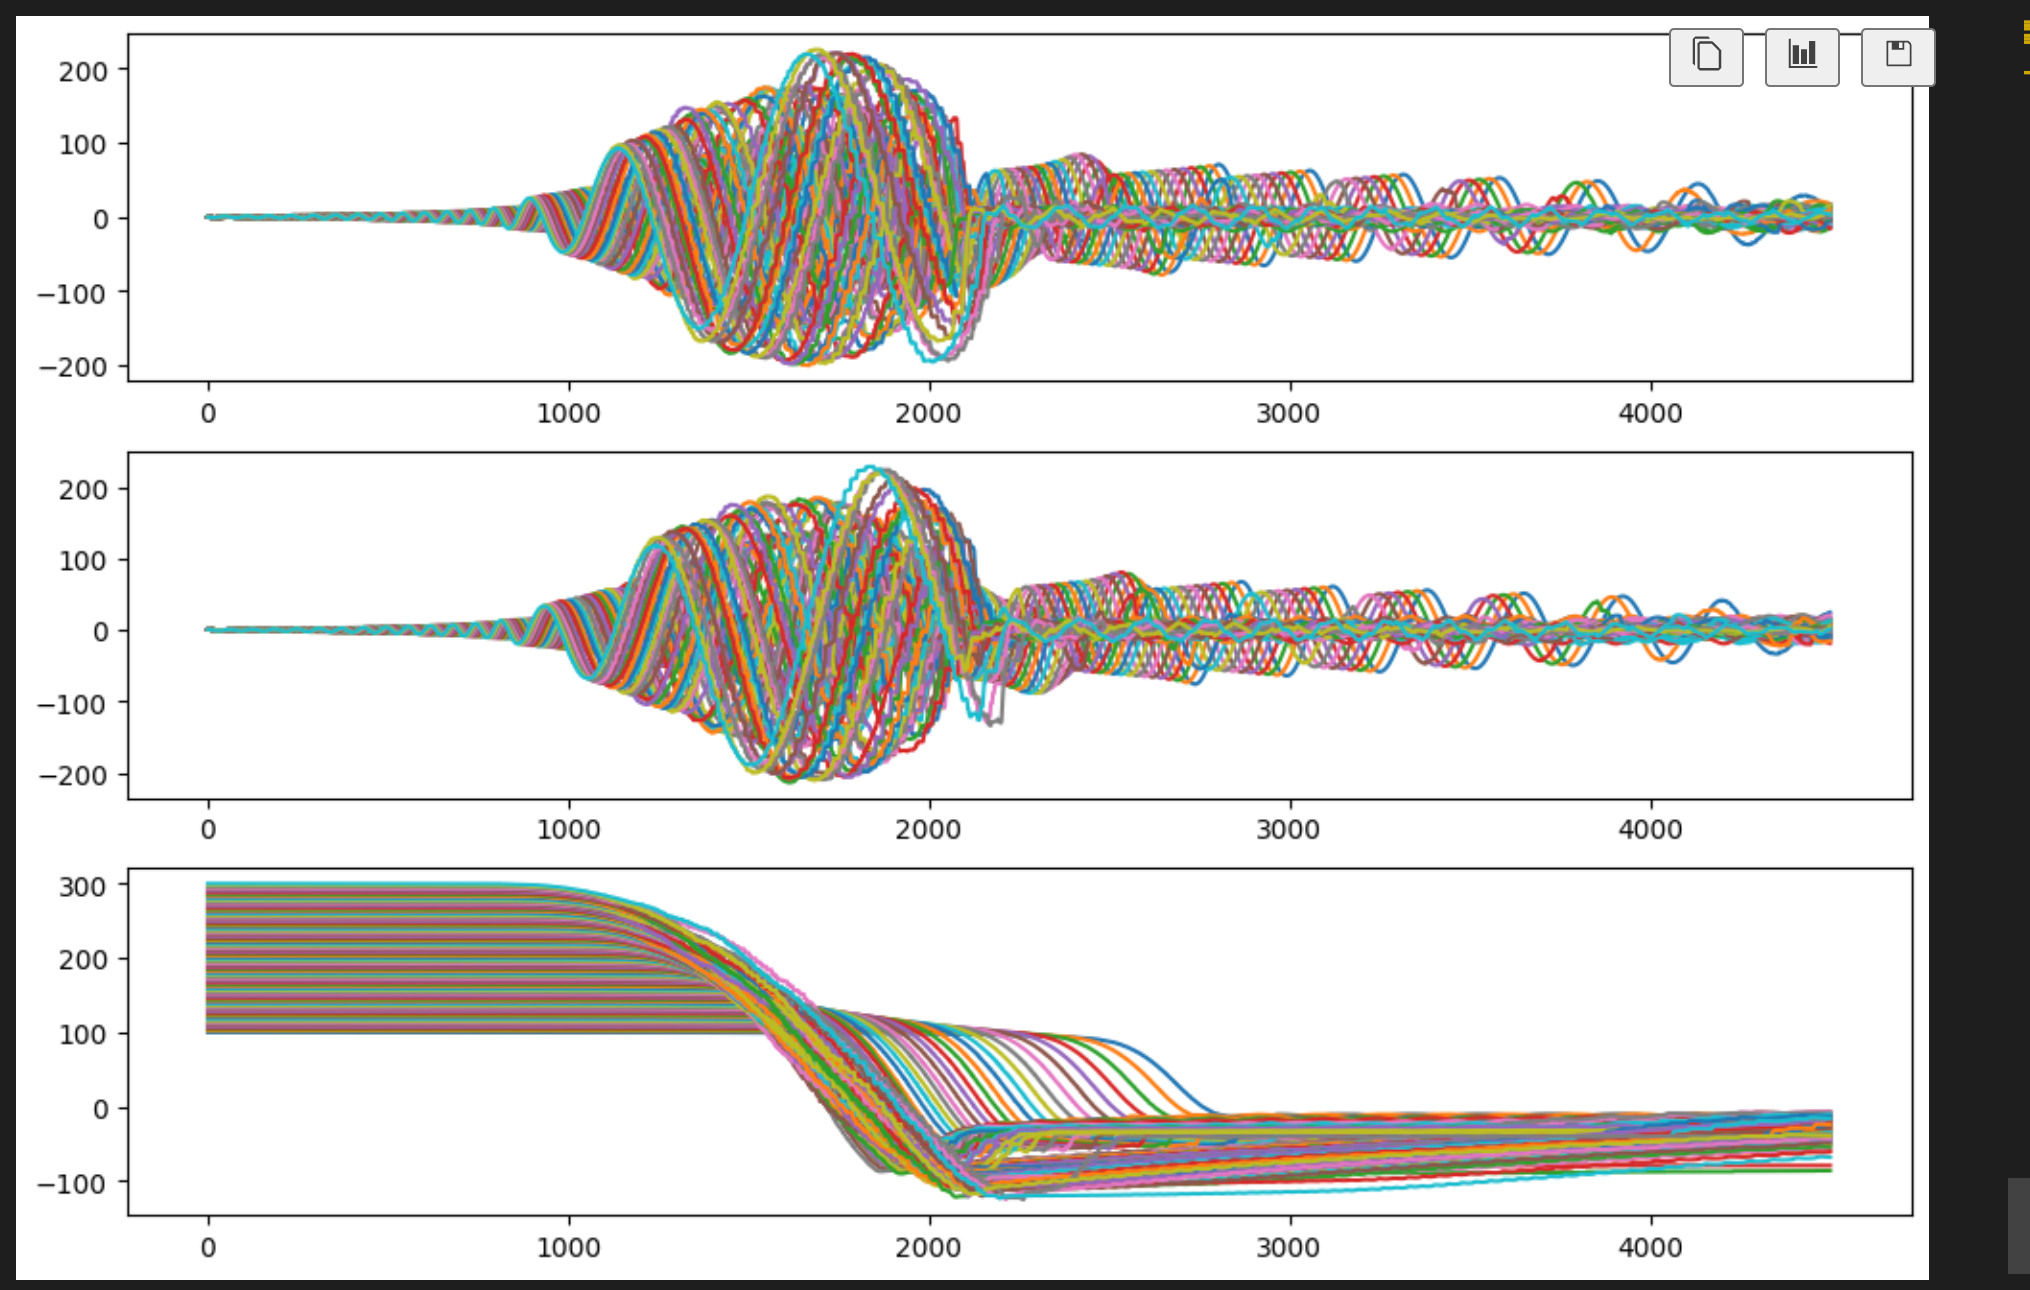
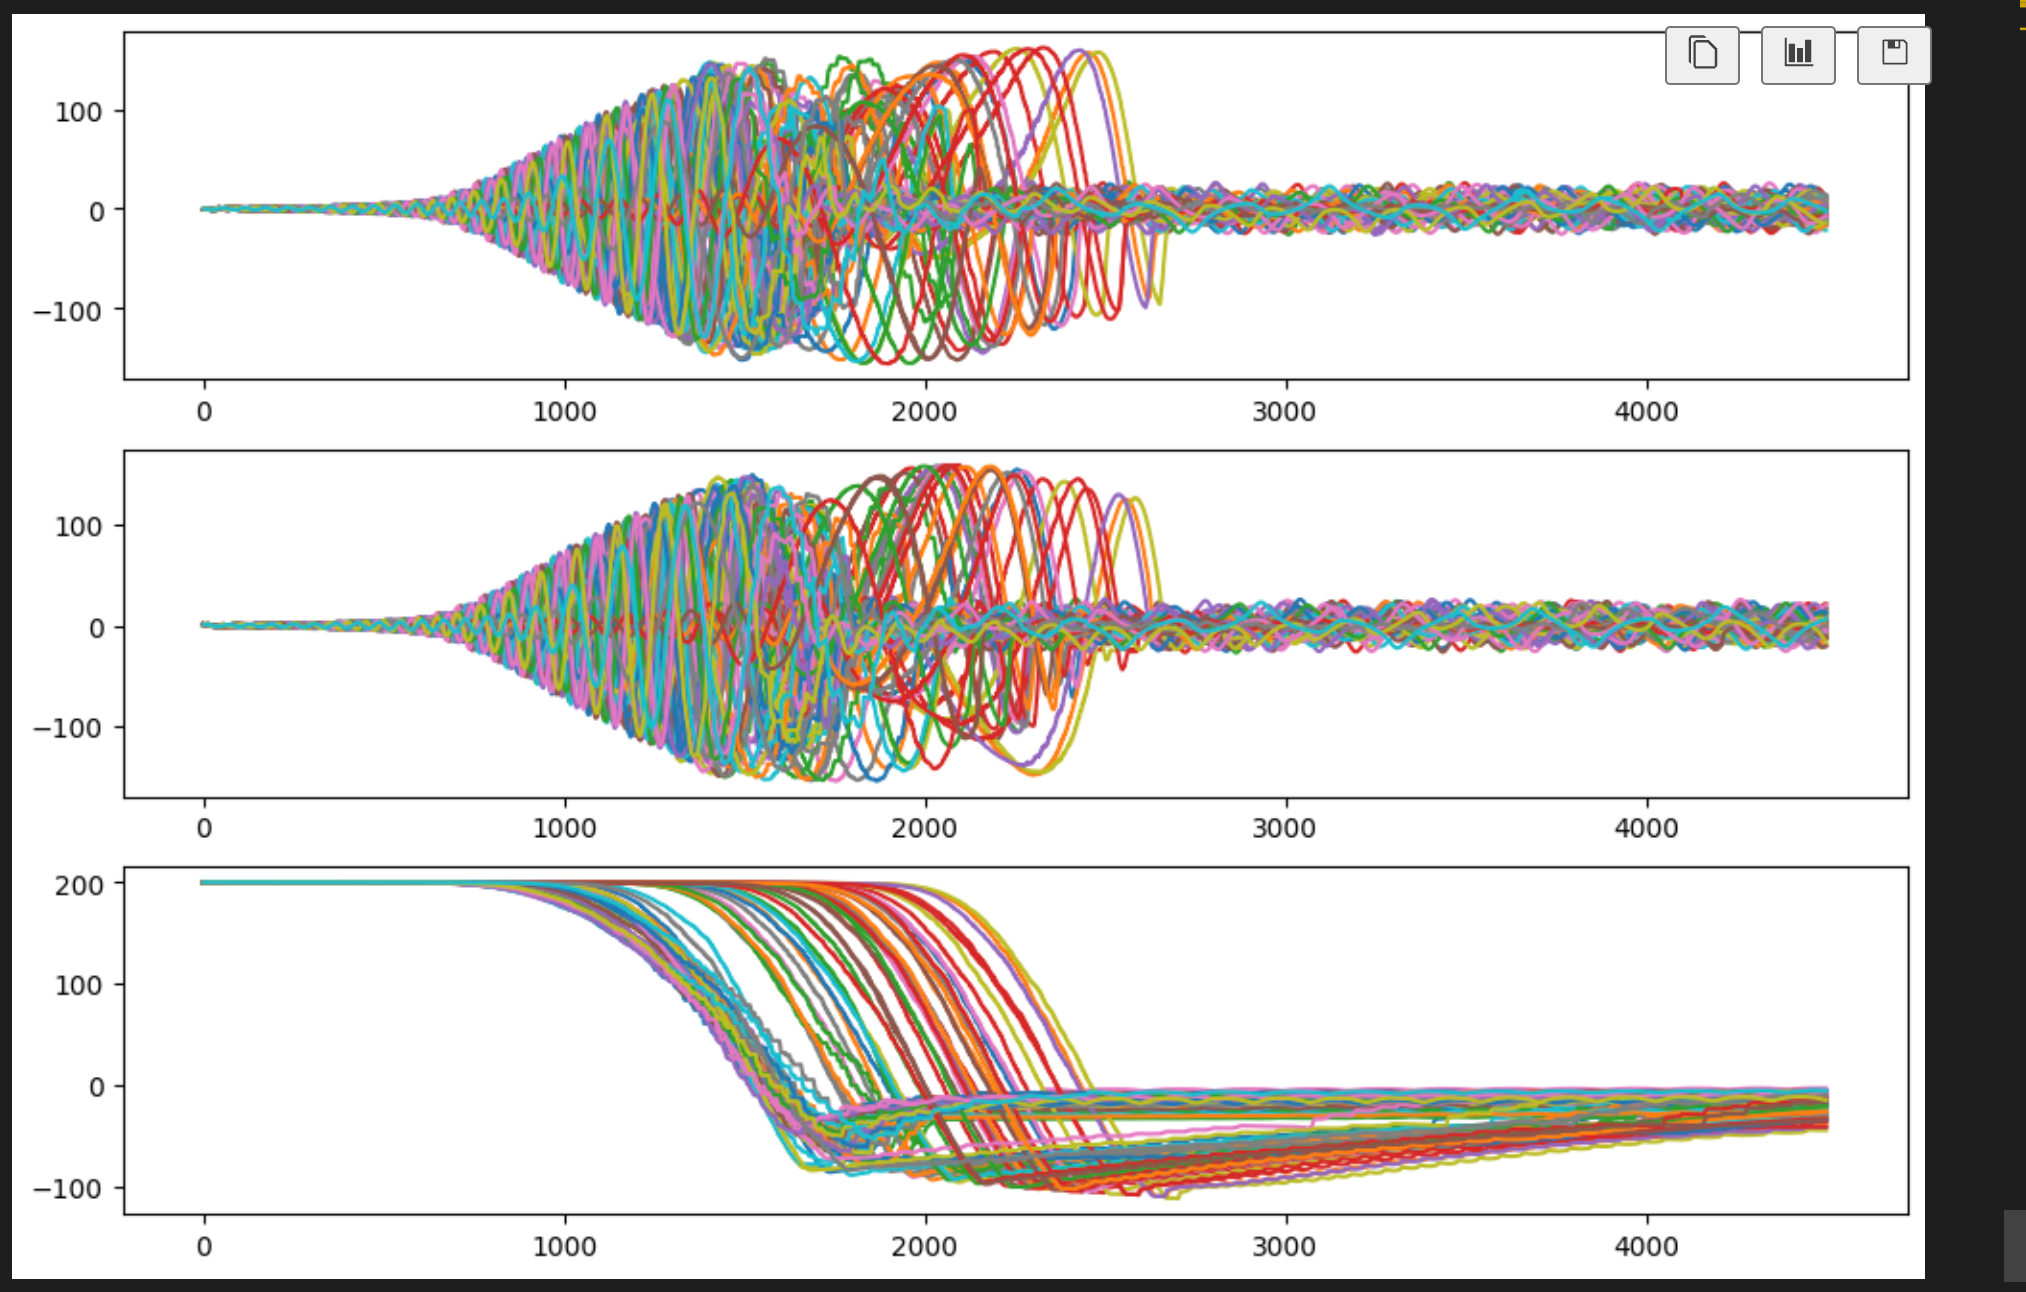
上面的模型中在顶部有一个角速度传感器(xml文件中<sensor> 定义的),绘制角速度传感器的曲线:
plt.figure(figsize=(12, 8))
plt.subplot(3,1,1)
for i in range(nbatch): plt.plot(sensordata[i, :, 0])
plt.subplot(3,1,2)
for i in range(nbatch): plt.plot(sensordata[i, :, 1])
plt.subplot(3,1,3)
for i in range(nbatch): plt.plot(sensordata[i, :, 2])
plt.show()
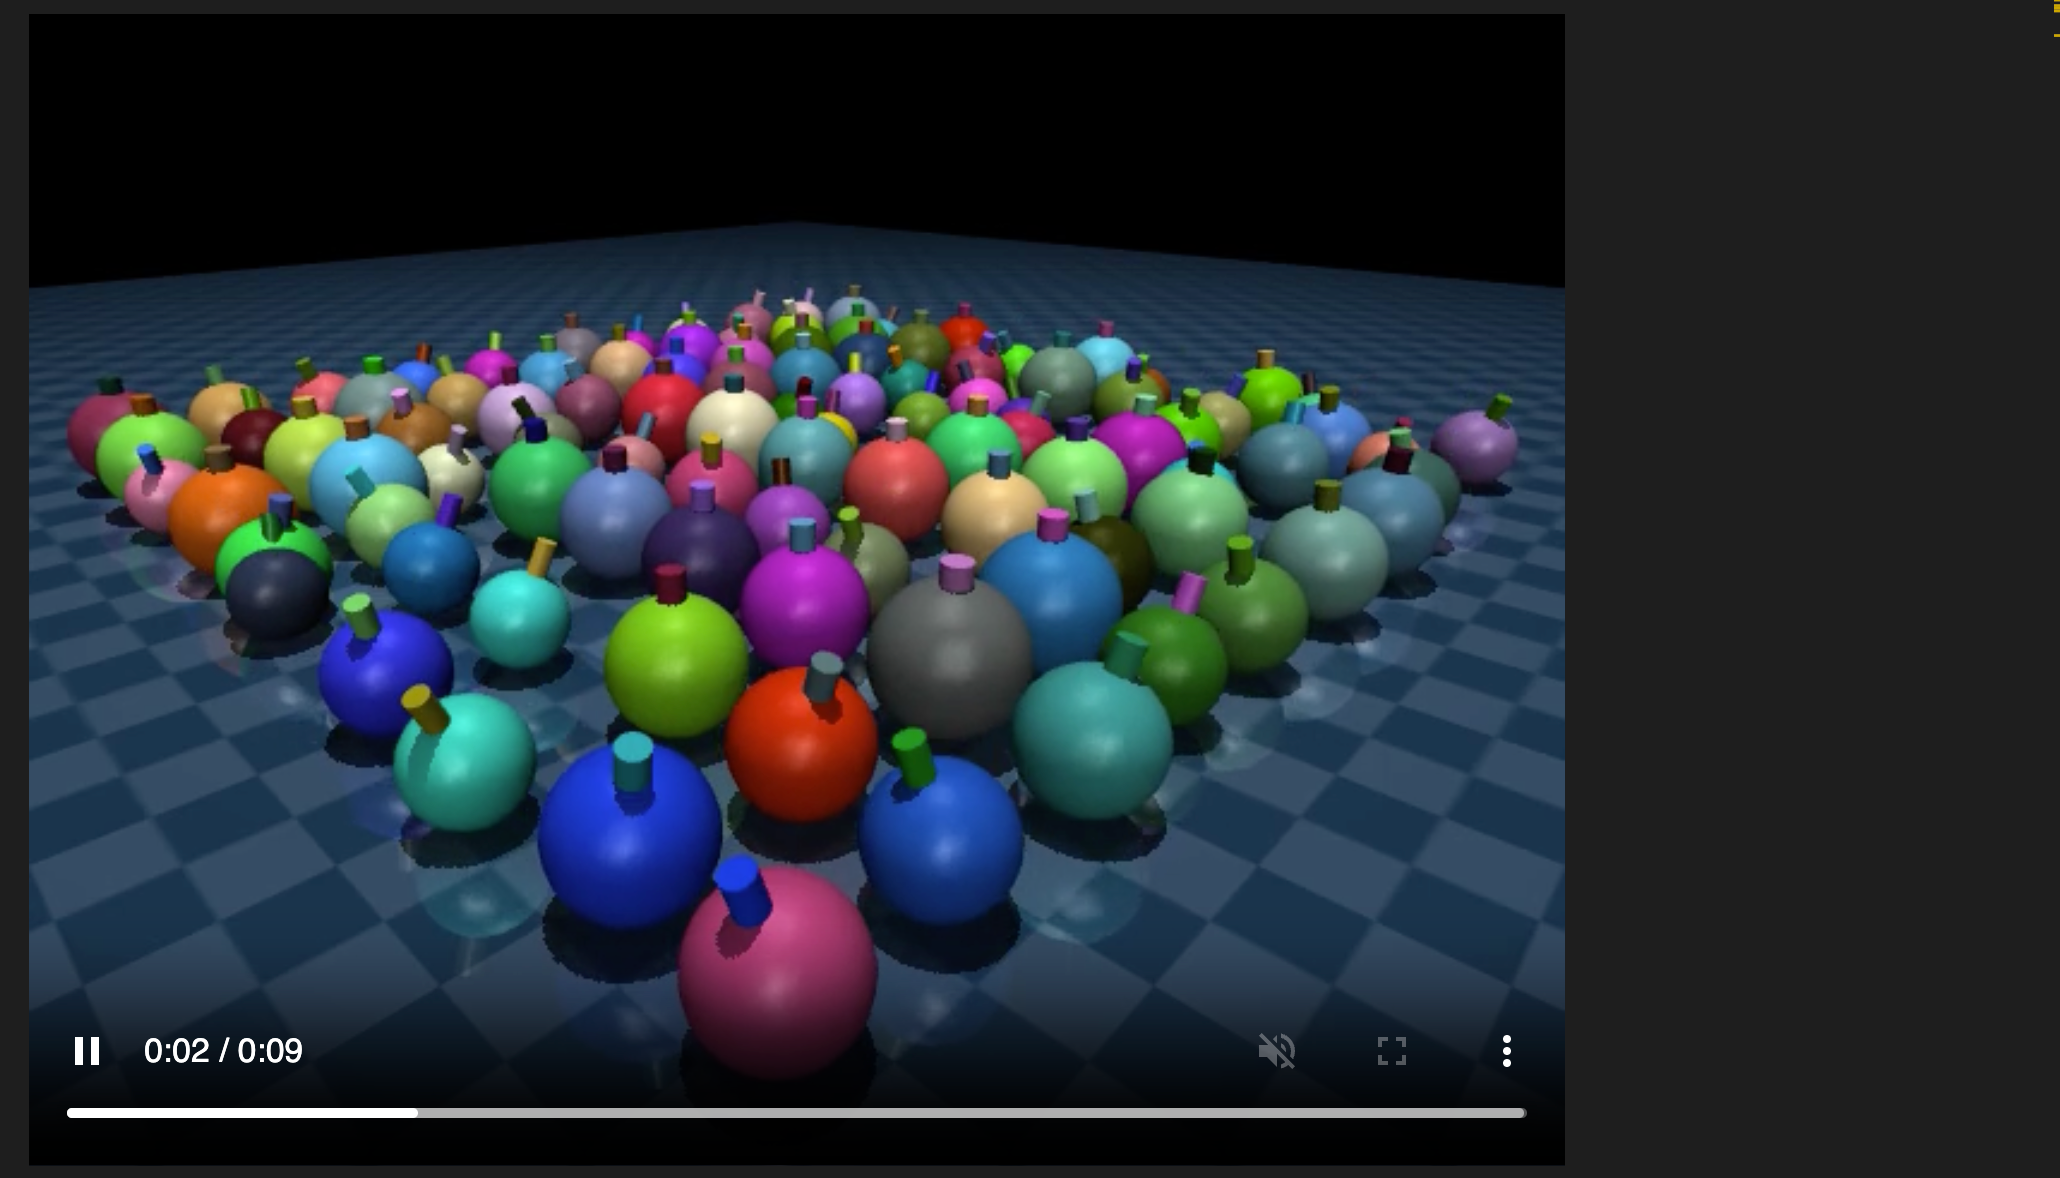
3.3 Example: 不同模型
rollout 支持为每个case使用不同的模型,只要它们的尺寸相同,现在模拟 100 个初始条件相同但大小和颜色不同的陀螺。
【Note】:严格来说模型必须具有相同数量的状态、控件、自由度、传感器输出。最常见的用例是同一个case 有多个模型,但参数值不同。
nbatch = 100
spec = mujoco.MjSpec.from_string(tippe_top)
spec.lights[0].pos[2] = 2
models = []
for i in range(nbatch):
  for geom in spec.geoms:
    if geom.name in ['ball', 'stem', 'ballast']:
      geom.rgba[:3] = np.random.rand(3)
    if geom.name == 'stem':
      stem_geom = geom
    if geom.name == 'ball':
      ball_geom = geom

  stem_geom_size = np.copy(stem_geom.size)
  ball_geom_size = np.copy(ball_geom.size)

  # 修改模型大小
  size_scale = 0.4*np.random.rand(1) + 0.75
  stem_geom.size *= size_scale
  ball_geom.size *= size_scale
  models.append(spec.compile())

  stem_geom.size = stem_geom_size
  ball_geom.size = ball_geom_size
执行仿真:
top_data = mujoco.MjData(top_model)
mujoco.mj_resetDataKeyframe(top_model, top_data, 0)
initial_states = get_state(top_model, top_data, nbatch)
initial_states[:, 1:3] = xy_grid(nbatch, ncols=10, spacing=0.05)

# 运行仿真
start = time.time()
top_datas = [copy.copy(top_data) for _ in range(nthread)]
nstep = int(9 / top_model.opt.timestep)
state, sensordata = rollout.rollout(models, top_datas, initial_states, nstep=nstep)
end = time.time()
渲染视频:
start_render = time.time()
framerate = 60
cam = mujoco.MjvCamera()
mujoco.mjv_defaultCamera(cam)
cam.distance = 0.2
cam.azimuth = 135
cam.elevation = -25
cam.lookat = [.2, -.2, 0.07]
models[0].vis.global_.fovy = 60
frames = render_many(models, top_data, state, framerate, camera=cam)
media.show_video(frames, fps=framerate)
end_render = time.time()

print(f"Rollout time {end-start:.1f} seconds")
print(f"Rendering time {end_render-start_render:.1f} seconds")
由于模型现在不同,即使每次推出的初始状态相同,陀螺仪传感器的测量结果也不一致。
plt.figure(figsize=(12, 8))
plt.subplot(3,1,1)
for i in range(nbatch): plt.plot(sensordata[i, :, 0])
plt.subplot(3,1,2)
for i in range(nbatch): plt.plot(sensordata[i, :, 1])
plt.subplot(3,1,3)
for i in range(nbatch): plt.plot(sensordata[i, :, 2])
plt.show()
3.4 Example: 不同控制输入
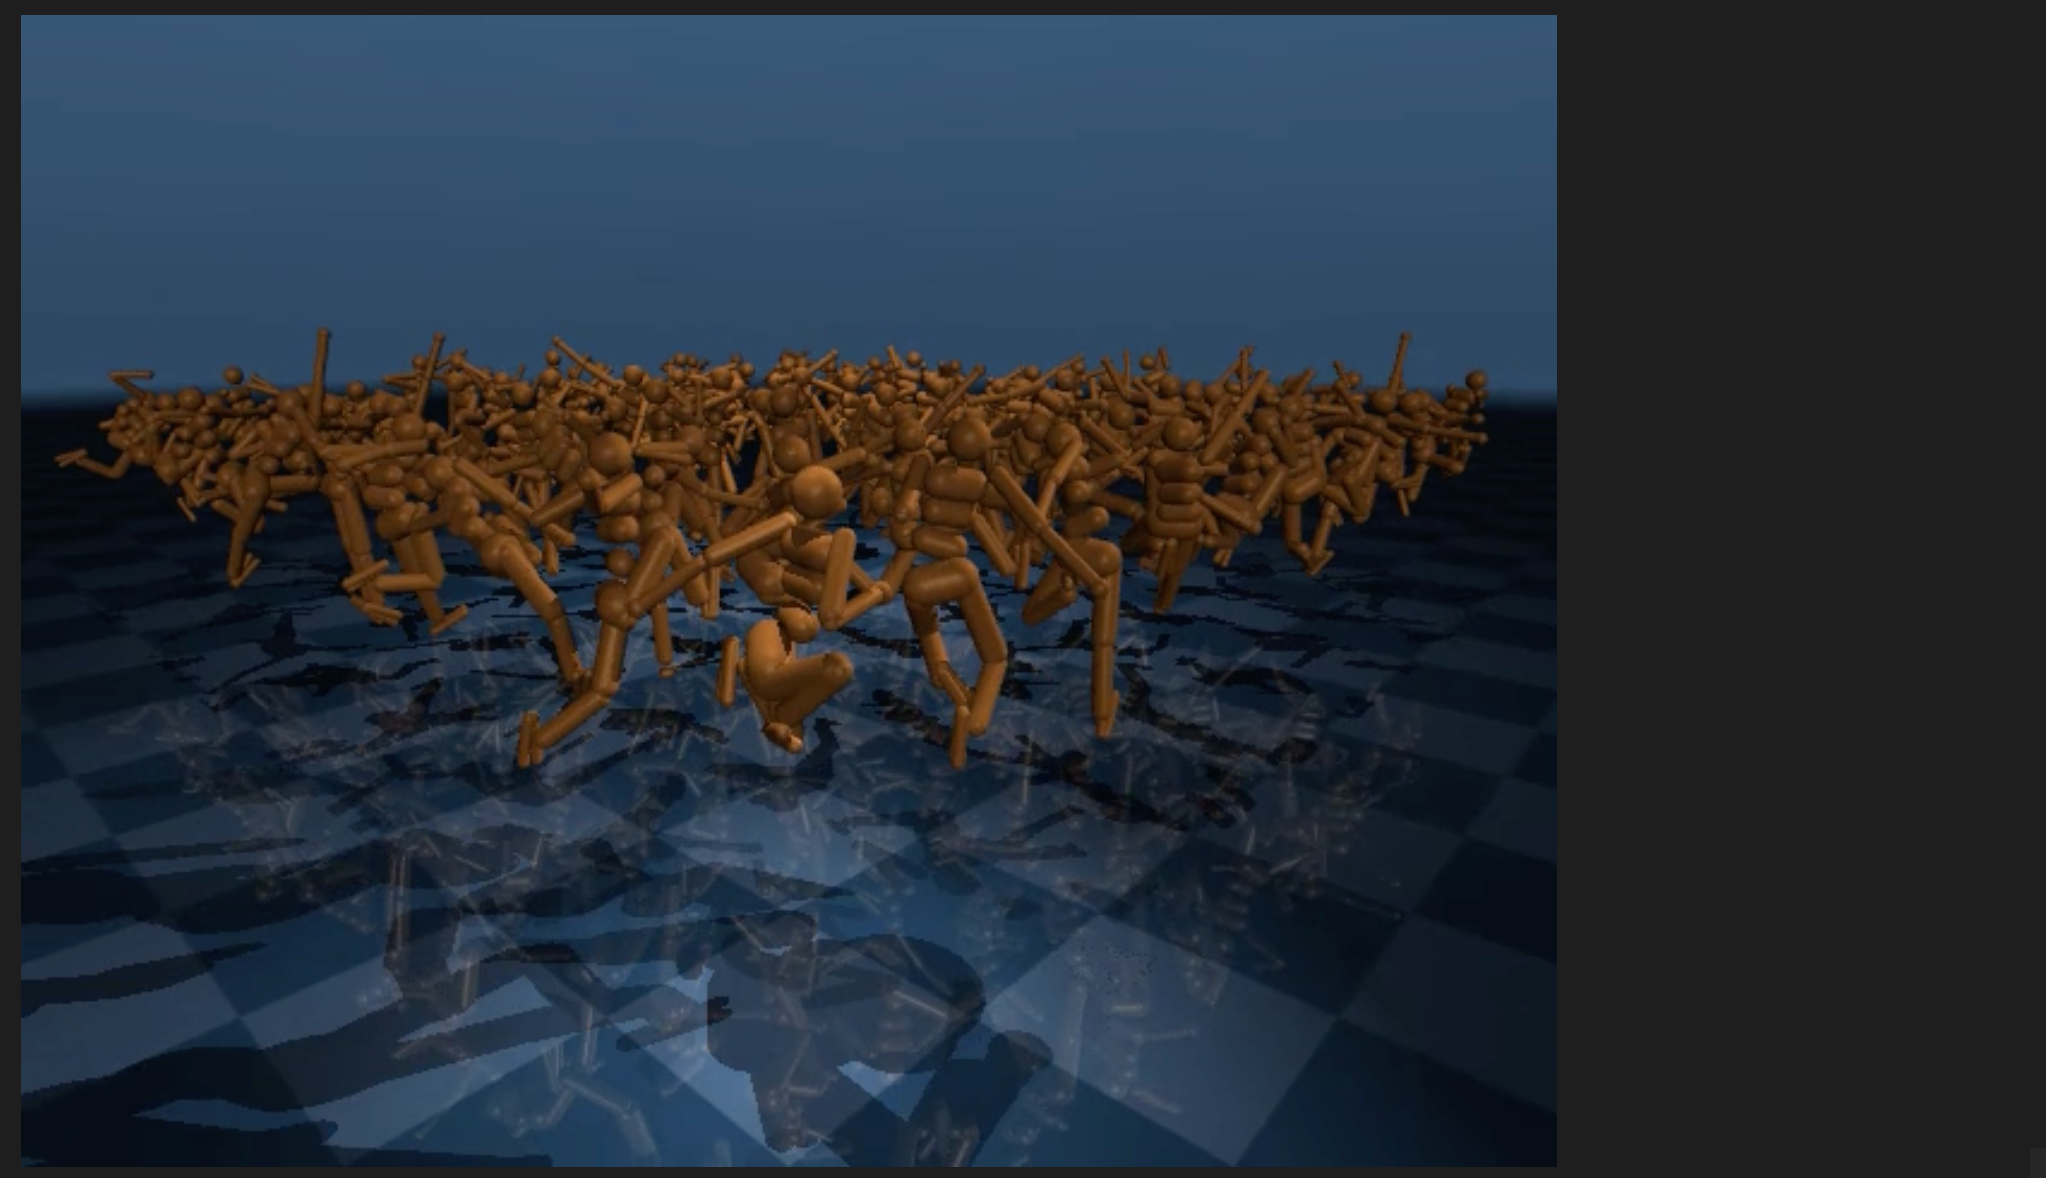
开环控制可以通过 control 参数传递给 rollout。如果传递了该参数,则无需再指定 nstep,因为它可以根据 control 的大小自动推断。下面的代码模拟了 100 个挥舞的人形机器人。每个机器人使用不同的控制信号。
duration = 3        # seconds
framerate = 120     # Hz
生成100个不同的控制序列
nbatch = 100
nstep = int(duration / humanoid_model.opt.timestep)
times = np.linspace(0.0, duration, nstep)
ctrl_phase = 2 * np.pi * np.random.rand(nbatch, 1, humanoid_model.nu)
control = np.sin((2 * np.pi * times).reshape(nstep, 1) + ctrl_phase)
初始化机器人状态
humanoid_data = mujoco.MjData(humanoid_model)
humanoid_data.qvel[2] = 4   # 给机器人z方向上一个速度
initial_states = get_state(humanoid_model, humanoid_data, nbatch)
initial_states[:, 1:3] = xy_grid(nbatch, ncols=10, spacing=1.0)
运行 rollout
start = time.time()
humanoid_datas = [copy.copy(humanoid_data) for _ in range(nthread)]
state, _ = rollout.rollout(humanoid_model, humanoid_datas, initial_states, control)
end = time.time()
渲染结果:
start_render = time.time()
framerate = 120
cam = mujoco.MjvCamera()
mujoco.mjv_defaultCamera(cam)
cam.distance = 10
cam.azimuth = 45
cam.elevation = -15
cam.lookat = [0, 0, 0]
humanoid_model.vis.global_.fovy = 60
frames = render_many(humanoid_model, humanoid_data, state, framerate, camera=cam, light_pos=[0,0,10])
media.show_video(frames, fps=framerate/2)
end_render = time.time()

print(f'Rollout time {end-start:.1f} seconds')
print(f'Render time {end_render-start_render:.1f} seconds')
rollout 的 control_spec 参数可用于指示控制包含执行器、广义力、笛卡尔力、动作捕捉姿势、与或等式约束的激活/停用值。在内部通过 mj_setState 进行管理,而 control_specß 对应于 mj_setState 的 spec 参数。
还可以还应用笛卡尔力,使类人机器人看起来像是在挥动肢体时被拖拽。
xfrc_size = mujoco.mj_stateSize(humanoid_model, mujoco.mjtState.mjSTATE_XFRC_APPLIED)
xfrc = np.zeros((nbatch, nstep, xfrc_size))
head_id = humanoid_model.body('head').id
对每个模型常数但值不同的力
control_xfrc = np.concatenate((control, xfrc), axis=2)
control_spec = mujoco.mjtState.mjSTATE_XFRC_APPLIED.value

start = time.time()
state, _ = rollout.rollout(humanoid_model, humanoid_datas, initial_states, xfrc, control_spec=control_spec)
end = time.time()
渲染仿真结果:
start_render = time.time()
frames = render_many(humanoid_model, humanoid_data, state, framerate=framerate, camera=cam, light_pos=[0,0,10])
media.show_video(frames, fps=framerate/2)
end_render = time.time()

print(f'Rollout time {end-start:.1f} seconds')
print(f'Render time {end_render-start_render:.1f} seconds')

4. 进阶用法
这一章节介绍 rollout 的更高级的用法,这部分内容是在你遇到性能瓶颈或者必须进行取舍的情况下才会考虑到,我个人用到的场景不多。
4.1 跳跃检查
rollout 在默认状态下会对返回的状态和传感器值进行全面的检查,但这种检查比较消耗时间,特别是当传感器数据量比较大的时候,可以通过设置 skip_checks=True 参数来跳过检查的动作,但使用的前提是所有数据维度必须是显示声明,不能让 rollout 自动推导:
model列表长度必须为nbatch;data列表长度必须为nthread;nstep必须明确计算得到;initial_state的 shape 必须为(nbatch x nstate);control是可选的,但如果传入了那么 shape 必须为(nbatch x nstep x ncontrol);state是可选的,但如果传入了那么 shape 必须为(nbatch x nstep x nstate);sensordata是可选的,但如果传入了那么 shape 必须为(nbatch x nstep x nsensordata);
下面的例子展示了一个 10000 个人形模型分别配置是否跳过检查仿真 1 步的情况:
nbatch = 1000
nstep = [1, 10, 100, 500]
ntiming = 5

top_data = mujoco.MjData(top_model)
mujoco.mj_resetDataKeyframe(top_model, top_data, 0)
top_datas = [copy.copy(top_data) for _ in range(nthread)]
initial_state = get_state(top_model, top_data)
initial_state_tiled = get_state(top_model, top_data, nbatch)
返回完整状态的函数:
def rollout_with_checks(nstep):
  state, sensordata = rollout.rollout([top_model]*nbatch, top_datas, initial_state, nstep=nstep)
返回删减状态的函数:
state = None
sensordata = None
def rollout_skip_checks(nstep):
  rollout.rollout([top_model]*nbatch, top_datas, initial_state_tiled, nstep=nstep,
                  state=state, sensordata=sensordata, skip_checks=True)
对比两者并绘制:
t_with_checks = benchmark(lambda x: rollout_with_checks(x), nstep, ntiming=ntiming)
t_skip_checks = benchmark(lambda x: rollout_skip_checks(x), nstep, ntiming=ntiming)

steps_per_second = (nbatch * np.array(nstep)) / np.array(t_with_checks)
steps_per_second_skip_checks = (nbatch * np.array(nstep)) / np.array(t_skip_checks)

plt.loglog(nstep, steps_per_second, label='with checks')
plt.loglog(nstep, steps_per_second_skip_checks, label='skip checks')
plt.ylabel('steps per second')
plt.xlabel('nstep')
ticker = matplotlib.ticker.FuncFormatter(lambda x, p: format(int(x), ','))
plt.gca().yaxis.set_minor_formatter(ticker)
plt.legend()
plt.grid(True, which="both", axis="both")
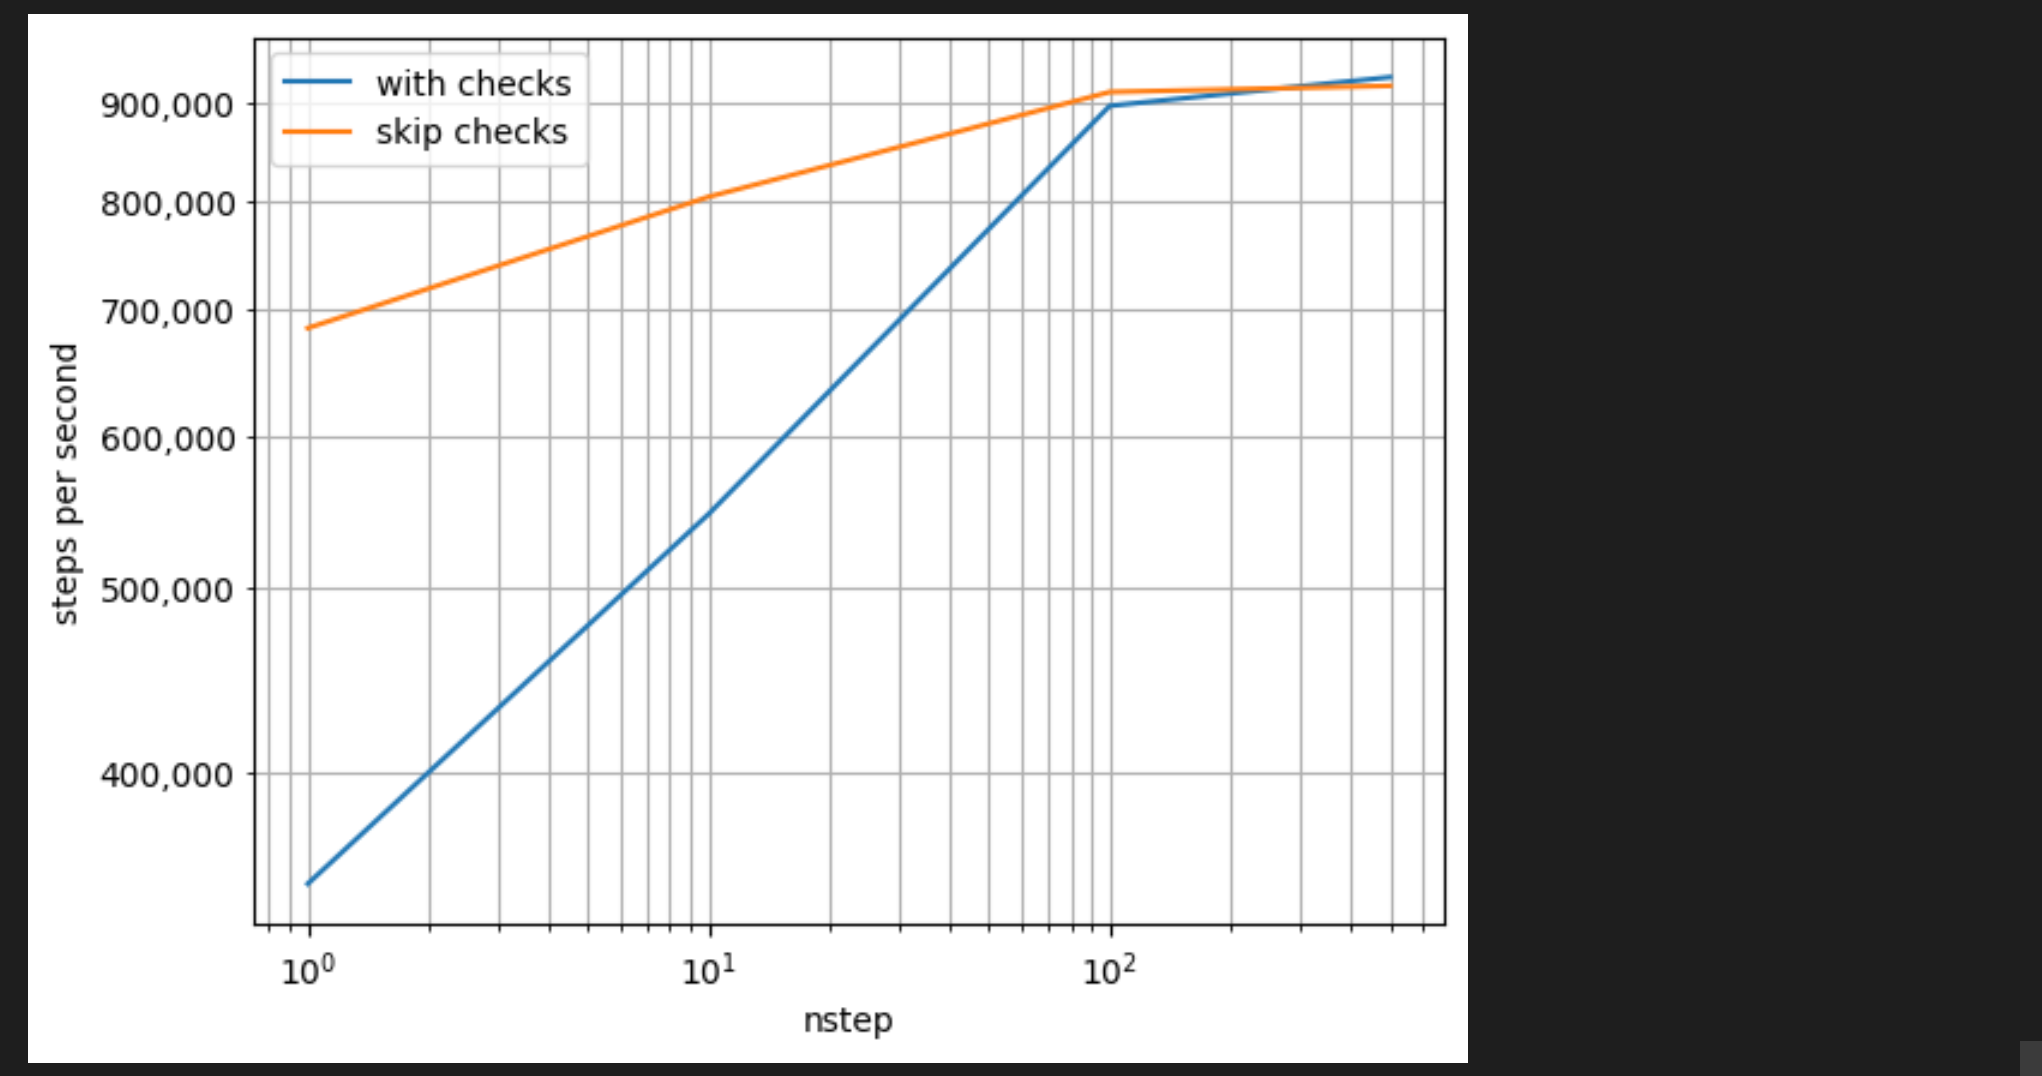
随着 nstep 的增加,使用跳过检查的优势会迅速减弱。然而在较低的 nstep 和较高的batch size下会产生显著的差异。
【Note】:带有检查的版本可以使用non-tiled 的 initial_state,但跳过检查的版本必须使用 tiled 的 initial_state_tiled。
4.2 重用线程池 (Rollout Class 方法)
除了方法 rollout 之外,rollout 模块还提供了 Rollout Class。Rollout 类旨在允许安全地重用内部管理的线程池。当 rollout 时间较短时,重用可以显著加快速度。
下面的代码通过增加 rollout 步数来观察 tippe top 模型的加速变化。
nbatch = 100
nsteps = [2**i for i in [2, 3, 4, 5, 6, 7]]
ntiming = 5

top_data = mujoco.MjData(top_model)
mujoco.mj_resetDataKeyframe(top_model, top_data, 0)
top_datas = [copy.copy(top_data) for _ in range(nthread)]

initial_states = get_state(top_model, top_data, nbatch)
定义两个对比函数
def rollout_method(nstep):
  for i in range(20):
    rollout.rollout(top_model, top_datas, initial_states, nstep=nstep)

def rollout_class(nstep):
  with rollout.Rollout(nthread=nthread) as rollout_:
    for i in range(20):
      rollout_.rollout(top_model, top_datas, initial_states, nstep=nstep)
运行对比:
t_method = benchmark(lambda x: rollout_method(x), nsteps, ntiming)
t_class = benchmark(lambda x: rollout_class(x), nsteps, ntiming)

plt.loglog(nsteps, nbatch * np.array(nsteps) / t_method, label='recreating threadpools')
plt.loglog(nsteps, nbatch * np.array(nsteps) / t_class, label='reusing threadpool')
plt.xlabel('nstep')
plt.ylabel('steps per second')
ticker = matplotlib.ticker.FuncFormatter(lambda x, p: format(int(x), ','))
plt.gca().yaxis.set_minor_formatter(ticker)
plt.legend()
plt.grid(True, which="both", axis="both")
4.3 重用线程池 (Rollout Method 方法)
rollout 通过传入 persistent_pool=True 来创建并重用一个持久线程池。但由于 rollout 是一个函数,它不知道用户何时完成调用,因此需要手动关闭线程池,如下所示:
nbatch = 1000
nstep = 1

top_data = mujoco.MjData(top_model)
mujoco.mj_resetDataKeyframe(top_model, top_data, 0)
top_datas = [copy.copy(top_data) for _ in range(nthread)]

initial_states = get_state(top_model, top_data, nbatch)

rollout.rollout(top_model, top_datas, initial_states, nstep=nstep, persistent_pool=True)    # 创建一个线程池
rollout.rollout(top_model, top_datas, initial_states, nstep=nstep, persistent_pool=True)    # 重用这个线程池
rollout.shutdown_persistent_pool()      # 重用线程池后需要手动关闭
【Note】:如果 rollout 在两次调用之间重用同一个线程池,那么从多个线程调用 rollout 就不再安全了
rollout 有自己的线程管理方式,不要想当然地用常规线程方案。
thread1 = threading.Thread(target=lambda: rollout.rollout(top_model, top_datas, initial_states, nstep=nstep, persistent_pool=True))
thread2 = threading.Thread(target=lambda: rollout.rollout(top_model, top_datas, initial_states, nstep=nstep, persistent_pool=True))

thread1.start()
# thread2.start()       # 非法
thread1.join()
# thread2.join()        # 非法
rollout.shutdown_persistent_pool()
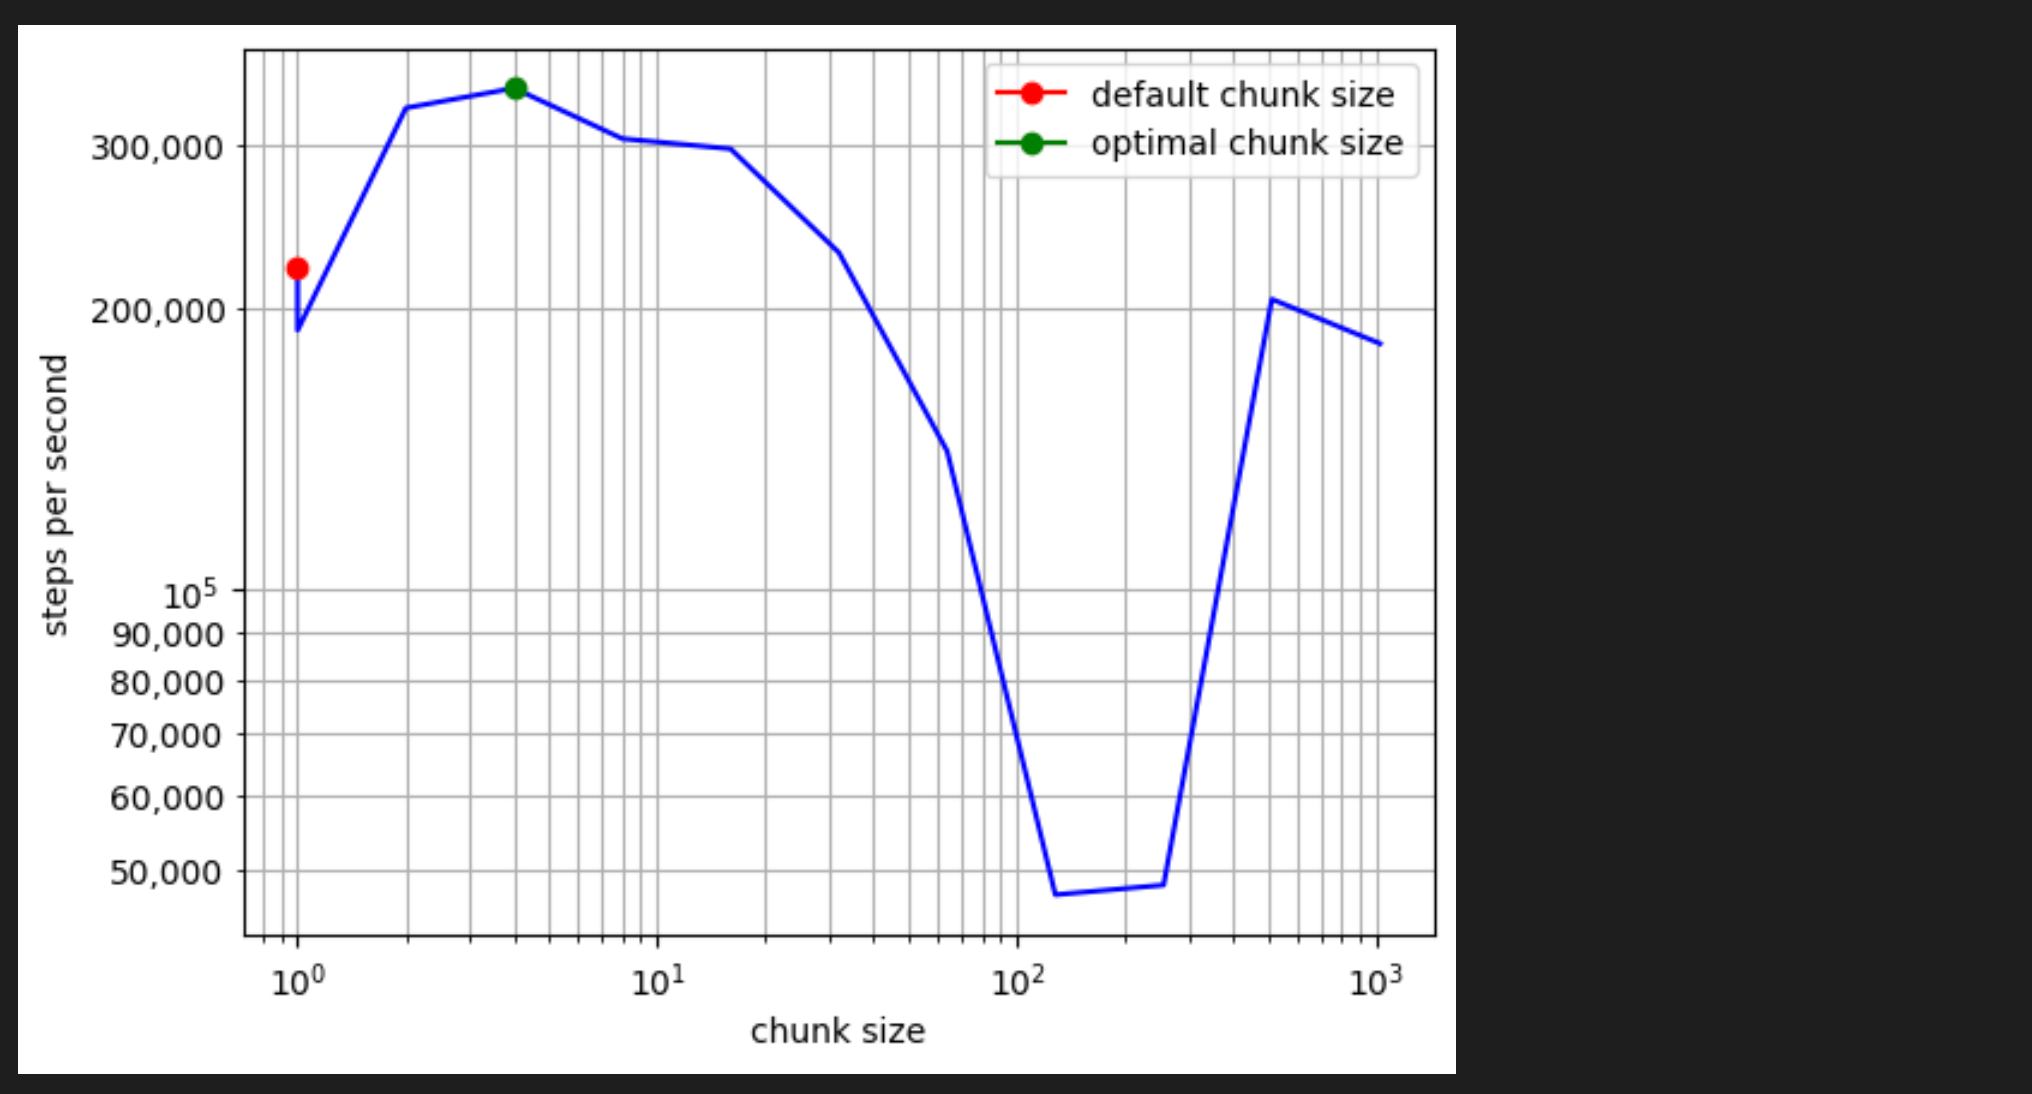
4.4 chunk_size 块大小
为了最大限度地降低通信开销,rollout 会将 rollout 以称为“chunk”的 rollout 组的形式分发到各个线程。默认情况下,每个 chunk 会分配最多 (1, 0.1 * (nbatch / nthread)) 个 rollout。虽然这种分块规则适用于大多数工作负载,但它并非始终最佳,尤其是在使用小型模型进行短时间 rollout 时。
下面的代码绘制了运行 1000 个 hopper,每个 hopper 执行 1 步仿真,默认的块大小比手工定义交大的块大小要慢得多。
nbatch = 100
nstep = 1
ntiming = 20

hopper_model = mujoco.MjModel.from_xml_path(hopper_path)
hopper_data = mujoco.MjData(hopper_model)
hopper_datas = [copy.copy(hopper_data) for _ in range(nthread)]

initial_states = get_state(hopper_model, hopper_data, nbatch)

# 定义获取chunk_size的rollout函数
def rollout_chunk_size(chunk_size=None):
    rollout.rollout(hopper_model, hopper_datas, initial_states, nstep=nstep, chunk_size=chunk_size)

default_chunk_size = int(max(1.0, 0.1*nbatch / nthread))
chunk_sizes = sorted([1, 2, 4, 8, 16, 32, 64, 128, 256, 512, 1024, default_chunk_size])
t_chunk_size = benchmark(lambda x: rollout_chunk_size(x), chunk_sizes, ntiming=ntiming)

steps_per_second = nbatch * nstep / t_chunk_size
default_index = [i for i, c in enumerate(chunk_sizes) if c == default_chunk_size][0]
optimal_index = np.argmax(steps_per_second)
plt.loglog(chunk_sizes, steps_per_second, color='b')
plt.plot(chunk_sizes[default_index], steps_per_second[default_index], marker='o', color='r', label='default chunk size')
plt.plot(chunk_sizes[optimal_index], steps_per_second[optimal_index], marker='o', color='g', label='optimal chunk size')
plt.ylabel('steps per second')
plt.xlabel('chunk size')
ticker = matplotlib.ticker.FuncFormatter(lambda x, p: format(int(x), ','))
plt.gca().yaxis.set_minor_formatter(ticker)
plt.legend()
plt.grid(True, which="both", axis="both")

print(f'default chunk size: {default_chunk_size} \t steps per second: {steps_per_second[default_index]:0.1f}')
print(f'optimal chunk size: {chunk_sizes[optimal_index]} \t steps per second: {steps_per_second[optimal_index]:0.1f}')
4.5 Warmstarting 热启动
initial_warmstart 参数可用于热启动约束求解器,在分步展开模型时非常有用。如果没有热启动,涉及多体接触的混沌系统可能会发散。
下面的代码使用接触求解器更改为 CG 的 tippe top 模型来演示这一点,接触力计算的可重复性比使用默认的牛顿法更低,并可以展示热启动的优势。
模拟运行三次。一次以 6000 步展开;一次以 100 个 60 步的块进行热启动;一次以 100 个 60 步的块进行非热启动。
top_model_cg = copy.copy(top_model)

# 因为牛顿求解器的收敛效果太好很难对比出热启动的效果,因此这里使用 CG 求解器来放大热启动的差异。
top_model_cg.opt.solver = mujoco.mjtSolver.mjSOL_CG
初始化
chunks = 100
steps_per_chunk = 60
nstep = steps_per_chunk*chunks

top_data_cg = mujoco.MjData(top_model_cg)
mujoco.mj_resetDataKeyframe(top_model_cg, top_data_cg, 0)
initial_state = get_state(top_model_cg, top_data_cg)
rollout 用 nstep 启动
start = time.time()
state_all, _ = rollout.rollout(top_model_cg, top_data_cg, initial_state, nstep=nstep)
rollout 以 chunk 方式用 warmstarting 启动
state_chunks = []
state_chunk, _ = rollout.rollout(top_model_cg, top_data_cg, initial_state, nstep=steps_per_chunk)
state_chunks.append(state_chunk)
for _ in range(chunks-1):
  state_chunk, _ = rollout.rollout(top_model_cg, top_data_cg, state_chunks[-1][0, -1, :],
                                   nstep=steps_per_chunk, initial_warmstart=top_data_cg.qacc_warmstart)
  state_chunks.append(state_chunk)
state_all_chunked_warmstart = np.concatenate(state_chunks, axis=1)
rollout 以 chunks 方式不用 warmstarting 启动
state_chunks = []
state_chunk, _ = rollout.rollout(top_model_cg, top_data_cg, initial_state, nstep=steps_per_chunk)
state_chunks.append(state_chunk)
first_warmstart = None
for i in range(chunks-1):
  state_chunk, _ = rollout.rollout(top_model_cg, top_data_cg, state_chunks[-1][0, -1, :], nstep=steps_per_chunk)
  state_chunks.append(state_chunk)
state_all_chunked = np.concatenate(state_chunks, axis=1)
end = time.time()
渲染结果
start_render = time.time()
framerate = 60
state_render = np.concatenate((state_all, state_all_chunked, state_all_chunked_warmstart), axis=0)
camera = 'distant'
frames1 = render_many(top_model_cg, top_data_cg, state_all, framerate, shape=(240, 320), transparent=False, camera=camera)
frames2 = render_many(top_model_cg, top_data_cg, state_all_chunked_warmstart, framerate, shape=(240, 320), transparent=False, camera=camera)
frames3 = render_many(top_model_cg, top_data_cg, state_all_chunked, framerate, shape=(240, 320), transparent=False, camera=camera)
media.show_video(np.concatenate((frames1, frames2, frames3), axis=2))
end_render = time.time()

print(f'Rollout took {end-start:.1f} seconds')
print(f'Rendering took {end_render-start_render:.1f} seconds')
【Note】:这里为了更好的说明将代码拆成了 6 块,所以 start = time.time() 这行代码的计时可能不准确,如果你先要更明显的对比可以将这 6 块合并成一块再去运行。
下图中间的动画(使用热启动)与左侧的连续滚动一致,而未使用热启动的模型出现了分歧。
5. Benchmarks
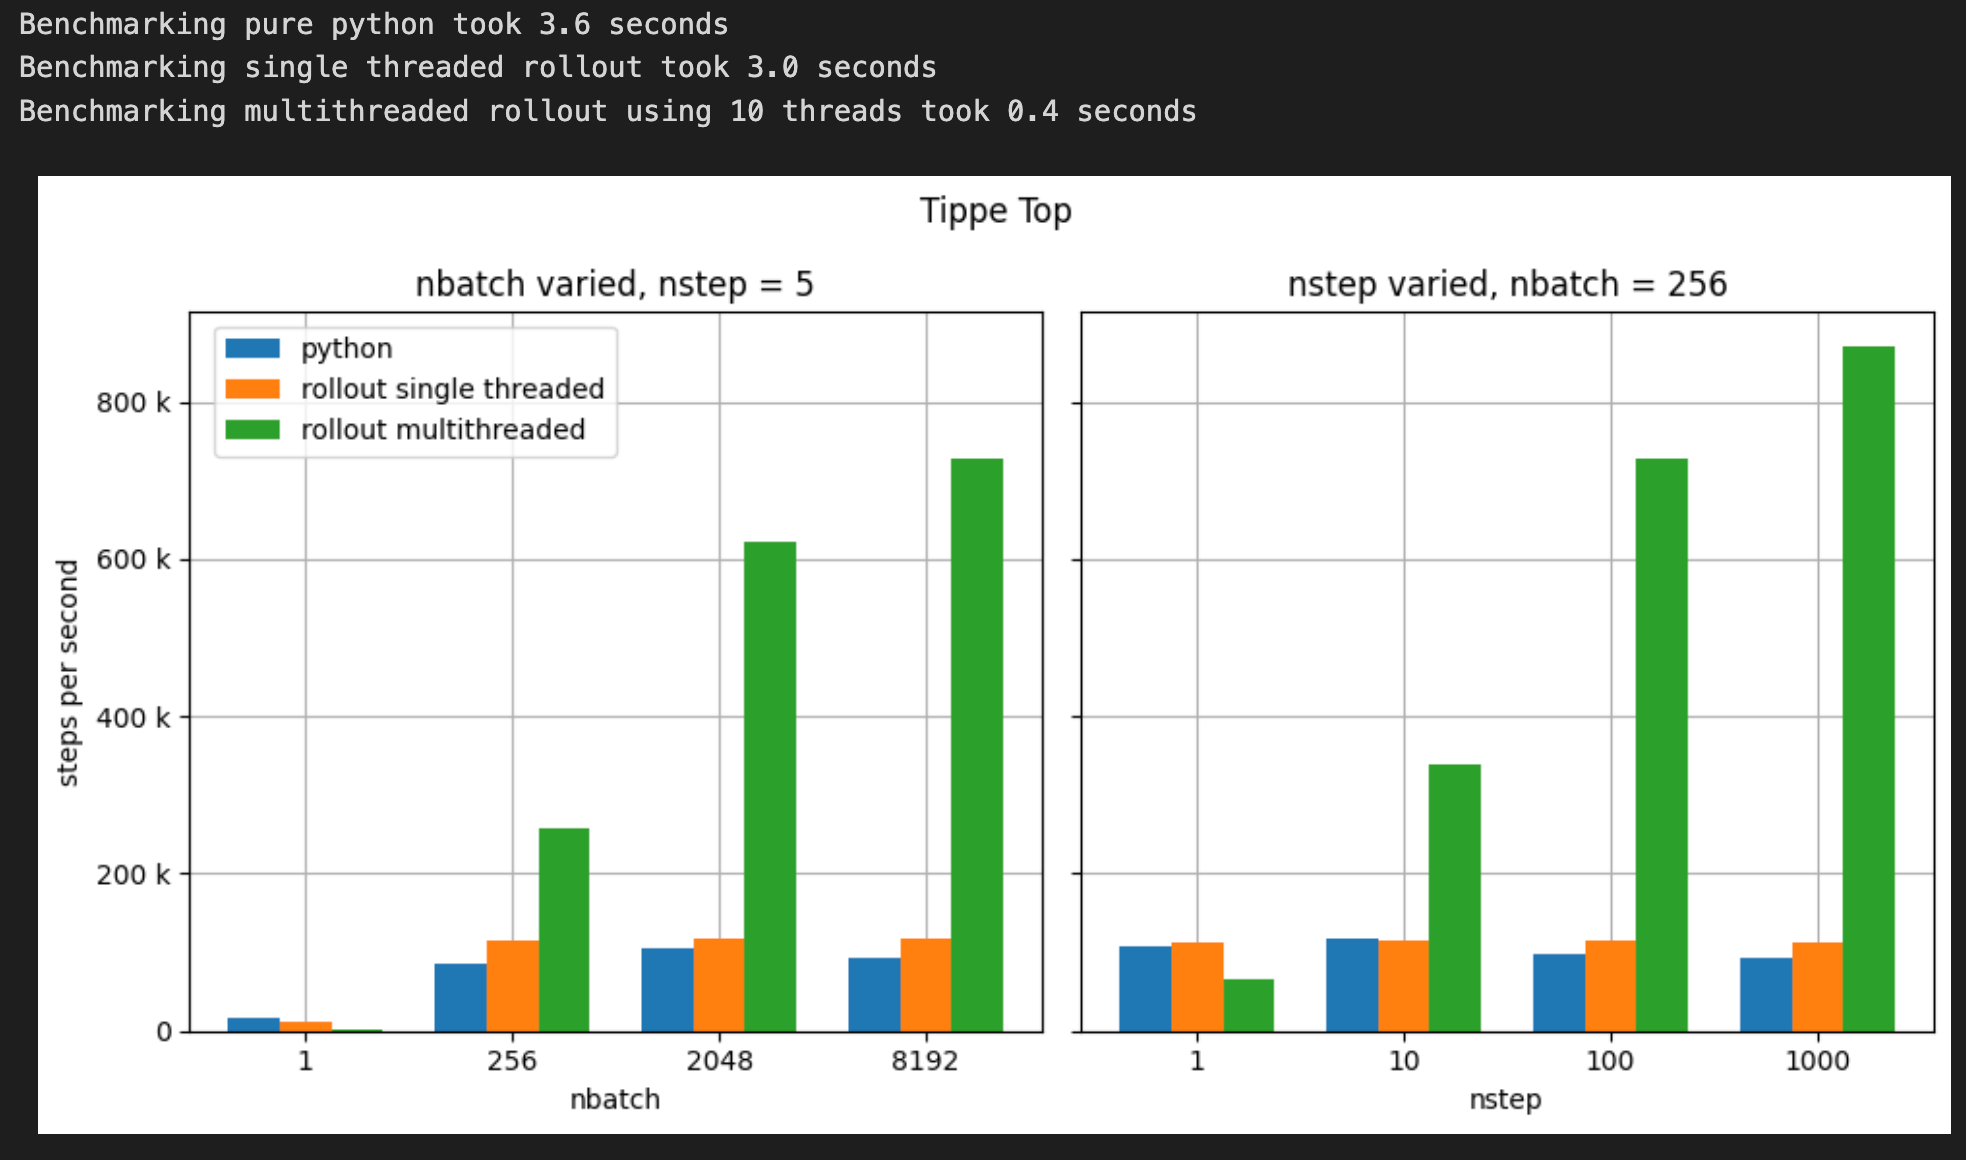
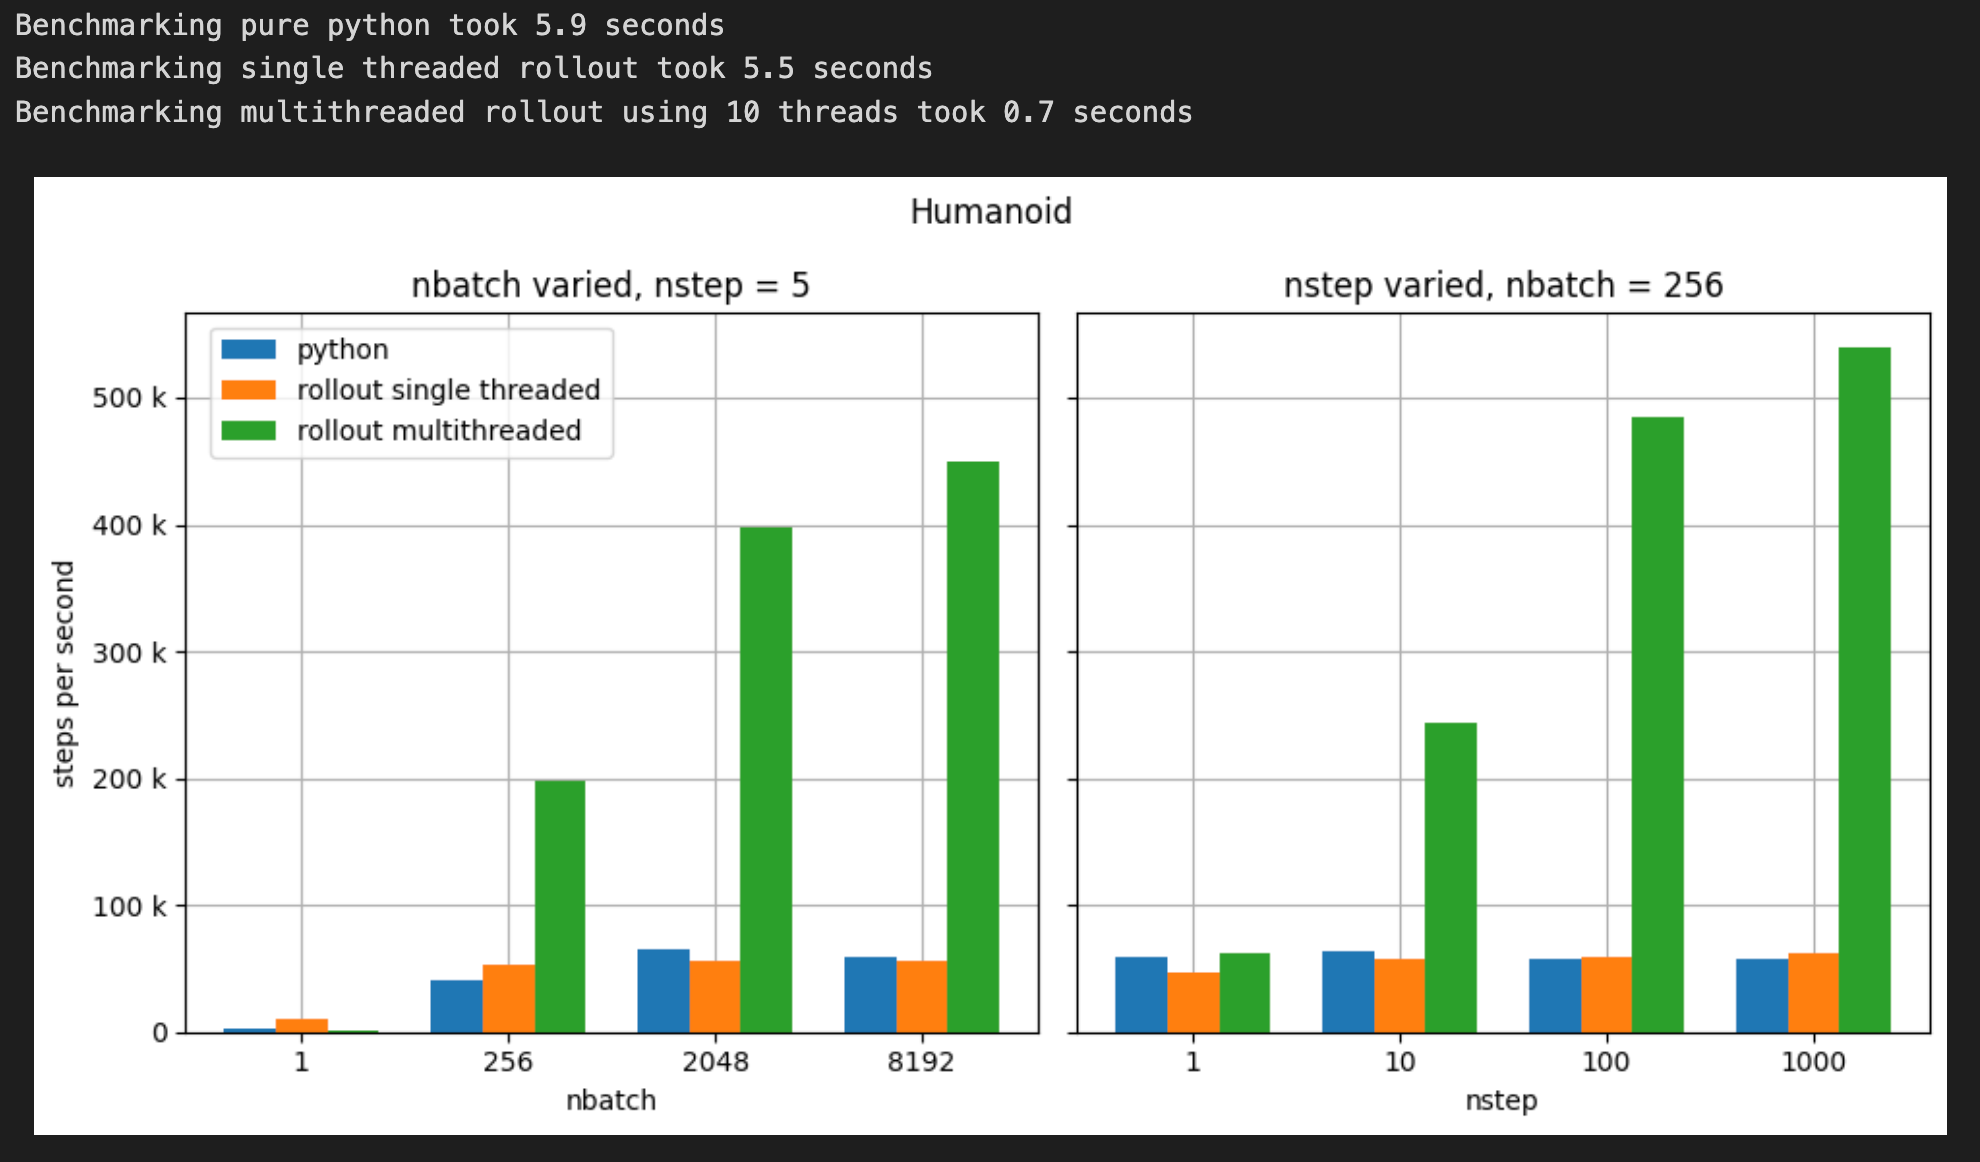
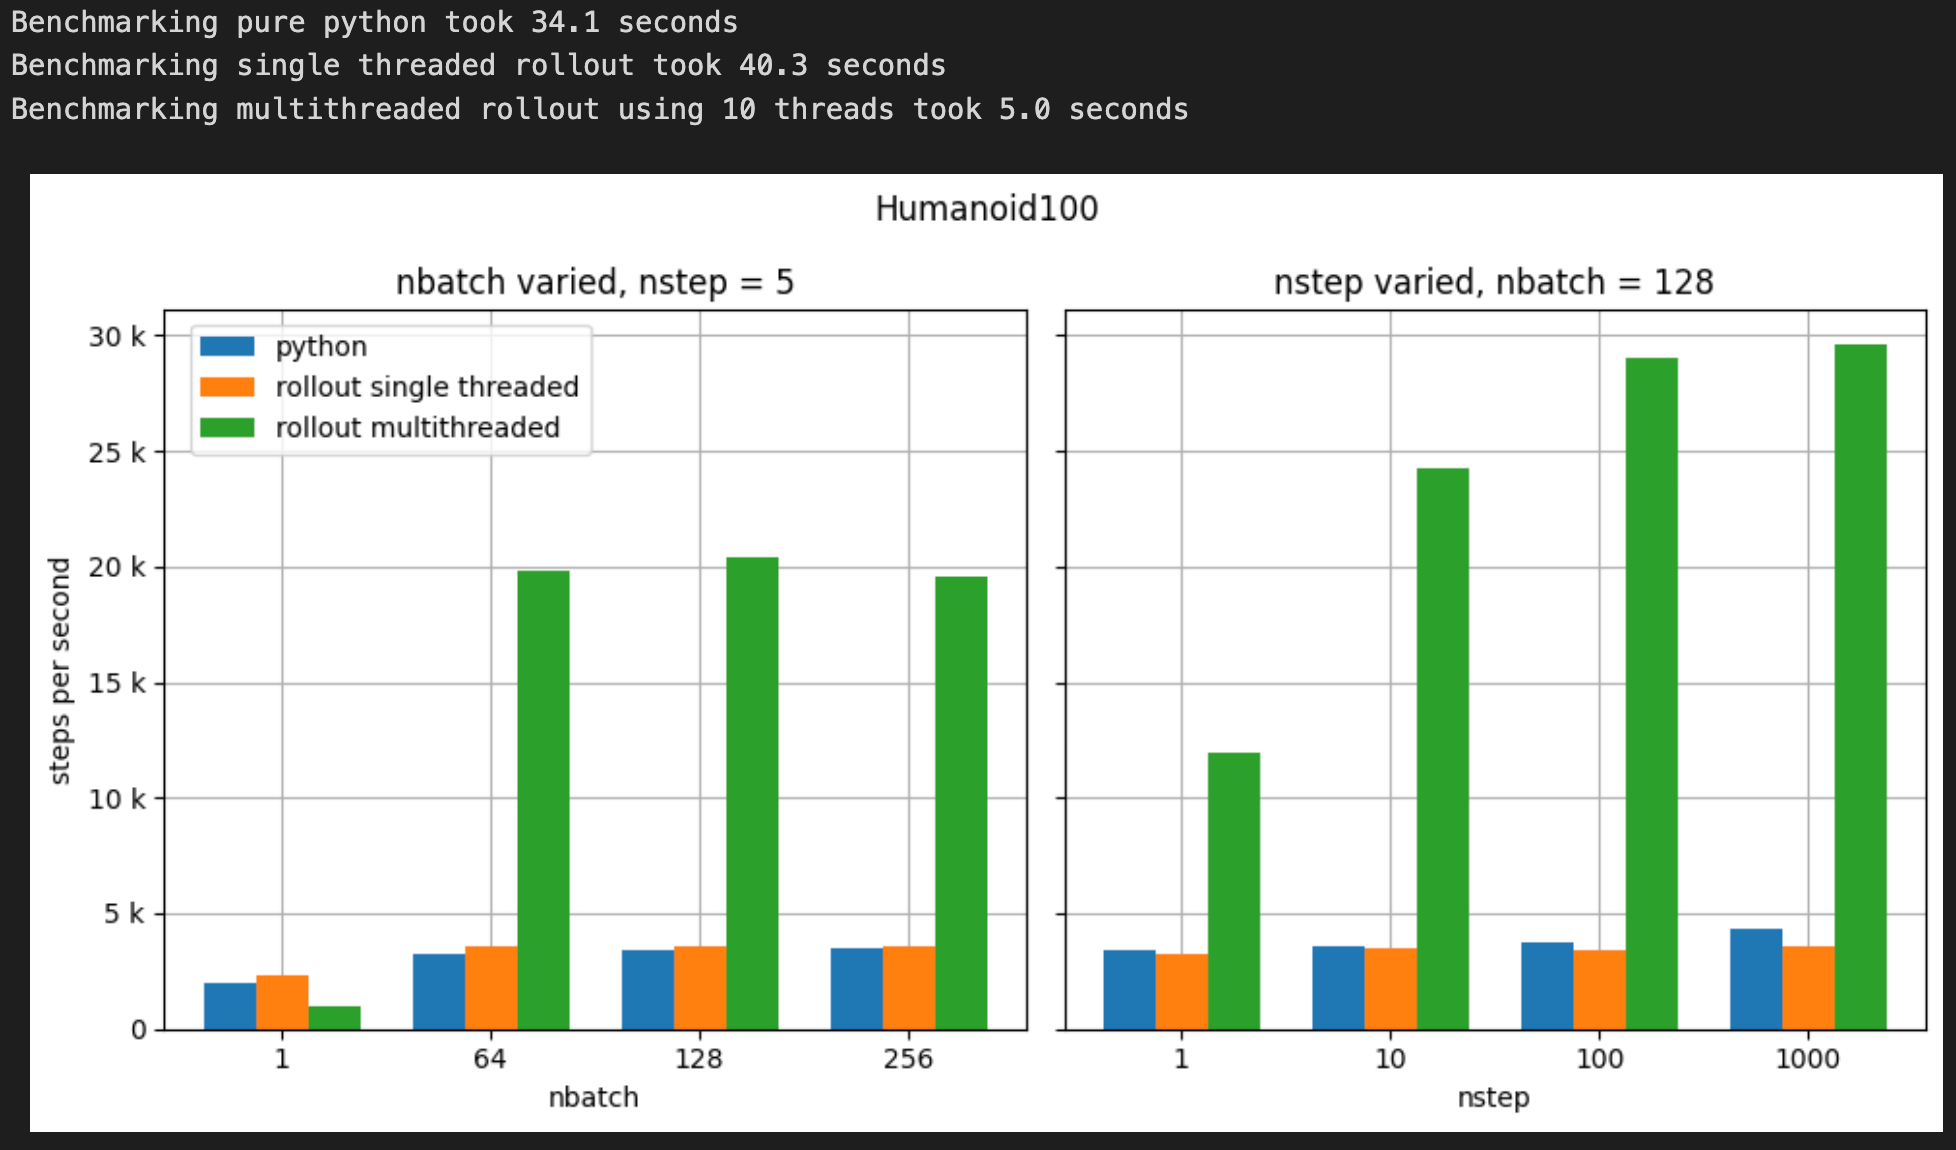
mujoco 中的 rollout.rollout 函数可以按固定步数批量运行模拟,在单线程或多线程模式下运行。相比纯 Python 程序,rollout 的加速效果非常显著,因为 rollout 可以轻松配置为使用多线程。
为了展示加速效果,下面的代码将使用“tippe top”、“humanoid”和“humanoid100” 模型运行基准测试。
Python rollouts VS rollout
纯手动方式推动每一步仿真:
def python_rollout(model, data, nbatch, nstep):
    for i in range(nbatch):
        for j in range(nstep):
            mujoco.mj_step(model, data)
为了使用 rollout 运行 nbatch rollout,需要创建一个 nbatch 初始状态数组,并位每个线程传递一个 MjData,由 nbatch、nstep 和 nthread 参数化后,最终的 rollout 调用结果如下:
def nthread_rollout(model, data, nbatch, nstep, nthread, rollout_):
  rollout_.rollout([model]*nbatch,
                   [copy.copy(data) for _ in range(nthread)],
                   np.tile(get_state(model, data), (nbatch, 1)),
                   nstep=nstep,
                   skip_checks=True)
然后在单线程和多线程模式下对手工循环和 rollout 进行基准测试。官方博客中的这三个基准测试在 AMD 5800X3D 上总共运行大约需要 2.5 分钟。
5.1 Benchmarking 辅助工具
为了进行benchmarking测试定义一些辅助工具:
top_model = mujoco.MjModel.from_xml_string(tippe_top)

# 初始化
def init_top(model):
  data = mujoco.MjData(model)
  mujoco.mj_resetDataKeyframe(model, data, 0)
  return data

# 创建humanoid模型
humanoid_model = mujoco.MjModel.from_xml_path(humanoid_path)
humanoid_data = mujoco.MjData(humanoid_model)
humanoid_data.qvel[2] = 4 # 给模型一个z方向的初速度
while humanoid_data.time < 2.0:
  mujoco.mj_step(humanoid_model, humanoid_data)
humanoid_initial_state = get_state(humanoid_model, humanoid_data)
def init_humanoid(model):
  data = mujoco.MjData(model)
  mujoco.mj_setState(model, data, humanoid_initial_state.flatten(),
                     mujoco.mjtState.mjSTATE_FULLPHYSICS)
  return data

# 创建humanoid100模型
humanoid100_model = mujoco.MjModel.from_xml_path(humanoid100_path)
humanoid100_data = mujoco.MjData(humanoid100_model)
while humanoid100_data.time < 4.0:
  mujoco.mj_step(humanoid100_model, humanoid100_data)
humanoid100_initial_state = get_state(humanoid100_model, humanoid100_data)
def init_humanoid100(model):
  data = mujoco.MjData(model)
  mujoco.mj_setState(model, data, humanoid100_initial_state.flatten(),
                     mujoco.mjtState.mjSTATE_FULLPHYSICS)
  return data

def benchmark_rollout(model, init_model, nbatch, nstep, nominal_nbatch, nominal_nstep, ntiming=1):
  print('Benchmarking pure python', end='\r')
  start = time.time()
  t_python_nbatch = benchmark(lambda x, data: python_rollout(model, data, x, nominal_nstep), nbatch, ntiming,
                              f_init=lambda x: init_model(model))
  t_python_nstep  = benchmark(lambda x, data: python_rollout(model, data, nominal_nbatch, x), nstep,  ntiming,
                              f_init=lambda x: init_model(model))
  end = time.time()
  print(f'Benchmarking pure python took {end-start:0.1f} seconds')

  print('Benchmarking single threaded rollout', end='\r')
  with rollout.Rollout(nthread=0) as rollout_:
    start = time.time()
    t_rollout_single_nbatch = benchmark(lambda x, data: nthread_rollout(model, data, x, nominal_nstep,  nthread=1, rollout_=rollout_),
                                        nbatch, ntiming,
                                        f_init=lambda x: init_model(model))
    t_rollout_single_nstep  = benchmark(lambda x, data: nthread_rollout(model, data, nominal_nbatch, x, nthread=1, rollout_=rollout_),
                                        nstep,  ntiming, f_init=lambda x: init_model(model))
    end = time.time()
  print(f'Benchmarking single threaded rollout took {end-start:0.1f} seconds')

  print(f'Benchmarking multithreaded rollout using {nthread} threads', end='\r')
  with rollout.Rollout(nthread=nthread) as rollout_:
    start = time.time()
    t_rollout_multi_nbatch = benchmark(lambda x, data: nthread_rollout(model, data, x, nominal_nstep,  nthread, rollout_=rollout_),
                                       nbatch, ntiming, f_init=lambda x: init_model(model))
    t_rollout_multi_nstep  = benchmark(lambda x, data: nthread_rollout(model, data, nominal_nbatch, x, nthread, rollout_=rollout_),
                                       nstep,  ntiming, f_init=lambda x: init_model(model))
    end = time.time()
  print(f'Benchmarking multithreaded rollout using {nthread} threads took {end-start:0.1f} seconds')

  return (t_python_nbatch, t_rollout_single_nbatch, t_rollout_multi_nbatch,
          t_python_nstep, t_rollout_single_nstep, t_rollout_multi_nstep)

def plot_benchmark(results, nbatch, nstep, nominal_nbatch, nominal_nstep, title):
  (t_python_nbatch, t_rollout_single_nbatch, t_rollout_multi_nbatch,
   t_python_nstep, t_rollout_single_nstep, t_rollout_multi_nstep) = results

  width = 0.25
  x = np.array([i for i in range(len(nbatch))])

  ticker = matplotlib.ticker.EngFormatter(unit='')

  fig, (ax1, ax2) = plt.subplots(1, 2, sharey=True)
  steps_per_t = np.array(nbatch) * nominal_nstep
  steps_per_t_python = steps_per_t / t_python_nbatch
  steps_per_t_single = steps_per_t / t_rollout_single_nbatch
  steps_per_t_multi  = steps_per_t / t_rollout_multi_nbatch
  ax1.bar(x + 0*width, steps_per_t_python, width=width, label='python')
  ax1.bar(x + 1*width, steps_per_t_single, width=width, label='rollout single threaded')
  ax1.bar(x + 2*width, steps_per_t_multi, width=width, label='rollout multithreaded')
  ax1.set_xticks(x + width, nbatch)
  ax1.yaxis.set_major_formatter(ticker)
  ax1.grid()
  ax1.set_axisbelow(True)
  ax1.set_xlabel('nbatch')
  ax1.set_ylabel('steps per second')
  ax1.set_title(f'nbatch varied, nstep = {nominal_nstep}')

  x = np.array([i for i in range(len(nstep))])
  steps_per_t = np.array(nstep) * nominal_nbatch
  steps_per_t_python = steps_per_t / t_python_nstep
  steps_per_t_single = steps_per_t / t_rollout_single_nstep
  steps_per_t_multi  = steps_per_t / t_rollout_multi_nstep
  ax2.bar(x + 0*width, steps_per_t_python, width=width, label='python')
  ax2.bar(x + 1*width, steps_per_t_single, width=width, label='rollout single threaded')
  ax2.bar(x + 2*width, steps_per_t_multi, width=width, label='rollout multithreaded')
  ax2.set_xticks(x + width, nstep)
  ax2.yaxis.set_major_formatter(ticker)
  ax2.grid()
  ax2.set_axisbelow(True)
  ax2.set_xlabel('nstep')
  ax2.set_title(f'nstep varied, nbatch = {nominal_nbatch}')

  ax1.legend(loc=(0.03, 0.8))
  fig.set_size_inches(10, 5)
  plt.suptitle(title)
  plt.tight_layout()
5.2 Tippe Top Benchmark
nominal_nbatch = 256
nominal_nstep = 5
nbatch = [1, 256, 2048, 8192]
nstep = [1, 10, 100, 1000]

top_benchmark_results = benchmark_rollout(top_model, init_top,
                                          nbatch, nstep,
                                          nominal_nbatch, nominal_nstep)
plot_benchmark(top_benchmark_results, nbatch, nstep,
               nominal_nbatch, nominal_nstep,
               title='Tippe Top')
5.3 Humanoid Benchmark
nominal_nbatch = 256
nominal_nstep = 5
nbatch = [1, 256, 2048, 8192]
nstep = [1, 10, 100, 1000]

humanoid_benchmark_results = benchmark_rollout(humanoid_model, init_humanoid,
                                               nbatch, nstep,
                                               nominal_nbatch, nominal_nstep)
plot_benchmark(humanoid_benchmark_results, nbatch, nstep,
               nominal_nbatch, nominal_nstep,
               title='Humanoid')
5.4 Humanoid100 Benchmark
nominal_nbatch = 128
nominal_nstep = 5
nbatch = [1, 64, 128, 256]
nstep = [1, 10, 100, 1000]

humanoid100_benchmark_results = benchmark_rollout(
    humanoid100_model,
    init_humanoid100,
    nbatch,
    nstep,
    nominal_nbatch,
    nominal_nstep,
)
plot_benchmark(humanoid100_benchmark_results, nbatch, nstep,
               nominal_nbatch, nominal_nstep,
               title='Humanoid100')
6. MJX 加速
使用 tippe top 模型和 humanoid 模型(MJX 不支持 humanoid100)对 MJX 进行基准测试。
官方原文档中两个基准测试在 AMD 5800X3D 和 NVIDIA 4090 上总共耗时约 16.5 分钟。大部分时间都用于 JIT 编译 MJX 函数。JIT 函数会被缓存,以便后续的基准测试运行速度更快。
【Note】:MJX 与其他在 GPU 上运行最佳的程序(例如神经网络)结合使用时效果最佳。如果没有这些额外的工作负载,基于 CPU 的模拟有时会更快,尤其是在使用性能略逊一筹的 GPU 时。
【Note】:在运行下面示例前需要确保自己电脑上已经正确部署 JAX,否则无法调用 GPU 进行加速。
6.1 MJX 辅助函数
def init_mjx_batch(model, init_model, nbatch, nstep, skip_jit=False):
  data = init_model(model)

  mjx_model = mjx.put_model(model)
  mjx_data = mjx.put_data(model, data)

  batch = jax.vmap(lambda x: mjx_data)(jp.array(list(range(nbatch))))
  jax.block_until_ready(batch)

  if not skip_jit:
    start = time.time()
    jit_step = jax.vmap(mjx.step, in_axes=(None, 0))
    def unroll(d, _):
      d = jit_step(mjx_model, d)
      return d, None
    jit_unroll = jax.jit(lambda d: jax.lax.scan(unroll, d, None, length=nstep, unroll=4)[0])
    jit_unroll = jit_unroll.lower(batch).compile()
    end = time.time()
    jit_time = end - start
  else:
    jit_unroll = None
    jit_time = 0.0

  return mjx_model, mjx_data, jit_unroll, batch, jit_time

def mjx_rollout(batch, jit_unroll):
  batch = jit_unroll(batch)
  jax.block_until_ready(batch)

def benchmark_mjx(model, init_model, nbatch, nstep, nominal_nbatch, nominal_nstep, ntiming=1, jit_unroll_cache=None):
  print(f'Benchmarking multithreaded rollout using {nthread} threads', end="\r")
  with rollout.Rollout(nthread=nthread) as rollout_:
    start = time.time()
    t_rollout_multi_nbatch = benchmark(lambda x, data: nthread_rollout(model, data, x, nominal_nstep,  nthread, rollout_),
                                       nbatch, ntiming, f_init=lambda x: init_model(model))
    t_rollout_multi_nstep  = benchmark(lambda x, data: nthread_rollout(model, data, nominal_nbatch, x, nthread, rollout_),
                                       nstep,  ntiming, f_init=lambda x: init_model(model))
    end = time.time()
  print(f'Benchmarking multithreaded rollout using {nthread} threads took {end-start:0.1f} seconds')

  print('Running JIT for MJX', end='\r')
  total_jit = 0.0
  if jit_unroll_cache is None:
    jit_unroll_cache = {}
  if f'nbatch_{nominal_nstep}' not in jit_unroll_cache:
    jit_unroll_cache[f'nbatch_{nominal_nstep}'] = {}
  if f'nstep_{nominal_nbatch}' not in jit_unroll_cache:
    jit_unroll_cache[f'nstep_{nominal_nbatch}'] = {}
  for n in nbatch:
    if n not in jit_unroll_cache[f'nbatch_{nominal_nstep}']:
      _, _, jit_unroll_cache[f'nbatch_{nominal_nstep}'][n], _, jit_time = init_mjx_batch(model, init_model, n, nominal_nstep)
      total_jit += jit_time
  for n in nstep:
    if n not in jit_unroll_cache[f'nstep_{nominal_nbatch}']:
      _, _, jit_unroll_cache[f'nstep_{nominal_nbatch}'][n], _, jit_time = init_mjx_batch(model, init_model, nominal_nbatch, n)
      total_jit += jit_time
  print(f'Running JIT for MJX took {total_jit:0.1f} seconds')

  print('Benchmarking MJX', end='\r')
  start = time.time()
  t_mjx_nbatch = benchmark(lambda x, x_init: mjx_rollout(x_init[3], jit_unroll_cache[f'nbatch_{nominal_nstep}'][x]),
                           nbatch, ntiming, f_init=lambda x: init_mjx_batch(model, init_model, x, nominal_nstep, skip_jit=True))
  t_mjx_nstep  = benchmark(lambda x, x_init: mjx_rollout(x_init[3], jit_unroll_cache[f'nstep_{nominal_nbatch}'][x]),
                           nstep, ntiming, f_init=lambda x: init_mjx_batch(model, init_model, nominal_nbatch, x, skip_jit=True))
  end = time.time()
  print(f'Benchmarking MJX took {end-start:0.1f} seconds')

  return t_rollout_multi_nbatch, t_rollout_multi_nstep, t_mjx_nbatch, t_mjx_nstep

def plot_mjx_benchmark(results, nbatch, nstep, nominal_nbatch, nominal_nstep, title):
  t_rollout_multi_nbatch, t_rollout_multi_nstep, t_mjx_nbatch, t_mjx_nstep = results

  width = 0.333
  x = np.array([i for i in range(len(nbatch))])

  ticker = matplotlib.ticker.EngFormatter(unit='')

  fig, (ax1, ax2) = plt.subplots(1, 2, sharey=True)
  steps_per_t = np.array(nbatch) * nominal_nstep
  steps_per_t_mjx = steps_per_t / t_mjx_nbatch
  steps_per_t_multi  = steps_per_t / t_rollout_multi_nbatch
  ax1.bar(x + 0*width, steps_per_t_mjx, width=width, label='mjx')
  ax1.bar(x + 1*width, steps_per_t_multi, width=width, label='rollout multithreaded')
  ax1.set_xticks(x + width / 2, nbatch)
  ax1.yaxis.set_major_formatter(ticker)
  ax1.grid()
  ax1.set_xlabel('nbatch')
  ax1.set_ylabel('steps per second')
  ax1.set_title(f'nbatch varied, nstep = {nominal_nstep}')

  x = np.array([i for i in range(len(nstep))])
  steps_per_t = np.array(nstep) * nominal_nbatch
  steps_per_t_mjx = steps_per_t / t_mjx_nstep
  steps_per_t_multi  = steps_per_t / t_rollout_multi_nstep
  ax2.bar(x + 0*width, steps_per_t_mjx, width=width, label='mjx')
  ax2.bar(x + 1*width, steps_per_t_multi, width=width, label='rollout multithreaded')
  ax2.set_xticks(x + width / 2, nstep)
  ax2.yaxis.set_major_formatter(ticker)
  ax2.grid()
  ax2.set_xlabel('nstep')
  ax2.set_title(f'nstep varied, nbatch = {nominal_nbatch}')

  ax2.legend(loc=(1.04, 0.0))
  fig.set_size_inches(10, 4)
  plt.suptitle(title)
  plt.tight_layout()

top_jit_unroll_cache = {}
humanoid_jit_unroll_cache = {}
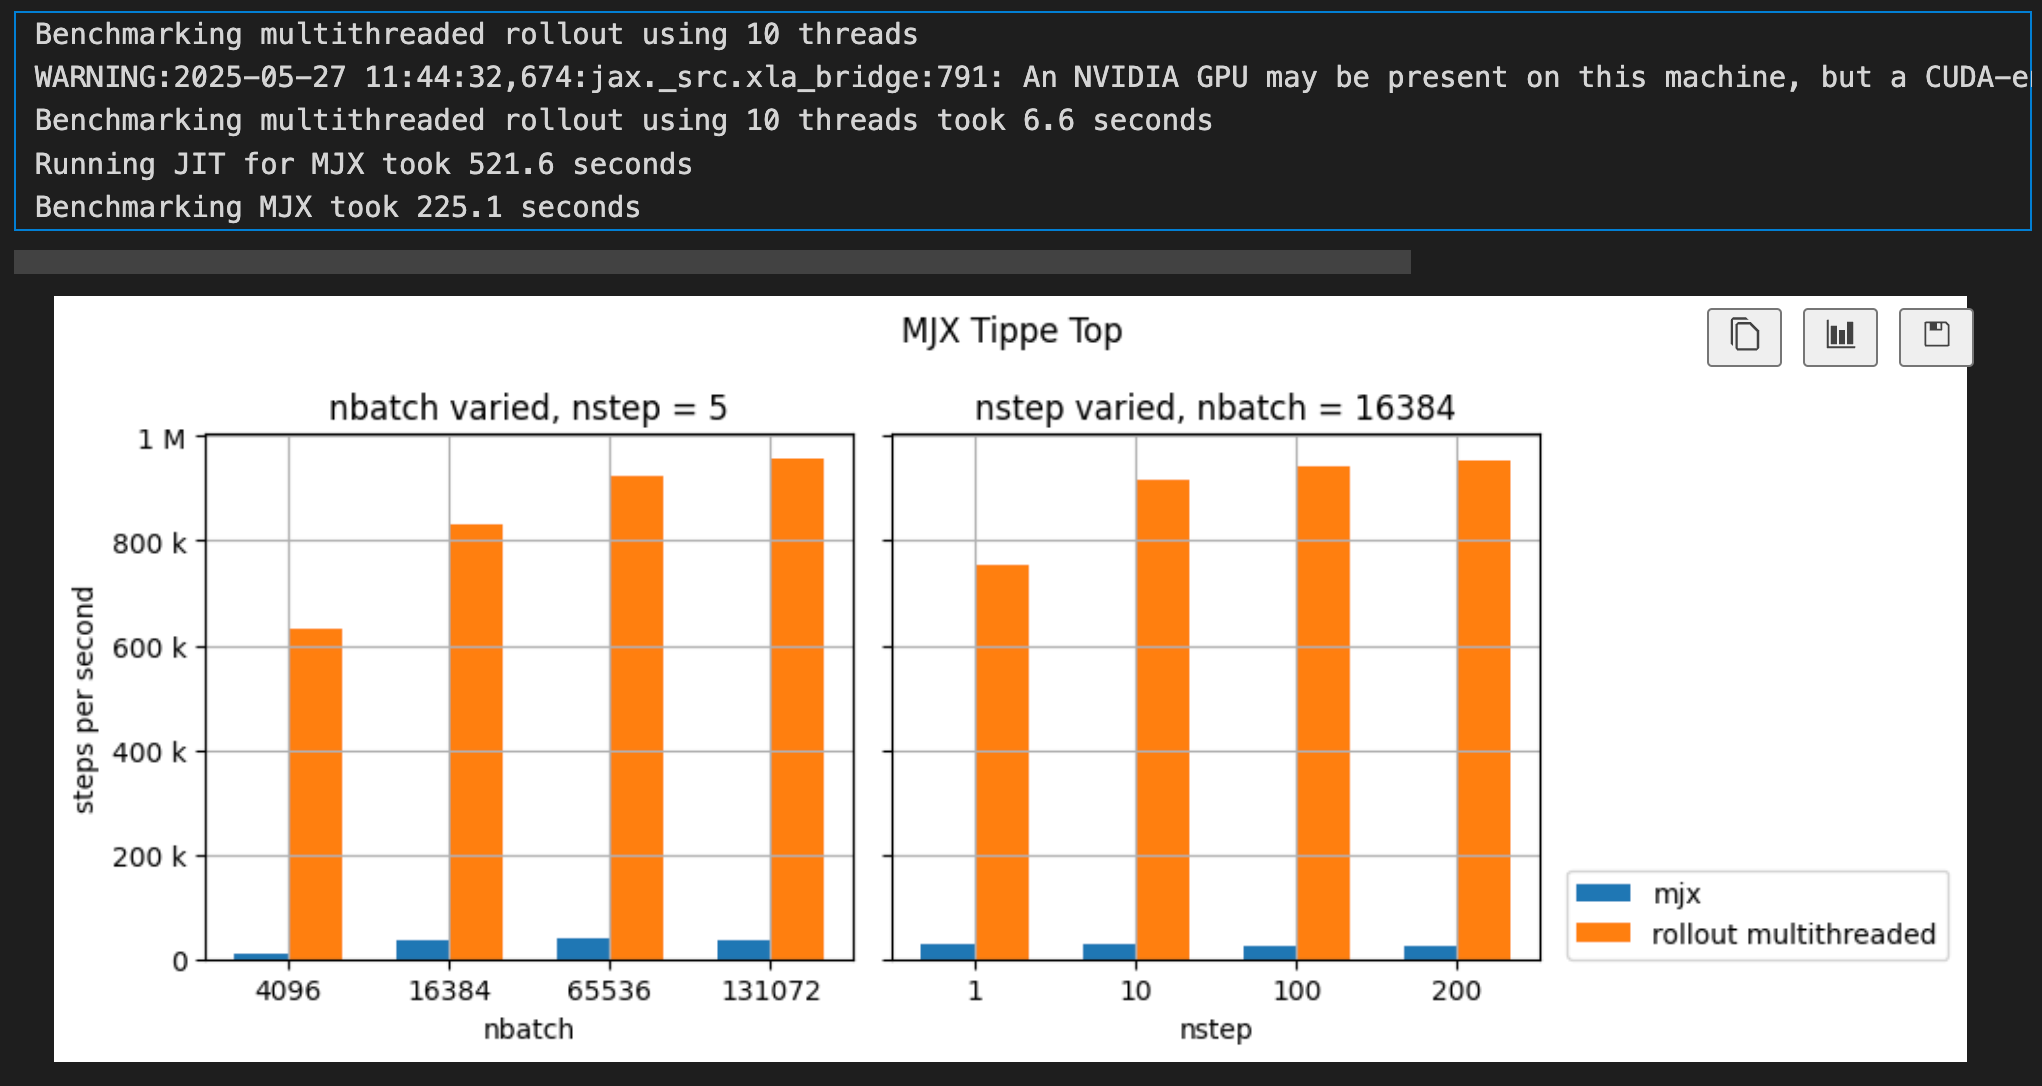
6.2 MJX Tippe Top Benchmark
nominal_nbatch = 16384
nominal_nstep = 5
nbatch = [4096, 16384, 65536, 131072]
nstep = [1, 10, 100, 200]

mjx_top_results = benchmark_mjx(top_model, init_top, nbatch, nstep, nominal_nbatch, nominal_nstep,
                                jit_unroll_cache=top_jit_unroll_cache)
plot_mjx_benchmark(mjx_top_results, nbatch, nstep, nominal_nbatch, nominal_nstep, title='MJX Tippe Top')
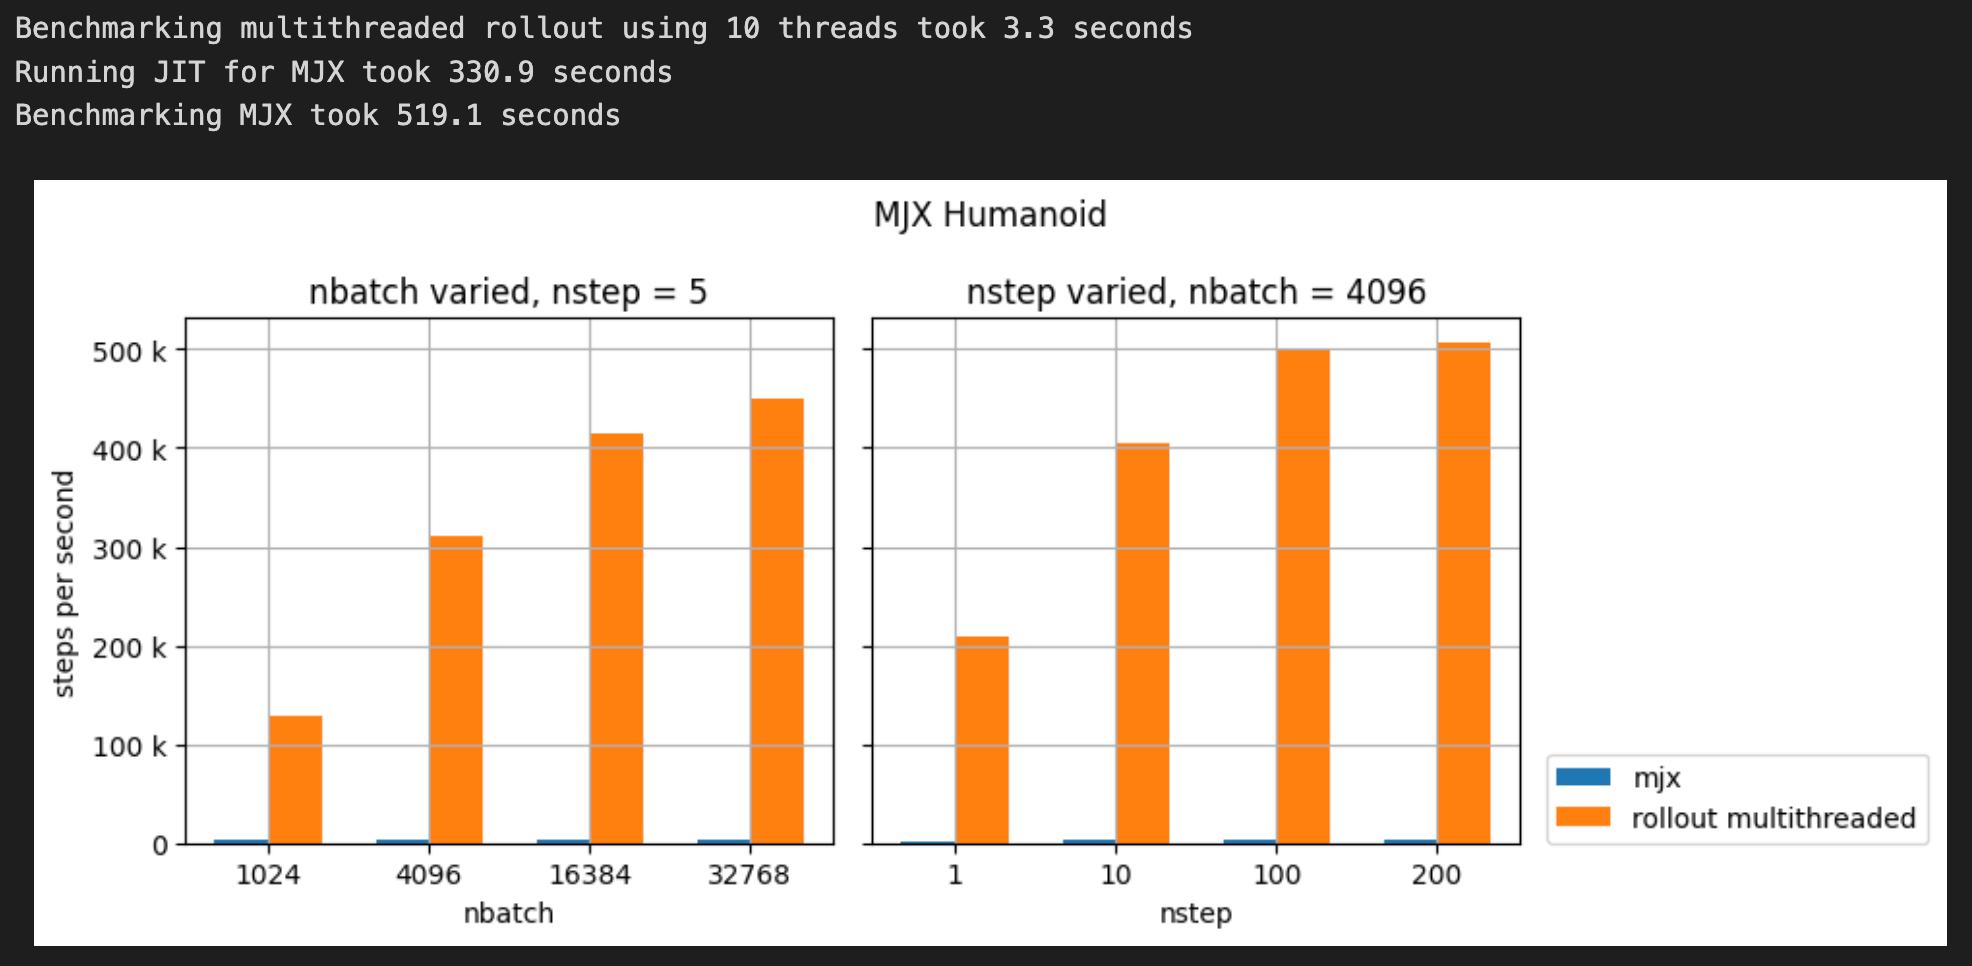
6.3 MJX Humanoid Benchmark
nominal_nbatch = 4096
nominal_nstep = 5
nbatch = [1024, 4096, 16384, 32768]
nstep = [1, 10, 100, 200]

mjx_humanoid_results = benchmark_mjx(humanoid_model, init_humanoid, nbatch, nstep, nominal_nbatch, nominal_nstep,
                                     jit_unroll_cache=humanoid_jit_unroll_cache)
plot_mjx_benchmark(mjx_humanoid_results, nbatch, nstep, nominal_nbatch, nominal_nstep, title='MJX Humanoid')
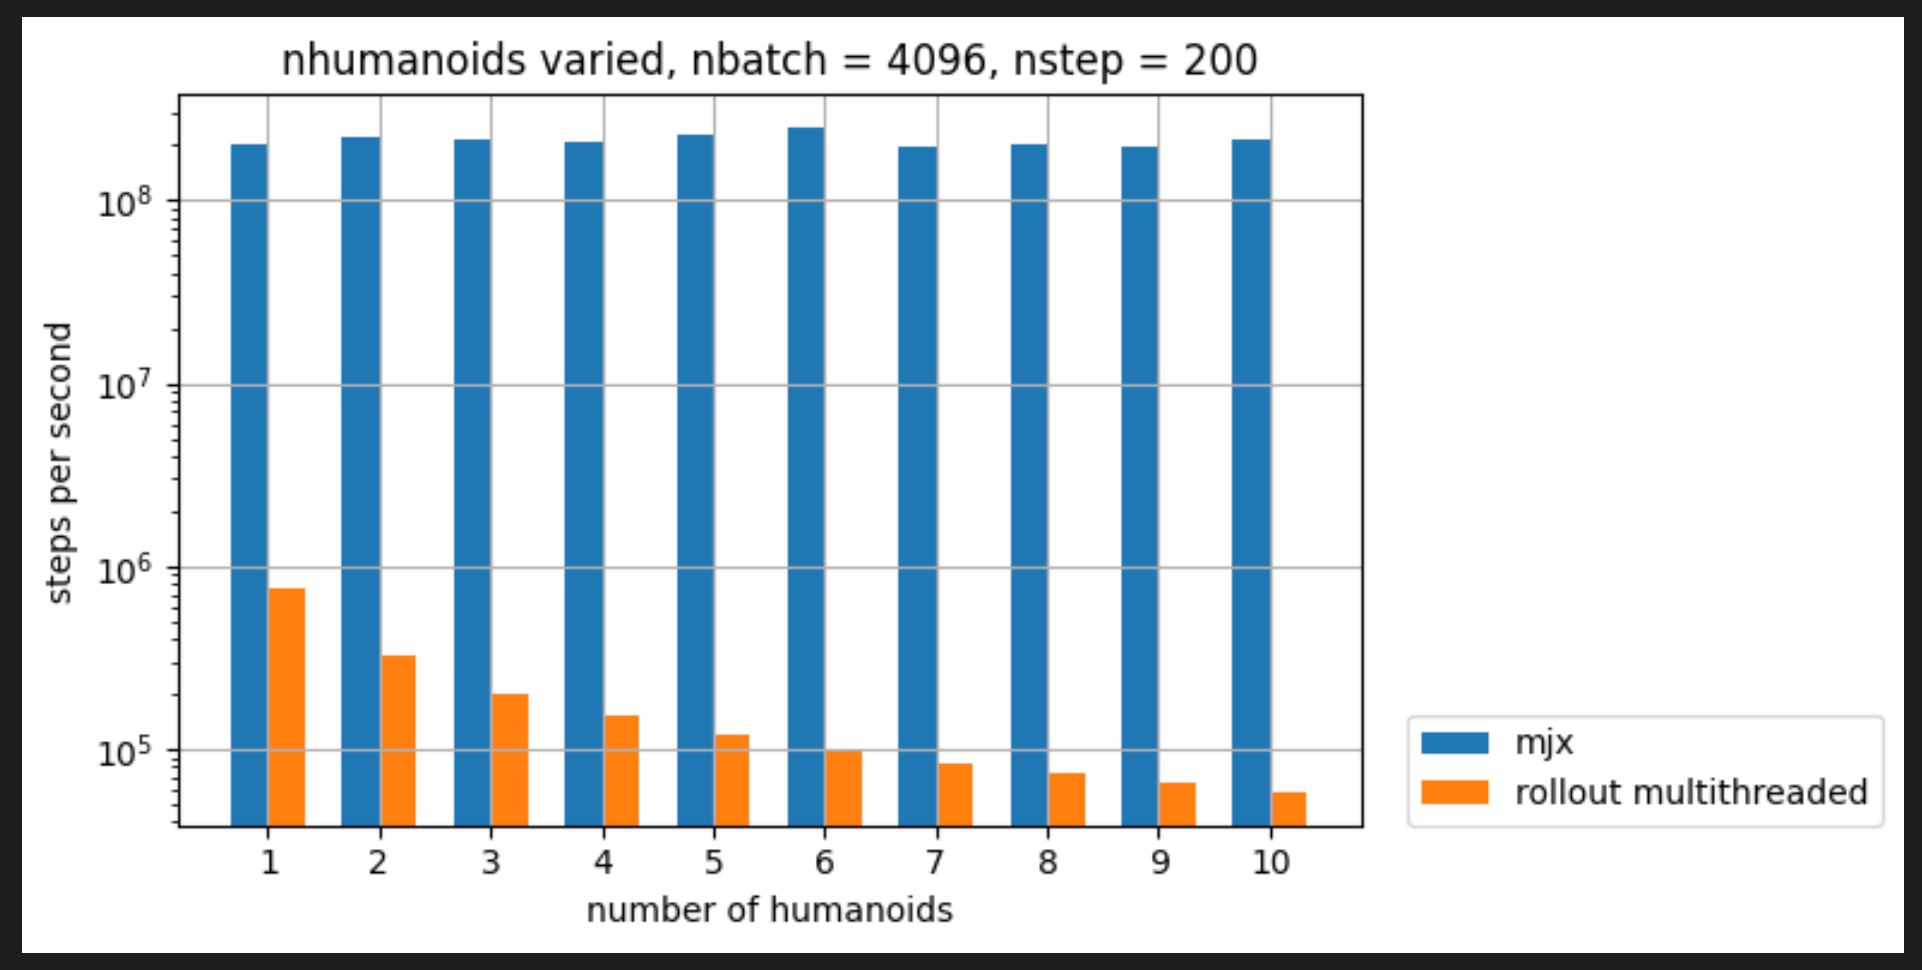
6.4 MJX Multiple Humanoids in one model
MJX 文档包含一张图表,比较了原生 MuJoCo 与 MJX 在各种设备上的速度。
- 官方文档链接:MJX - The shape bits
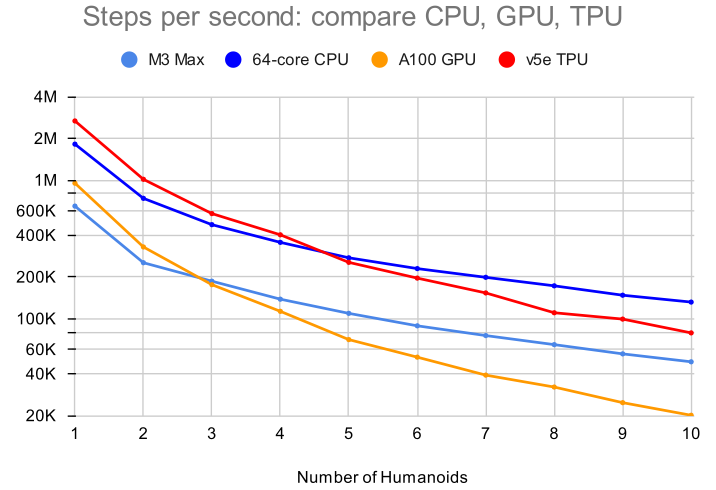
下面代码绘制一个类似的图表来比较 MJX 和 rollout 的性能。在 5800X3D 和 4090 上,基准测试大约需要 16.5 分钟。
【Note】:结果无法与文档中的图表直接比较,因为为了适应 4090 的批次大小,批次大小从 8192 减少到了 4096。
下面这个代码就很明显了,如果你设备上没有 JAX 加速库,在我的电脑上总共运行了 70分钟。
max_humanoids = 10
nbatch = 8192 // 2 # 这里从 8192 减少到了 4096
nstep = 200

jit_step = jax.vmap(mjx.step, in_axes=(None, 0))
t_rollout = []
t_mjx = []
for i in range(1, max_humanoids+1):
  print(f'Running benchmark on {i} humanoids')
  nhumanoid_model = mujoco.MjModel.from_xml_path(
      f'mujoco/mjx/mujoco/mjx/test_data/humanoid/{i:02d}_humanoids.xml'
  )
  nhumanoid_data = mujoco.MjData(nhumanoid_model)

  mjx_model = mjx.put_model(nhumanoid_model)
  mjx_data = mjx.put_data(nhumanoid_model, nhumanoid_data)
  batch = jax.vmap(lambda x: mjx_data)(jp.array(list(range(nbatch))))
  jax.block_until_ready(batch)

  with rollout.Rollout(nthread=nthread) as rollout_:
    initial_state = get_state(nhumanoid_model, nhumanoid_data, nbatch)
    start = time.perf_counter()
    rollout_.rollout([nhumanoid_model]*nbatch,
                     [copy.copy(nhumanoid_data) for _ in range(nthread)],
                     initial_state=initial_state,
                     nstep=nstep, skip_checks=True)
    end = time.perf_counter()
  t_rollout.append(end-start)

  def unroll(d, _):
    d = jit_step(mjx_model, d)
    return d, None
  jit_unroll = jax.jit(lambda d: jax.lax.scan(unroll, d, None, length=nstep, unroll=4)[0])
  jit_unroll = jit_unroll.lower(batch).compile()

  start = time.perf_counter()
  jit_unroll(batch)
  jax.block_until_ready(batch)
  end = time.perf_counter()
  t_mjx.append(end-start)
绘制 benchmarking 结果:
def plot_mjx_nhumanoid_benchmark(t_rollout, t_mjx, nbatch, nstep, max_humanoids):
  nhumanoids = [i for i in range(1, max_humanoids+1)]

  width = 0.333
  x = np.array([i for i in range(len(nhumanoids))])

  ticker = matplotlib.ticker.EngFormatter(unit='')

  fig, ax1 = plt.subplots(1, 1, sharey=True)
  steps_per_t = nbatch * nstep
  steps_per_t_mjx = steps_per_t / np.array(t_mjx)
  steps_per_t_multi  = steps_per_t / np.array(t_rollout)
  ax1.bar(x + 0*width, steps_per_t_mjx, width=width, label='mjx')
  ax1.bar(x + 1*width, steps_per_t_multi, width=width, label='rollout multithreaded')
  ax1.set_xticks(x + width / 2, nhumanoids)
  ax1.yaxis.set_major_formatter(ticker)
  ax1.set_yscale('log')
  ax1.grid()
  ax1.set_xlabel('number of humanoids')
  ax1.set_ylabel('steps per second')
  ax1.set_title(f'nhumanoids varied, nbatch = {nbatch}, nstep = {nstep}')

  ax1.legend(loc=(1.04, 0.0))
  fig.set_size_inches(8, 4)
  plt.tight_layout()

plot_mjx_nhumanoid_benchmark(t_rollout, t_mjx, nbatch, nstep, max_humanoids)


 1503
1503

 被折叠的 条评论
为什么被折叠?
被折叠的 条评论
为什么被折叠?
 到【灌水乐园】发言


