


本篇记录总结一下最近踩的坑和解决方法,以及现存问题。
已经完成:
1.在pc端训练好pt模型,并转成了onnx模型。
2.树莓派镜像已安装,摄像头及无线模块测试使用良好。
基本情况:
硬件:树莓派4B+CSI摄像头+无线模块(自带)
镜像:树莓派官方
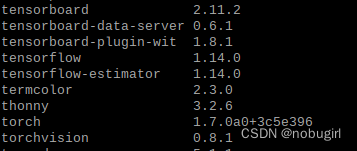
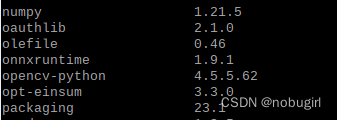
主要依赖包及版本:
(armv7l架构)
测试代码:
测试opencv:
import cv2
img=cv2.imread("image.jpg")
print(img.shape)
cv2.imshow("output",img)
cv2.waitKey(0)
使用opencv测试onnx模型:
import cv2
import numpy as np
import time
def plot_one_box(x, img, color=None, label=None, line_thickness=None):
    """
    description: Plots one bounding box on image img,
                 this function comes from YoLov5 project.
    param:
        x:      a box likes [x1,y1,x2,y2]
        img:    a opencv image object
        color:  color to draw rectangle, such as (0,255,0)
        label:  str
        line_thickness: int
    return:
        no return
    """
    tl = (
        line_thickness or round(0.002 * (img.shape[0] + img.shape[1]) / 2) + 1
    )  # line/font thickness
    color = color or [random.randint(0, 255) for _ in range(3)]
    c1, c2 = (int(x[0]), int(x[1])), (int(x[2]), int(x[3]))
    cv2.rectangle(img, c1, c2, color, thickness=tl, lineType=cv2.LINE_AA)
    if label:
        tf = max(tl - 1, 1)  # font thickness
        t_size = cv2.getTextSize(label, 0, fontScale=tl / 3, thickness=tf)[0]
        c2 = c1[0] + t_size[0], c1[1] - t_size[1] - 3
        cv2.rectangle(img, c1, c2, color, -1, cv2.LINE_AA)  # filled
        cv2.putText(
            img,
            label,
            (c1[0], c1[1] - 2),
            0,
            tl / 3,
            [225, 255, 255],
            thickness=tf,
            lineType=cv2.LINE_AA,
        )

def post_process_opencv(outputs,model_h,model_w,img_h,img_w,thred_nms,thred_cond):

    conf = outputs[:,4].tolist()
    c_x = outputs[:,0]/model_w*img_w
    c_y = outputs[:,1]/model_h*img_h
    w  = outputs[:,2]/model_w*img_w
    h  = outputs[:,3]/model_h*img_h
    p_cls = outputs[:,5:]
    if len(p_cls.shape)==1:
        p_cls = np.expand_dims(p_cls,1)
    cls_id = np.argmax(p_cls,axis=1)

    p_x1 = np.expand_dims(c_x-w/2,-1)
    p_y1 = np.expand_dims(c_y-h/2,-1)
    p_x2 = np.expand_dims(c_x+w/2,-1)
    p_y2 = np.expand_dims(c_y+h/2,-1)
    areas = np.concatenate((p_x1,p_y1,p_x2,p_y2),axis=-1)
    print(areas.shape)
    areas = areas.tolist()
    ids = cv2.dnn.NMSBoxes(areas,conf,thred_cond,thred_nms)
    return  np.array(areas)[ids],np.array(conf)[ids],cls_id[ids]


def infer_image(net,img0,model_h,model_w,thred_nms=0.4,thred_cond=0.5):

    img = img0.copy()
    img = cv2.resize(img,[model_h,model_w])
    blob = cv2.dnn.blobFromImage(img, scalefactor=1/255.0, swapRB=True)
    net.setInput(blob)
    outs = net.forward()[0]
    print(outs[0])
    det_boxes,scores,ids = post_process_opencv(outs,model_h,model_w,img0.shape[0],img0.shape[1],thred_nms,thred_cond)
    return det_boxes,scores,ids


if __name__=="__main__":
    dic_labels= {0:'0',
            1:'1',
            2:'2',
            3:'3',
            4:'4',
            5:'5',
            6:'6',
            7:'7',
            8:'8',
            9:'9'
                 }

    model_h = 640
    model_w = 640
    file_model = '/home/pi/best.onnx'
    net = cv2.dnn.readNet(file_model)
    img0 = cv2.imread('/home/pi/bus.jpg')
    t1 = time.time()
    det_boxes,scores,ids = infer_image(net,img0,model_h,model_w,thred_nms=0.4,thred_cond=0.5)
    t2 = time.time()

    print("cost time  %.2fs"%(t2-t1))

    for box,score,id in zip(det_boxes,scores,ids):
        label = '%s:%.2f'%(dic_labels[id],score)

        plot_one_box(box.astype(np.int16), img0, color=(255,0,0), label=label, line_thickness=None)
    cv2.imshow('img',img0)

    cv2.waitKey(0)
一、部署onnx模型
使用onnx模型的好处是针对硬件不同进行了优化加速。且onnx模型作为中间模型可适配性高。
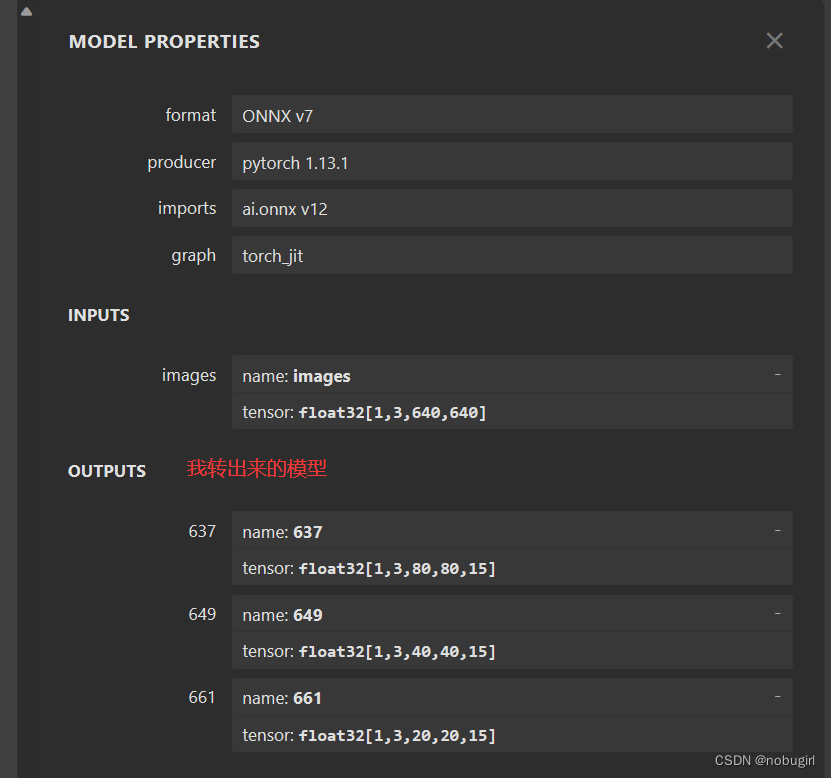
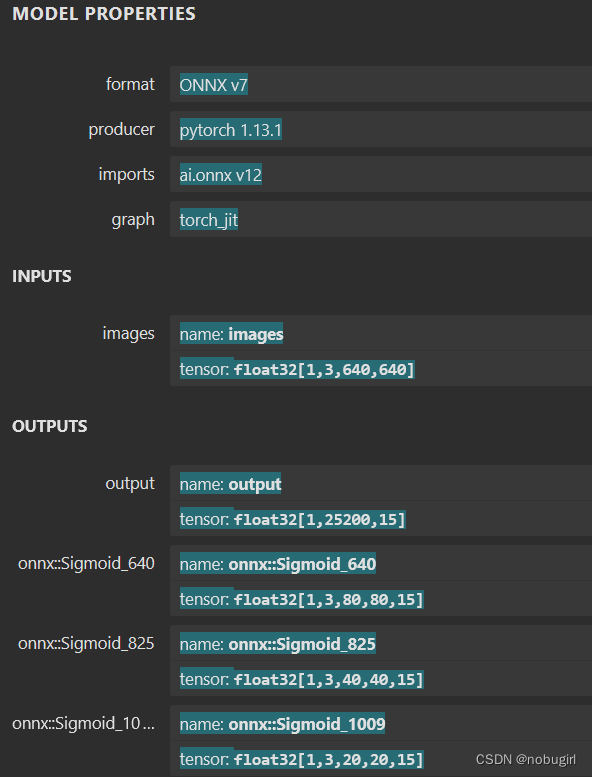
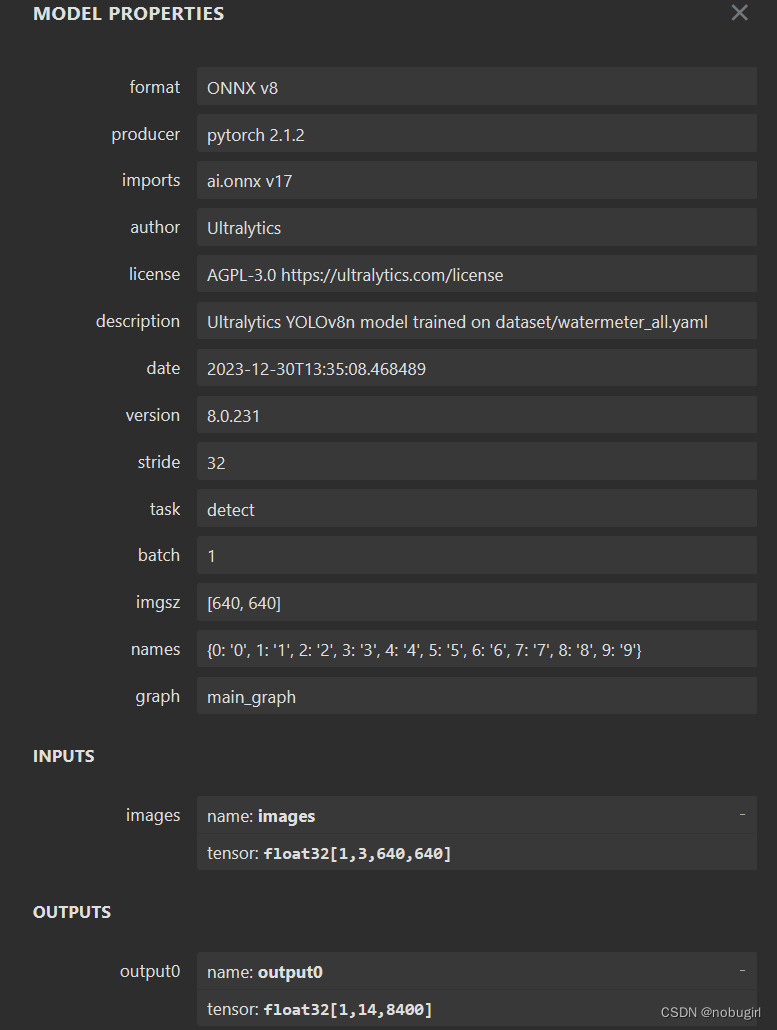
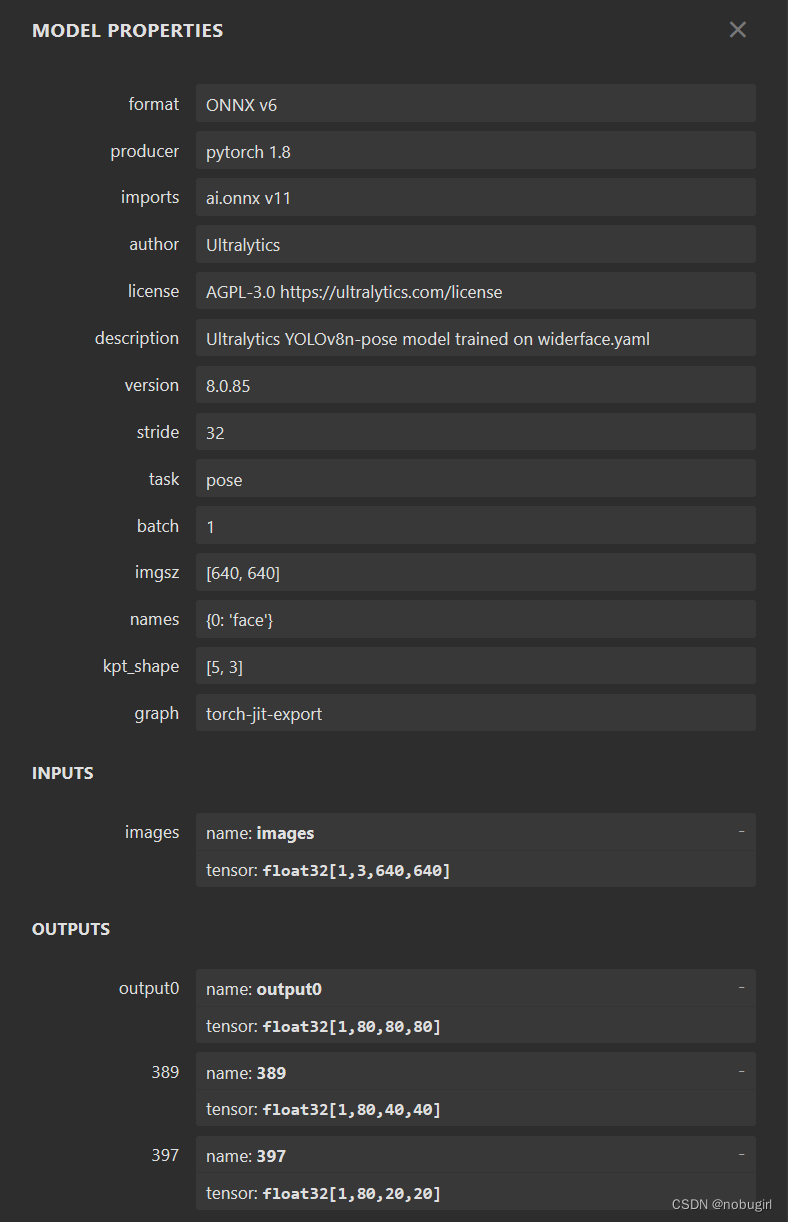
onnx是用yolo中的export.py文件生成,用netron可视化查看模型结构。下图为我转出来的模型以及官方转出来的onnx模型结构。后两张是grid和yolov8,

使用opencv直接调用官方转出的onnx模型结果可以直接跑通,但跑出的图片标记混乱,应该是nms参数和labels需要调整,图片没有对应目标。

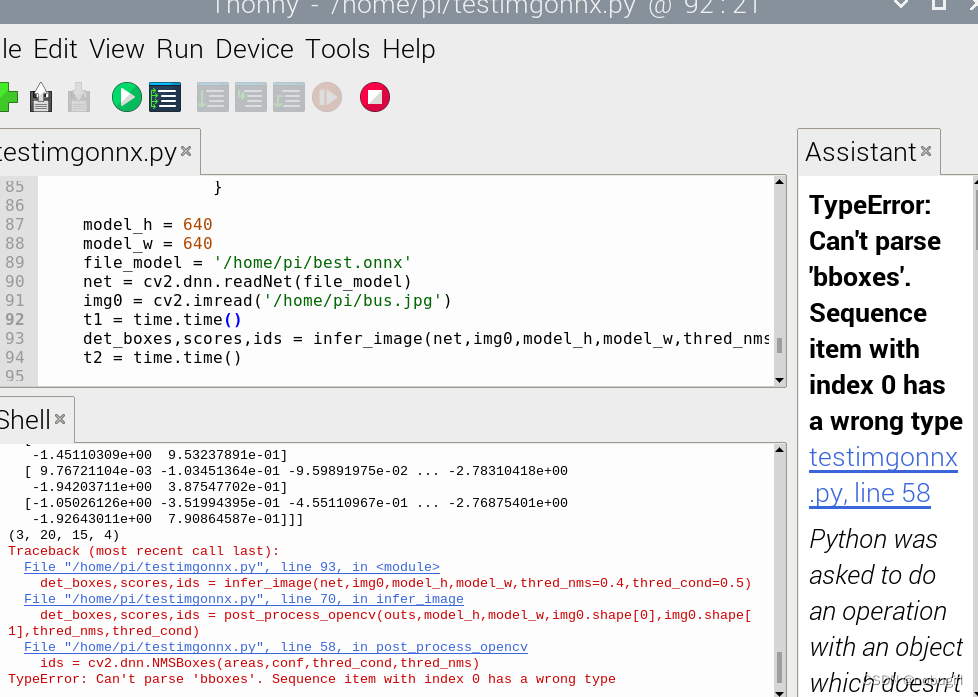
使用自己的onnx模型跑出来的结果报错bbox类型出错,暂时还未解决,求路过大佬指点,卡这里很久了一直没定位到错误。
二、直接部署pt模型
onnx部署未果,使用yolo打包进来直接安装依赖部署。
网特别慢老安装错误,手动离线安装whl,pip3 list结果贴在上图基本情况处。
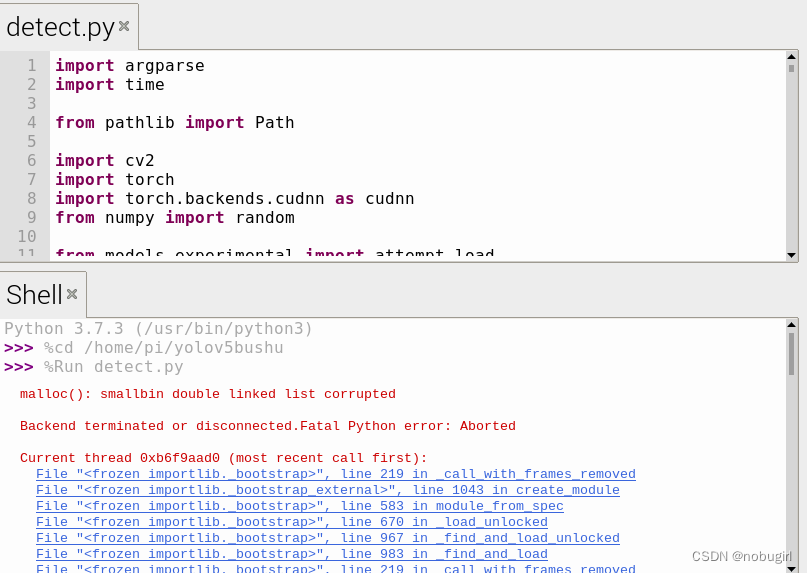
run detect.py结果:仍然报错malloc(): smallbin double linked list corrupted Backend terminated or disconnected.Fatal Python error: Aborted段错误,改错已经人麻了qwq
三、opencv调用onnx解决方法
寻求外界帮助,在pc端检查错误定位原因基本上是此testonnx的代码可能是适用于更新版本的yolo算法跑出来的结果。我去问了贾志刚老师,贾老师也是建议我试试yolov5的6.0版本。(但是我暂时没有尝试
根据5.0版本导出的onnx的输出格式,写了一版使用opencv调用的代码:
在pc端测试良好,在树莓派测试也通过。
import cv2
import argparse
import numpy as np
import time

class yolov5():
    def __init__(self, yolo_type, confThreshold=0.5, nmsThreshold=0.5, objThreshold=0.5):
        # 需修改:mylabels.names是类别名
        with open('mylabels.names', 'rt') as f:
            self.classes = f.read().rstrip('\n').split('\n')    ###这个是在coco数据集上训练的模型做opencv部署的,如果你在自己的数据集上训练出的模型做opencv部署,那么需要修改self.classes
        self.colors = [np.random.randint(0, 255, size=3).tolist() for _ in range(len(self.classes))]
        num_classes = len(self.classes)
        # 需修改
        anchors = [  [10, 13, 16, 30, 33, 23], [30, 61, 62, 45, 59, 119],[116, 90, 156, 198, 373, 326],]
        self.nl = len(anchors)
        self.na = len(anchors[0]) // 2
        self.no = num_classes + 5
        self.grid = [np.zeros(1)] * self.nl
        # 需修改,注意和anchors对应
        self.stride = np.array([8.,16.,32.])
        self.anchor_grid = np.asarray(anchors, dtype=np.float32).reshape(self.nl, 1, -1, 1, 1, 2)

        self.net = cv2.dnn.readNet(yolo_type + '.onnx')
        self.confThreshold = confThreshold
        self.nmsThreshold = nmsThreshold
        self.objThreshold = objThreshold

    def _make_grid(self, nx=20, ny=20):
        xv, yv = np.meshgrid(np.arange(ny), np.arange(nx))
        return np.stack((xv, yv), 2).reshape((1, 1, ny, nx, 2)).astype(np.float32)

    def postprocess(self, frame, outs):
        frameHeight = frame.shape[0]
        frameWidth = frame.shape[1]
        ratioh, ratiow = frameHeight / 640, frameWidth / 640
        # Scan through all the bounding boxes output from the network and keep only the
        # ones with high confidence scores. Assign the box's class label as the class with the highest score.
        classIds = []
        confidences = []
        boxes = []
        for out in outs:
            for detection in out:
                scores = detection[5:]
                classId = np.argmax(scores)
                confidence = scores[classId]
                if confidence > self.confThreshold and detection[4] > self.objThreshold:
                    center_x = int(detection[0] * ratiow)
                    center_y = int(detection[1] * ratioh)
                    width = int(detection[2] * ratiow)
                    height = int(detection[3] * ratioh)
                    left = int(center_x - width / 2)
                    top = int(center_y - height / 2)
                    classIds.append(classId)
                    confidences.append(float(confidence))
                    boxes.append([left, top, width, height])

        # Perform non maximum suppression to eliminate redundant overlapping boxes with
        # lower confidences.
        indices = cv2.dnn.NMSBoxes(boxes, confidences, self.confThreshold, self.nmsThreshold)
        for i in indices:
            # i = i[0]
            box = boxes[i]
            left = box[0]
            top = box[1]
            width = box[2]
            height = box[3]
            frame = self.drawPred(frame, classIds[i], confidences[i], left, top, left + width, top + height)
        return frame
    def drawPred(self, frame, classId, conf, left, top, right, bottom):
        # Draw a bounding box.
        cv2.rectangle(frame, (left, top), (right, bottom), (0, 0, 255), thickness=4)

        label = '%.2f' % conf
        label = '%s:%s' % (self.classes[classId], label)

        # Display the label at the top of the bounding box
        labelSize, baseLine = cv2.getTextSize(label, cv2.FONT_HERSHEY_SIMPLEX, 0.5, 1)
        top = max(top, labelSize[1])
        # cv.rectangle(frame, (left, top - round(1.5 * labelSize[1])), (left + round(1.5 * labelSize[0]), top + baseLine), (255,255,255), cv.FILLED)
        cv2.putText(frame, label, (left, top - 10), cv2.FONT_HERSHEY_SIMPLEX, 1, (0, 255, 0), thickness=2)
        return frame
    def detect(self, srcimg):
        blob = cv2.dnn.blobFromImage(srcimg, 1 / 255.0, (640, 640), [0, 0, 0], swapRB=True, crop=False)
        # Sets the input to the network
        self.net.setInput(blob)

        # Runs the forward pass to get output of the output layers
        outs = self.net.forward(self.net.getUnconnectedOutLayersNames())

        z = []  # inference output
        for i in range(self.nl):
            bs, _, nx, ny, _ = outs[i].shape  # x(bs,255,20,20) to x(bs,3,20,20,85)
            # outs[i] = outs[i].view(bs, self.na, self.no, ny, nx).permute(0, 1, 3, 4, 2).contiguous()
            # outs[i] = outs[i].reshape(bs, self.na, self.no, ny, nx).transpose(0, 1, 3, 4, 2)
            if self.grid[i].shape[2:4] != outs[i].shape[2:4]:
                self.grid[i] = self._make_grid(nx, ny)

            y = 1 / (1 + np.exp(-outs[i]))  ### sigmoid
            ###其实只需要对x,y,w,h做sigmoid变换的, 不过全做sigmoid变换对结果影响不大,因为sigmoid是单调递增函数,那么就不影响类别置信度的排序关系,因此不影响后面的NMS
            ###不过设断点查看类别置信度,都是负数,看来有必要做sigmoid变换把概率值强行拉回到0到1的区间内
            y[..., 0:2] = (y[..., 0:2] * 2. - 0.5 + self.grid[i]) * int(self.stride[i])
            y[..., 2:4] = (y[..., 2:4] * 2) ** 2 * self.anchor_grid[i]  # wh
            z.append(y.reshape(bs, -1, self.no))
        z = np.concatenate(z, axis=1)
        return z

if __name__ == "__main__":
    parser = argparse.ArgumentParser()
    parser.add_argument("--imgpath", type=str, default='data/images/pic1.jpg', help="image path")
    parser.add_argument('--net_type', default='runs/train/exp/weights/1213/best', choices=['yolov5s', 'yolov5l', 'yolov5m', 'yolov5x'])
    parser.add_argument('--confThreshold', default=0.5, type=float, help='class confidence')
    parser.add_argument('--nmsThreshold', default=0.5, type=float, help='nms iou thresh')
    parser.add_argument('--objThreshold', default=0.5, type=float, help='object confidence')
    args = parser.parse_args()

    yolonet = yolov5(args.net_type, confThreshold=args.confThreshold, nmsThreshold=args.nmsThreshold, objThreshold=args.objThreshold)
    srcimg = cv2.imread(args.imgpath)
    H, W, _ = srcimg.shape
    t1 = time.time()
    dets = yolonet.detect(srcimg)
    t2 = time.time()
    srcimg = yolonet.postprocess(srcimg, dets)

    print("cost time  %.2fs" % (t2 - t1))
    winName = 'Deep learning object detection in OpenCV'
    cv2.namedWindow(winName, cv2.WINDOW_NORMAL)
    cv2.imshow(winName, srcimg)
    cv2.waitKey(0)
    cv2.destroyAllWindows()
pc端版本:
pthon 3.9
numpy 1.19.5
onnx 1.9.0
onnxruntime 1.16.3
opencv-python 4.7.0.72
树莓派端版本:
python 3.7
numpy 1.21.5
onnxruntime 1.9.1
opencv-python 4.5.5.62
跑出来结果正常,就是树莓派跑的很慢,21秒推理一张照片。
四、继续优化方法
有考虑使用其他方法yolov5-lite轻量化yolov5或者使用yolov8.
将以下代码创建、拷贝到yolov8根目录下。
具体代码my_export.py:
from ultralytics import YOLO
# Load a model
model = YOLO('yolov8n.pt') # load an official model
# Export the model
model.export(format='onnx', imgsz=[480, 640], opset=12) # 导出一定不要修改这里参数
然后命令行:
python my_export.py
即可导出onnx模型。
测试onnx模型:
输出格式【1,14,8400】


 4450
4450

 被折叠的 条评论
为什么被折叠?
被折叠的 条评论
为什么被折叠?
 到【灌水乐园】发言


