


写在前面
python太慢,搞C
Qt配置onnx_runtime
首先,onnx_runtime官方也给编译好的release版本,下载即可。但是在qt中配置有一个坑。

在Qt Creator中正常添加外部库,但是你会发现构建会找不到onnxruntime.lib,这是如果你替换成全路径,即把注释的部分换成下面的lib路径,直接指明onnxruntime.lib。这时构建成功,可以include <onnxruntime_cxx_api.h>,但是在运行你会遇到应用程序无法启动。

根据百度把onnxruntime.dll复制到.exe目录下。

OK,启动成功。
opencv读取视频流
居中显示,随意拉伸。


实现居中的逻辑:
// 调整QImage的大小以匹配QLabel的大小
QPixmap scaledPixmap = QPixmap::fromImage(qimg).scaled(ui->Origin_Video->size(), Qt::KeepAspectRatio, Qt::FastTransformation);
而在界面当中需要对窗口随意拉伸,这是就需要界面允许缩放。修改QLabel的属性:

修改成minimum,并给定最小宽度和高度。(还不知道原因,等有空学习一下)
最后opencv读取视频流并拉取每一帧显示在QLabel中,这里采用的是用一个Qtimer,定时去获取视频帧。
// 创建定时器,每隔一定时间显示下一帧
timer = new QTimer(this);
connect(timer, &QTimer::timeout, this, &MainWindow::showNextFrame);
timer->start(33);  // 设置帧率为30FPS,即每隔33毫秒显示一帧
完整代码如下:
// 在槽函数中处理视频的加载和显示
void MainWindow::on_actionvideo_triggered()
{
    camera->stop();
    viewfinder->close();
    QString curPath = QDir::homePath();
    QString dlgTitle = "选择视频文件";
    QString filter = "视频文件(*.wmv *.mp4);;所有文件(*.*)";
    QString aFile = QFileDialog::getOpenFileName(this, dlgTitle, curPath, filter);

    if (aFile.isEmpty()) {
        return;
    }

    ui->dir_Edit->setText(aFile);

    currentSource = File;  // 更新当前视频源为视频文件
    displayVideo();  // 显示视频

}

// 根据当前视频源显示视频的函数
void MainWindow::displayVideo()
{
    if (currentSource == File) {
        std::string video_path = ui->dir_Edit->text().toLocal8Bit().constData();
        cap.open(video_path);
        if (!cap.isOpened()) {
            qDebug() << "Error: Unable to open the video file";
            return;
        }

        // 创建定时器,每隔一定时间显示下一帧
        timer = new QTimer(this);
        connect(timer, &QTimer::timeout, this, &MainWindow::showNextFrame);
        timer->start(33);  // 设置帧率为30FPS,即每隔33毫秒显示一帧
    } else if (currentSource == Camera) {

        // 创建定时器,每隔一定时间显示下一帧
        timer = new QTimer(this);
        connect(timer, &QTimer::timeout, this, &MainWindow::viewfinderchange);
        timer->start(33);  // 设置帧率为30FPS,即每隔33毫秒显示一帧
//        cameras = QCameraInfo::availableCameras();   //获取所有相机的列表
//        camera = new QCamera(cameras[0]);                //camera指向指定的摄像头
        camera->setCaptureMode(QCamera::CaptureStillImage);  //设定捕获模式
        camera->setViewfinder(viewfinder);                   //设置取景器
        camera->start();

    }
}

// 显示下一帧的槽函数
void MainWindow::showNextFrame()
{
    cv::Mat frame;
    cap >> frame; // 从视频流中获取一帧

    if (frame.empty()) {
        cap.set(cv::CAP_PROP_POS_FRAMES, 0); // 如果视频结束,重新开始播放
        cap >> frame;
    }

    currentFrame = frame;  // 保存当前帧
    displayCurrentFrame();  // 显示当前帧
}

void MainWindow::displayCurrentFrame() {
    // 将OpenCV帧转换为QImage
    QImage qimg(currentFrame.data, currentFrame.cols, currentFrame.rows, currentFrame.step, QImage::Format_RGB888);
    qimg = qimg.rgbSwapped(); // 将格式从BGR转换为RGB


    // 调整QImage的大小以匹配QLabel的大小
    QPixmap scaledPixmap = QPixmap::fromImage(qimg).scaled(ui->Origin_Video->size(), Qt::KeepAspectRatio, Qt::FastTransformation);

    // 将调整大小后的图像居中显示在QLabel中
    centerImageInLabel(ui->Origin_Video, scaledPixmap);
}
QCamra
居中显示,随意拉伸

QCamera其实同理,中间拉伸也用了一个QTimer定时获取QLabel的size。
QCamera的使用包括初始化一个camera和设置取景器viewfinder,viewfinder的作用就是控制图像在空间中的展示。
void MainWindow::on_actioncamera_triggered()
{

    cameras = QCameraInfo::availableCameras();   //获取所有相机的列表
    //qDebug() << "this is camera: ";
    if (cameras.count() > 0) {
        for(const QCameraInfo &cameraInfo:cameras) {
            qDebug() << cameraInfo.description();
        }
        camera = new QCamera(cameras.at(0));     //初始化实例化一个相机对象
    }
    //设置取景器
    viewfinder = new QCameraViewfinder(ui->Origin_Video);
    camera->setViewfinder(viewfinder);
    centerCameraViewfinderInLabel(viewfinder, ui->Origin_Video);

    camera->start();                             //开启相机

    //设置默认摄像头参数
    QCameraViewfinderSettings set;
    //    set.setResolution(640, 480);                 //设置显示分辨率
    set.setMaximumFrameRate(30);                 //设置帧率
    camera->setViewfinderSettings(set);

    stopVideo();
    ui->Origin_Video->setPixmap(QPixmap(""));
    currentSource = Camera;  // 更新当前视频源为摄像头
    viewfinder->show();
    displayVideo();  // 显示视频


}
yolov8 onnx 推理
void MainWindow::on_actionTest_triggered()
{

    //    std::string projectBasePath = "./"; // Set your ultralytics base path
    QString qs = QCoreApplication::applicationDirPath();
    std::string projectBasePath = qs.toLocal8Bit().constData();

    bool runOnGPU = false;

    // Note that in this example the classes are hard-coded and 'classes.txt' is a place holder.
    Inference inf(projectBasePath + "/moust_best.onnx", cv::Size(640, 640), "mouse.txt", runOnGPU);


    std::string video_path = ui->dir_Edit->text().toLocal8Bit().constData();
    // 读取视频文件
    //    cv::VideoCapture cap(projectBasePath + "/video/video.mp4");
    cv::VideoCapture cap(video_path);

    if (!cap.isOpened()) {
        std::cout << "Error opening video file" << std::endl;
        return ;
    }

    cv::Mat frame;

    while (cap.read(frame)) {
        // 推断开始...
        std::vector<Detection> output = inf.runInference(frame);

        int detections = output.size();
        std::cout << "Number of detections:" << detections << std::endl;

        for (int i = 0; i < detections; ++i)
        {
            Detection detection = output[i];

            cv::Rect box = detection.box;
            cv::Scalar color = detection.color;

            // Detection box
            cv::rectangle(frame, box, color, 2);

            // Detection box text
            std::string classString = detection.className + ' ' + std::to_string(detection.confidence).substr(0, 4);
            cv::Size textSize = cv::getTextSize(classString, cv::FONT_HERSHEY_DUPLEX, 1, 2, 0);
            cv::Rect textBox(box.x, box.y - 40, textSize.width + 10, textSize.height + 20);

            cv::rectangle(frame, textBox, color, cv::FILLED);
            cv::putText(frame, classString, cv::Point(box.x + 5, box.y - 10), cv::FONT_HERSHEY_DUPLEX, 1, cv::Scalar(0, 0, 0), 2, 0);
        }
        // 推断结束...

        // 仅用于预览
        float scale = 0.8;
        cv::resize(frame, frame, cv::Size(frame.cols*scale, frame.rows*scale));
        cv::imshow("Inference", frame);

        if (cv::waitKey(1) == 27) {
            break;
        }
    }

    cap.release();
    cv::destroyAllWindows();

}
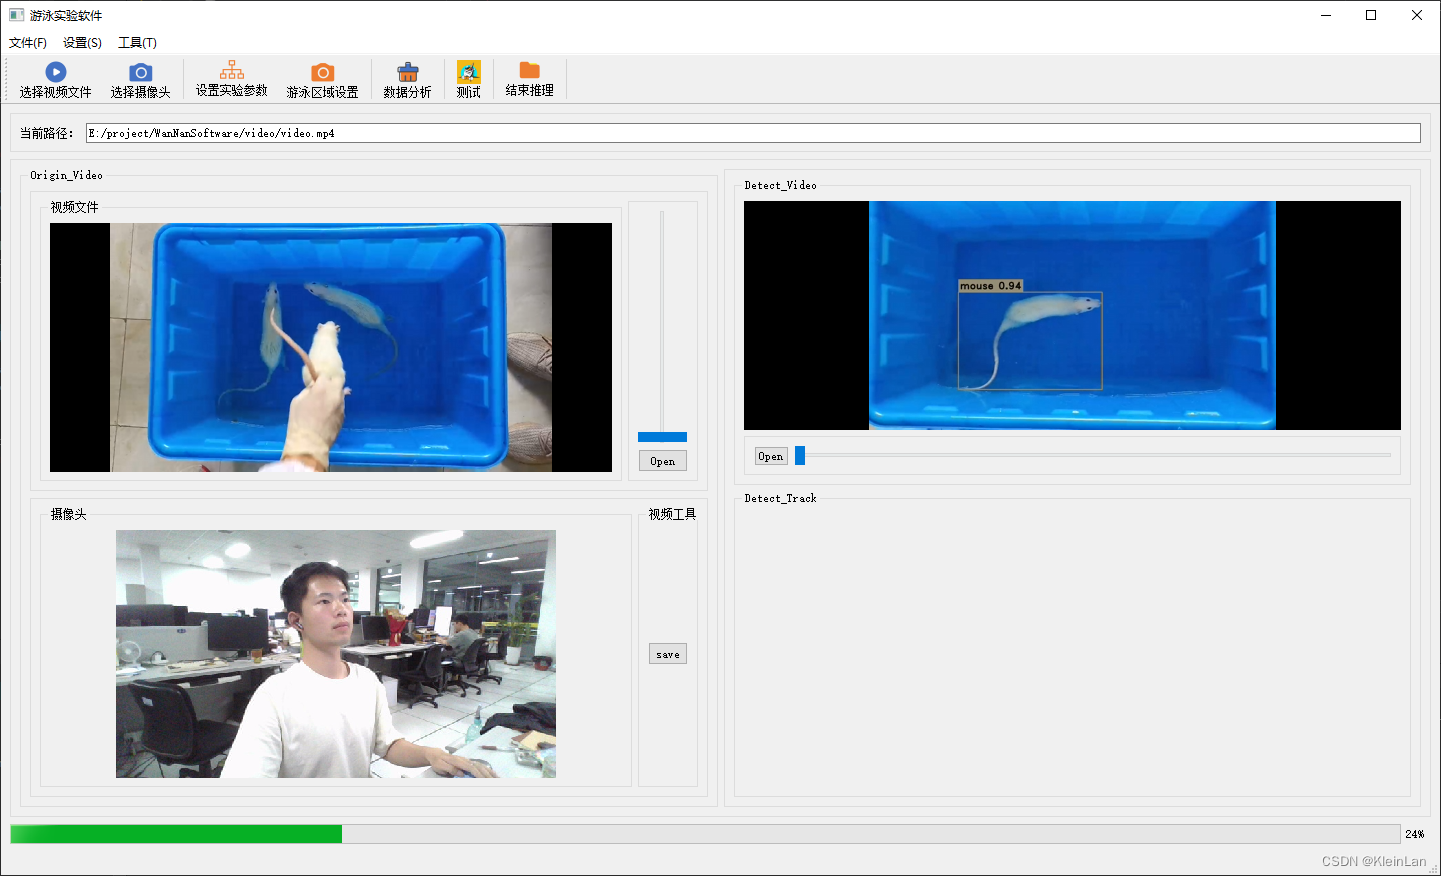
多线程(onnx推理线程和界面主线程)

摄像头与onnx互不干扰,说明主界面线程与onnx推理是分开线程进行的,ok!
######################### 2024 05 09 更新 ##############################################


 1113
1113


 被折叠的 条评论
为什么被折叠?
被折叠的 条评论
为什么被折叠?
 到【灌水乐园】发言


