


keepalived高可用
keepalived简介
Keepalived是Linux下一个轻量级别的高可用解决方案。高可用(High Avalilability,HA),其实两种不同的含义:广义来讲,是指整个系统的高可用行,狭义的来讲就是之主机的冗余和接管,
它与HeartBeat RoseHA 实现相同类似的功能,都可以实现服务或者网络的高可用,但是又有差别,HeartBeat是一个专业的、功能完善的高可用软件,它提供了HA 软件所需的基本功能,比如:心跳检测、资源接管,检测集群中的服务,在集群节点转移共享IP地址的所有者等等。HeartBeat功能强大,但是部署和使用相对比较麻烦,
与HeartBeat相比,Keepalived主要是通过虚拟路由冗余来实现高可用功能,虽然它没有HeartBeat功能强大,但是Keepalived部署和使用非常的简单,所有配置只需要一个配置文件即可以完成,
keepalived是什么
Keepalived起初是为LVS设计的,专门用来监控集群系统中各个服务节点的状态,它根据TCP/IP参考模型的第三、第四层、第五层交换机制检测每个服务节点的状态,如果某个服务器节点出现异常,或者工作出现故障,Keepalived将检测到,并将出现的故障的服务器节点从集群系统中剔除,这些工作全部是自动完成的,不需要人工干涉,需要人工完成的只是修复出现故障的服务节点。
后来Keepalived又加入了VRRP的功能,VRRP(Vritrual Router Redundancy Protocol,虚拟路由冗余协议)出现的目的是解决静态路由出现的单点故障问题,通过VRRP可以实现网络不间断稳定运行,因此Keepalvied 一方面具有服务器状态检测和故障隔离功能,另外一方面也有HA cluster功能,下面介绍一下VRRP协议实现的过程。
VRRP协议与工作原理
在现实的网络环境中。主机之间的通信都是通过配置静态路由或者(默认网关)来完成的,而主机之间的路由器一旦发生故障,通信就会失效,因此这种通信模式当中,路由器就成了一个单点瓶颈,为了解决这个问题,就引入了VRRP协议。
熟悉网络的学员对VRRP协议应该不陌生,它是一种主备模式的协议,通过VRRP可以在网络发生故障时透明的进行设备切换而不影响主机之间的数据通信,这其中涉及到两个概念:物理路由器和虚拟路由器。
VRRP可以将两台或者多台物理路由器设备虚拟成一个虚拟路由,这个虚拟路由器通过虚拟IP(一个或者多个)对外提供服务,而在虚拟路由器内部十多个物理路由器协同工作,同一时间只有一台物理路由器对外提供服务,这台物理路由设备被成为:主路由器(Master角色),一般情况下Master是由选举算法产生,它拥有对外服务的虚拟IP,提供各种网络功能,如:ARP请求,ICMP 数据转发等,而且其它的物理路由器不拥有对外的虚拟IP,也不提供对外网络功能,仅仅接收MASTER的VRRP状态通告信息,这些路由器被统称为“BACKUP的角色”,当主路由器失败时,处于BACKUP角色的备份路由器将重新进行选举,产生一个新的主路由器进入MASTER角色,继续提供对外服务,整个切换对用户来说是完全透明的。
每个虚拟路由器都有一个唯一的标识号,称为VRID,一个VRID与一组IP地址构成一个虚拟路由器,在VRRP协议中,所有的报文都是通过IP多播方式发送的,而在一个虚拟路由器中,只有处于Master角色的路由器会一直发送VRRP数据包,处于BACKUP角色的路由器只会接受Master角色发送过来的报文信息,用来监控Master运行状态,一一般不会发生BACKUP抢占的情况,除非它的优先级更高,而当MASTER不可用时,BACKUP也就无法收到Master发过来的信息,于是就认定Master出现故障,接着多台BAKCUP就会进行选举,优先级最高的BACKUP将称为新的MASTER,这种选举角色切换非常之快,因而保证了服务的持续可用性。
Keepalived作用
Keepalived主要用作RealServer的健康状态检查以及LoadBalance主机和BackUP主机之间failover的实现。Keepalived的作用是检测web服务器的状态,如果有一台web服务器死机,或工作出现故障,Keepalived将检测到,并将有故障的web服务器从系统中剔除,当web服务器工作正常后Keepalived自动将web服务器加入到服务器群中,这些工作全部自动完成,不需要人工干涉,需要人工做的只是修复故障的web服务器。
keepalived的重要功能
keepalived 有三个重要的功能,分别是:
- 管理LVS负载均衡软件
- 实现LVS集群节点的健康检查
- 作为系统网络服务的高可用性(failover)
keepalived高可用架构图
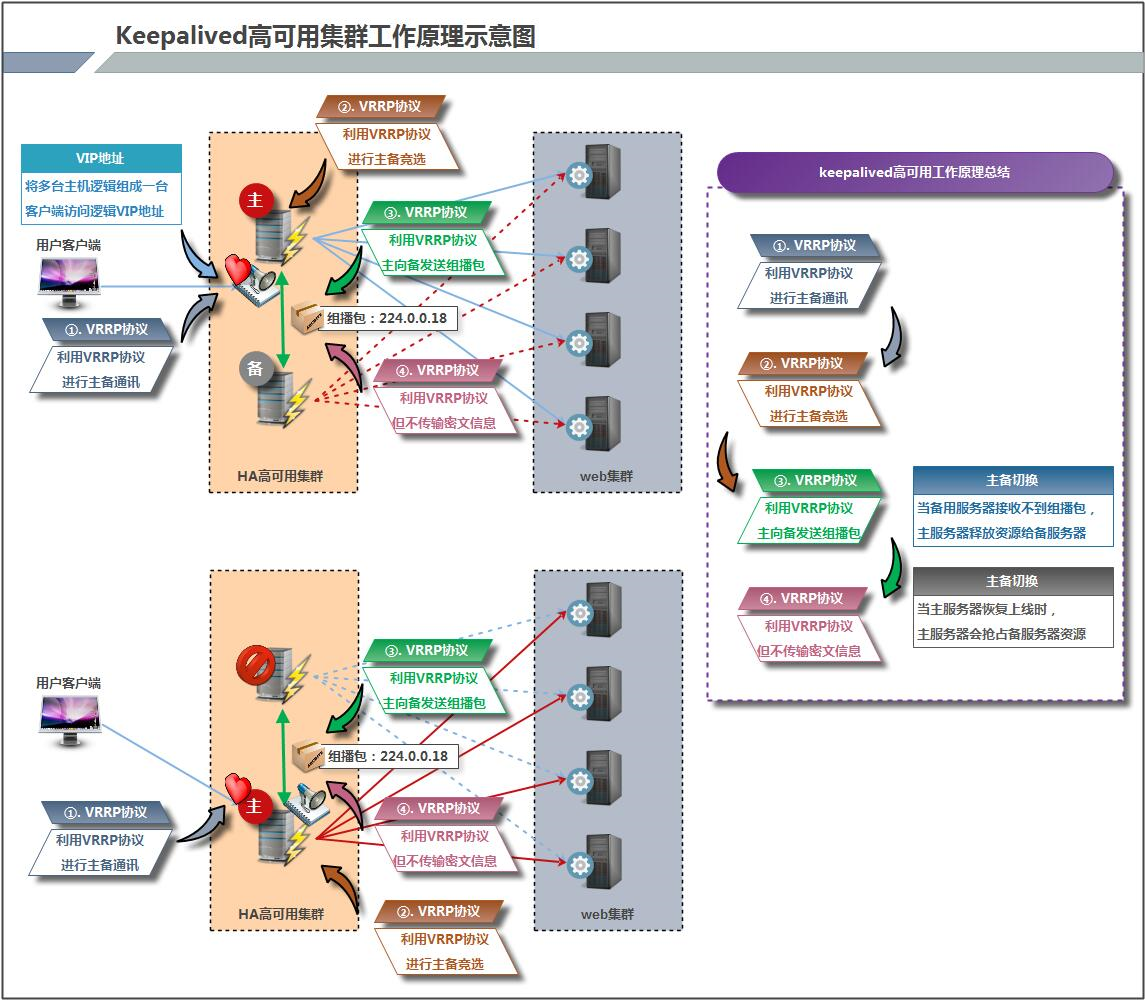
keepalived工作原理描述
Keepalived高可用对之间是通过VRRP通信的,因此,我们从 VRRP开始了解起:
\1) VRRP,全称 Virtual Router Redundancy Protocol,中文名为虚拟路由冗余协议,VRRP的出现是为了解决静态路由的单点故障。
\2) VRRP是通过一种竟选协议机制来将路由任务交给某台 VRRP路由器的。
\3) VRRP用 IP多播的方式(默认多播地址(224.0_0.18))实现高可用对之间通信。
\4) 工作时主节点发包,备节点接包,当备节点接收不到主节点发的数据包的时候,就启动接管程序接管主节点的开源。备节点可以有多个,通过优先级竞选,但一般 Keepalived系统运维工作中都是一对。
\5) VRRP使用了加密协议加密数据,但Keepalived官方目前还是推荐用明文的方式配置认证类型和密码。
介绍完 VRRP,接下来我再介绍一下 Keepalived服务的工作原理:
Keepalived高可用是通过 VRRP 进行通信的, VRRP是通过竞选机制来确定主备的,主的优先级高于备,因此,工作时主会优先获得所有的资源,备节点处于等待状态,当主挂了的时候,备节点就会接管主节点的资源,然后顶替主节点对外提供服务。
在 Keepalived 服务之间,只有作为主的服务器会一直发送 VRRP 广播包,告诉备它还活着,此时备不会枪占主,当主不可用时,即备监听不到主发送的广播包时,就会启动相关服务接管资源,保证业务的连续性.接管速度最快可以小于1秒。
keepalived实现nginx负载均衡机高可用
环境说明
| 系统信息 | 主机名 | IP |
|---|---|---|
| centos8 | master | 192.168.171.141 |
| centos8 | slave | 192.168.171.13 |
虚拟网络vip是:192.168.171.250
keepalived安装
配置主keepalived
//关闭master防火墙和selinux
[root@master ~]# systemctl disable --now firewalld.service
Removed /etc/systemd/system/multi-user.target.wants/firewalld.service.
Removed /etc/systemd/system/dbus-org.fedoraproject.FirewallD1.service.
[root@master ~]#  setenforce 0
[root@master ~]# sed -ri 's/^(SELINUX=).*/\1disabled/g' /etc/selinux/config
//关闭slave的防火请和selinux
[root@slave ~]# systemctl disable --now firewalld
Removed /etc/systemd/system/multi-user.target.wants/firewalld.service.
Removed /etc/systemd/system/dbus-org.fedoraproject.FirewallD1.service.
[root@slave ~]# setenforce 0
[root@slave ~]# sed -ri 's/^(SELINUX=).*/\1disabled/g' /etc/selinux/config
//在主,备上下载工具和epel源
[root@master ~]# yum -y install epel-release vim wget
[root@slave ~]# yum -y install epel-release vim wget

//在主,备。上下载keepalived的服务
[root@slave ~]# yum -y install keepalived
[root@master ~]# yum -y install keepalived

//在主,备上下载nginx
[root@master ~]# yum -y install nginx
[root@master ~]# cd /usr/share/nginx/html/
[root@master html]# ls
404.html  50x.html  index.html  nginx-logo.png  poweredby.png
[root@master html]# echo "master" > /index.html
[root@master html]#

//在主上面可以配置开机自启,但是在主备机上不可以配置nginx的开机自启。
[root@master html]# systemctl start nginx
[root@master html]# systemctl enable nginx
Created symlink /etc/systemd/system/multi-user.target.wants/nginx.service → /usr/lib/systemd/system/nginx.service.
[root@master html]#
在slave上安装nginx
[root@slave ~]# yum -y install nginx
[root@slave ~]# cd /usr/share/nginx/
[root@slave nginx]# cd html/
[root@slave html]# ls
404.html  50x.html  index.html  nginx-logo.png  poweredby.png
[root@slave html]# echo "slave" > index.html
//不要配置开机自启
[root@slave html]# systemctl start nginx
在浏览器上访问试试,确保master上的nginx服务能够正常访问
配置主keepalived
[root@master keepalived]# vim keepalived.conf
! Configuration File for keepalived

bal_defs {
   router_id lb01
}

vrrp_instance VI_1 {
    state BACKUP
    interface ens33
    virtual_router_id 51
    priority 100
    advert_int 1
    authentication {
        auth_type PASS
        auth_pass wutingkang
    }
    virtual_ipaddress {
        192.168.171.250
    }
}

virtual_server 192.168.171.250 80 {
    delay_loop 6
    lb_algo rr
    lb_kind DR
    persistence_timeout 50
    protocol TCP

    real_server 192.168.171.141 80 {
        weight 1
        TCP_CHECK {
            connect_port 80
            connect_timeout 3
            nb_get_retry 3
            delay_before_retry 3
        }
    }

    real_server 192.168.171.13 80 {
        weight 1
        TCP_CHECK {
            connect_port 80
            connect_timeout 3
            nb_get_retry 3
            delay_before_retry 3
        }
    }
}
[root@master keepalived]# systemctl start keepalived.service
[root@master keepalived]# systemctl enable keepalived.service
配置备keepalived
[root@slave ~]# vim /etc/keepalived/keepalived.conf
! Configuration File for keepalived

bal_defs {
   router_id lb02
}

vrrp_instance VI_1 {
    state BACKUP
    interface ens33
    virtual_router_id 51
    priority 90
    advert_int 1
    authentication {
        auth_type PASS
        auth_pass wutingkang
    }
    virtual_ipaddress {
        192.168.171.250
    }
}

virtual_server 192.168.171.250 80 {
    delay_loop 6
    lb_algo rr
    lb_kind DR
    persistence_timeout 50
    protocol TCP

    real_server 192.168.171.141 80 {
        weight 1
        TCP_CHECK {
            connect_port 80
            connect_timeout 3
            nb_get_retry 3
            delay_before_retry 3
        }
    }

    real_server 192.168.171.13 80 {
        weight 1
        TCP_CHECK {
            connect_port 80
            connect_timeout 3
            nb_get_retry 3
            delay_before_retry 3
        }
    }
}
[root@slave keepalived]# systemctl start keepalived
[root@slave keepalived]# systemctl enable keepalived
查看VIP在哪里
在MASTER上查看
//可以看到vip在master这里即主
[root@master keepalived]# ip a| grep ens33
2: ens33: <BROADCAST,MULTICAST,UP,LOWER_UP> mtu 1500 qdisc fq_codel state UP group default qlen 1000
    inet 192.168.171.141/24 brd 192.168.171.255 scope global noprefixroute ens33
    inet 192.168.171.250/32 scope global ens33
在SLAVE上查看
[root@slave keepalived]# ip a | grep ens33
2: ens33: <BROADCAST,MULTICAST,UP,LOWER_UP> mtu 1500 qdisc fq_codel state UP group default qlen 1000
    inet 192.168.171.13/24 brd 192.168.171.255 scope global noprefixroute ens33
[root@slave keepalived]#
访问测试
//如果不把slave的nginx关闭的话用vip访问是无论如何访问不到的。所以关闭slave的nginx在用VIP访问一下。
[root@slave ~]# systemctl stop nginx
[root@slave ~]# ss -antl
State              Recv-Q              Send-Q                           Local Address:Port                           Peer Address:Port             Process
LISTEN             0                   128                                    0.0.0.0:22                                  0.0.0.0:*
LISTEN             0                   128                                       [::]:22                                     [::]:*
[root@slave ~]#

//把主master的nginx和keepalived关闭,再用vip访问就可以访问到slave了
[root@master ~]# systemctl stop nginx
[root@master ~]# systemctl stop keepalived.service
[root@master ~]# ip a| grep ens33
2: ens33: <BROADCAST,MULTICAST,UP,LOWER_UP> mtu 1500 qdisc fq_codel state UP group default qlen 1000
    inet 192.168.171.141/24 brd 192.168.171.255 scope global noprefixroute ens33
//可以很明显的看到VIP的ip已经到备这里来了。
[root@slave ~]# ip a | grep  ens33
2: ens33: <BROADCAST,MULTICAST,UP,LOWER_UP> mtu 1500 qdisc fq_codel state UP group default qlen 1000
    inet 192.168.171.13/24 brd 192.168.171.255 scope global noprefixroute ens33
    inet 192.168.171.250/32 scope global ens33
可以看到用vip访问到的是备

让keepalived监控nginx负载均衡机
keepalived通过脚本来监控nginx负载均衡机的状态
在master上编写脚本
//创建一个存放脚本的目录
[root@master ~]# mkdir /scripts
[root@master ~]# cd /scripts/
[root@master scripts]# ls
//写一个如果主nginx服务崩了的话把keepalived的服务也停掉的脚本,这样可以释放vip给备,然后由备提供服务。
[root@master scripts]# vi nginx_status.sh
#!/bin/bash

nginx_status=$(ps -ef|grep -Ev "grep|$0"|grep '\bnginx\b'|wc -l)
if [ $nginx_status -lt 1 ];then
    systemctl stop keepalived
fi

[root@master scripts]# chmod +x nginx_status.sh
[root@master scripts]# ls
nginx_status.sh
[root@master scripts]#

[root@master scripts]# vi notify.sh
#!/bin/bash
VIP=$2

case "$1" in
  master)
        nginx_status=$(ps -ef|grep -Ev "grep|$0"|grep '\bnginx\b'|wc -l)
        if [ $nginx_status -lt 1 ];then
            systemctl start nginx
        fi
        sendmail
  ;;
  backup)
        nginx_status=$(ps -ef|grep -Ev "grep|$0"|grep '\bnginx\b'|wc -l)
        if [ $nginx_status -gt 0 ];then
            systemctl stop nginx
        fi
  ;;
  *)
        echo "Usage:$0 master|backup VIP"
  ;;
esac
[root@master scripts]# chmod +x notify.sh
[root@master scripts]# ll
total 8
-rwxr-xr-x 1 root root 143 Oct  8 07:38 nginx_status.sh
-rwxr-xr-x 1 root root 452 Oct  8 07:44 notify.sh

//把主上面的这个脚本传给备上面
[root@master scripts]# scp notify.sh 192.168.171.13:/scripts
The authenticity of host '192.168.171.13 (192.168.171.13)' can't be established.
ECDSA key fingerprint is SHA256:b2+ErORHLlANCY23XTlkC8uzQ6KKscSXnc5aIAK80dI.
Are you sure you want to continue connecting (yes/no/[fingerprint])? yes
Warning: Permanently added '192.168.171.13' (ECDSA) to the list of known hosts.
root@192.168.171.13's password:
notify.sh                                                                                                                            100%  452   340.2KB/s   00:00
[root@master scripts]#


[root@slave scripts]# ll
total 4
-rwxr-xr-x 1 root root 452 Oct  8 07:46 notify.sh
[root@slave scripts]#
配置keepalived加入监控脚本的配置
配置主keepalived
! Configuration File for keepalived

bal_defs {
   router_id lb01
}

vrrp_script nginx_check {
    script "/scripts/nginx_status.sh"
    interval 1
    weight -20
}

vrrp_instance VI_1 {
    state MASTER
    interface ens33
    virtual_router_id 51
    priority 100
    advert_int 1
    authentication {
        auth_type PASS
        auth_pass wutingkang
    }
    virtual_ipaddress {
        192.168.171.250
    }
    track_script {
        nginx_check
    }
    notify_master "/scripts/notify.sh master"
#    notify_backup "/scripts/notify.sh backup"    /这一行注释掉,因为这一行调用脚本是在这个节点是备节点的情况下才调用,但是我们给他的是主节点所以这一行是不需要的否则服务起不来。
}

virtual_server 192.168.171.250 80 {
    delay_loop 6
    lb_algo rr
    lb_kind DR
    persistence_timeout 50
    protocol TCP

    real_server 192.168.171.141 80 {
        weight 1
        TCP_CHECK {
            connect_port 80
            connect_timeout 3
            nb_get_retry 3
            delay_before_retry 3
        }
    }

    real_server 192.168.171.13 80 {
        weight 1
        TCP_CHECK {
            connect_port 80
            connect_timeout 3
            nb_get_retry 3
            delay_before_retry 3
        }
    }
}
[root@master keepalived]# systemctl restart keepalived.service
配置备keepalived
backup无需检测nginx是否正常,当升级为MASTER时启动nginx,当降级为BACKUP时关闭
[root@slave keepalived]# cat keepalived.conf
! Configuration File for keepalived

bal_defs {
   router_id lb02
}

vrrp_instance VI_1 {
    state BACKUP
    interface ens33
    virtual_router_id 51
    priority 90
    advert_int 1
    authentication {
        auth_type PASS
        auth_pass wutingkang
    }
    virtual_ipaddress {
        192.168.171.250
    }
    notify_master "/scripts/notify.sh master"
    notify_backup "/scripts/notify.sh backup"
}

virtual_server 192.168.171.250 80 {
    delay_loop 6
    lb_algo rr
    lb_kind DR
    persistence_timeout 50
    protocol TCP

    real_server 192.168.171.141 80 {
        weight 1
        TCP_CHECK {
            connect_port 80
            connect_timeout 3
            nb_get_retry 3
            delay_before_retry 3
        }
    }

    real_server 192.168.171.13 80 {
        weight 1
        TCP_CHECK {
            connect_port 80
            connect_timeout 3
            nb_get_retry 3
            delay_before_retry 3
        }
    }
}
[root@slave keepalived]# systemctl restart keepalived
keepalived实现haproxy负载均衡高可用
环境说明
| 系统信息 | 主机名 | IP |
|---|---|---|
| centos8 | master | 192.168.171.141 |
| centos8 | slave | 192.168.171.13 |
| centos8 | RS1 | 192.168.171.133 |
| centos8 | RS2 | 192.168.171.142 |
虚拟网络vip是:192.168.171.250
部署master
//关闭防火墙和selinux
[root@master ~]# systemctl disable --now firewalld.service
Removed /etc/systemd/system/multi-user.target.wants/firewalld.service.
Removed /etc/systemd/system/dbus-org.fedoraproject.FirewallD1.service.
[root@master ~]# setenforce 0
[root@master ~]# sed -ri 's/^(SELINUX=).*/\1disabled/g' /etc/selinux/config
//安装keepalived服务
[root@master ~]# yum -y install vim keepalived
//修改内核参数
[root@master ~]# vi /etc/sysctl.conf
[root@master ~]# sysctl -p
net.ipv4.ip_nonlocal_bind = 1
net.ipv4.ip_forward = 1
//下载依赖包
[root@master ~]# yum -y install make gcc pcre-devel bzip2-devel openssl-devel systemd-devel
//然后在网上下载压缩包(网址:https://src.fedoraproject.org/repo/pkgs/haproxy/)
[root@master ~]# ls
anaconda-ks.cfg  haproxy-2.6.0.tar.gz
[root@master ~]# useradd -rMs /sbin/nologin haproxy
[root@master ~]# tar -xzf haproxy-2.6.0.tar.gz
[root@master ~]# ls
anaconda-ks.cfg  haproxy-2.6.0  haproxy-2.6.0.tar.gz
[root@master ~]# cd haproxy-2.6.0/
[root@master haproxy-2.6.0]# make clean
[root@master haproxy-2.6.0]#
[root@master haproxy-2.6.0]# make -j $(grep 'processor' /proc/cpuinfo |wc -l)  \
TARGET=linux-glibc  \
USE_OPENSSL=1  \
USE_ZLIB=1  \
USE_PCRE=1  \
USE_SYSTEMD=1
[root@master haproxy-2.6.0]# make install PREFIX=/usr/local/haproxy

[root@master haproxy-2.6.0]# cp haproxy /usr/sbin/
//创建配置文件路径
[root@master ~]# mkdir /etc/haproxy
[root@master ~]# vi /etc/haproxy/haproxy.cfg
global
    log 127.0.0.1 local0  info
    maxconn 20480
    pidfile /var/run/haproxy.pid
    #maxconn 4000
    user haproxy
    group haproxy
    daemon
defaults
    mode http
    log global
    option dontlognull
    option httpclose
    option httplog
    option redispatch
    balance roundrobin
    timeout connect 10s
    timeout client 10s
    timeout server 10s
    timeout check 10s
    maxconn 60000
    retries 3
listen admin_stats
    bind 0.0.0.0:8189
    stats enable
    mode http
    log global
    stats uri /admin
    stats realm Haproxy\ Statistics
    stats auth admin:123456
    #stats hide-version
    stats admin if TRUE
    stats refresh 30s
#---------------web设置-----------------------
listen webcluster
    bind 0.0.0.0:80
    mode http
    log global
    maxconn 3000
    balance roundrobin
    cookie SESSION_COOKIE insert indirect nocache
    server web01 192.168.171.133:80
    server web02 192.168.171.142:80

//写service文件
[root@master ~]# vi /usr/lib/systemd/system/haproxy.service
[Unit]
Description=HAProxy Load Balancer
After=syslog.target network.target

[Service]
ExecStartPre=/usr/local/haproxy/sbin/haproxy -f /etc/haproxy/haproxy.cfg   -c -q
ExecStart=/usr/local/haproxy/sbin/haproxy -Ws -f /etc/haproxy/haproxy.cfg  -p /var/run/haproxy.pid
ExecReload=/bin/kill -USR2 $MAINPID

[Install]
WantedBy=multi-user.target
[root@master ~]# systemctl daemon-reload
[root@master ~]# systemctl restart haproxy.service
[root@master ~]# systemctl enable haproxy.service
[root@master ~]# cd /etc/keepalived/
[root@master keepalived]# ls
keepalived.conf
[root@master keepalived]# mv keepalived.conf keepalived.conf.bre
[root@master keepalived]# vi keepalived.conf
[root@master keepalived]# cat keepalived.conf
! Configuration File for keepalived

global_defs {
   router_id lb01
}

vrrp_instance VI_1 {
    state BACKUP
    interface ens33
    virtual_router_id 51
    priority 100
    advert_int 1
    authentication {
        auth_type PASS
        auth_pass wutingkang
    }
    virtual_ipaddress {
        192.168.171.250
    }
}

virtual_server 192.168.171.250 80 {
    delay_loop 6
    lb_algo rr
    lb_kind DR
    persistence_timeout 50
    protocol TCP

    real_server 192.168.171.141 80 {
        weight 1
        TCP_CHECK {
            connect_port 80
            connect_timeout 3
            nb_get_retry 3
            delay_before_retry 3
        }
    }

    real_server 192.168.171.13 80 {
        weight 1
        TCP_CHECK {
            connect_port 80
            connect_timeout 3
            nb_get_retry 3
            delay_before_retry 3
        }
    }
}

[root@master keepalived]# systemctl restart keepalived.service
[root@master keepalived]# systemctl enable keepalived.service
配置slave
//关闭防火墙和selinux
[root@localhost ~]# hostnamectl set-hostname slave
[root@localhost ~]# bash
[root@slave ~]# systemctl disable --now firewalld.service
[root@slave ~]# setenforce 0
[root@slave ~]# sed -ri 's/^(SELINUX=).*/\1disabled/g' /etc/selinux/config
[root@slave ~]#  yum -y install vim keepalived
//修改内核参数
[root@slave ~]# vim /etc/sysctl.conf
[root@slave ~]# sysctl -p
net.ipv4.ip_nonlocal_bind = 1
net.ipv4.ip_forward = 1
[root@slave ~]#
//下载依赖包
[root@slave ~]# yum -y install make gcc pcre-devel bzip2-devel openssl-devel systemd-devel
[root@slave ~]# ls
anaconda-ks.cfg  haproxy-2.6.0.tar.gz
[root@slave ~]#
[root@slave ~]# useradd -rMs /sbin/nologin haproxy
[root@slave ~]#  tar -xzf haproxy-2.6.0.tar.gz
//然后进入解压目录编译
[root@slave haproxy-2.6.0]# make clean
[root@slave haproxy-2.6.0]# make -j $(grep 'processor' /proc/cpuinfo |wc -l)  \
 TARGET=linux-glibc  \
 USE_OPENSSL=1  \
 USE_ZLIB=1  \
 USE_PCRE=1  \
 USE_SYSTEMD=1
[root@slave haproxy-2.6.0]# make install PREFIX=/usr/local/haproxy
[root@slave haproxy-2.6.0]# cp haproxy /usr/sbin/
[root@slave haproxy-2.6.0]# mkdir /etc/haproxy
[root@slave haproxy-2.6.0]# vi /etc/haproxy/haproxy.cfg
global
    log 127.0.0.1 local0  info
    maxconn 20480
    pidfile /var/run/haproxy.pid
    #maxconn 4000
    user haproxy
    group haproxy
    daemon
defaults
    mode http
    log global
    option dontlognull
    option httpclose
    option httplog
    option redispatch
    balance roundrobin
    timeout connect 10s
    timeout client 10s
    timeout server 10s
    timeout check 10s
    maxconn 60000
    retries 3
listen admin_stats
    bind 0.0.0.0:8189
    stats enable
    mode http
    log global
    stats uri /admin
    stats realm Haproxy\ Statistics
    stats auth admin:123456
    #stats hide-version
    stats admin if TRUE
    stats refresh 30s
#---------------web设置-----------------------
listen webcluster
    bind 0.0.0.0:80
    mode http
    log global
    maxconn 3000
    balance roundrobin
    cookie SESSION_COOKIE insert indirect nocache
    server web01 192.168.171.133:80
    server web02 192.168.171.142:80

//写service文件
[root@slave haproxy-2.6.0]# vi /usr/lib/systemd/system/haproxy.service
[Unit]
Description=HAProxy Load Balancer
After=syslog.target network.target

[Service]
ExecStartPre=/usr/local/haproxy/sbin/haproxy -f /etc/haproxy/haproxy.cfg   -c -q
ExecStart=/usr/local/haproxy/sbin/haproxy -Ws -f /etc/haproxy/haproxy.cfg  -p /var/run/haproxy.pid
ExecReload=/bin/kill -USR2 $MAINPID

[Install]
WantedBy=multi-user.target

[root@slave haproxy-2.6.0]# systemctl daemon-reload
[root@slave haproxy-2.6.0]# systemctl restart haproxy
[root@slave haproxy-2.6.0]# systemctl enable haproxy

//配置备keepalived
[root@slave ~]# cd /etc/keepalived/
[root@slave keepalived]# ls
keepalived.conf
[root@slave keepalived]# mv keepalived.conf keepalived.conf.ber
[root@slave keepalived]# vi keepalived.conf
! Configuration File for keepalived

global_defs {
   router_id lb01
}

vrrp_instance VI_1 {
    state BACKUP
    interface ens33
    virtual_router_id 51
    priority 100
    advert_int 1
    authentication {
        auth_type PASS
        auth_pass wutingkang
    }
    virtual_ipaddress {
        192.168.171.250
    }
}

virtual_server 192.168.171.250 80 {
    delay_loop 6
    lb_algo rr
    lb_kind DR
    persistence_timeout 50
    protocol TCP

    real_server 192.168.171.141 80 {
        weight 1
        TCP_CHECK {
            connect_port 80
            connect_timeout 3
            nb_get_retry 3
            delay_before_retry 3
        }
    }

    real_server 192.168.171.13 80 {
        weight 1
        TCP_CHECK {
            connect_port 80
            connect_timeout 3
            nb_get_retry 3
            delay_before_retry 3
        }
    }
}

[root@slave keepalived]# systemctl restart keepalived
[root@slave keepalived]# systemctl enable keepalived
配置RS1
//关闭防火墙selinux
[root@RS1 ~]# systemctl disable --now firewalld.service
Removed /etc/systemd/system/multi-user.target.wants/firewalld.service.
Removed /etc/systemd/system/dbus-org.fedoraproject.FirewallD1.service.
[root@RS1 ~]# sed -ri 's/^(SELINUX=).*/\1disabled/g' /etc/selinux/config
[root@RS1 ~]# yum -y install httpd
[root@RS1 ~]# echo "RS1" >/var/www/html/index.html
[root@RS1 ~]# systemctl restart httpd
[root@RS1 ~]# systemctl enable httpd
配置RS2
//关闭防火墙和selinux
[root@RS2 ~]# systemctl disable --now firewalld.service
Removed /etc/systemd/system/multi-user.target.wants/firewalld.service.
Removed /etc/systemd/system/dbus-org.fedoraproject.FirewallD1.service.
[root@RS2 ~]# setenforce 0
[root@RS2 ~]# sed -ri 's/^(SELINUX=).*/\1disabled/g' /etc/selinux/config
[root@RS2 ~]# yum -y install nginx
[root@RS2 ~]# echo "RS2" >/usr/share/nginx/html/index.html
[root@RS2 ~]# systemctl restart nginx.service
[root@RS2 ~]# systemctl enable nginx.service
测试
//可以看到此时的vip在备服务机上
[root@slave keepalived]# ip a | grep ens33
2: ens33: <BROADCAST,MULTICAST,UP,LOWER_UP> mtu 1500 qdisc fq_codel state UP group default qlen 1000
    inet 192.168.171.13/24 brd 192.168.171.255 scope global noprefixroute ens33
    inet 192.168.171.250/32 scope global ens33

[root@slave keepalived]# systemctl start keepalived
[root@slave keepalived]# curl http://192.168.171.250
RS1
[root@slave keepalived]# curl http://192.168.171.250
RS2
[root@slave keepalived]# curl http://192.168.171.250
RS1
[root@slave keepalived]# curl http://192.168.171.250
RS2
#### 测试

```bash
//可以看到此时的vip在备服务机上
[root@slave keepalived]# ip a | grep ens33
2: ens33: <BROADCAST,MULTICAST,UP,LOWER_UP> mtu 1500 qdisc fq_codel state UP group default qlen 1000
    inet 192.168.171.13/24 brd 192.168.171.255 scope global noprefixroute ens33
    inet 192.168.171.250/32 scope global ens33

[root@slave keepalived]# systemctl start keepalived
[root@slave keepalived]# curl http://192.168.171.250
RS1
[root@slave keepalived]# curl http://192.168.171.250
RS2
[root@slave keepalived]# curl http://192.168.171.250
RS1
[root@slave keepalived]# curl http://192.168.171.250
RS2


 354
354


 被折叠的 条评论
为什么被折叠?
被折叠的 条评论
为什么被折叠?
 到【灌水乐园】发言


