


 本文详细介绍了如何使用STM32CubeMX配置并移植Keil RTX操作系统,包括新建工程、配置RTOS、添加头文件、初始化函数、任务创建等步骤,并对比了两种不同的移植方法。主要内容涉及STM32CubeMX、HAL库、CMSIS-RTOS2以及中断优先级设置。
1.0 如何使用cubemx并且移植RTX操作系统?(方法二)
方法二的不同之处是直接从keil里面,进入cubemx,然后进行配置具体如下
1、生成过程
步骤 一:新建工程,选择RTX
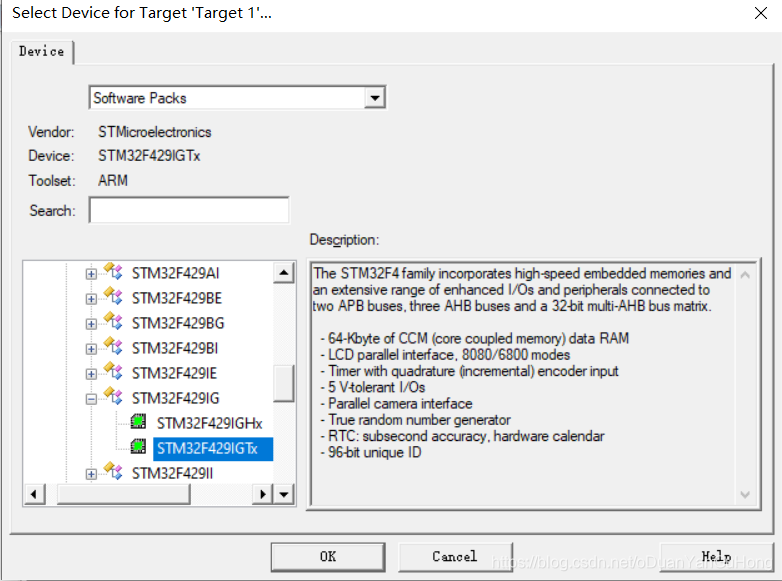
Project->New uvision Project,然后填写工程的文件名,保存。

然后会跳出Device 里选择芯片型号:
在接着会跳出:Manage Run-Time Envrionment对话框:
在RTOS2(API)中选择 Keil RTX5
然后点击下面Resolve,自动把缺的东西配置完

步骤二:勾选需要的库,运行cubemx
接着上面步骤
如下图片:
1、勾选 通过STM32cubemx 来配置文件。
2、勾选需要的HAL库,可以先全部勾选上。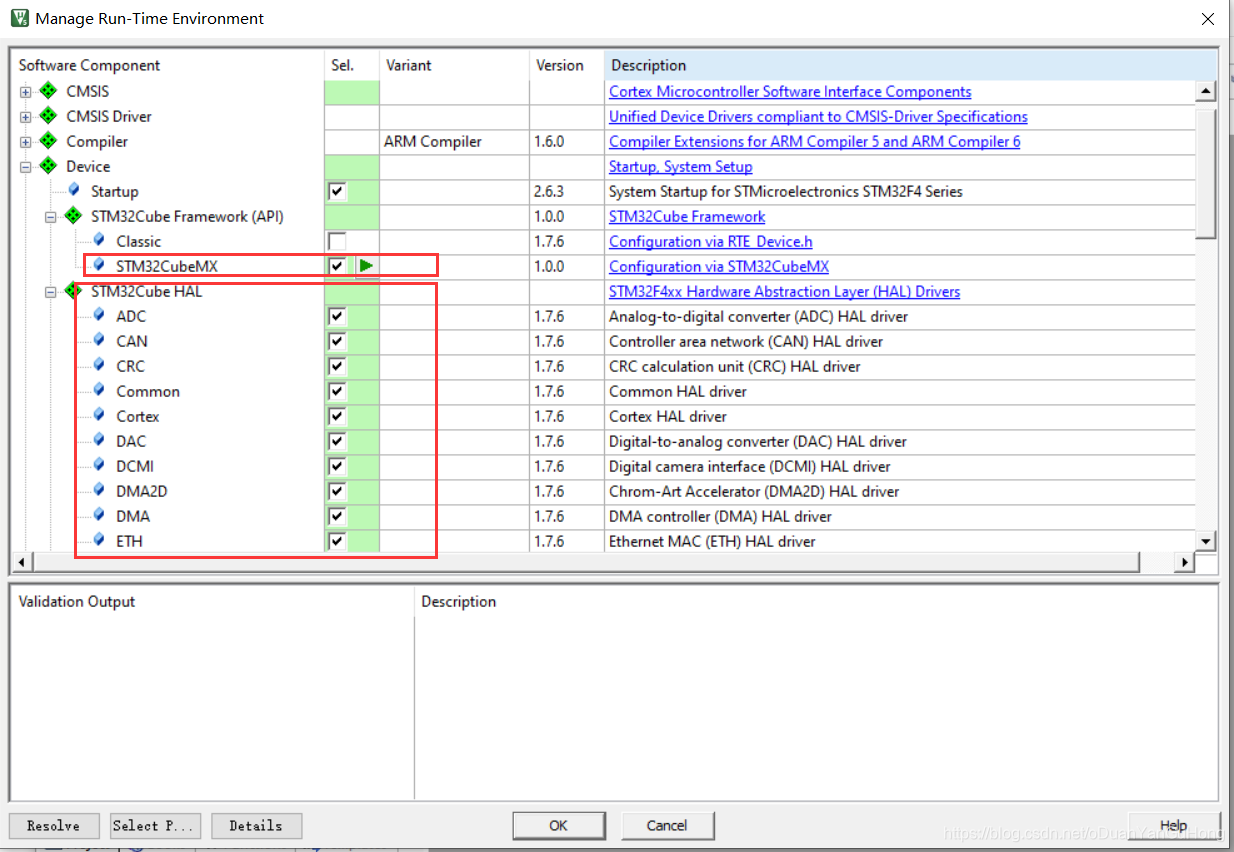
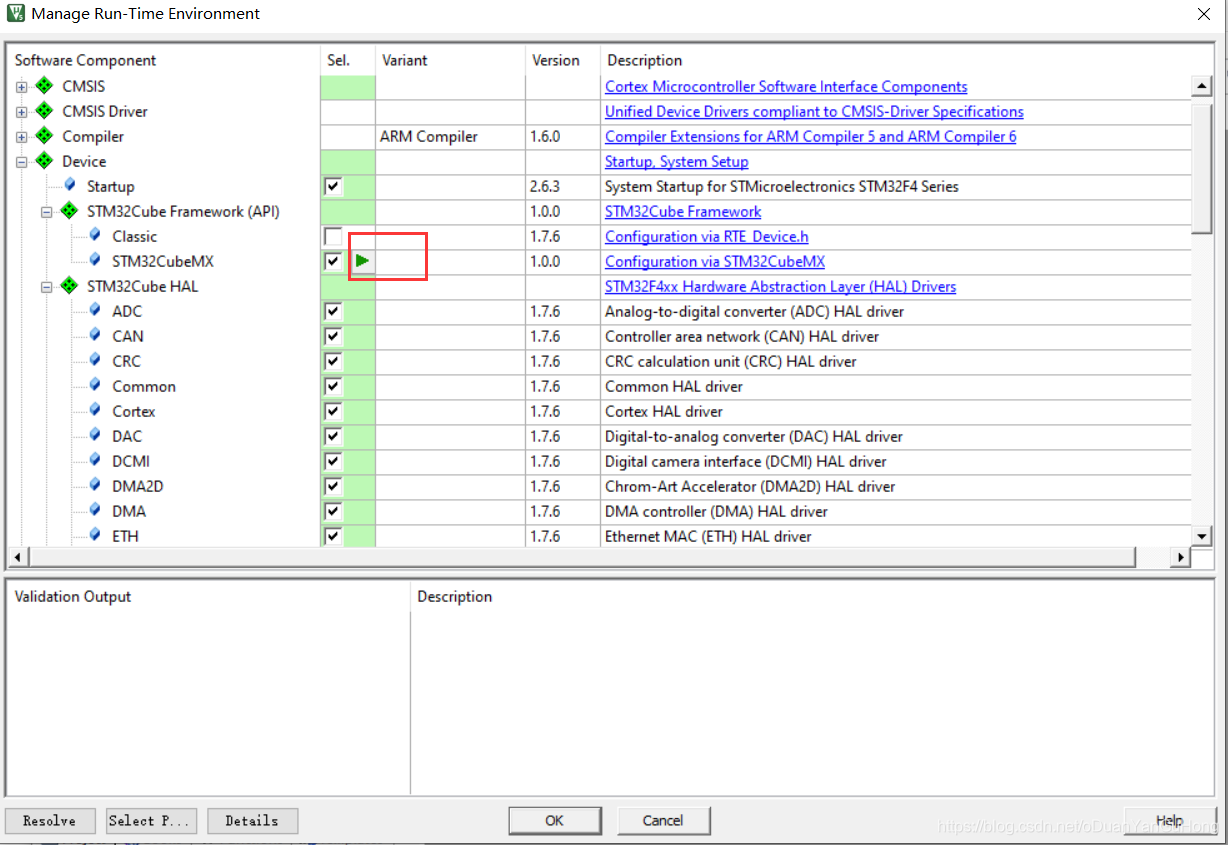
步骤三:配置Cubemx
接着上面步骤:
点击下图跳转到Cubemx 进行配置
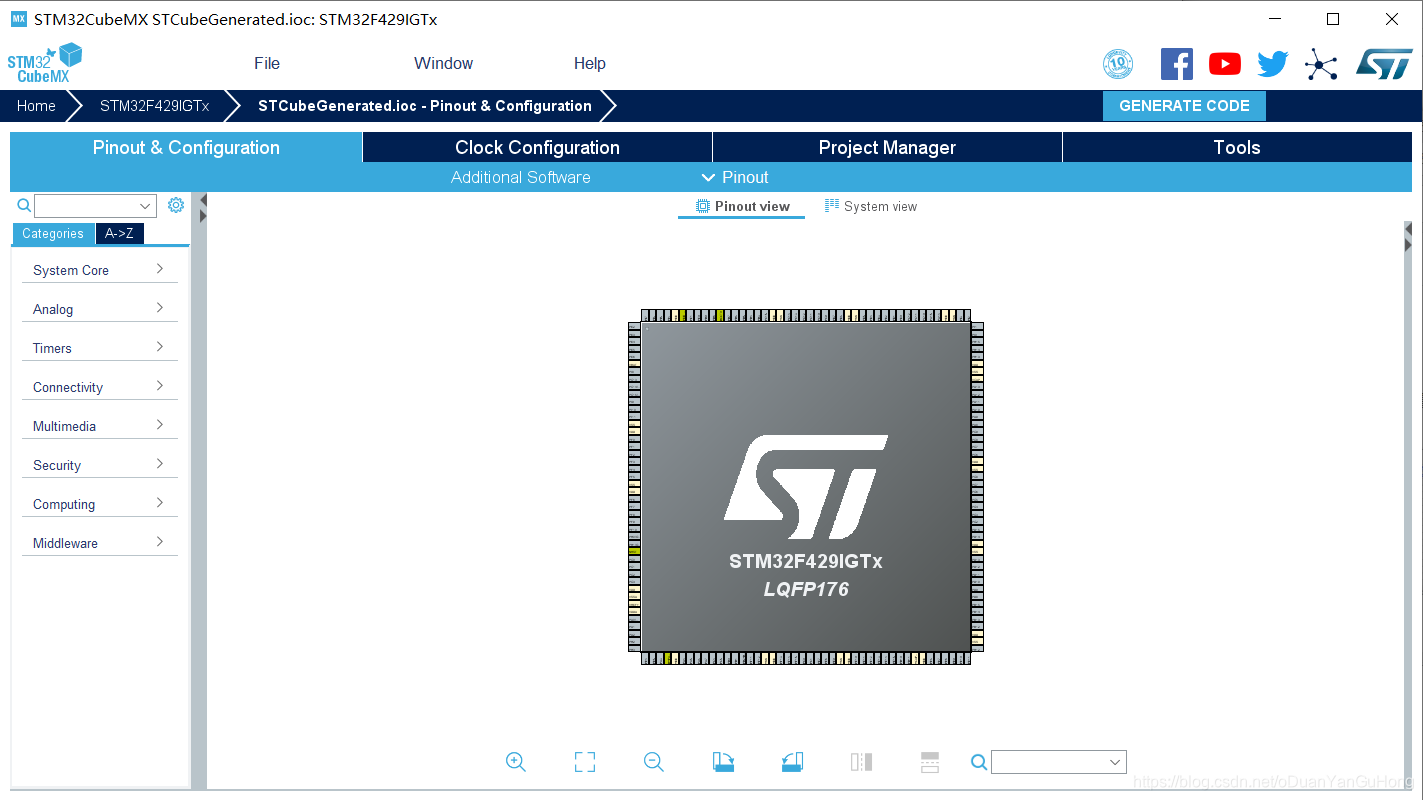
接下来就是很熟悉的CubeMX配置环节了,可参考方法一。
按照各自需求,进行配置。
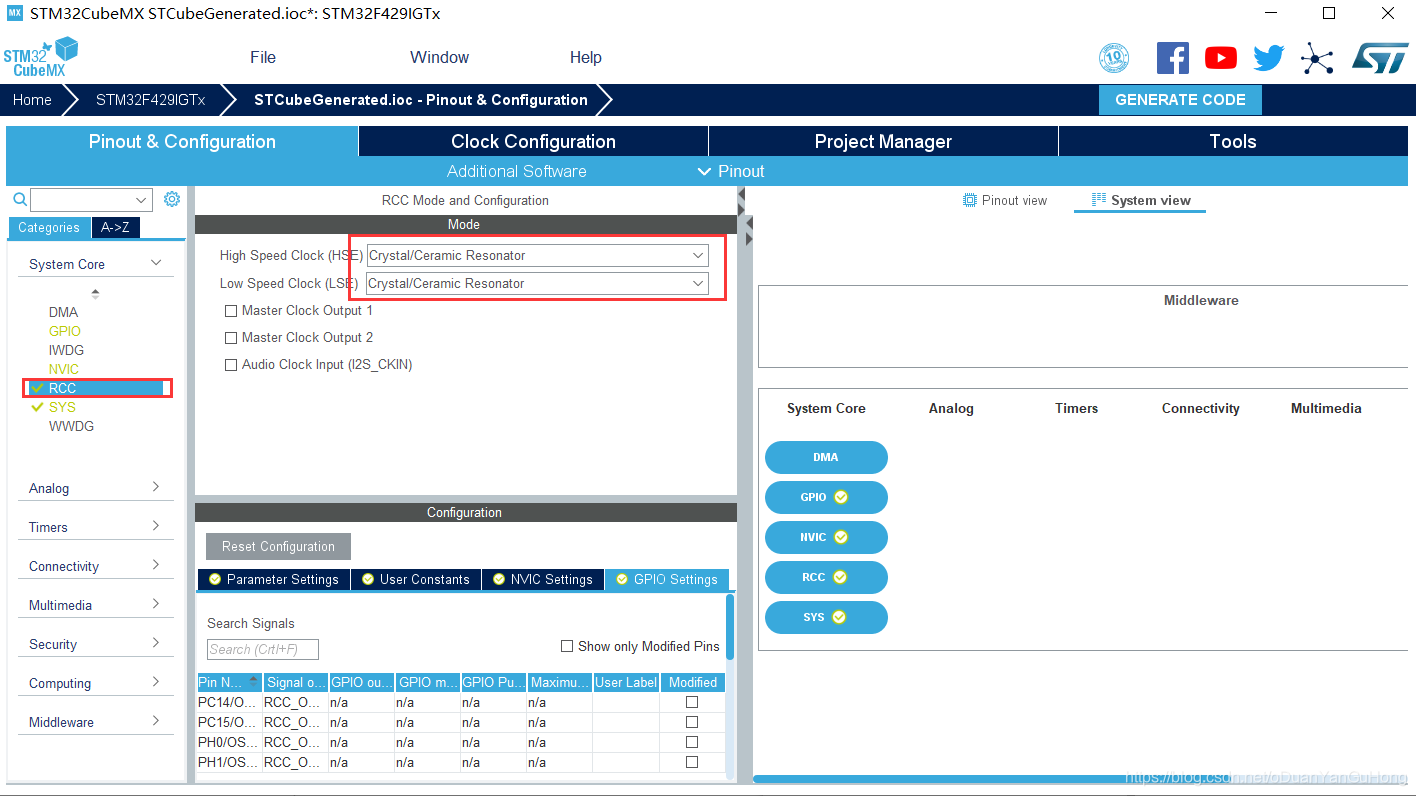
配置RCC:
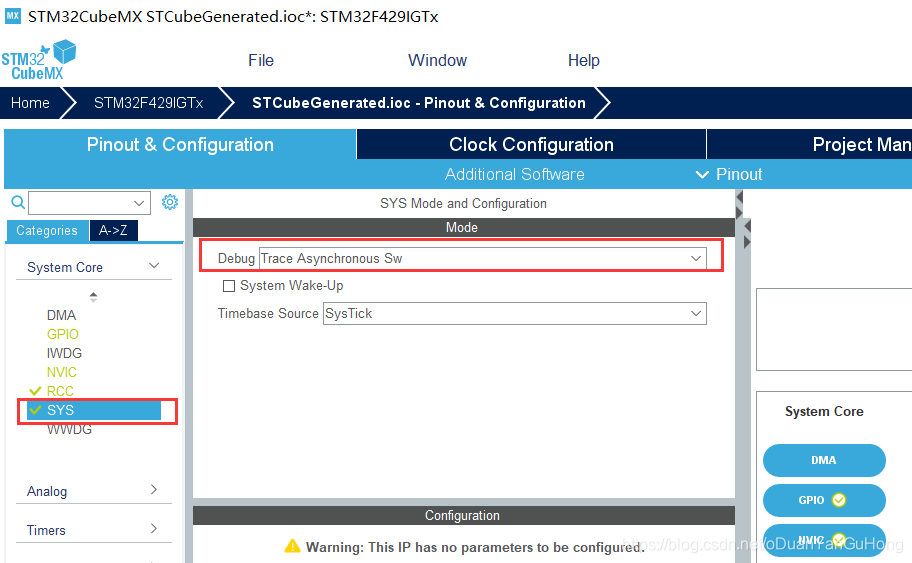
配置SYS:
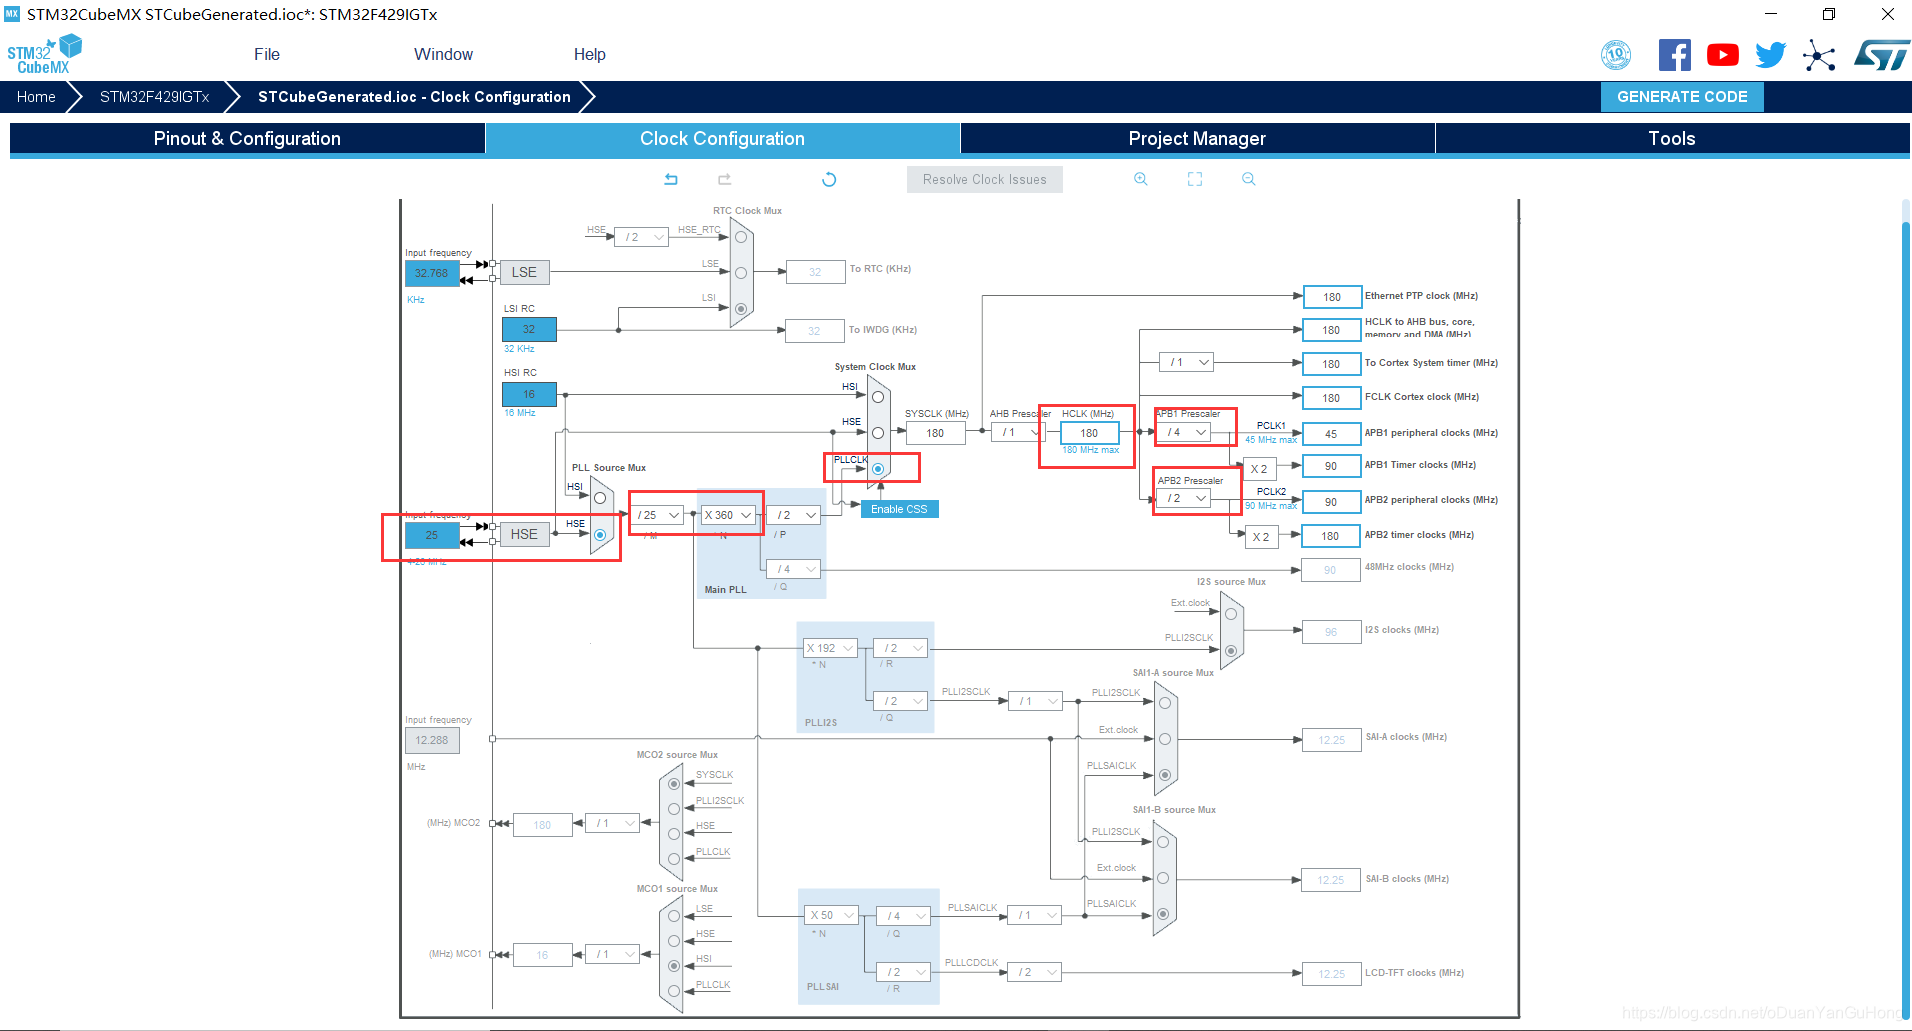
配置CLK:
配置NVIC:
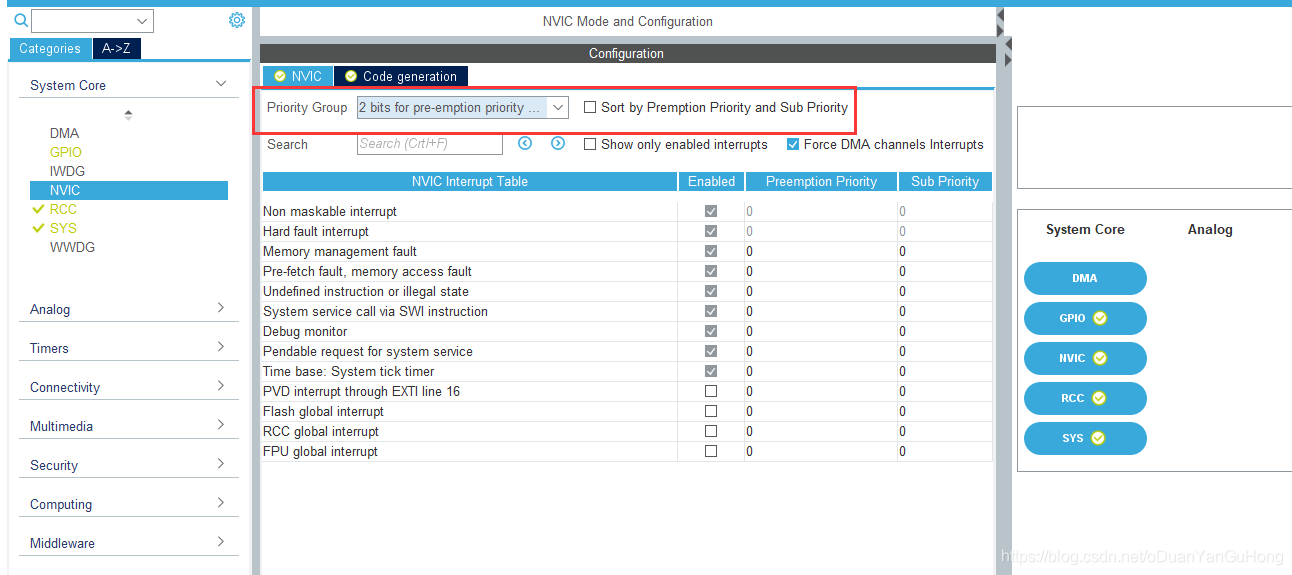
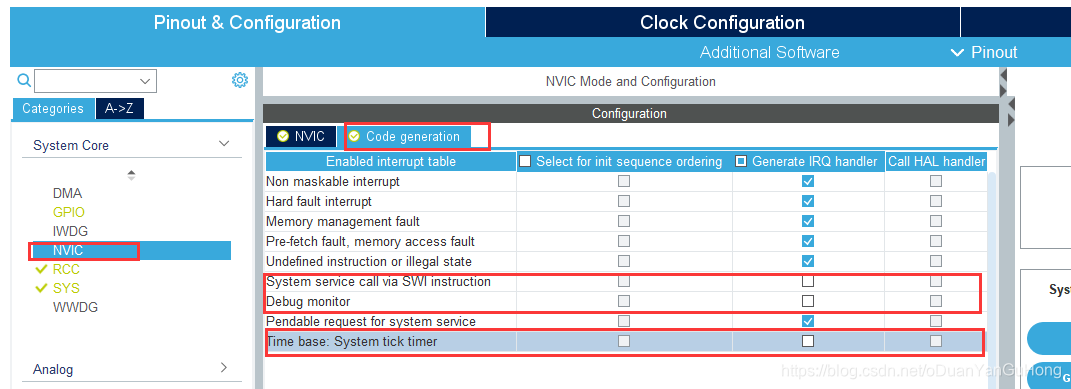
特别注意:上面三项不能投选
…
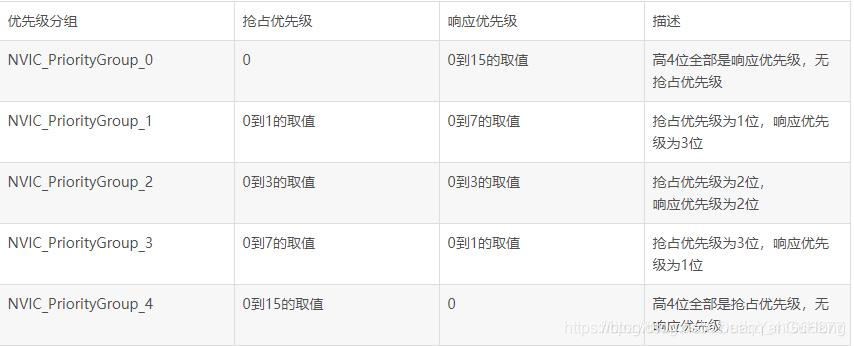
科普中断优先级:
1.抢占优先级–PreemptionPriority
2.响应优先级–SubPriority
3.中断分组–NVIC_PriorityGroup_0(第0组)
4.中断通道–IRQChannel
抢占 > 响应 (数值越小,等级越高)
配置生成代码
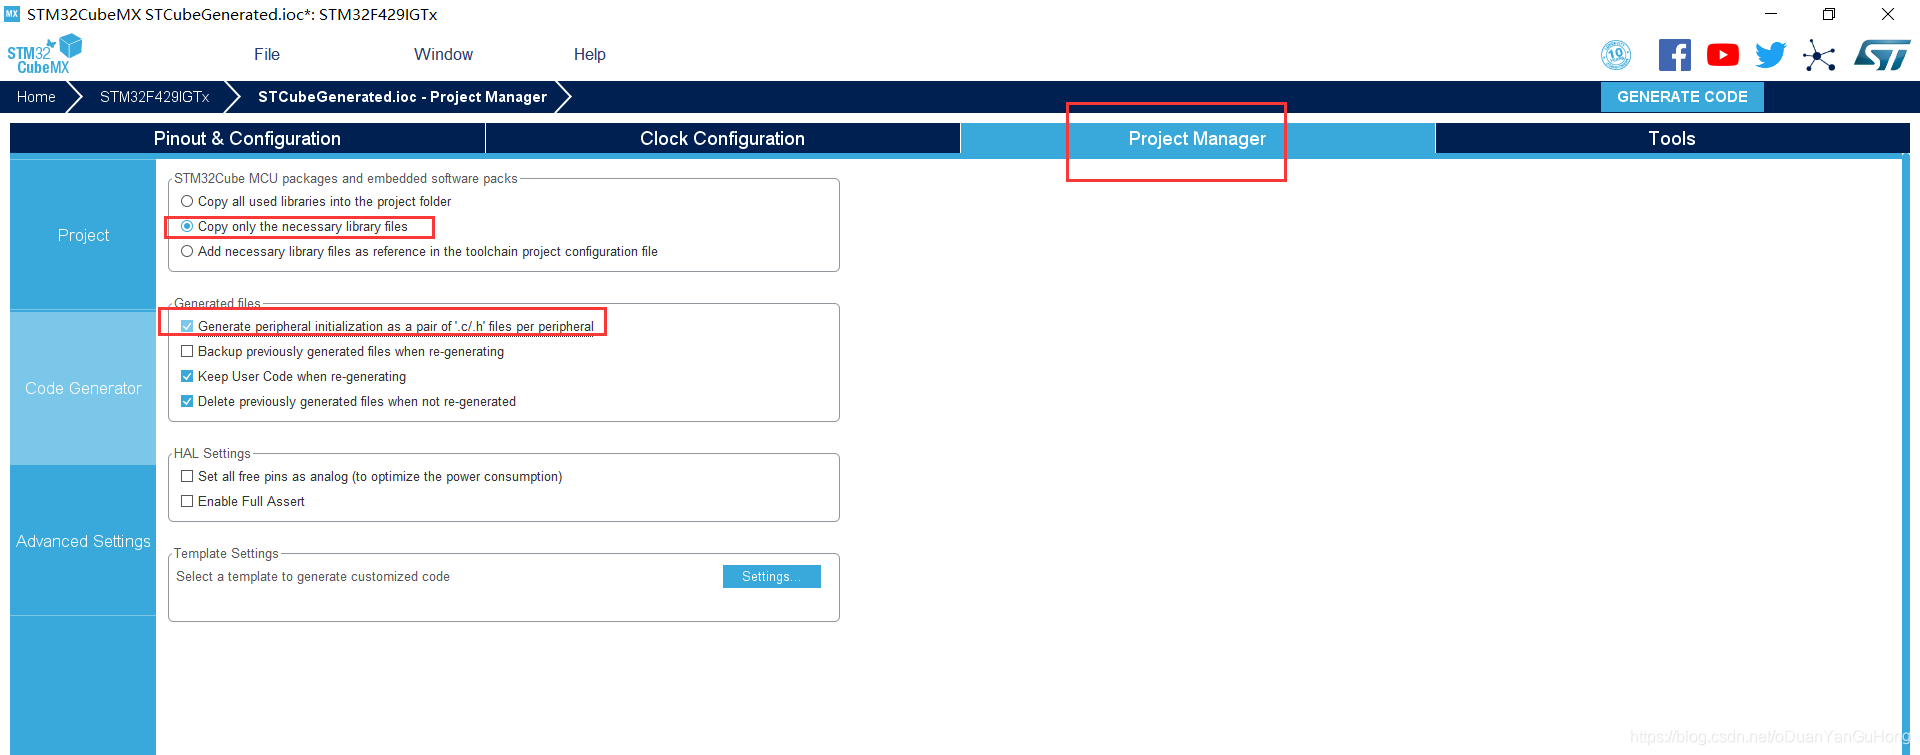
GENERATE CODE生成代码
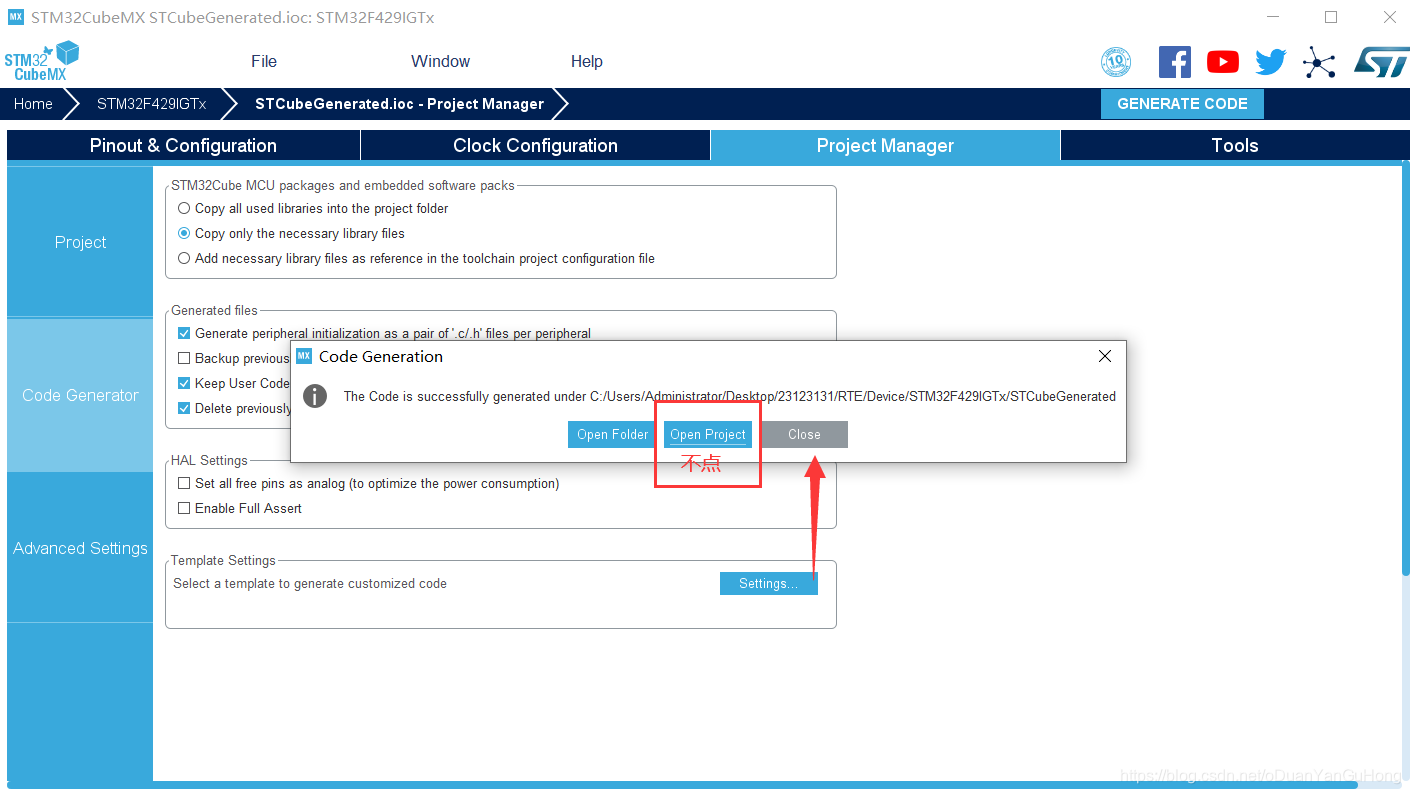
上面生成代码步骤特别注意:生成完成Close即可,千万别点击Open Project, 否则配置的信息全部消失了。这个可能是软件bug。
叉掉STM32CubeMx配置软件。
步骤四:添加一些RTX的头文件,及核的启动代码
下图是Cubemx配置好的,其中Source Group1就是预留的用户组,也可以添加组。

点击main.c添加,头文件
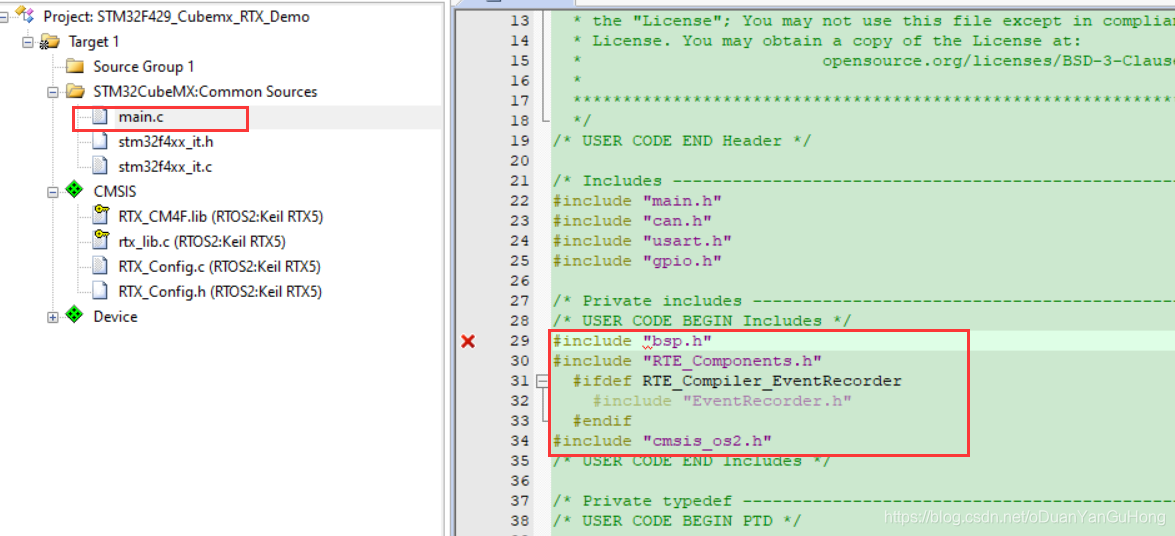
#include "bsp.h" //个人头文件
#include "RTE_Components.h"
  #ifdef RTE_Compiler_EventRecorder
    #include "EventRecorder.h"
  #endif
#include "cmsis_os2.h"
添加代码1:
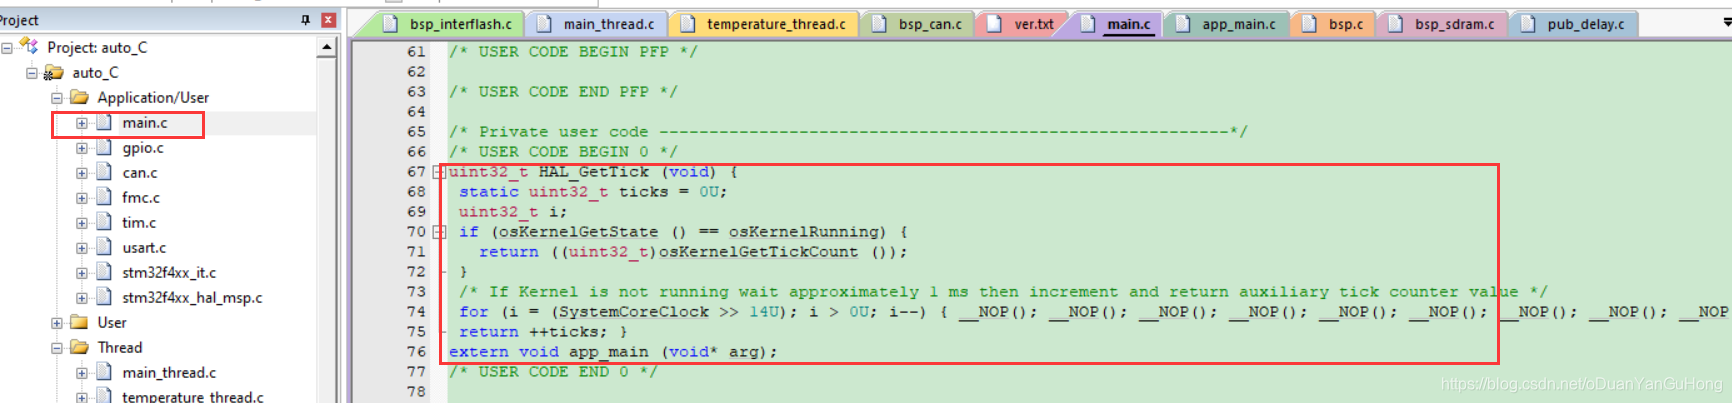
uint32_t HAL_GetTick (void) {
 static uint32_t ticks = 0U;
 uint32_t i;
 if (osKernelGetState () == osKernelRunning) {
   return ((uint32_t)osKernelGetTickCount ());
 }
 /* If Kernel is not running wait approximately 1 ms then increment and return auxiliary tick counter value */
 for (i = (SystemCoreClock >> 14U); i > 0U; i--) { __NOP(); __NOP(); __NOP(); __NOP(); __NOP(); __NOP(); __NOP(); __NOP(); __NOP(); __NOP(); __NOP(); __NOP(); }
 return ++ticks; }
extern void app_main (void* arg);
添加代码2:
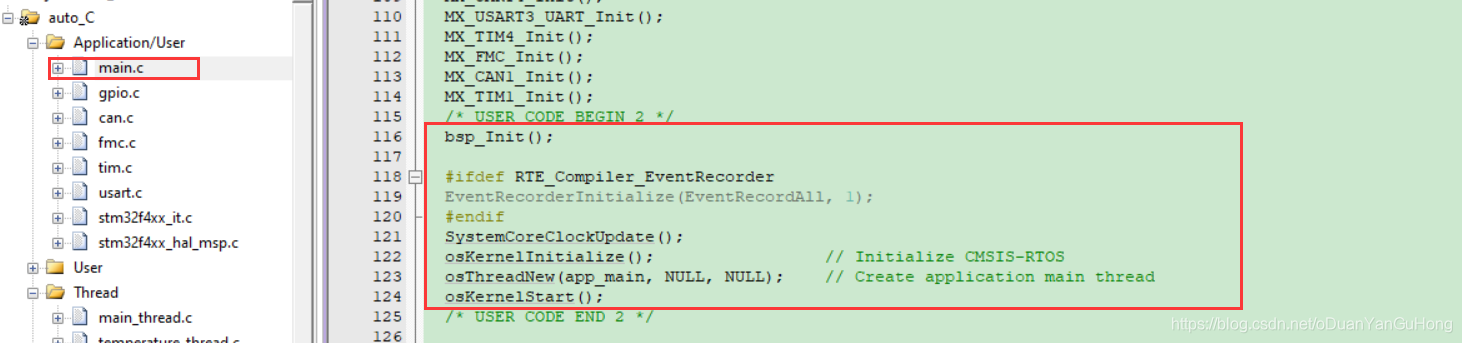
	bsp_Init();//个人初始化函数

	#ifdef RTE_Compiler_EventRecorder
	EventRecorderInitialize(EventRecordAll, 1);
	#endif
	SystemCoreClockUpdate();
	osKernelInitialize();                 // Initialize CMSIS-RTOS
	osThreadNew(app_main, NULL, NULL);    // Create application main thread
	osKernelStart();
把app_main任务就大功告成了。
比如啥也不干:
void app_main (void * arg)
{
	while(1)
	{
		osDelay(100);
	}
}
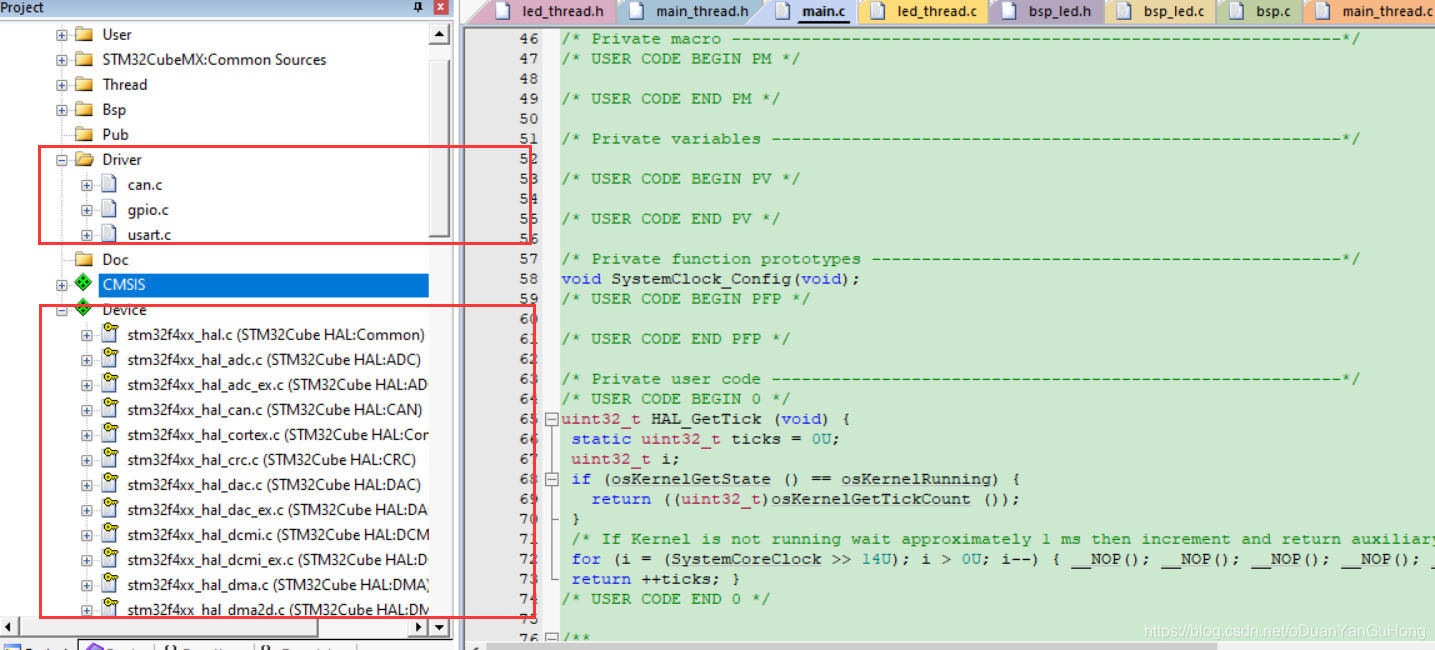
步骤五:添加cubemx生成代码到project
直接编译发现Cubemx生成的初始化函数没有定义,我们还需要把Cubemx生成的驱动文件添加到项目中。
自动生成的c文件位置:
RTE\Device\STM32F429IGTx\STCubeGenerated\Src
到此结束。此致敬礼! 希望对你有所帮助。别忘记点关注或者点个赞。
2、源代码
2.1 结构
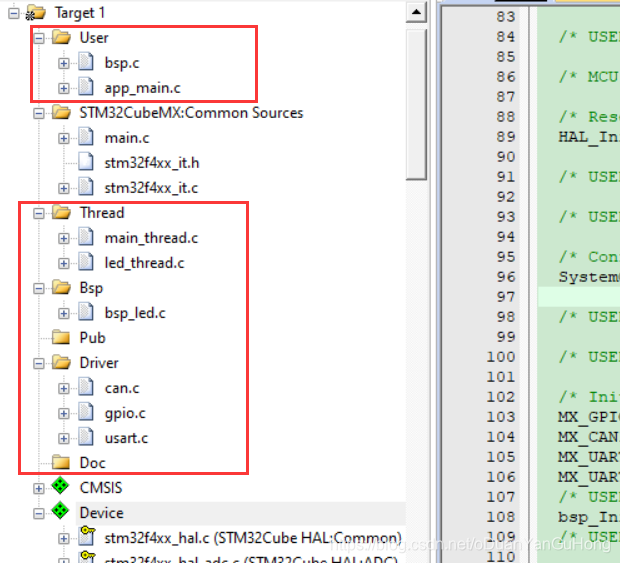
红框为自己加入的代码
2.2 代码
User :bsp.c
#include "bsp.h"
extern void app_main (void* arg);


void rtx_start(void)
{
		/*启动任务*/
	#ifdef RTE_Compiler_EventRecorder
	EventRecorderInitialize(EventRecordAll, 1);
	#endif
	SystemCoreClockUpdate();
	osKernelInitialize();                 // Initialize CMSIS-RTOS
	osThreadNew(app_main, NULL, NULL);    // Create application main thread
	osKernelStart();
}

void DeviceInit(void)
{
	bsp_InitLed();//LED初始化
}
/*
*********************************************************************************************************
*	函 数 名: bsp_Init
*	功能说明: 初始化硬件设备。只需要调用一次。该函数配置CPU寄存器和外设的寄存器并初始化一些全局变量。
*			 全局变量。
*	形    参: 无
*	返 回 值: 无
*********************************************************************************************************
*/
void bsp_Init(void)
{
	/*硬件初始化*/
	DeviceInit();
	/*启动任务*/
  rtx_start();
}
/*
*********************************************************************************************************
*
*	模块名称 : 驱动模块
*	文件名称 : bsp.h
*	版    本 : V1.0
*	说    明 : 头文件
*
*
*********************************************************************************************************
*/
#ifndef __BSP_H__
#define __BSP_H__
#include "stm32f4xx_hal.h"
#include "cmsis_os2.h"
#include "main.h"
#include "app_main.h"

#include "main_thread.h"
#include "led_thread.h"

#include "bsp_led.h"


/* 供外部调用的函数声明 */
void bsp_Init(void);


#endif
User: app_main.c
#include "bsp.h"


/* 任务句柄 */
osThreadId_t 	main_ids  = NULL;
osThreadId_t 	led_ids = NULL;

/*Mutex &semaphore & queue handle*/
osSemaphoreId_t		sid_Semaphore_softtimer0;


/*timer*/
osTimerId_t  timer0_id;//200ms 定时器


//Attributes structure for led_thread.
static const osThreadAttr_t ThreadAttr_LED = {
	.name = "Main_Thread",
	.priority=osPriorityNormal,
	.stack_size =1024,
};

//Attributes structure for main_thread.
static const osThreadAttr_t ThreadAttr_MAIN = {
	.name = "Main_Thread",
	.priority=osPriorityNormal,
	.stack_size =1024,
};

/*timer0*/
static const  osTimerAttr_t timerAttr_timer0 = {
	.name = "timer_0",
};
/*semaphore*/
static const osSemaphoreAttr_t semAttr_SEM1 = {
	.name = "SEM1",
};
//软件定时器0中断回调函数
void callback0(void *param)
{
	switch( (uint32_t) param){
		case 0:
			osSemaphoreRelease(sid_Semaphore_softtimer0);//200mS
		break;
	}
}

/*----------------------------------------------------------------------------
 *      Message Queue creation & usage
 *      Initilise the LED's, Create the semaphore
 *---------------------------------------------------------------------------*/
int AppObjCreate (void)
{
	osStatus_t  status;  // function return status
	/* Creat Semaphore */
	sid_Semaphore_softtimer0 = osSemaphoreNew(1, 0, &semAttr_SEM1 );
	if(sid_Semaphore_softtimer0 == NULL){
		return -1;}

	/*timer*/
	timer0_id = osTimerNew(&callback0, osTimerPeriodic,(void *)0, &timerAttr_timer0);	//软件定时器timer0 200ms
	if (timer0_id == NULL){
		return -1;}
	status=osTimerStart(timer0_id, 200);//200mS定时开始计时
	if(status!=osOK){
		return -1;}

	return 0;
}

void app_main (void const* arg)
{
  osStatus_t status;
	/* 创建任务通信机制 */
	AppObjCreate();
	/* 创建任务 */
	AppTaskCreate();

  while(1)
	{
		osDelay(10);
		LED_ERR_Toggle();
	}
}

/*
*********************************************************************************************************
*	函 数 名: AppTaskCreate
*	功能说明: 创建应用任务
*	形    参: 无
*	返 回 值: 无
*********************************************************************************************************
*/
static void AppTaskCreate (void)
{

//main_task
	main_ids=osThreadNew(main_task, NULL, &ThreadAttr_MAIN);

//led task
	led_ids=osThreadNew(led_task, NULL, &ThreadAttr_LED);
}
#ifndef __APP_MAIN_H__
#define __APP_MAIN_H__
#include "cmsis_os2.h"
#include "led_thread.h"
#include "main_thread.h"

extern osThreadId_t 	main_ids;
extern osThreadId_t 	led_ids;


/*semaphore*/
extern osSemaphoreId_t		sid_Semaphore_softtimer0;
/*queue*/

/*event*/

/*timer*/
extern osTimerId_t  timer0_id;//0定时器


/* 供外部调用的函数声明 */
static void AppTaskCreate (void);
int  AppObjCreate (void);


#endif
Thread: main_thread.c
#include  "main_thread.h"

void main_task (void * arg)
{
	while(1)
	{
		osDelay(100);
		LED_ERR_Toggle();
	}
}
main_thread.h
#ifndef __MAIN_THREAD_H
#define __MAIN_THREAD_H

#include "stm32f4xx_hal.h"
#include "cmsis_os2.h"
#include "bsp_led.h"
#include "app_main.h"

void main_task (void * arg);
#endif
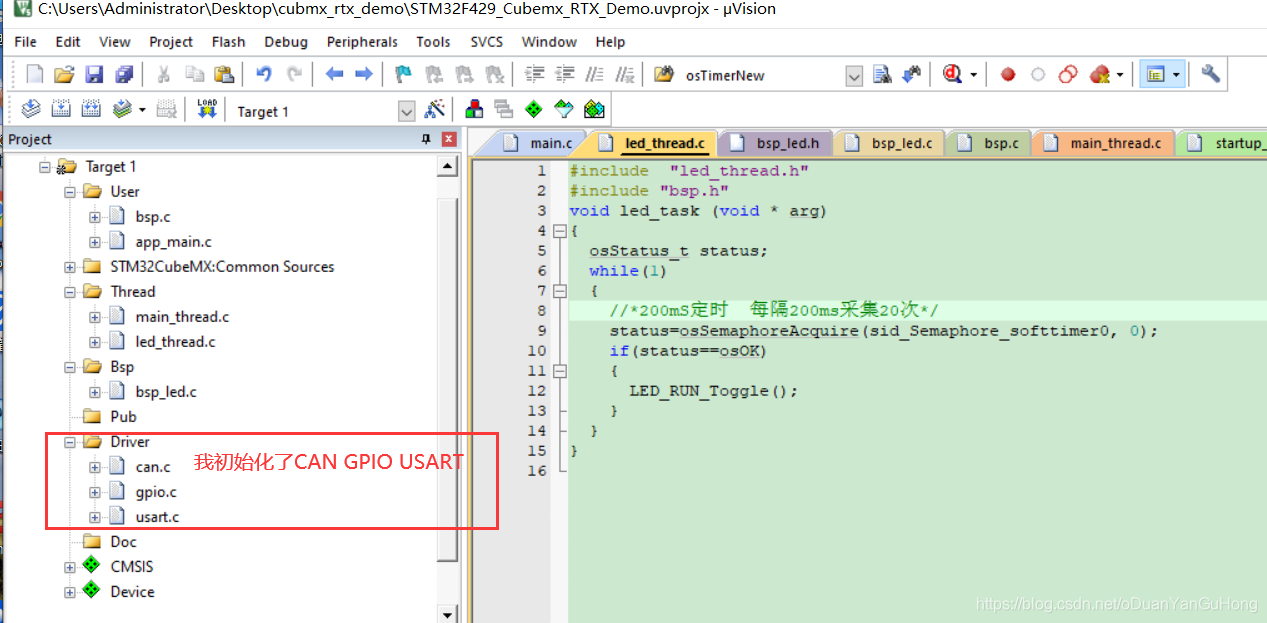
Thread : led_thread.c
#include  "led_thread.h"
#include "bsp.h"
void led_task (void * arg)
{
	osStatus_t status;
	while(1)
	{
		//*200mS定时  每隔200ms采集20次*/
		status=osSemaphoreAcquire(sid_Semaphore_softtimer0, 0);
		if(status==osOK)
		{
			LED_RUN_Toggle();
		}
	}
}
led_thread.h
#ifndef __LED_THREAD_H
#define __LED_THREAD_H
#include "stm32f4xx_hal.h"
#include "cmsis_os2.h"
#include "bsp_led.h"
#include "app_main.h"

void led_task (void * arg);
#endif
STM32CubeMX:Common Sources main.c
/* USER CODE BEGIN Header */
/**
******************************************************************************
* @file : main.c
* @brief : Main program body
******************************************************************************
* @attention
*
* <h2><center>© Copyright (c) 2021 STMicroelectronics.
* All rights reserved.</center></h2>
*
* This software component is licensed by ST under BSD 3-Clause license,
* the "License"; You may not use this file except in compliance with the
* License. You may obtain a copy of the License at:
* opensource.org/licenses/BSD-3-Clause
*
******************************************************************************
*/
/* USER CODE END Header */
/* Includes ------------------------------------------------------------------*/
#include "main.h"
#include "can.h"
#include "usart.h"
#include "gpio.h"
/* Private includes ----------------------------------------------------------*/
/* USER CODE BEGIN Includes */
#include "bsp.h"
#include "RTE_Components.h"
#ifdef RTE_Compiler_EventRecorder
#include "EventRecorder.h"
#endif
#include "cmsis_os2.h"
/* USER CODE END Includes */
/* Private typedef -----------------------------------------------------------*/
/* USER CODE BEGIN PTD */
/* USER CODE END PTD */
/* Private define ------------------------------------------------------------*/
/* USER CODE BEGIN PD */
/* USER CODE END PD */
/* Private macro -------------------------------------------------------------*/
/* USER CODE BEGIN PM */
/* USER CODE END PM */
/* Private variables ---------------------------------------------------------*/
/* USER CODE BEGIN PV */
/* USER CODE END PV */
/* Private function prototypes -----------------------------------------------*/
void SystemClock_Config(void);
/* USER CODE BEGIN PFP */
/* USER CODE END PFP */
/* Private user code ---------------------------------------------------------*/
/* USER CODE BEGIN 0 */
uint32_t HAL_GetTick (void) {
static uint32_t ticks = 0U;
uint32_t i;
if (osKernelGetState () == osKernelRunning) {
return ((uint32_t)osKernelGetTickCount ());
}
/* If Kernel is not running wait approximately 1 ms then increment and return auxiliary tick counter value */
for (i = (SystemCoreClock >> 14U); i > 0U; i--) { __NOP(); __NOP(); __NOP(); __NOP(); __NOP(); __NOP(); __NOP(); __NOP(); __NOP(); __NOP(); __NOP(); __NOP(); }
return ++ticks; }
/* USER CODE END 0 */
/**
* @brief The application entry point.
* @retval int
*/
int main(void)
{
/* USER CODE BEGIN 1 */
/* USER CODE END 1 */
/* MCU Configuration--------------------------------------------------------*/
/* Reset of all peripherals, Initializes the Flash interface and the Systick. */
HAL_Init();
/* USER CODE BEGIN Init */
/* USER CODE END Init */
/* Configure the system clock */
SystemClock_Config();
/* USER CODE BEGIN SysInit */
/* USER CODE END SysInit */
/* Initialize all configured peripherals */
MX_GPIO_Init();
MX_CAN1_Init();
MX_UART4_Init();
MX_UART5_Init();
/* USER CODE BEGIN 2 */
bsp_Init();
/* USER CODE END 2 */
/* Infinite loop */
/* USER CODE BEGIN WHILE */
while (1)
{
/* USER CODE END WHILE */
/* USER CODE BEGIN 3 */
}
/* USER CODE END 3 */
}
/**
* @brief System Clock Configuration
* @retval None
*/
void SystemClock_Config(void)
{
RCC_OscInitTypeDef RCC_OscInitStruct = {0};
RCC_ClkInitTypeDef RCC_ClkInitStruct = {0};
/** Configure the main internal regulator output voltage
*/
__HAL_RCC_PWR_CLK_ENABLE();
__HAL_PWR_VOLTAGESCALING_CONFIG(PWR_REGULATOR_VOLTAGE_SCALE1);
/** Initializes the CPU, AHB and APB busses clocks
*/
RCC_OscInitStruct.OscillatorType = RCC_OSCILLATORTYPE_HSE;
RCC_OscInitStruct.HSEState = RCC_HSE_ON;
RCC_OscInitStruct.PLL.PLLState = RCC_PLL_ON;
RCC_OscInitStruct.PLL.PLLSource = RCC_PLLSOURCE_HSE;
RCC_OscInitStruct.PLL.PLLM = 25;
RCC_OscInitStruct.PLL.PLLN = 360;
RCC_OscInitStruct.PLL.PLLP = RCC_PLLP_DIV2;
RCC_OscInitStruct.PLL.PLLQ = 4;
if (HAL_RCC_OscConfig(&RCC_OscInitStruct) != HAL_OK)
{
Error_Handler();
}
/** Activate the Over-Drive mode
*/
if (HAL_PWREx_EnableOverDrive() != HAL_OK)
{
Error_Handler();
}
/** Initializes the CPU, AHB and APB busses clocks
*/
RCC_ClkInitStruct.ClockType = RCC_CLOCKTYPE_HCLK|RCC_CLOCKTYPE_SYSCLK
|RCC_CLOCKTYPE_PCLK1|RCC_CLOCKTYPE_PCLK2;
RCC_ClkInitStruct.SYSCLKSource = RCC_SYSCLKSOURCE_PLLCLK;
RCC_ClkInitStruct.AHBCLKDivider = RCC_SYSCLK_DIV1;
RCC_ClkInitStruct.APB1CLKDivider = RCC_HCLK_DIV4;
RCC_ClkInitStruct.APB2CLKDivider = RCC_HCLK_DIV2;
if (HAL_RCC_ClockConfig(&RCC_ClkInitStruct, FLASH_LATENCY_5) != HAL_OK)
{
Error_Handler();
}
}
/* USER CODE BEGIN 4 */
/* USER CODE END 4 */
/**
* @brief This function is executed in case of error occurrence.
* @retval None
*/
void Error_Handler(void)
{
/* USER CODE BEGIN Error_Handler_Debug */
/* User can add his own implementation to report the HAL error return state */
/* USER CODE END Error_Handler_Debug */
}
#ifdef USE_FULL_ASSERT
/**
* @brief Reports the name of the source file and the source line number
* where the assert_param error has occurred.
* @param file: pointer to the source file name
* @param line: assert_param error line source number
* @retval None
*/
void assert_failed(uint8_t *file, uint32_t line)
{
/* USER CODE BEGIN 6 */
/* User can add his own implementation to report the file name and line number,
tex: printf("Wrong parameters value: file %s on line %d\r\n", file, line) */
/* USER CODE END 6 */
}
#endif /* USE_FULL_ASSERT */
/************************ (C) COPYRIGHT STMicroelectronics *****END OF FILE****/
3、它与第一种方法区别
第一种

第二种


 1135
1135

 被折叠的 条评论
为什么被折叠?
被折叠的 条评论
为什么被折叠?
 到【灌水乐园】发言


