前几天遇到一个低概率复现锁屏界面不显示,只显示状态栏的问题,跟了下锁屏界面启动显示的流程,在这分享下,也方便以后自己查看。前面简单介绍了下Zygote启动流程, Zygote进程启动后会首先创建一个SystemServer进程,SystemServer进程在调用startOtherServices同时也会调用WindowManagerService的systemReady()方法
-
- private void startOtherServices() {
- ...
- wm = WindowManagerService.main(context, inputManager,
- mFactoryTestMode != FactoryTest.FACTORY_TEST_LOW_LEVEL,
- !mFirstBoot, mOnlyCore);
- ...
- try {
- wm.systemReady();
- Slog.i("jason11", "SystemServer wm.systemReady");
- } catch (Throwable e) {
- reportWtf("making Window Manager Service ready", e);
- }
- ...
- }
在WindowManagerService中直接调用了PhoneWindowManager里的systemReady()
-
-
- public void systemReady() {
- mPolicy.systemReady();
- }
在
PhoneWindowManager的systemReady()会根据一个Boolean值bindKeyguardNow来决定是否绑定keyguard service
-
-
- @Override
- public void systemReady() {
- mKeyguardDelegate = new KeyguardServiceDelegate(mContext);
- mKeyguardDelegate.onSystemReady();
-
- readCameraLensCoverState();
- updateUiMode();
- boolean bindKeyguardNow;
- synchronized (mLock) {
- updateOrientationListenerLp();
- mSystemReady = true;
- mHandler.post(new Runnable() {
- @Override
- public void run() {
- updateSettings();
- }
- });
-
- bindKeyguardNow = mDeferBindKeyguard;
- if (bindKeyguardNow) {
-
- mDeferBindKeyguard = false;
- }
- }
- if (bindKeyguardNow) {
- mKeyguardDelegate.bindService(mContext);
- mKeyguardDelegate.onBootCompleted();
- }
- mSystemGestures.systemReady();
- }
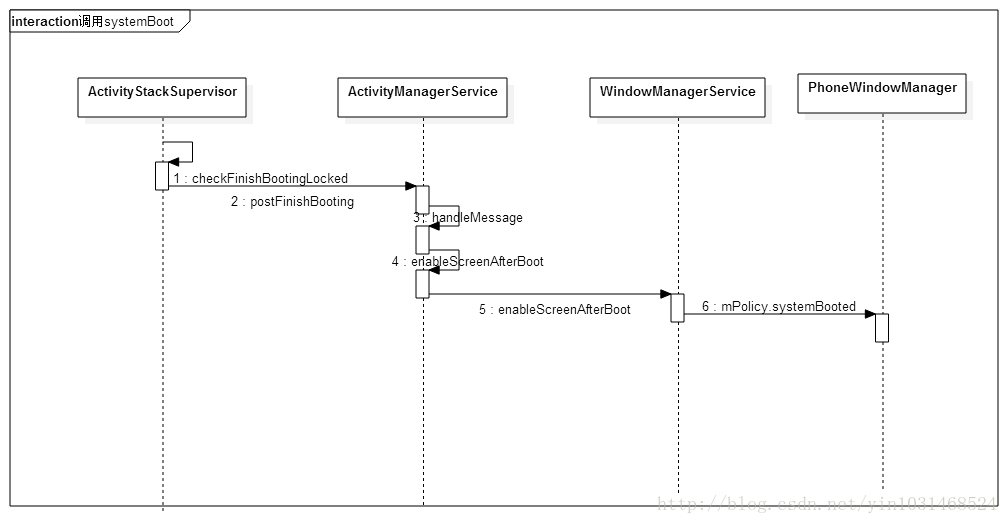
看到这里,可能会想到如果bindKeyguardNow为false就会不绑定,后面通过继续跟踪发现在PhoneWindowManager的systemBooted()里也会去绑定keyguard service,如果在systemBooted里绑定了就不在systemReady里再去绑定,自己测试的时候是在systemBooted绑定的
-
-
- @Override
- public void systemBooted() {
- boolean bindKeyguardNow = false;
- synchronized (mLock) {
-
-
- if (mKeyguardDelegate != null) {
- bindKeyguardNow = true;
- } else {
-
-
- mDeferBindKeyguard = true;
- }
- }
- if (bindKeyguardNow) {
- mKeyguardDelegate.bindService(mContext);
- mKeyguardDelegate.onBootCompleted();
- }
- synchronized (mLock) {
- mSystemBooted = true;
- }
- startedWakingUp();
- screenTurningOn(null);
- screenTurnedOn();
- }
下面就通过如下的时序图看看是如何调用到systemBooted的,就不在一步步跟了
通过上面的分析知道,无论是在systemReady或systemBooted,都调用了KeyguardServiceDelegate对象的bindService方法,下面就以这个方法开始,看看锁屏界面是怎么显示出来的,先看看下面的时序图,再来分步讲解

1、先来看看在KeyguardServiceDelegate如何绑定KeyguardService的
-
- public class KeyguardServiceDelegate {
- ...
- public void bindService(Context context) {
- Intent intent = new Intent();
- final Resources resources = context.getApplicationContext().getResources();
-
- final ComponentName keyguardComponent = ComponentName.unflattenFromString(
- resources.getString(com.android.internal.R.string.config_keyguardComponent));
- intent.setComponent(keyguardComponent);
-
- if (!context.bindServiceAsUser(intent, mKeyguardConnection,
- Context.BIND_AUTO_CREATE, UserHandle.OWNER)) {
- Log.v(TAG, "*** Keyguard: can't bind to " + keyguardComponent);
- mKeyguardState.showing = false;
- mKeyguardState.showingAndNotOccluded = false;
- mKeyguardState.secure = false;
- synchronized (mKeyguardState) {
-
-
-
- mKeyguardState.deviceHasKeyguard = false;
- hideScrim();
- }
- } else {
- if (DEBUG) Log.v(TAG, "*** Keyguard started");
- }
- }
- ...
- }
在bindService中调用了bindServiceAsUser绑定指定intent的service,config_keyguardComponent的定义如下
- //frameworks/base/core/res/res/values/config.xml
-
- <string name="config_keyguardComponent" translatable="false">com.android.systemui/com.android.systemui.keyguard.KeyguardService</string>
当绑定成功后会调用mKeyguardConnection里的onServiceConnected方法
-
- public class KeyguardServiceDelegate {
- ...
- private final ServiceConnection mKeyguardConnection = new ServiceConnection() {
- @Override
- public void onServiceConnected(ComponentName name, IBinder service) {
- if (DEBUG) Log.v(TAG, "*** Keyguard connected (yay!)");
- mKeyguardService = new KeyguardServiceWrapper(mContext,
- IKeyguardService.Stub.asInterface(service));
- if (mKeyguardState.systemIsReady) {
-
- mKeyguardService.onSystemReady();
-
- if (mKeyguardState.interactiveState == INTERACTIVE_STATE_AWAKE) {
- mKeyguardService.onStartedWakingUp();
- }
- if (mKeyguardState.screenState == SCREEN_STATE_ON
- || mKeyguardState.screenState == SCREEN_STATE_TURNING_ON) {
- mKeyguardService.onScreenTurningOn(
- new KeyguardShowDelegate(mDrawnListenerWhenConnect));
- }
- if (mKeyguardState.screenState == SCREEN_STATE_ON) {
- mKeyguardService.onScreenTurnedOn();
- }
- mDrawnListenerWhenConnect = null;
- }
- if (mKeyguardState.bootCompleted) {
- mKeyguardService.onBootCompleted();
- }
- if (mKeyguardState.occluded) {
- mKeyguardService.setOccluded(mKeyguardState.occluded);
- }
- }
-
- @Override
- public void onServiceDisconnected(ComponentName name) {
- if (DEBUG) Log.v(TAG, "*** Keyguard disconnected (boo!)");
- mKeyguardService = null;
- }
-
- };
- ...
- }
当mKeyguardState.systemIsReady为true是,就会通过KeyguardServiceWrapper的实例mKeyguardService调用onSystemReady方法,在
KeyguardServiceWrapper的onSystemReady里调用了上面刚刚绑定成功的KeyguardService的onSystemReady方法
-
- public class KeyguardServiceWrapper implements IKeyguardService {
- ...
- @Override
- public void onSystemReady() {
- try {
- mService.onSystemReady();
- } catch (RemoteException e) {
- Slog.w(TAG , "Remote Exception", e);
- }
- }
- ...
- }
在KeyguardService的onSystemReady里调用了KeyguardViewMediator里的onSystemReady,在这里就不贴这个代码了,直接看看KeyguardViewMediator.onSystemReady这个里面干啥了
2、KeyguardViewMediator.onSystemReady
-
- public class KeyguardViewMediator extends SystemUI {
- ...
- public void onSystemReady() {
- mSearchManager = (SearchManager) mContext.getSystemService(Context.SEARCH_SERVICE);
- synchronized (this) {
- if (DEBUG) Log.d(TAG, "onSystemReady");
- mSystemReady = true;
- doKeyguardLocked(null);
- mUpdateMonitor.registerCallback(mUpdateCallback);
- }
-
-
- maybeSendUserPresentBroadcast();
- }
- ...
- }
在这个方法里主要调用了doKeyguardLocked和注册了KeyguardUpdateMonitorCallback
3、通过调用doKeyguardLocked显示锁屏界面
-
- public class KeyguardViewMediator extends SystemUI {
- ...
- private void doKeyguardLocked(Bundle options) {
-
- if (!mExternallyEnabled) {
- if (DEBUG) Log.d(TAG, "doKeyguard: not showing because externally disabled");
-
-
-
-
-
-
-
-
-
-
- return;
- }
-
-
- if (mStatusBarKeyguardViewManager.isShowing()) {
- if (DEBUG) Log.d(TAG, "doKeyguard: not showing because it is already showing");
- resetStateLocked();
- return;
- }
-
-
- final boolean requireSim = !SystemProperties.getBoolean("keyguard.no_require_sim", false);
- final boolean absent = SubscriptionManager.isValidSubscriptionId(
- mUpdateMonitor.getNextSubIdForState(IccCardConstants.State.ABSENT));
- final boolean disabled = SubscriptionManager.isValidSubscriptionId(
- mUpdateMonitor.getNextSubIdForState(IccCardConstants.State.PERM_DISABLED));
- final boolean lockedOrMissing = mUpdateMonitor.isSimPinSecure()
- || ((absent || disabled) && requireSim);
-
- if (!lockedOrMissing && shouldWaitForProvisioning()) {
- if (DEBUG) Log.d(TAG, "doKeyguard: not showing because device isn't provisioned"
- + " and the sim is not locked or missing");
- return;
- }
-
- if (mLockPatternUtils.isLockScreenDisabled(KeyguardUpdateMonitor.getCurrentUser())
- && !lockedOrMissing) {
- if (DEBUG) Log.d(TAG, "doKeyguard: not showing because lockscreen is off");
- return;
- }
-
- if (mLockPatternUtils.checkVoldPassword(KeyguardUpdateMonitor.getCurrentUser())) {
- if (DEBUG) Log.d(TAG, "Not showing lock screen since just decrypted");
-
- setShowingLocked(false);
- hideLocked();
- mUpdateMonitor.reportSuccessfulStrongAuthUnlockAttempt();
- return;
- }
-
- if (DEBUG) Log.d(TAG, "doKeyguard: showing the lock screen");
- showLocked(options);
- }
- ...
- }
这段代码主要是在是否要显示锁屏之前做了5个判断:1.如果启用第三方锁屏界面,不显示原生界面;2.锁屏界面已经显示了话,重新更新下状态;3.如果第一次开机引导界面setup wizard 还没有运行,也先不显示;4.屏幕没有亮不显示;5.当前正在解密界面不显示。如果这几个条件都不满足,则调用showLocked显示锁屏界面。在
showLocked通过mHandler发送Message,在handleMessage里“case SHOW:”时调用handleShow
4、在handleShow里设置一些锁屏状态和显示锁屏界面
-
- public class KeyguardViewMediator extends SystemUI {
- ...
- private void handleShow(Bundle options) {
- synchronized (KeyguardViewMediator.this) {
- if (!mSystemReady) {
- if (DEBUG) Log.d(TAG, "ignoring handleShow because system is not ready.");
- return;
- } else {
- if (DEBUG) Log.d(TAG, "handleShow");
- }
-
- setShowingLocked(true);
- mStatusBarKeyguardViewManager.show(options);
- mHiding = false;
- mWakeAndUnlocking = false;
- resetKeyguardDonePendingLocked();
- mHideAnimationRun = false;
- updateActivityLockScreenState();
- adjustStatusBarLocked();
- userActivity();
-
- mShowKeyguardWakeLock.release();
- }
- mKeyguardDisplayManager.show();
- }
- ...
- }
5、通过调用StatusBarKeyguardViewManager的show重置当前状态显示keyguard
-
- public class StatusBarKeyguardViewManager {
- ...
- public void show(Bundle options) {
- mShowing = true;
- mStatusBarWindowManager.setKeyguardShowing(true);
- mScrimController.abortKeyguardFadingOut();
- reset();
- }
- ...
- }
在reset里调用本类的showBouncerOrKeyguard,在这个方法里通过KeyguardBouncer的实例mBouncer调用prepare(),在
prepare里调用了KeyguardHostView的showPrimarySecurityScreen
6、KeyguardSecurityContainer.showPrimarySecurityScreen
在KeyguardHostView的showPrimarySecurityScreen里调用KeyguardSecurityContainer的showPrimarySecurityScreen方法,如下
-
- public class KeyguardSecurityContainer extends FrameLayout implements KeyguardSecurityView {
- ...
- void showPrimarySecurityScreen(boolean turningOff) {
- SecurityMode securityMode = mSecurityModel.getSecurityMode();
- if (DEBUG) Log.v(TAG, "showPrimarySecurityScreen(turningOff=" + turningOff + ")");
- showSecurityScreen(securityMode);
- }
- ...
- }
在这个方法里调用了showSecurityScreen,根据mSecurityModel.getSecurityMode()获取的SecurityMode来显示不同界面,SecurityMode定义如下
-
- public class KeyguardSecurityModel {
- public enum SecurityMode {
- Invalid,
- None,
- Pattern,
- Password,
- PIN,
- SimPin,
- SimPuk
- }
- ...
- }
showSecurityScreen方法如下:
-
- public class KeyguardSecurityContainer extends FrameLayout implements KeyguardSecurityView {
- ...
- private void showSecurityScreen(SecurityMode securityMode) {
- if (DEBUG) Log.d(TAG, "showSecurityScreen(" + securityMode + ")");
-
- if (securityMode == mCurrentSecuritySelection) return;
-
- KeyguardSecurityView oldView = getSecurityView(mCurrentSecuritySelection);
- KeyguardSecurityView newView = getSecurityView(securityMode);
-
-
- if (oldView != null) {
- oldView.onPause();
- oldView.setKeyguardCallback(mNullCallback);
- }
- if (securityMode != SecurityMode.None) {
- newView.onResume(KeyguardSecurityView.VIEW_REVEALED);
- newView.setKeyguardCallback(mCallback);
- }
-
-
- final int childCount = mSecurityViewFlipper.getChildCount();
-
- final int securityViewIdForMode = getSecurityViewIdForMode(securityMode);
- for (int i = 0; i < childCount; i++) {
- if (mSecurityViewFlipper.getChildAt(i).getId() == securityViewIdForMode) {
- mSecurityViewFlipper.setDisplayedChild(i);
- break;
- }
- }
-
- mCurrentSecuritySelection = securityMode;
- mSecurityCallback.onSecurityModeChanged(securityMode,
- securityMode != SecurityMode.None && newView.needsInput());
- }
- ...
- }
到这里锁屏就启动完成了,这里简单总结一下:
1. 在KeyguardServiceDelegate里绑定KeyguardService,并调用onSystemReady方法。
2. KeyguardViewMediator里调用doKeyguardLocked来决定是否需要显示锁屏界面;如果显示则调用StatusBarKeyguardViewManager的show,最后调用到KeyguardHostView的showPrimarySecurityScreen()。
3. 在KeyguardSecurityContainer的showPrimarySecurityScreen利用mSecurityModel.getSecurityMode()获取当前的securityMode,传入showSecurityScreen来显示不同锁屏界面。
原文地址: http://blog.csdn.net/yin1031468524/article/details/56284449


 522
522

 被折叠的 条评论
为什么被折叠?
被折叠的 条评论
为什么被折叠?
 到【灌水乐园】发言


