


一、引脚配置
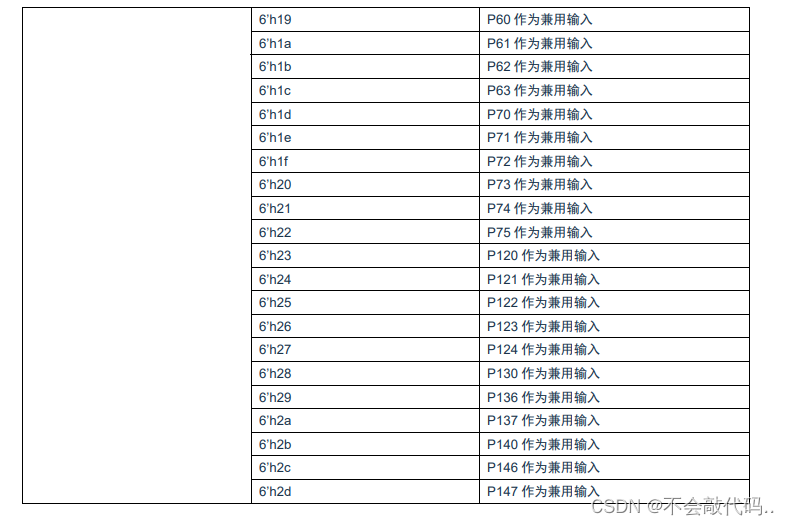
查阅数据手册可知,以下端口均可以作为串口引脚使用(也就意味着我们有更多的接口可以用作串口使用),这一点与STM32系列单片机不一样。

二、软件配置
打开系统例程,根据系统例程进行修改即可。
本次以P00、P01作为串口RX、TX使用。
例程默认以\r\n作为一次接收结束的标志。根据项目需求对void uart1_interrupt_receive(void *msg)内容进行修改即可。
int8_t Uart1_Init(uint32_t bound)
{
    int8_t res ;
    GPIO_InitTypeDef GPIO_InitStruct = {0};
    UART_InitTypeDef UART_InitStructure = {0};

    GPIO_PinAFConfig(GPIO_PORT0, GPIO_Pin_0, GPIO_P00, GROUP_AF_TXD1);
    GPIO_PinAFConfig(GPIO_PORT0, GPIO_Pin_1, GPIO_P01, GROUP_AF_RXD1);

    /*TX GPIO CONFIG*/
    GPIO_InitStruct.GPIO_Pin    = GPIO_Pin_0;
    GPIO_InitStruct.GPIO_Mode   = GPIO_Mode_OUT;
    GPIO_InitStruct.GPIO_OType  = GPIO_OType_PP;
    GPIO_InitStruct.GPIO_Ctrl   = GPIO_Control_DIG;
    GPIO_Init(GPIO_PORT0, &GPIO_InitStruct);

    /*RX GPIO CONFIG*/
    GPIO_InitStruct.GPIO_Pin    = GPIO_Pin_1;
    GPIO_InitStruct.GPIO_Mode   = GPIO_Mode_IN;
    GPIO_InitStruct.GPIO_Ctrl   = GPIO_Control_DIG;
    GPIO_Init(GPIO_PORT0, &GPIO_InitStruct);

    /*USART CONFIG*/
    UART_InitStructure.UART_BaudRate = bound;
    UART_InitStructure.UART_WordLength = UART_WordLength_8b;
    UART_InitStructure.UART_StopBits = UART_StopBits_1;//一个停止位
    UART_InitStructure.UART_Parity = UART_Parity_No;//无奇偶校验位
    UART_InitStructure.phase = UART_Phase_Normal;
    UART_InitStructure.bitorder = UART_Bit_LSB;
    UART_InitStructure.UART_Mode = UART_Mode_Rx | UART_Mode_Tx; //收发模式

    res = UART_Init(UART1, &UART_InitStructure); //初始化串口

    if (res)
    {
        SCI_ERROR_LOG(res);
        return res;
    }

    ISR_Register(ST1_IRQn, uart1_interrupt_send);     //串口1发送中断服务路径注册
    ISR_Register(SR1_IRQn, uart1_interrupt_receive);  //串口1接收中断服务路径注册

    return SCI_SUCCESS;
}


void uart_callback_error(uint8_t err_type)
{
    //user edit here when appear error
}

void Uart1_IntSend(uint8_t *tx_buf, uint16_t tx_num)
{
    pData.data = tx_buf;
    pData.len = tx_num;

    INTC_SetPendingIRQ(ST1_IRQn);
}


void uart1_interrupt_send(void *msg)
{
    ATE_FRAME_t *pFrame = (ATE_FRAME_t *)msg;

    INTC_ClearPendingIRQ(ST1_IRQn);

    if ((pFrame->len > 0U) && pFrame->data)
    {
        UART1_TX = *pFrame->data;
        pFrame->data++;
        pFrame->len --;
    }
    else  //send finished
    {
    }
}


int  Uart1_IntRcv(uint8_t *rx_buf)
{
    uint32_t rx_num = 0;

    if ((UART1_RX_STA & 0x8000U) == 1)
    {
        rx_num = UART1_RX_STA & 0x3fff;
        memcpy(rx_buf, UART1_RX_BUF, rx_num);
        return rx_num;
    }

    return 0;
}
/************************************************************************
* Function Name: uart1_interrupt_receive
* @brief  UART1 Receive interrupt service routine
* @param  None
* @return None
*************************************************************************/
void uart1_interrupt_receive(void *msg)
{
    volatile uint8_t rx_data;
    volatile uint8_t err_type;

    INTC_ClearPendingIRQ(SR1_IRQn);
    err_type = UART_GetErrStaus(UART1, UART_FLAG_FEF | UART_FLAG_PEF | UART_FLAG_OVF);

    if (err_type)
    {
        uart_callback_error(err_type);
    }

    rx_data = UART1_RX;

    if ((UART1_RX_STA & 0x8000U) == 0) //接收未完成
    {
        if (UART1_RX_STA & 0x4000U) //接收到0x0d
        {
            if (rx_data != 0x0a)
			{
				UART1_RX_BUF[UART1_RX_STA & 0x3fff] = rx_data;
                UART1_RX_STA++;
			}
            else
            {
                UART1_RX_STA |= 0x8000;
                UART1_RX_BUF[UART1_RX_STA & 0x3fff] = rx_data;
                UART1_RX_STA ++;
            }
        }
        else                     //还未接收到0x0d
        {
            if (rx_data == 0x0d)
            {
                UART1_RX_STA |= 0x4000;
                UART1_RX_BUF[UART1_RX_STA & 0x3fff] = rx_data;
                UART1_RX_STA ++;
            }
            else
            {
                UART1_RX_BUF[UART1_RX_STA & 0x3fff] = rx_data;
                UART1_RX_STA ++;
            }
        }
    }
    else if ((UART1_RX_STA & 0x8000U) == 1) //received finished
    {
    }
}
三、串口使用注意事项
1、调用串口功能时,需要调用下面两个库文件为串口通信服务。
![]()
2、需要开启系统时钟为串口通信服务。
  SystemCoreClockUpdate();
  msCnt = SystemCoreClock / 1000;
  SysTick_Config(msCnt);
四、总结
与STM32系列单片机相比,CMS32L051单片机串口端口选择性更多(STM32系列单片机以固定端口作为串口端口使用,用户对端口的选择性更低),用户配置起来也更加方便。


 1592
1592


 被折叠的 条评论
为什么被折叠?
被折叠的 条评论
为什么被折叠?
 到【灌水乐园】发言


