


需求分析
最近需要实现一个布控球检测的需求,要求如下:
1、布控球应摆放在三脚架上
2、离地高度在 1 米以上
3、布控球与水平面夹角应小于 45°
根据以上需求,首先我们需要识别到布控球和三脚架,并通过计算两者之间的位置关系来判断布控球是否摆在三脚架上。
随后则需要根据布控球的大小来推算其距离地面的高度。
而夹角这块是要求布控球的视角与地面应该在45度以内,这个目前博主考虑使用布控球与摄像头的位置作圆,进而求出夹角。
那么按照这个思路,首先我们需要执行采集数据、标注数据集、数据集增强、模型训练、模型测试、模型部署、后逻辑处理等步骤。
数据采集与标注
我们采集了57张图像,然后使用Labelme软件进行标注
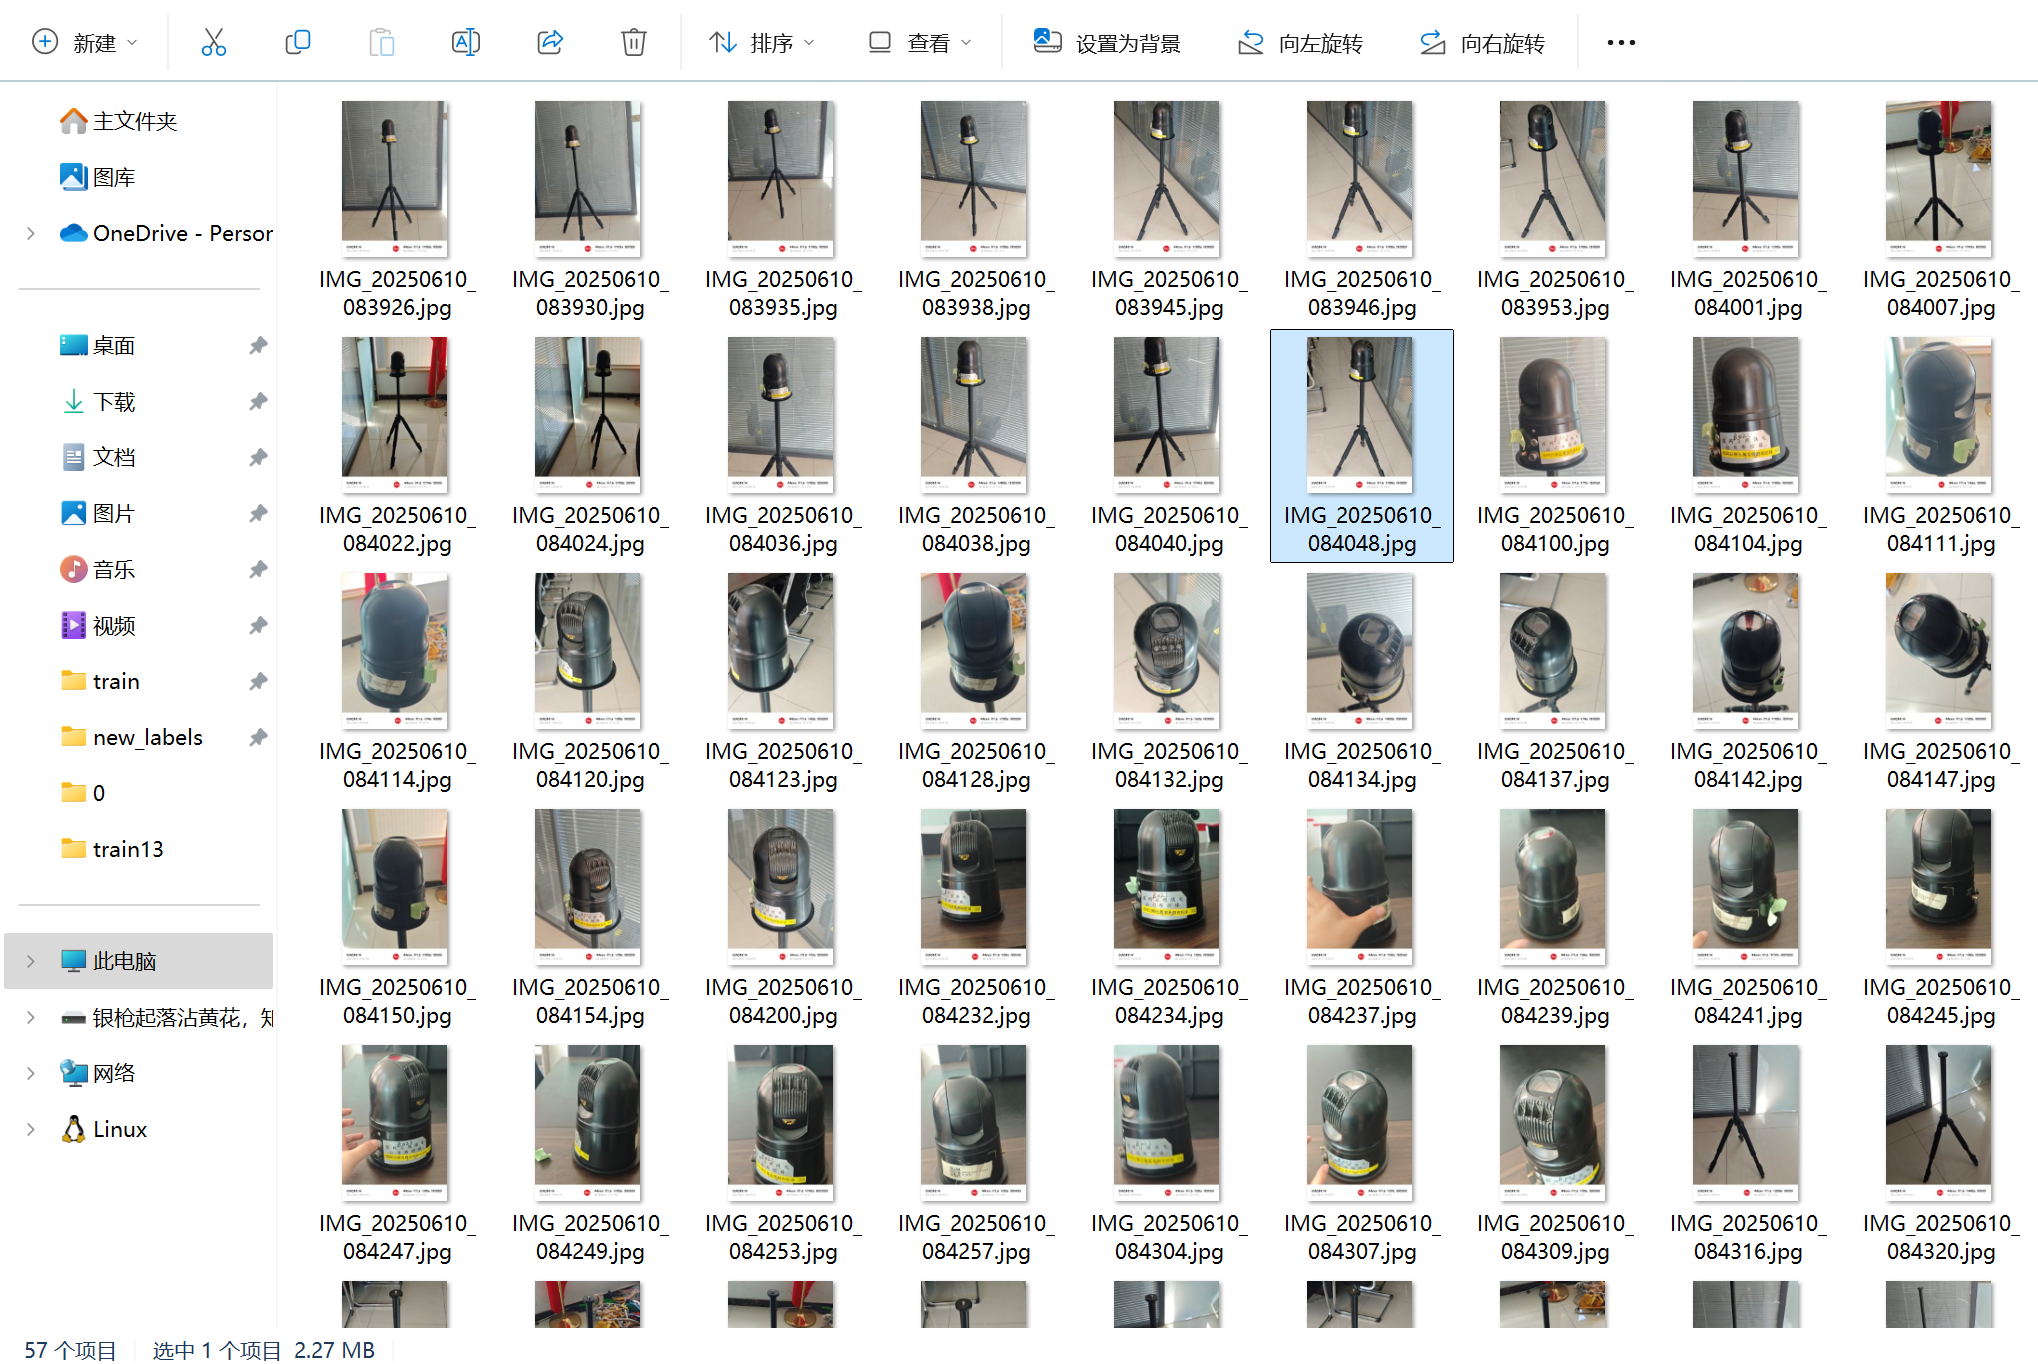
随后将标注后的数据进行数据增强、进而扩充数据集(数据集扩充真的很有必要,博主开始时没有进行数据扩充,效果非常拉跨)
将这些数据采用翻转,随机裁剪、改变色调、添加噪声等方式进行数据增强,最终获得了450余张图像。
# -*- coding: utf-8 -*-
"""
review:常用的数据增强方式;
        1.翻转:左右和上下翻转,随机翻转
        2.随机裁剪,图像缩放
        3.改变色调
        4.添加噪声
注意: boxes的标签和坐标一个是int,一个是float,存放的时候要注意处理方式。
"""
import torch
from PIL import Image
from PIL import ImageDraw
from PIL import ImageFile
ImageFile.LOAD_TRUNCATED_IMAGES = True
from torchvision import transforms
import numpy as np
import matplotlib.pyplot as plt
import os
import random
random.seed(0)
class DataAugmentationOnDetection:
    def __init__(self):
        super(DataAugmentationOnDetection, self).__init__()

    # 以下的几个参数类型中,image的类型全部如下类型
    # 参数类型: image:Image.open(path)
    def resize_keep_ratio(self, image, boxes, target_size):
        """
            参数类型: image:Image.open(path), boxes:Tensor, target_size:int
            功能:将图像缩放到size尺寸,调整相应的boxes,同时保持长宽比(最长的边是target size
        """
        old_size = image.size[0:2]  # 原始图像大小
        # 取最小的缩放比例
        ratio = min(float(target_size) / (old_size[i]) for i in range(len(old_size)))  # 计算原始图像宽高与目标图像大小的比例,并取其中的较小值
        new_size = tuple([int(i * ratio) for i in old_size])  # 根据上边求得的比例计算在保持比例前提下得到的图像大小
        # boxes 不用变化,因为是等比例变化
        return image.resize(new_size, Image.BILINEAR), boxes

    def resizeDown_keep_ratio(self, image, boxes, target_size):
        """ 与上面的函数功能类似,但它只降低图片的尺寸,不会扩大图片尺寸"""
        old_size = image.size[0:2]  # 原始图像大小
        # 取最小的缩放比例
        ratio = min(float(target_size) / (old_size[i]) for i in range(len(old_size)))  # 计算原始图像宽高与目标图像大小的比例,并取其中的较小值
        ratio = min(ratio, 1)
        new_size = tuple([int(i * ratio) for i in old_size])  # 根据上边求得的比例计算在保持比例前提下得到的图像大小

        # boxes 不用变化,因为是等比例变化
        return image.resize(new_size, Image.BILINEAR), boxes

    def resize(self, img, boxes, size):
        # ---------------------------------------------------------
        # 类型为 img=Image.open(path),boxes:Tensor,size:int
        # 功能为:将图像长和宽缩放到指定值size,并且相应调整boxes
        # ---------------------------------------------------------
        return img.resize((size, size), Image.BILINEAR), boxes

    def random_flip_horizon(self, img, boxes, h_rate=1):
        # -------------------------------------
        # 随机水平翻转
        # -------------------------------------
        if np.random.random() < h_rate:
            transform = transforms.RandomHorizontalFlip(p=1)
            img = transform(img)
            if len(boxes) > 0:
                x = 1 - boxes[:, 1]
                boxes[:, 1] = x
        return img, boxes

    def random_flip_vertical(self, img, boxes, v_rate=1):
        # 随机垂直翻转
        if np.random.random() < v_rate:
            transform = transforms.RandomVerticalFlip(p=1)
            img = transform(img)
            if len(boxes) > 0:
                y = 1 - boxes[:, 2]
                boxes[:, 2] = y
        return img, boxes

    def center_crop(self, img, boxes, target_size=None):
        # -------------------------------------
        # 中心裁剪 ,裁剪成 (size, size) 的正方形, 仅限图形,w,h
        # 这里用比例是很难算的,转成x1,y1, x2, y2格式来计算
        # -------------------------------------
        w, h = img.size
        size = min(w, h)
        if len(boxes) > 0:
            # 转换到xyxy格式
            label = boxes[:, 0].reshape([-1, 1])
            x_, y_, w_, h_ = boxes[:, 1], boxes[:, 2], boxes[:, 3], boxes[:, 4]
            x1 = (w * x_ - 0.5 * w * w_).reshape([-1, 1])
            y1 = (h * y_ - 0.5 * h * h_).reshape([-1, 1])
            x2 = (w * x_ + 0.5 * w * w_).reshape([-1, 1])
            y2 = (h * y_ + 0.5 * h * h_).reshape([-1, 1])
            boxes_xyxy = torch.cat([x1, y1, x2, y2], dim=1)
            # 边框转换
            if w > h:
                boxes_xyxy[:, [0, 2]] = boxes_xyxy[:, [0, 2]] - (w - h) / 2
            else:
                boxes_xyxy[:, [1, 3]] = boxes_xyxy[:, [1, 3]] - (h - w) / 2
            in_boundary = [i for i in range(boxes_xyxy.shape[0])]
            for i in range(boxes_xyxy.shape[0]):
                # 判断x是否超出界限
                if (boxes_xyxy[i, 0] < 0 and boxes_xyxy[i, 2] < 0) or (boxes_xyxy[i, 0] > size and boxes_xyxy[i, 2] > size):
                    in_boundary.remove(i)
                # 判断y是否超出界限
                elif (boxes_xyxy[i, 1] < 0 and boxes_xyxy[i, 3] < 0) or (boxes_xyxy[i, 1] > size and boxes_xyxy[i, 3] > size):
                    in_boundary.append(i)
            boxes_xyxy = boxes_xyxy[in_boundary]
            boxes = boxes_xyxy.clamp(min=0, max=size).reshape([-1, 4])  # 压缩到固定范围
            label = label[in_boundary]
            # 转换到YOLO格式
            x1, y1, x2, y2 = boxes[:, 0], boxes[:, 1], boxes[:, 2], boxes[:, 3]
            xc = ((x1 + x2) / (2 * size)).reshape([-1, 1])
            yc = ((y1 + y2) / (2 * size)).reshape([-1, 1])
            wc = ((x2 - x1) / size).reshape([-1, 1])
            hc = ((y2 - y1) / size).reshape([-1, 1])
            boxes = torch.cat([xc, yc, wc, hc], dim=1)
        # 图像转换
        transform = transforms.CenterCrop(size)
        img = transform(img)
        if target_size:
            img = img.resize((target_size, target_size), Image.BILINEAR)
        if len(boxes) > 0:
            return img, torch.cat([label.reshape([-1, 1]), boxes], dim=1)
        else:
            return img, boxes


    def random_bright(self, img, u=120, p=1):
        # -------------------------------------
        # 随机亮度变换
        # -------------------------------------
        if np.random.random() < p:
            alpha=np.random.uniform(-u, u)/255
            img += alpha
            img=img.clamp(min=0.0, max=1.0)
        return img

    def random_contrast(self, img, lower=0.5, upper=1.5, p=1):
        # -------------------------------------
        # 随机增强对比度
        # -------------------------------------
        if np.random.random() < p:
            alpha=np.random.uniform(lower, upper)
            img*=alpha
            img=img.clamp(min=0, max=1.0)
        return img

    def random_saturation(self, img,lower=0.5, upper=1.5, p=1):
        # 随机饱和度变换,针对彩色三通道图像,中间通道乘以一个值
        if np.random.random() < p:
            alpha=np.random.uniform(lower, upper)
            img[1]=img[1]*alpha
            img[1]=img[1].clamp(min=0,max=1.0)
        return img

    def add_gasuss_noise(self, img, mean=0, std=0.1):
        noise=torch.normal(mean,std,img.shape)
        img+=noise
        img=img.clamp(min=0, max=1.0)
        return img

    def add_salt_noise(self, img):
        noise=torch.rand(img.shape)
        alpha=np.random.random()/5 + 0.7
        img[noise[:,:,:]>alpha]=1.0
        return img

    def add_pepper_noise(self, img):
        noise=torch.rand(img.shape)
        alpha=np.random.random()/5 + 0.7
        img[noise[:, :, :]>alpha]=0
        return img


def plot_pics(img, boxes):
    # 显示图像和候选框,img是Image.Open()类型, boxes是Tensor类型
    plt.imshow(img)
    label_colors = [(213, 110, 89)]
    w, h = img.size
    for i in range(boxes.shape[0]):
        box = boxes[i, 1:]
        xc, yc, wc, hc = box
        x = w * xc - 0.5 * w * wc
        y = h * yc - 0.5 * h * hc
        box_w, box_h = w * wc, h * hc
        plt.gca().add_patch(plt.Rectangle(xy=(x, y), width=box_w, height=box_h,
                                          edgecolor=[c / 255 for c in label_colors[0]],
                                          fill=False, linewidth=2))
    plt.show()

def get_image_list(image_path):
    # 根据图片文件,查找所有图片并返回列表
    files_list = []
    for root, sub_dirs, files in os.walk(image_path):
        for special_file in files:
            special_file = special_file[0: len(special_file)]
            files_list.append(special_file)
    return files_list

def get_label_file(label_path, image_name):
    # 根据图片信息,查找对应的label
    fname = os.path.join(label_path, image_name[0: len(image_name)-4]+".txt")
    data2 = []
    if not os.path.exists(fname):
        return data2
    if os.path.getsize(fname) == 0:
        return data2
    else:
        with open(fname, 'r', encoding='utf-8') as infile:
            # 读取并转换标签
            for line in infile:
                data_line = line.strip("\n").split()
                data2.append([float(i) for i in data_line])
    return data2


def save_Yolo(img, boxes, save_path, prefix, image_name):
    # img: 需要时Image类型的数据, prefix 前缀
    # 将结果保存到save path指示的路径中
    if not os.path.exists(save_path) or \
            not os.path.exists(os.path.join(save_path, "images")):
        os.makedirs(os.path.join(save_path, "images"))
        os.makedirs(os.path.join(save_path, "labels"))
    try:
        img.save(os.path.join(save_path, "images", prefix + image_name))
        with open(os.path.join(save_path, "labels", prefix + image_name[0:len(image_name)-4] + ".txt"), 'w', encoding="utf-8") as f:
            if len(boxes) > 0:  # 判断是否为空
                # 写入新的label到文件中
                for data in boxes:
                    str_in = ""
                    for i, a in enumerate(data):
                        if i == 0:
                            str_in += str(int(a))
                        else:
                            str_in += " " + str(float(a))
                    f.write(str_in + '\n')
    except:
        print("ERROR: ", image_name, " is bad.")


def runAugumentation(image_path, label_path, save_path):
    image_list = get_image_list(image_path)
    for image_name in image_list:
        print("dealing: " + image_name)
        img = Image.open(os.path.join(image_path, image_name))
        boxes = get_label_file(label_path, image_name)
        boxes = torch.tensor(boxes)
        # 下面是执行的数据增强功能,可自行选择
        # Image类型的参数
        DAD = DataAugmentationOnDetection()

        """ 尺寸变换   """
        # 缩小尺寸
        t_img, t_boxes = DAD.resizeDown_keep_ratio(img, boxes, 1024)
        save_Yolo(t_img, boxes, save_path, prefix="rs_", image_name=image_name)
        # 水平旋转
        t_img, t_boxes = DAD.random_flip_horizon(img, boxes.clone())
        save_Yolo(t_img, t_boxes, save_path, prefix="fh_", image_name=image_name)
        # 竖直旋转
        t_img, t_boxes = DAD.random_flip_vertical(img, boxes.clone())
        save_Yolo(t_img, t_boxes, save_path, prefix="fv_", image_name=image_name)
        # center_crop
        t_img, t_boxes = DAD.center_crop(img, boxes.clone(), 1024)
        save_Yolo(t_img, t_boxes, save_path, prefix="cc_", image_name=image_name)

        """ 图像变换,用tensor类型"""
        to_tensor = transforms.ToTensor()
        to_image = transforms.ToPILImage()
        img = to_tensor(img)

        # random_bright  随机亮度
        t_img, t_boxes = DAD.random_bright(img.clone()), boxes
        save_Yolo(to_image(t_img), boxes, save_path, prefix="rb_", image_name=image_name)
        #random_contrast 对比度变化
        t_img, t_boxes = DAD.random_contrast(img.clone()), boxes
        save_Yolo(to_image(t_img), boxes, save_path, prefix="rc_", image_name=image_name)
        #random_saturation 饱和度变化
        t_img, t_boxes = DAD.random_saturation(img.clone()), boxes
        save_Yolo(to_image(t_img), boxes, save_path, prefix="rs_", image_name=image_name)
        # 高斯噪声
        t_img, t_boxes = DAD.add_gasuss_noise(img.clone()), boxes
        save_Yolo(to_image(t_img), boxes, save_path, prefix="gn_", image_name=image_name)
        # add_salt_noise  盐噪声
        # t_img, t_boxes = DAD.add_salt_noise(img.clone()), boxes
        # save_Yolo(to_image(t_img), boxes, save_path, prefix="sn_", image_name=image_name)
        # add_pepper_noise   椒噪声
        t_img, t_boxes = DAD.add_pepper_noise(img.clone()), boxes
        save_Yolo(to_image(t_img), boxes, save_path, prefix="pn_", image_name=image_name)

        print("end:     " + image_name)


if __name__ == '__main__':
    # 图像和标签文件夹
    image_path = r"D:\project_mine\detection\datasets\bukongqiu/images"
    label_path = r"D:\project_mine\detection\datasets\bukongqiu/txt"
    save_path = r"D:\project_mine\detection\datasets\bukongqiu/data"    # 结果保存位置路径,可以是一个不存在的文件夹
    # 运行
    runAugumentation(image_path, label_path, save_path)
随后,我们将数据集按照 8:2 的比例划分为训练集与验证集,其数据集格式如下:
dataset/
├── images/
│   ├── train/
│   │   ├── img1.jpg
│   │   ├── img2.jpg
│   │   └── ...
│   └── val/
│       ├── img3.jpg
│       ├── img4.jpg
│       └── ...
├── labels/
│   ├── train/
│   │   ├── img1.txt
│   │   ├── img2.txt
│   │   └── ...
│   └── val/
│       ├── img3.txt
│       ├── img4.txt
│       └── ...
└── data.yaml         # 配置文件(类别等)
配置文件的设置如下:
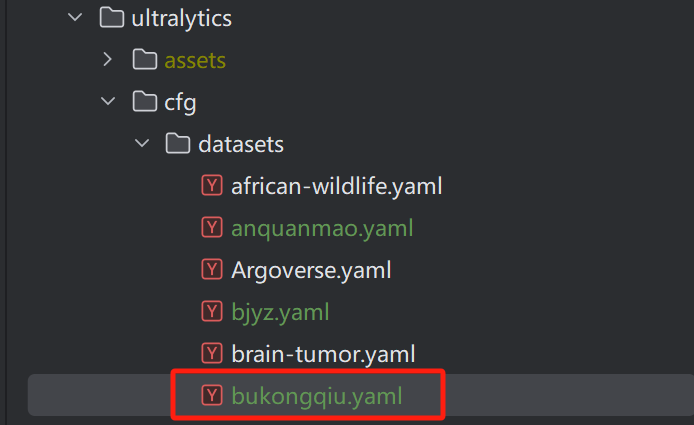
path: ../datasets/bukongqiu/bukongqiu # dataset root dir
train: images/train # train images (relative to 'path') 4 images
val: images/val # val images (relative to 'path') 4 images
test: # test images (optional)
# Classes
names:
  0: bukongqiu
  1: sanjiaojia
将该配置文件放到如下位置
模型训练
我们选用的是 ultralytics 框架的 yolo11 模型,大家可以自行选择。
其训练较为简单,只要配置没有问题,运行下面的代码即可。
from ultralytics import YOLO
model=YOLO("yolo11.yaml")
# Train the model
results = model.train(data="bukongqiu.yaml",
                      epochs=80,
                      batch=8,       # 根据GPU显存调整(T4建议batch=8)
                      imgsz=640,
                      device="0",     # 指定GPU ID
                      optimizer="AdamW",
                      lr0=1e-4,
                      warmup_epochs=4,
                      label_smoothing=0.1,
                      amp=True)
训练结果解析
YOLO模型的训练结果较多,我们来逐个解析:
首先是weight文件夹的权重文件,分为best和last,顾名思义,分别是最好的模型和最后的模型,我们可以之间加载该模型进行验证与推理,也可以将其转换为ONNX、TFlite等多种格式。

推理很方便,代码如下:
model = YOLO("best.pt")
results = model(["images/6666.jpg"],conf=0.3)
随后是args.yaml文件,这是记录这次训练参数的文件,如使用的batch大小、训练轮次、迭代器等。
紧接着便是重头戏了,分别是F1、准确率、召回率等。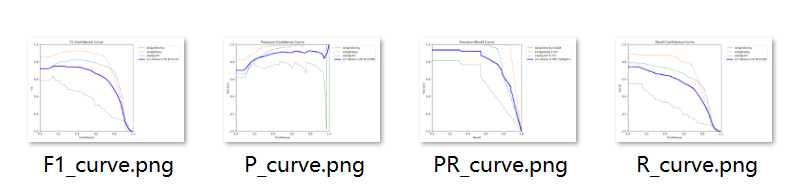
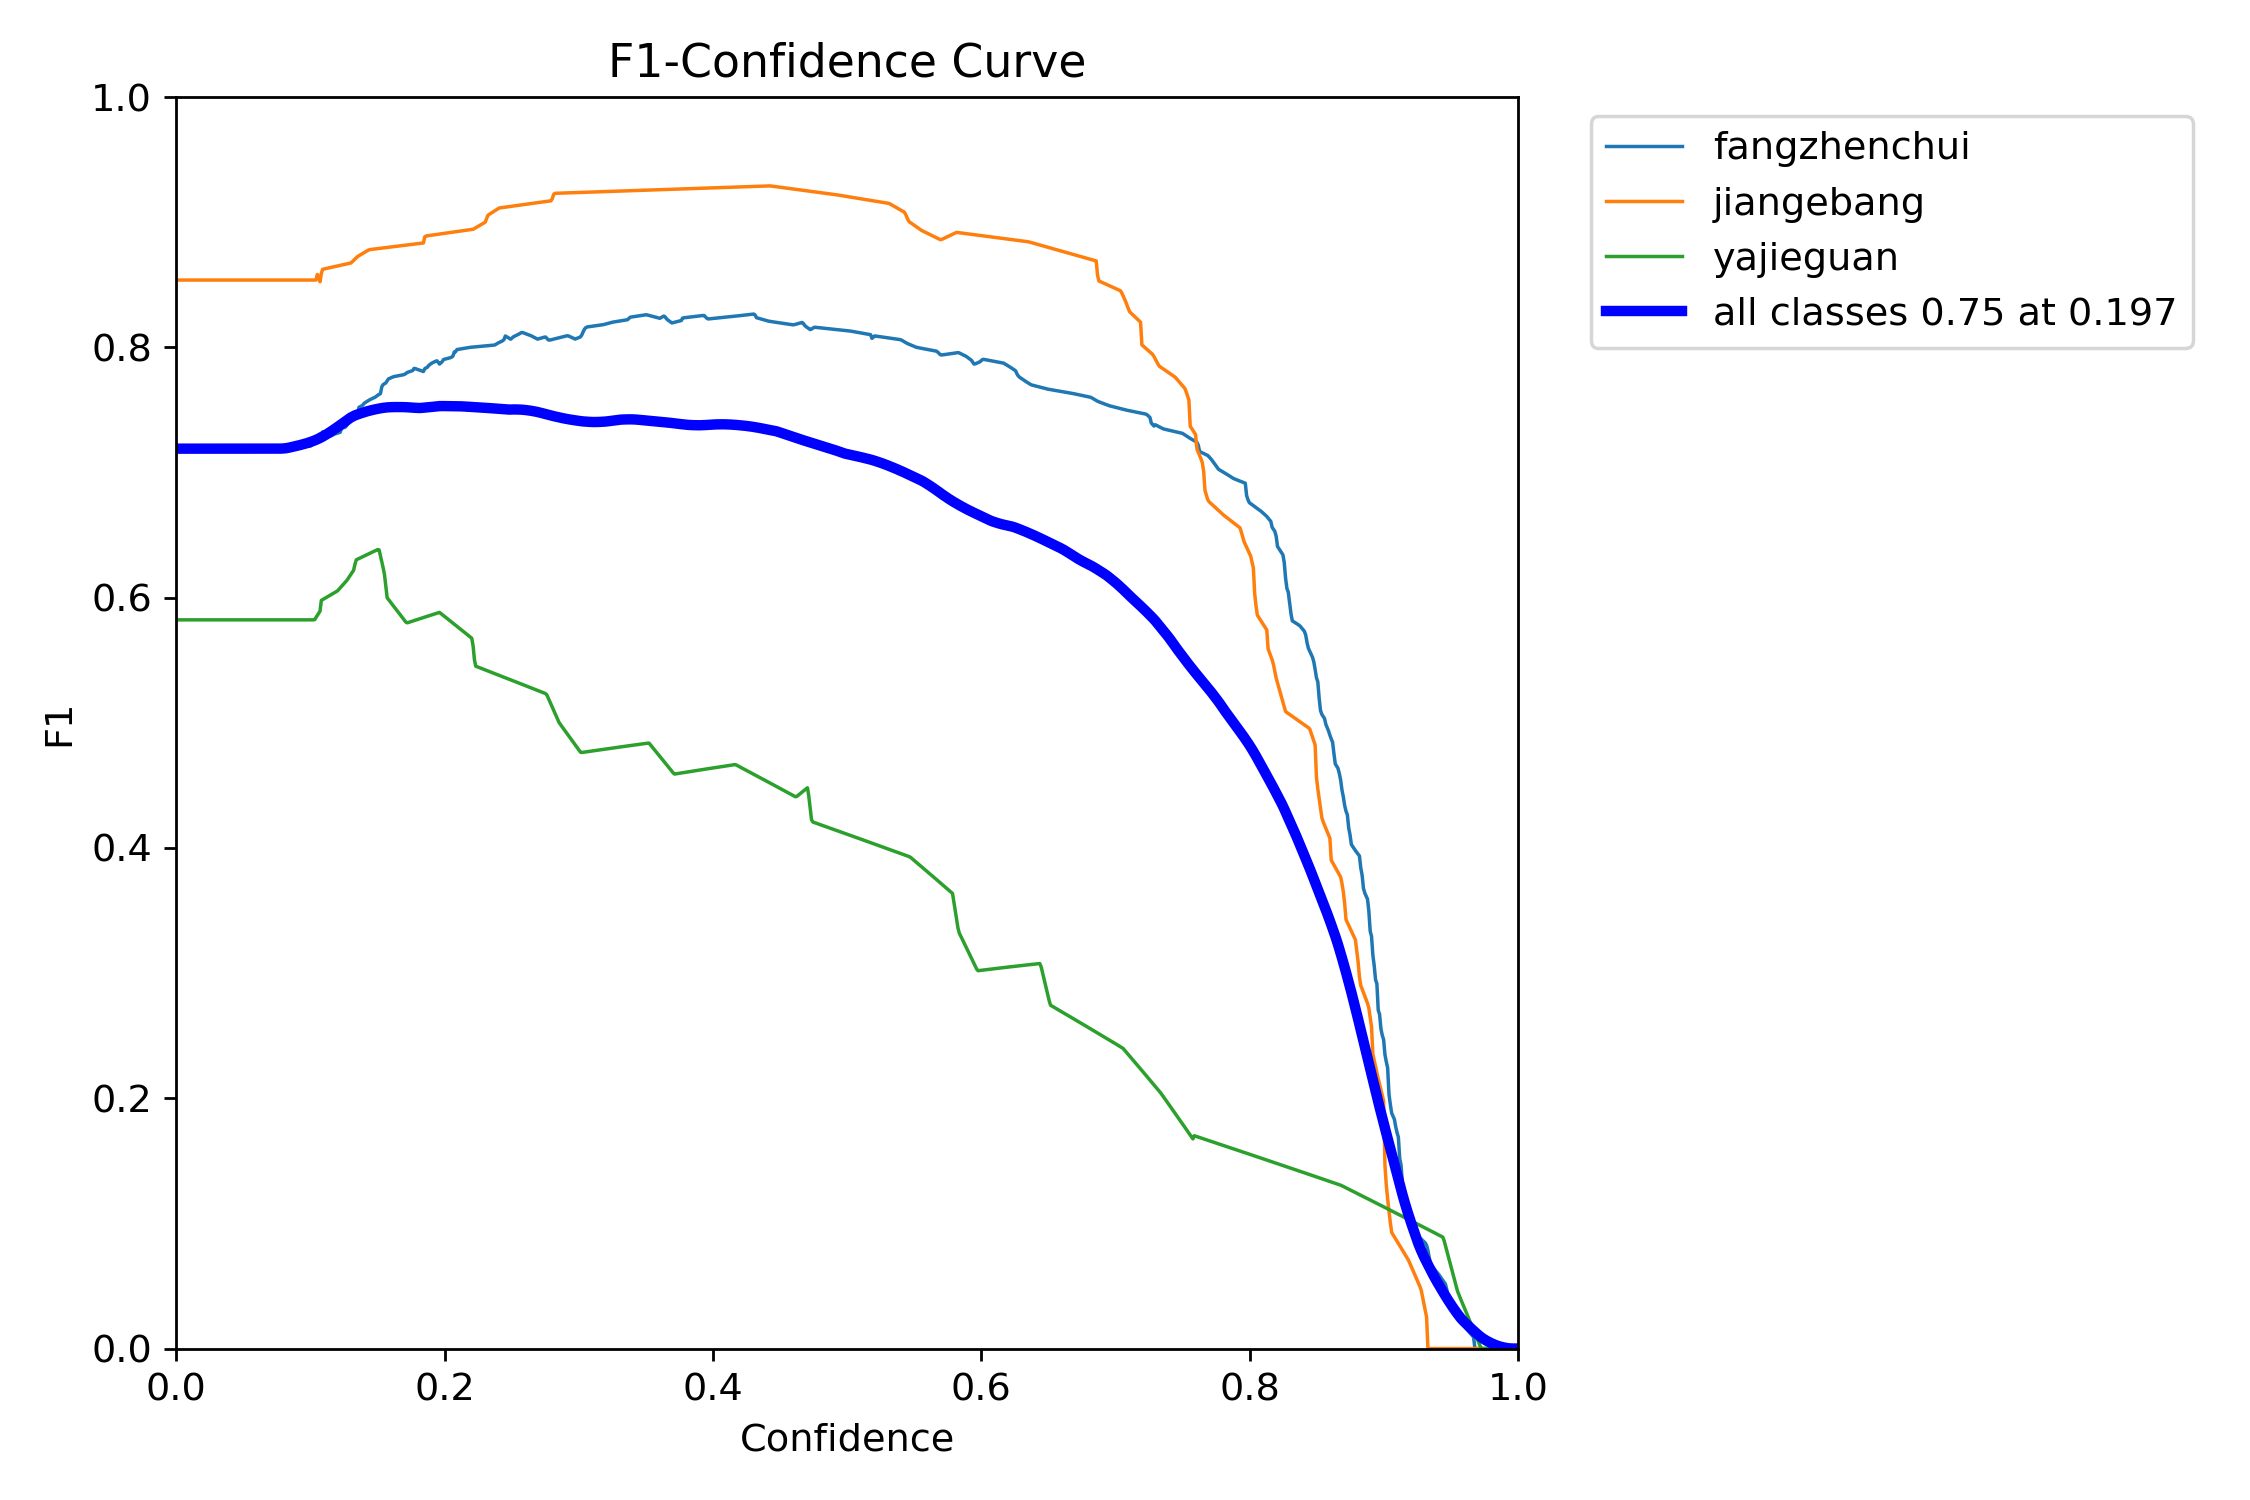
F1曲线
首先是,F1曲线,被定义为查准率和召回率的调和平均数,即图1
一些多分类问题的竞赛,常常将F1-score作为最终测评F1 Score(F1分数)是信息检索和机器学习中常用的评估指标,它是精确率(Precision,图2) 和召回率(Recall,图4) 的调和平均数(Harmonic Mean),计算公式为:
F1 = 2 * (Precision * Recall) / (Precision + Recall)
一般来说,置信度阈值(该样本被判定为某一类的概率阈值)较低的时候,很多置信度低的样本被认为是真,召回率高,精确率低;置信度阈值较高的时候,置信度高的样本才能被认为是真,类别检测的越准确,即精准率较大(只有confidence很大,才被判断是某一类别),所以前后两头的F1分数比较少。
如下图中,表示将置信度设置为 0.4 左右效果会较好
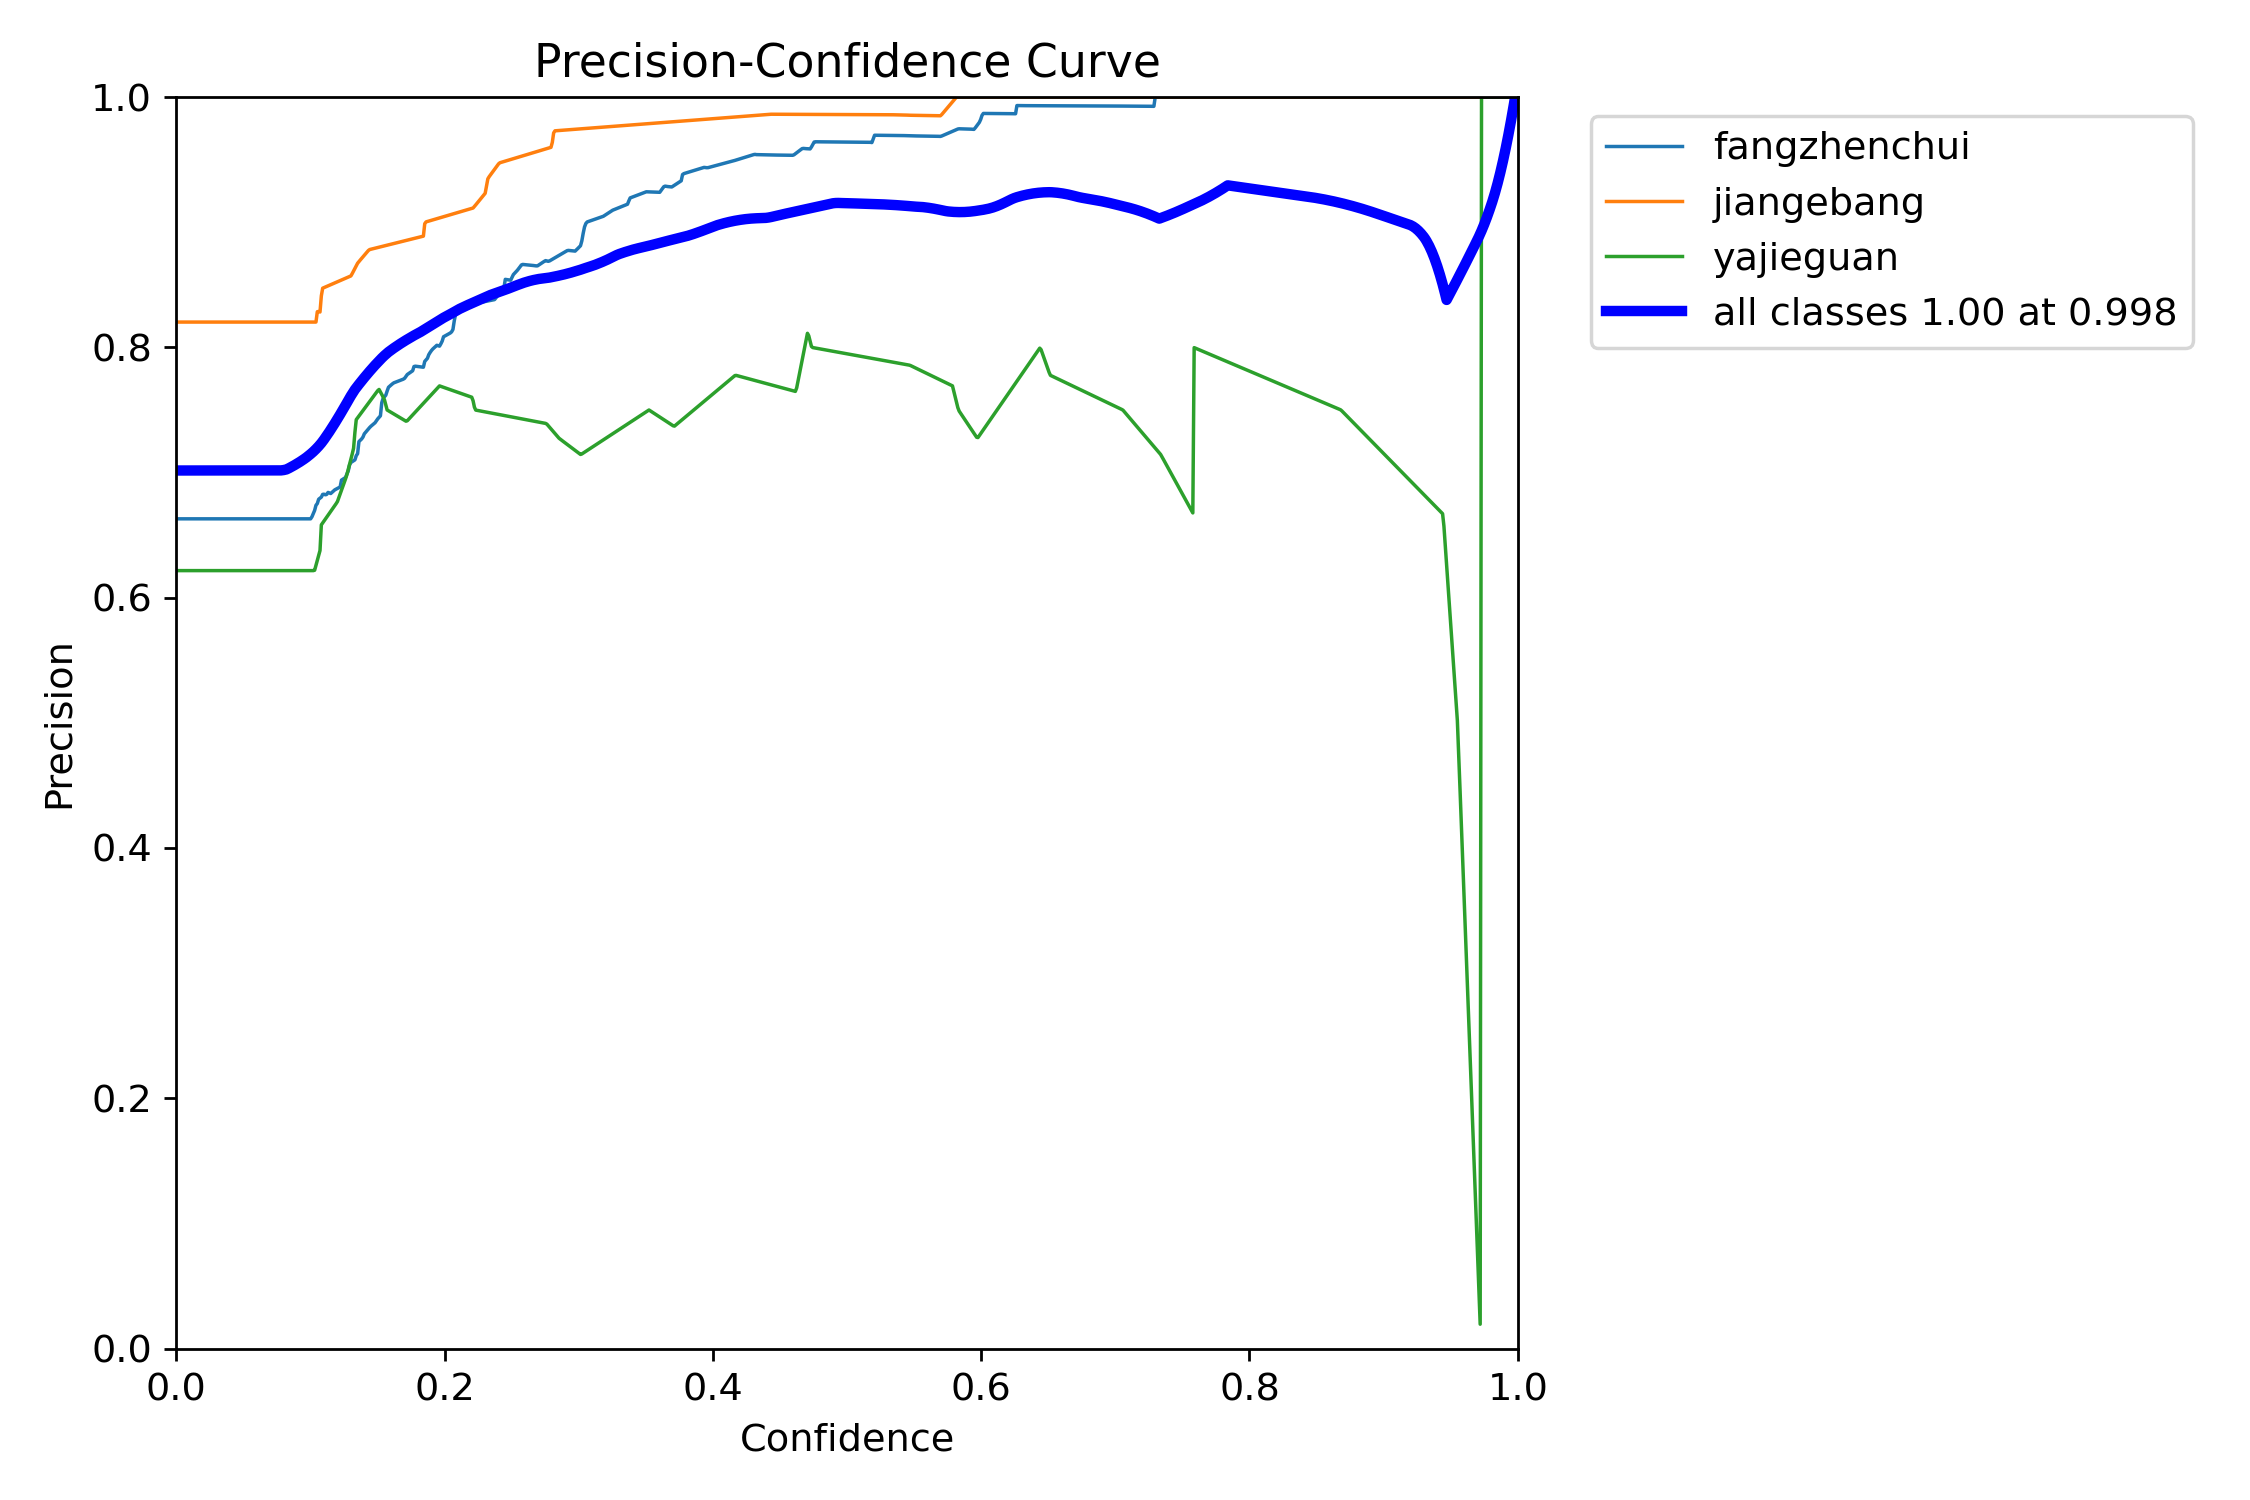
PC曲线
P-C图:置信度阈值 - 准确率曲线图
- 精确率(Precision)= 真正例(TP) / (真正例(TP)+假正例(FP))
- 表示模型预测为正例的样本中,真实为正例的比例
- 示例:在100个被预测为垃圾邮件中,有80个确实是垃圾邮件,则精确率为80%
当判定概率超过置信度阈值时,各个类别识别的准确率。当置信度越大时,类别检测越准确,但是这样就有可能漏掉一些判定概率较低的真实样本。
意思就是,当我设置置信度为某一数值的时候,各个类别识别的准确率。可以看到,当置信度越大的时候,类别检测的越准确。这也很好理解,只有confidence很大,才被判断是某一类别。当然,这样的话,会漏检一些置信度低的类别。
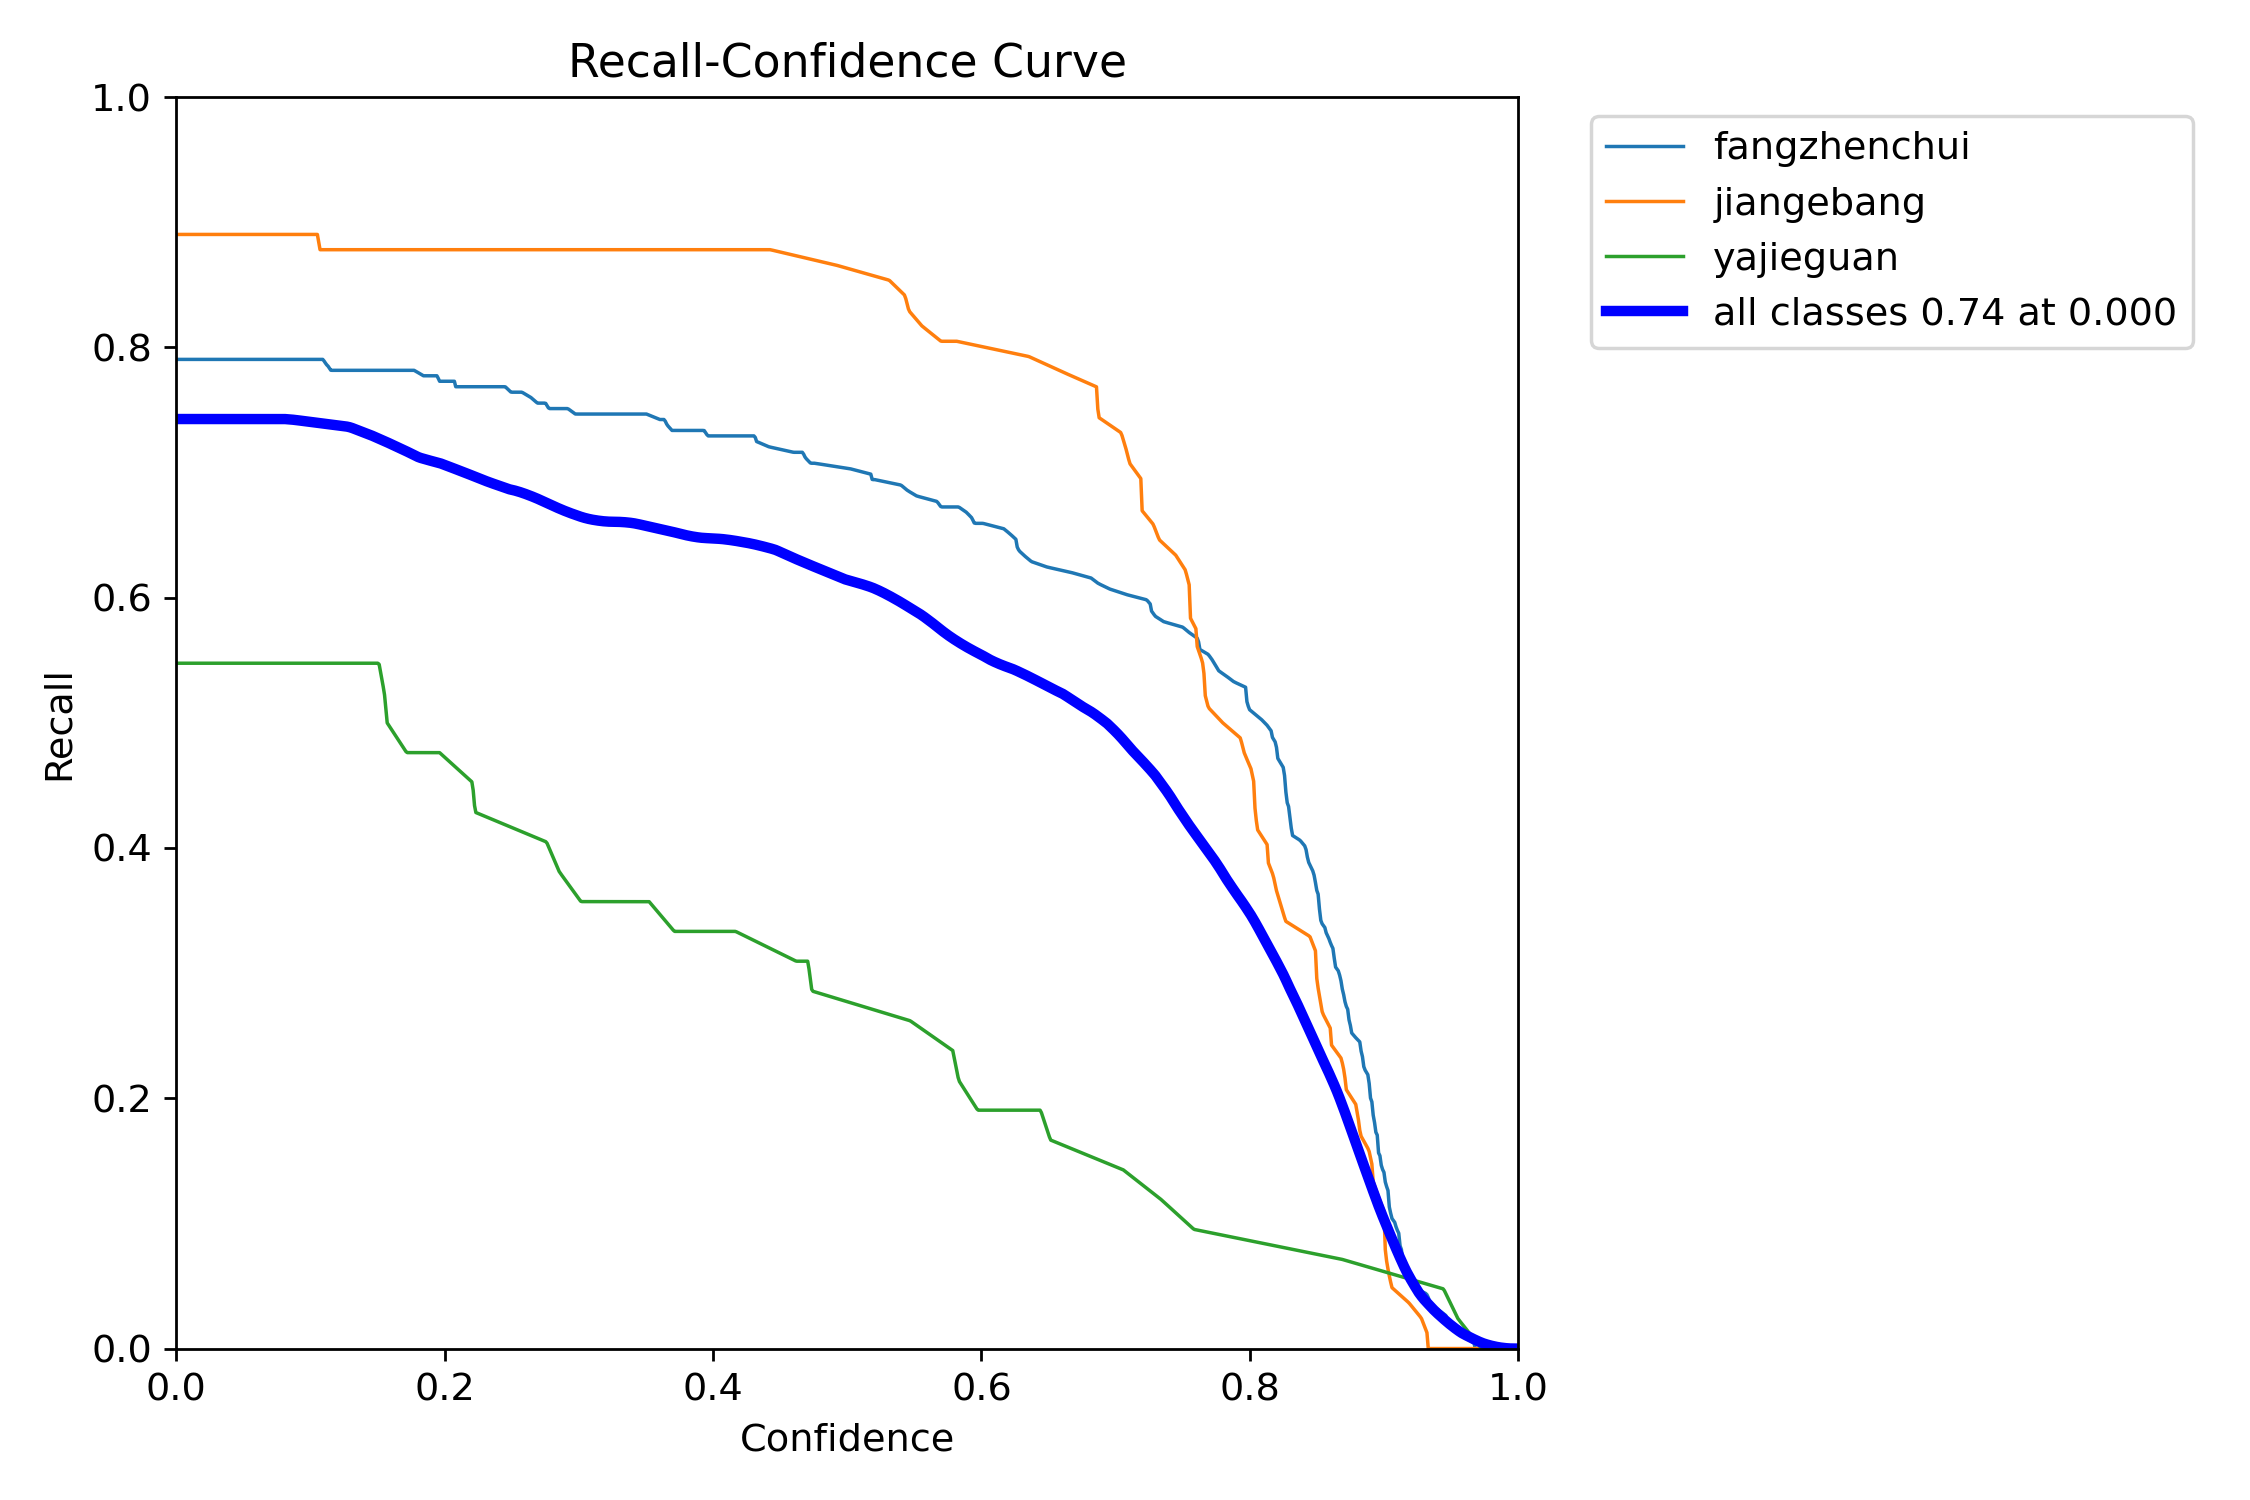
RC曲线
- 召回率(Recall)= 真正例(TP) / (真正例(TP)+假反例(FN))
- 表示所有真实正例中,被正确预测为正例的比例
- 示例:在200个真实垃圾邮件中,模型检测出150个,则召回率为75%
R-C图:召回率recall和置信度confidence之间的关系,recall(真实为positive的准确率),即正样本有多少被找出来了(召回了多少)
PR曲线
P-R图(精确率和召回率的关系图)
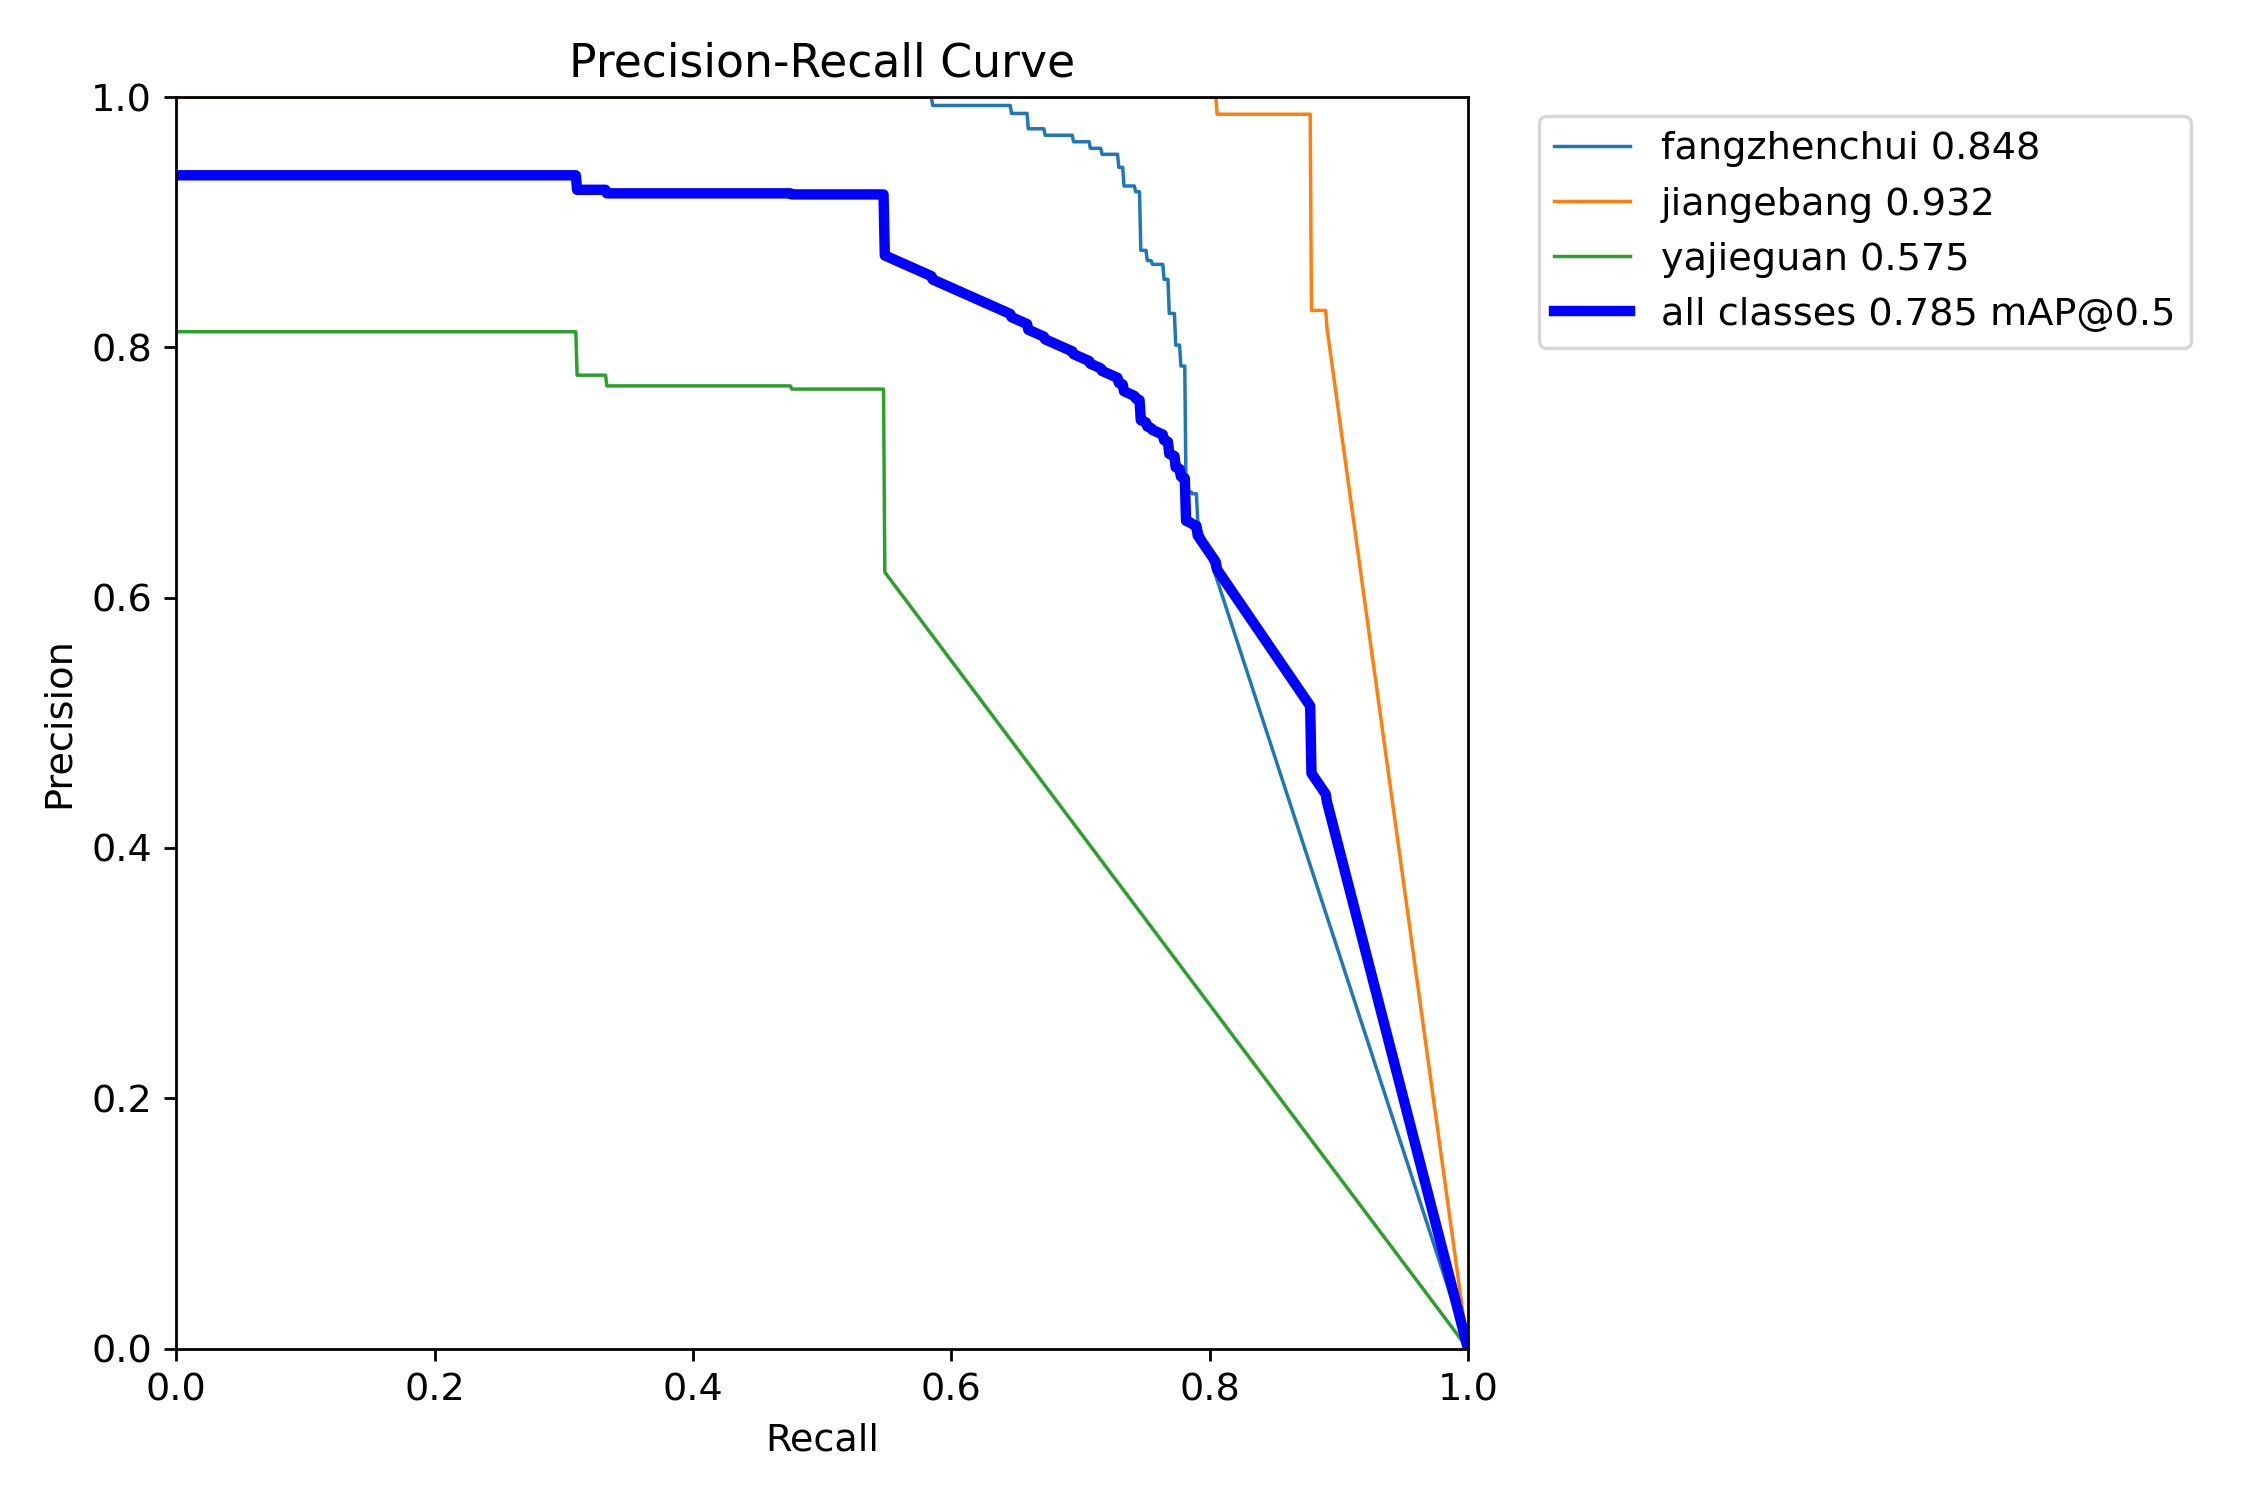
PR曲线体现精确率和召回率的关系。mAP 是 Mean Average Precision 的缩写,即 均值平均精度。可以看到:精度越高,召回率越低。
因此我们希望:在准确率很高的前提下,尽可能的检测到全部的类别。因此希望我们的曲线接近(1,1),即希望mAP曲线的面积尽可能接近1。
PR曲线中的P代表的是precision(精准率),R代表的是recall(召回率),其代表的是精准率与召回率的关系,一般情况下,将recall设置为横坐标,precision设置为纵坐标。PR曲线下围成的面积即AP,所有类别AP平均值即Map。
Result图像
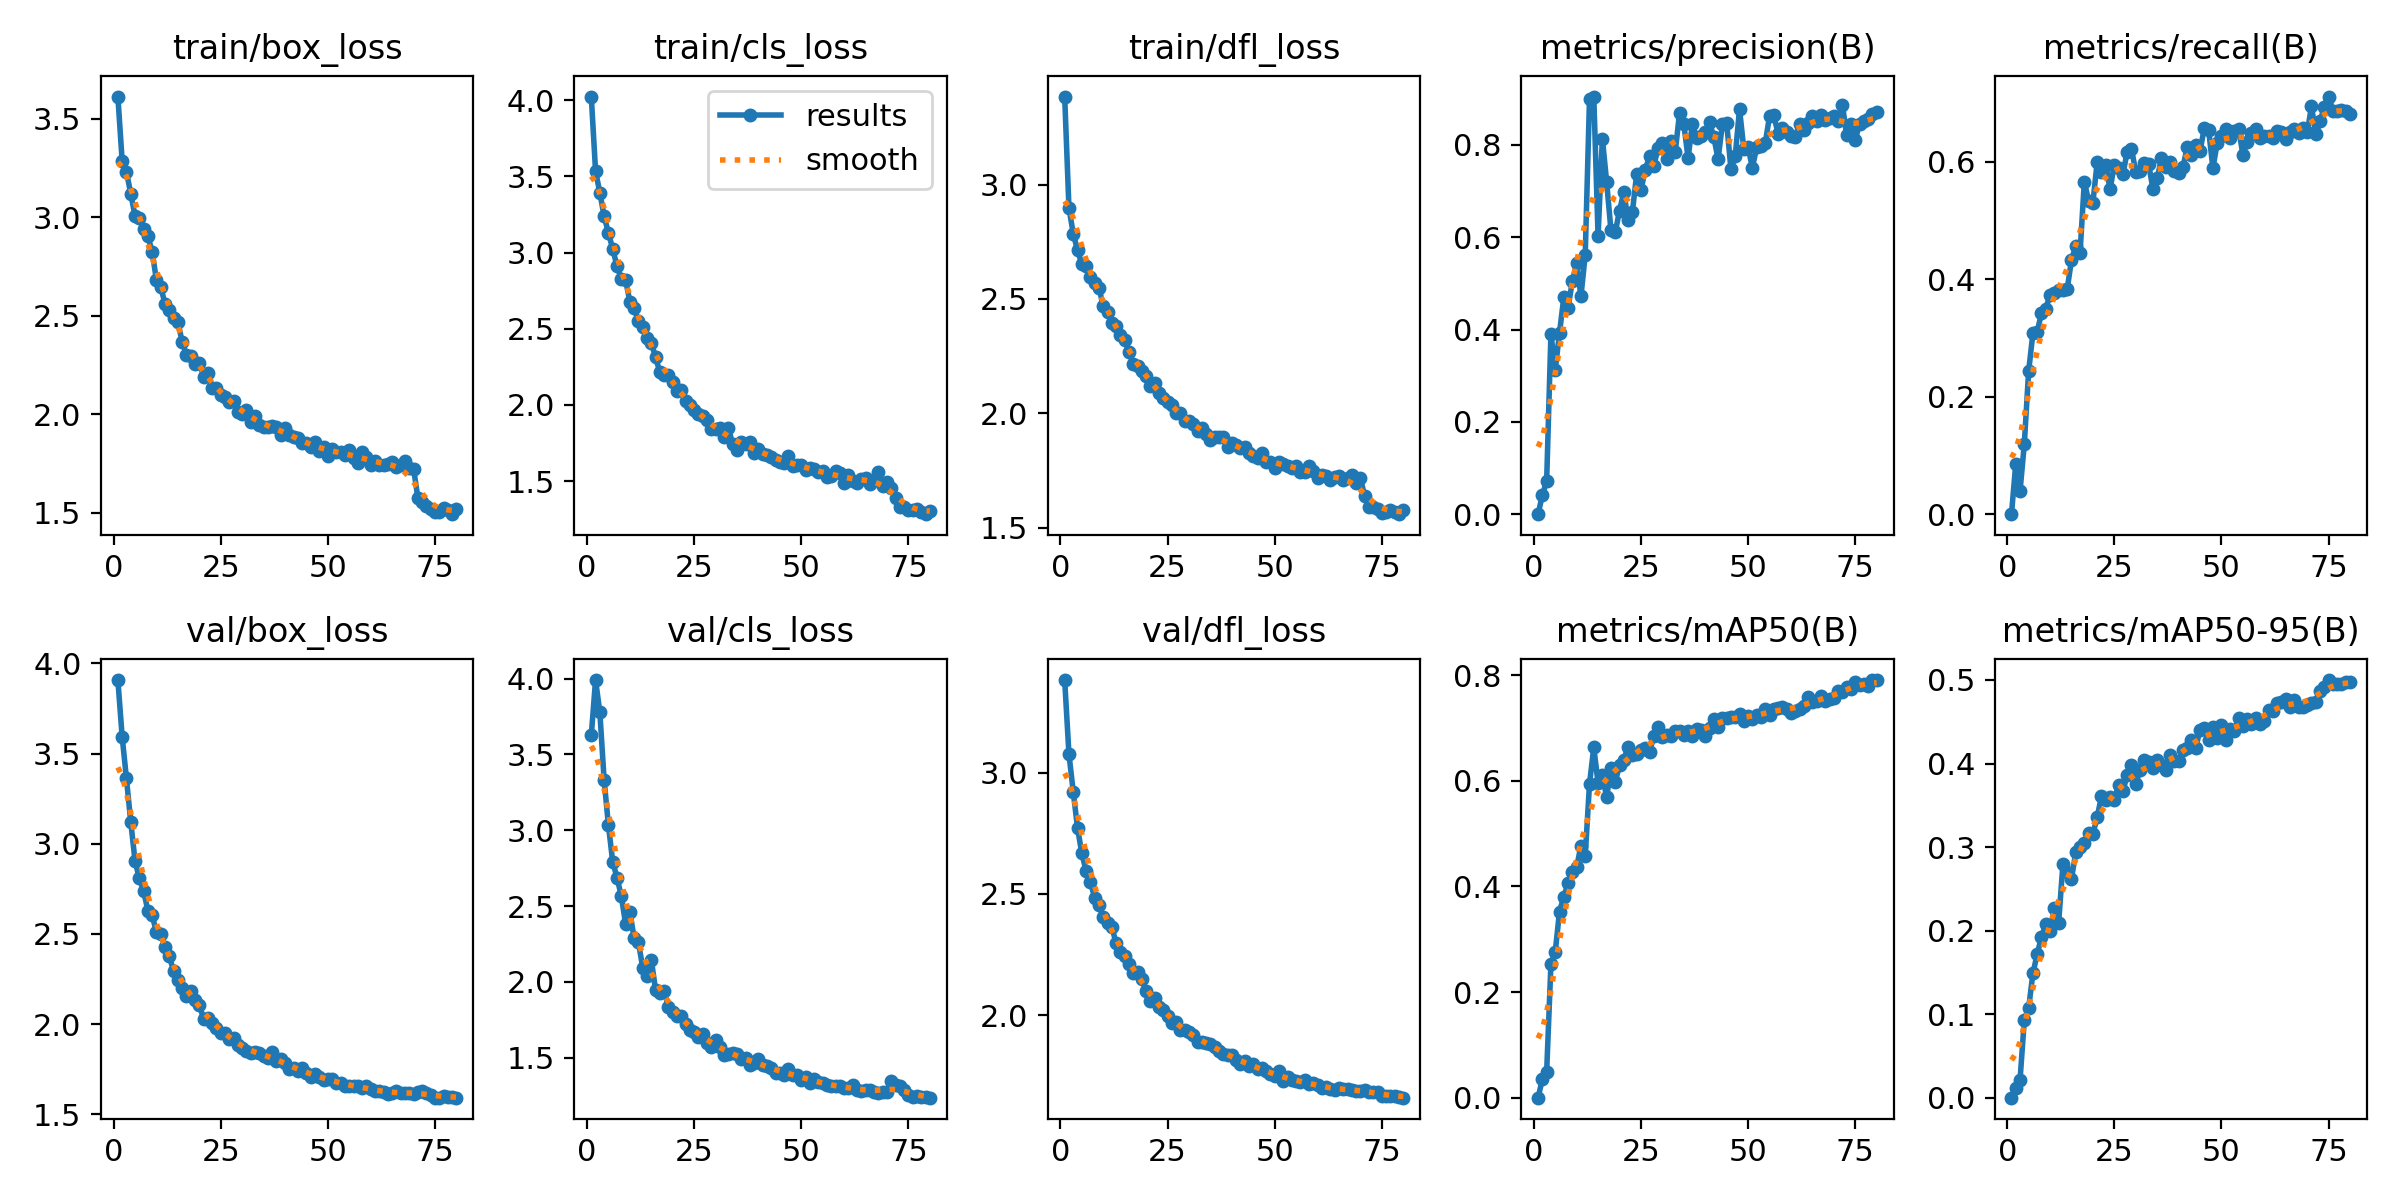
损失函数是用来衡量模型预测值和真实值不一样的程度,极大程度上决定了模型的性能。
定位损失box_loss:预测框与标定框之间的误差(GIoU),越小定位得越准
置信度损失obj_loss:计算网络的置信度,越小判定为目标的能力越准
分类损失cls_loss:计算锚框与对应的标定分类是否正确,越小分类得越准
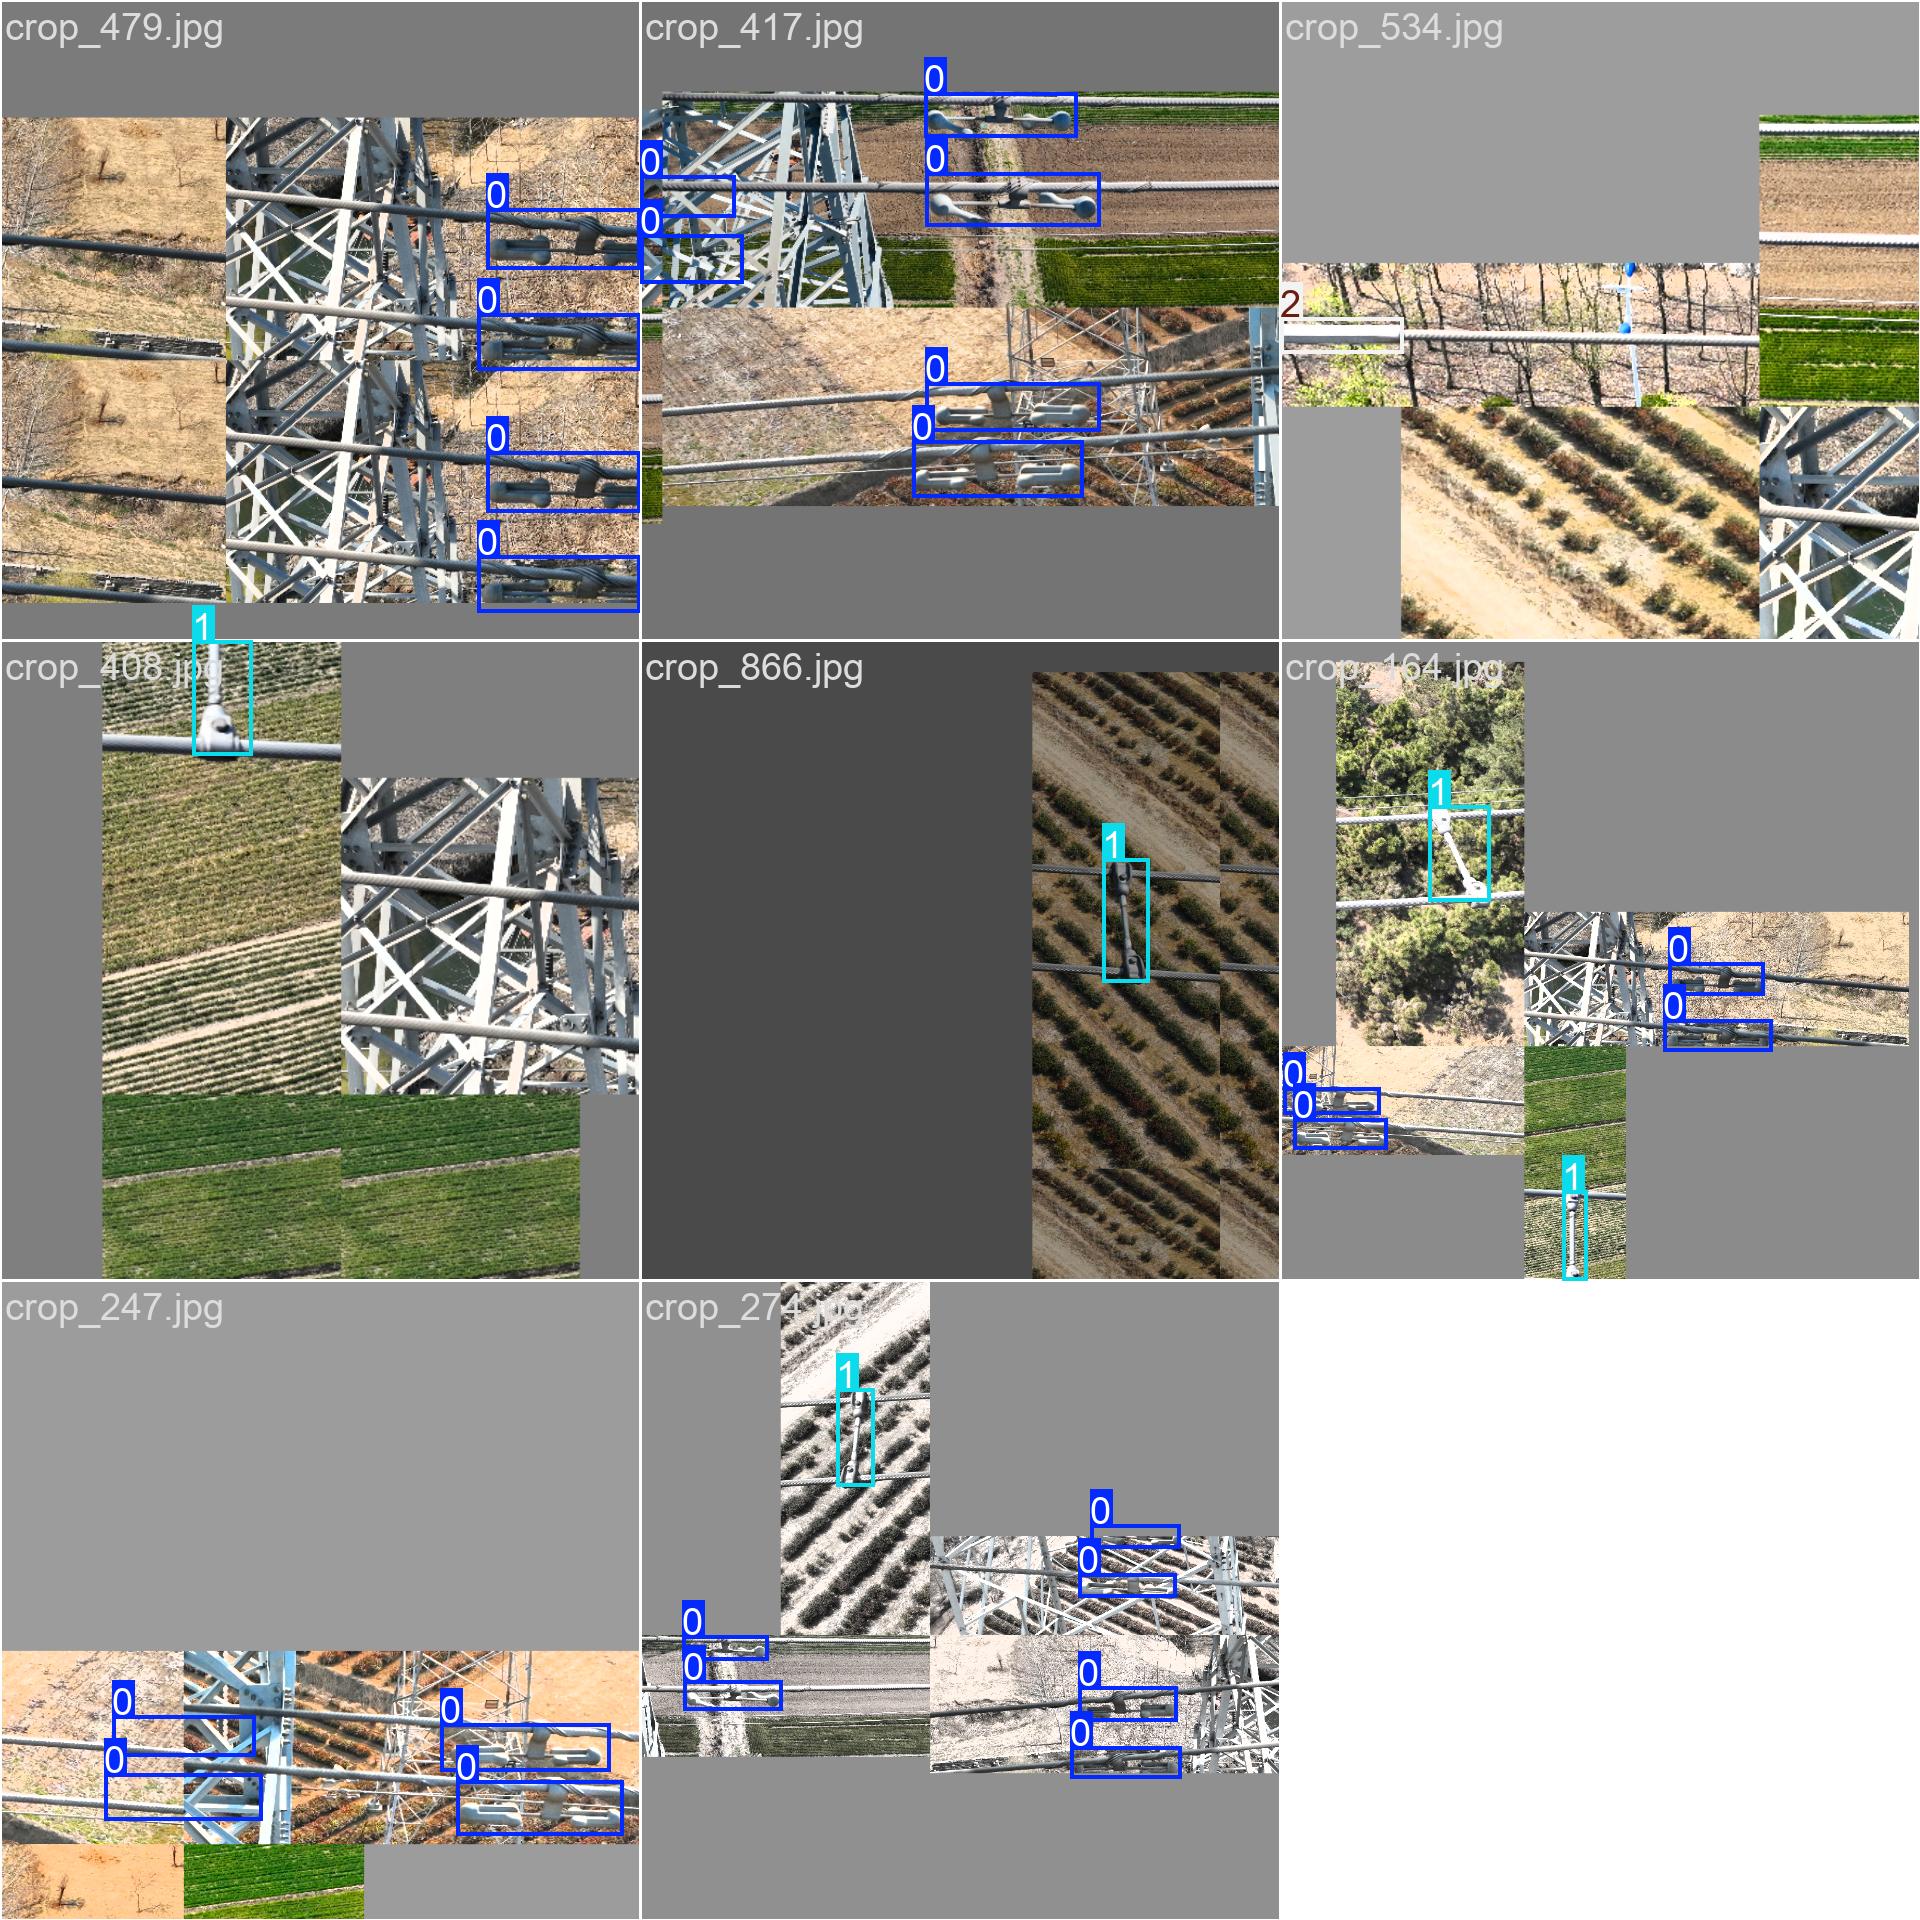
训练集的标签,我一般从这里看数据标注的是否有问题
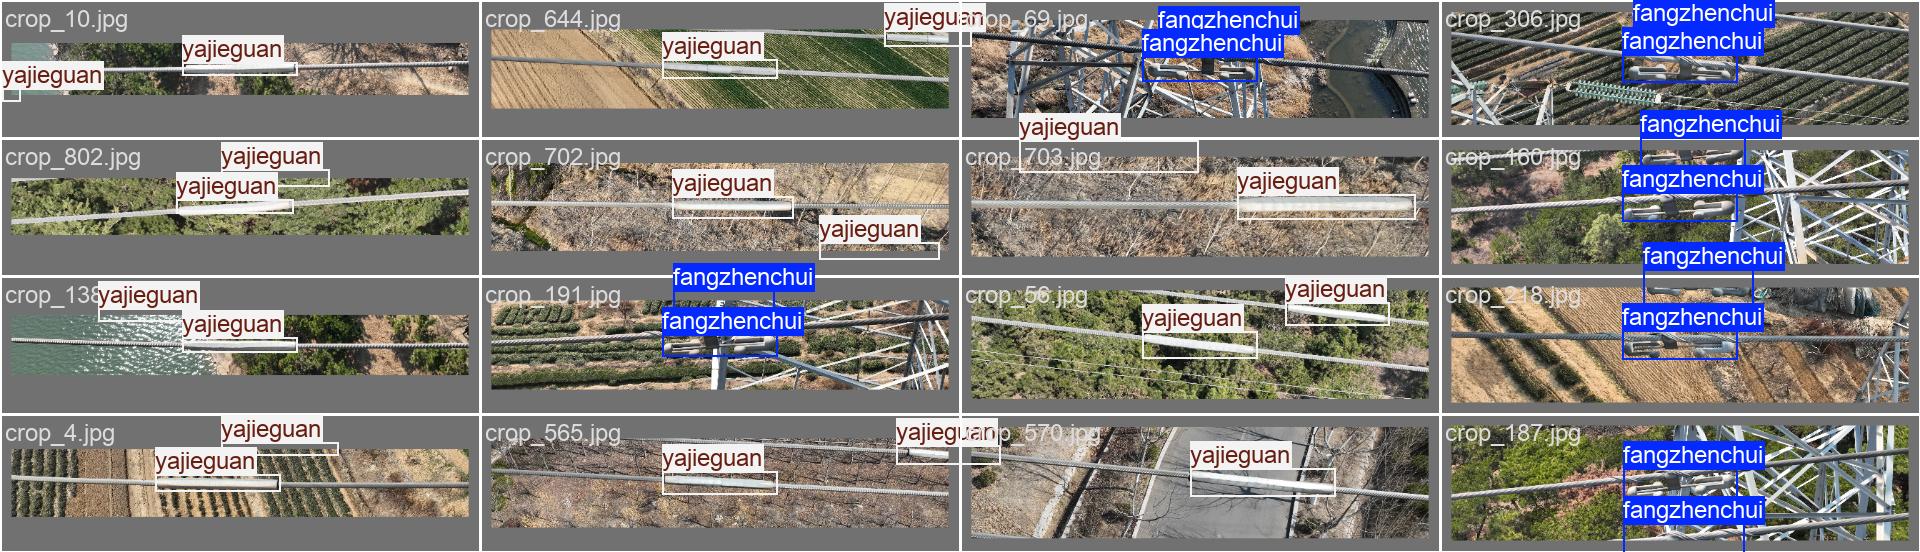
验证集的标签
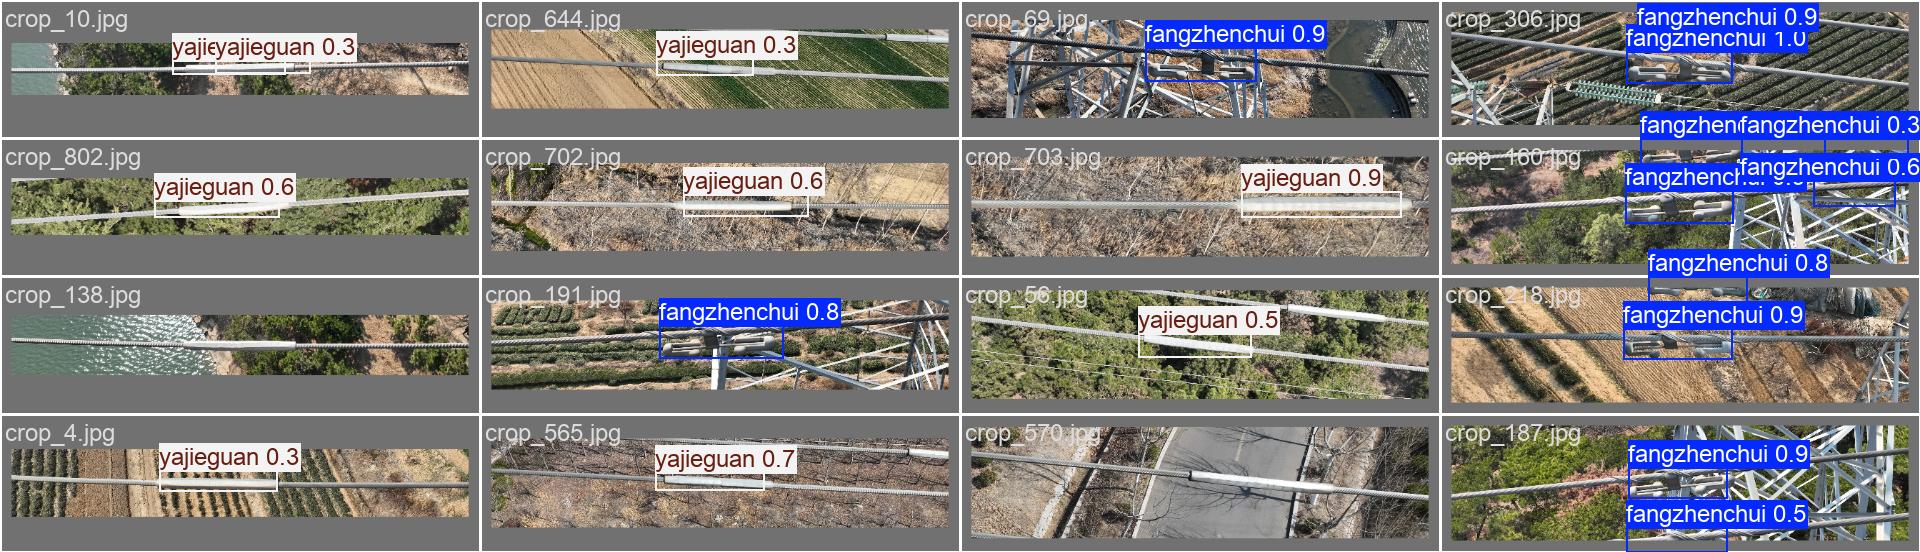
验证集的预测结果,可以看到其训练的效果。
模型预测与后处理
当我们完成模型的训练后,我们就可以使用自己采集的数据集进行预测验证,如果没有问题的话,我们就可以进行部署了,这里博主先使用pt文件进行预测,用于计算布控球的旋转角度,代码如下:
from ultralytics import YOLO
# 加载模型
import cv2
import math
import numpy as np
# 定义颜色和字体
RED_COLOR = (0, 0, 255)
GREEN_COLOR = (0, 255, 0)
FONT = cv2.FONT_HERSHEY_SIMPLEX
def calculate_angle_with_horizontal_extension(x1, y1, x2, y2, half_height):
# 步骤1:构造 P 点
p_x = x1 + half_height
p_y = y1
P = (p_x, p_y)
# 步骤2:水平线 y = y2
sy = y2
dy = sy - p_y
radius = half_height
# 处理水平线在圆外或无交点
if abs(dy) > radius:
return 90 # 或计算直接角度:math.degrees(math.atan2(y2 - y1, x2 - x1))
# 步骤3:计算交点 Q1, Q2
delta_x = math.sqrt(max(0, radius**2 - dy**2)) # 避免浮点误差
q1 = (p_x - delta_x, sy)
q2 = (p_x + delta_x, sy)
# 步骤4:选择使 ∠BPQ 最小的 Q(而非距离 SP 最近)
def angle_between_vectors(v1, v2):
dot = v1[0]*v2[0] + v1[1]*v2[1]
mag_v1 = math.hypot(v1[0], v1[1])
mag_v2 = math.hypot(v2[0], v2[1])
cos_theta = dot / (mag_v1 * mag_v2)
return math.degrees(math.acos(max(-1, min(1, cos_theta)))) # 安全 clip
vector_bp = (x1 - p_x, y1 - p_y)
angles = []
for Q in [q1, q2]:
vector_pq = (Q[0] - p_x, Q[1] - p_y)
angles.append(angle_between_vectors(vector_bp, vector_pq))
# 返回最小夹角
return min(angles)
def get_center(box):
"""从 xyxy 格式的框获取中心坐标"""
x1, y1, x2, y2 = box
return (x1 + x2) / 2, (y1 + y2) / 2
def find_largest_and_smallest_box(boxes):
# boxes: list of xyxy tensors or lists
if len(boxes) < 2:
return None, None
# 按照高度 h = y2 - y1 来排序
sorted_boxes = sorted(boxes, key=lambda b: (b[3] - b[1]), reverse=True)
return sorted_boxes[0], sorted_boxes[1] # 最大的两个 box
# 处理结果
model = YOLO("D:/project_mine/detection/ultralytics/runs/detect/train16/weights/best.pt") # 替换为你自己的路径
results = model(["images/6666.jpg"],conf=0.3) # 可以是多个图像路径的列表
# 处理结果
for i, result in enumerate(results):
img_path = result.path
img = cv2.imread(img_path)
helmet_boxes = [box.tolist() for box in result.boxes.xyxy]
boxes = result.boxes.xyxy.tolist() # 所有框的坐标 [[x1,y1,x2,y2], ...]
confs = result.boxes.conf.tolist() # 所有框的置信度 [conf1, conf2, ...]
# 将每个框和它的置信度组合成 (box, conf) 的形式,再排序
box_conf_pairs = list(zip(boxes, confs))
# 按照置信度从高到低排序,并只取前两个
top_two_boxes = sorted(box_conf_pairs, key=lambda pair: pair[1], reverse=True)[:2]
# 只保留框的坐标(去掉了 conf)
boxes_sorted = [pair[0] for pair in top_two_boxes]
angle=0
if len(boxes_sorted) == 2:
box_large, box_small = find_largest_and_smallest_box(helmet_boxes)
# 获取中心点
cx, cy = get_center(box_large)
sx, sy = get_center(box_small)
half_height = (box_large[3] - box_large[1]) // 2
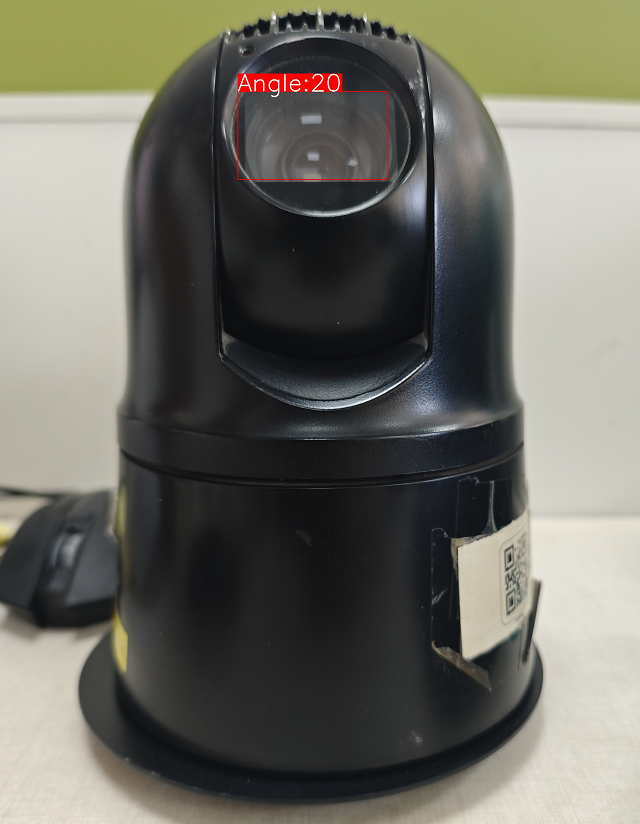
angle = int(calculate_angle_with_horizontal_extension(cx, cy, sx, sy, half_height*0.8))
print(f"图像 {img_path} 中计算得到的角度为: {angle:.2f}°")
x1, y1, x2, y2 = map(int, box_small) # 获取框的坐标
cv2.rectangle(img, (x1, y1), (x2, y2), RED_COLOR, thickness=2) # 绘制红色矩形框
# 如果需要显示类别和置信度
cls = int(result.boxes.cls[i]) # 类别索引
print(cls)
label = f'Angle:{angle}'
t_size = cv2.getTextSize(label, 0, fontScale=3, thickness=3)[0]
c2 = x1 + t_size[0], y1 - t_size[1] - 3
cv2.rectangle(img, (x1, y1), c2, RED_COLOR, -1, cv2.LINE_AA) # 背景填充
cv2.putText(img, label, (x1, y1 - 2), 0, 3, [255, 255, 255], thickness=3, lineType=cv2.LINE_AA) # 文字
else:
print("检测失败,请检查图像是否规范!")
# 保存结果
cv2.imwrite(f"result_{i}.jpg", img)
效果如下,这里博主采用预测大框与小框的位置,通过位置关系计算布控球的摄像头的旋转角度。
模型转换与部署
当我们使用pt模型文件进行预测没有问题时,我们就可以将其部署到生产环境上了,这时,为了提示模型的推理速度,同时使模型兼容不同的环境,我们需要对其进行格式转换,一般情况下,我们会将其转换为ONNX格式,博主曾经将模型转换为TF-Lite的格式,并将其部署在安卓设备上,但从推理速度来看,TF-Lite的格式表现并不如ONNX。
格式转换代码如下:
from ultralytics import YOLO
# 加载一个模型,路径为 YOLO 模型的 .pt 文件
model = YOLO(r"best.pt")
# 导出模型,设置多种参数
model.export(
    imgsz=640,
    format="onnx",
    opset=12
)
关于模型格式转换的环境部署,大家可以参照博主这篇文章:
YOLO模型格式转换
这时我们便可以采用Python、Java、C++等不同开发语言调用我们的模型进行推理了。


 272
272

 被折叠的 条评论
为什么被折叠?
被折叠的 条评论
为什么被折叠?
 到【灌水乐园】发言


