


这篇文章我们将一起深入探讨计算机视觉领域的一项重要贡献——Vision Transformer(ViT),本文聚焦于ViT自发布以来的最新实现方法。
如何从零开始训练ViT?
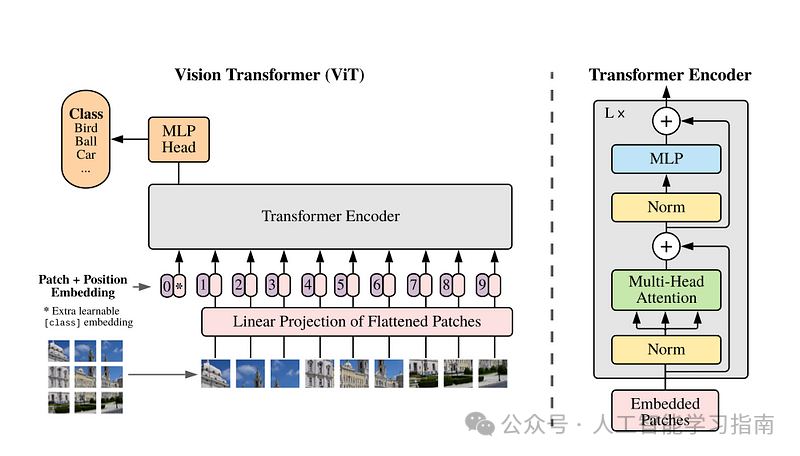
ViT架构图
1. 注意力层

注意力层示意图
让我们从Transformer编码器的核心组件开始:注意力层。
class Attention(nn.Module):
    def __init__(self, dim, heads=8, dim_head=64, dropout=0.):
        super().__init__()
        inner_dim = dim_head * heads  # Calculate the total inner dimension based on the number of attention heads and the dimension per head

        # Determine if a final projection layer is needed based on the number of heads and dimension per head
        project_out = not (heads == 1 and dim_head == dim)

        self.heads = heads  # Store the number of attention heads
        self.scale = dim_head ** -0.5  # Scaling factor for the attention scores (inverse of sqrt(dim_head))

        self.norm = nn.LayerNorm(dim)  # Layer normalization to stabilize training and improve convergence

        self.attend = nn.Softmax(dim=-1)  # Softmax layer to compute attention weights (along the last dimension)
        self.dropout = nn.Dropout(dropout)  # Dropout layer for regularization during training

        # Linear layer to project input tensor into queries, keys, and values
        self.to_qkv = nn.Linear(dim, inner_dim * 3, bias=False)

        # Conditional projection layer after attention, to project back to the original dimension if required
        self.to_out = nn.Sequential(
            nn.Linear(inner_dim, dim),  # Linear layer to project concatenated head outputs back to the original input dimension
            nn.Dropout(dropout)         # Dropout layer for regularization
        ) if project_out else nn.Identity()  # Use Identity (no change) if no projection is needed

    def forward(self, x):
        x = self.norm(x)  # Apply normalization to the input tensor

        # Apply the linear layer to get queries, keys, and values, then split into 3 separate tensors
        qkv = self.to_qkv(x).chunk(3, dim=-1)  # Chunk the tensor into 3 parts along the last dimension: (query, key, value)

        # Reshape each chunk tensor from (batch_size, num_patches, inner_dim) to (batch_size, num_heads, num_patches, dim_head)
        q, k, v = map(lambda t: rearrange(t, 'b n (h d) -> b h n d', h=self.heads), qkv)

        # Calculate dot products between queries and keys, scale by the inverse square root of dimension
        dots = torch.matmul(q, k.transpose(-1, -2)) * self.scale  # Shape: (batch_size, num_heads, num_patches, num_patches)

        # Apply softmax to get attention weights
        attn = self.attend(dots)  # Shape: (batch_size, num_heads, num_patches, num_patches)
        attn = self.dropout(attn)

        # Multiply attention weights by values to get the output
        out = torch.matmul(attn, v)  # Shape: (batch_size, num_heads, num_patches, dim_head)

        # Rearrange the output tensor to (batch_size, num_patches, inner_dim)
        out = rearrange(out, 'b h n d -> b n (h d)')  # Combine heads dimension with the output dimension

        # Project the output back to the original input dimension if needed
        out = self.to_out(out)  # Shape: (batch_size, num_patches, dim)

        return out  # Return the final output tensor
关键点:
inner_dim:是dim_head(头维度)与头数(number of heads)的乘积。为了向量化和加快计算速度,我们在张量积之前合并这两个维度。
计算效率:不单独初始化Q(查询)、K(键)、V(值),而是将它们拼接成一个大的张量self.to_qkv,这样可以一次性完成所有计算。
einops库:一个强大的库,通过指定维度来重新排列张量大小,非常直观。
例如,如果你有一个维度为(batch_size, n_tokens, number_heads * head_dim)的张量,并希望将最后一个维度拆分为(batch_size, n_tokens, number_heads, head_dim),可以使用Einops.rearrange(qvk, ‘b n (h d) -> b n h d’, h=num_heads),这样更容易追踪正在操作的维度。
2. 前馈神经网络(FFN)
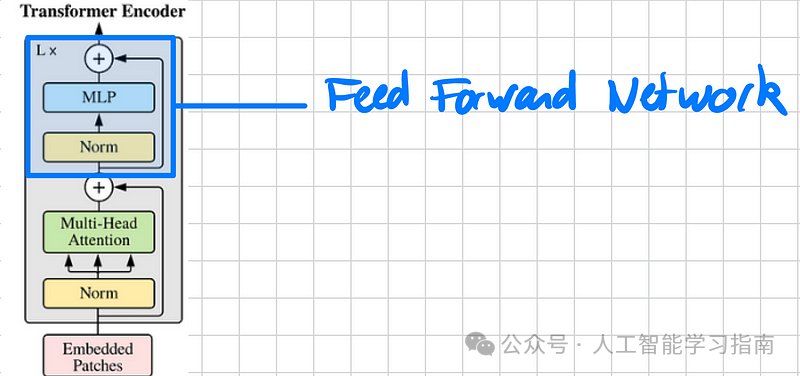
前馈网络示意图
接下来,我们添加Transformer的第二个模块:前馈神经网络(FFN)。
class FFN(nn.Module):
    def __init__(self, dim, hidden_dim, dropout = 0.):
        super().__init__()
        self.net = nn.Sequential(
            # norm -> linear -> activation -> dropout -> linear -> dropout
            # we first norm with a layer norm
            nn.LayerNorm(dim),
            nn.Linear(dim, hidden_dim),
            # we project in a higher dimension hidden_dim
            nn.GELU(),
            # we apply the GELU activation function
            nn.Dropout(dropout),
            # we apply dropout
            nn.Linear(hidden_dim, dim),
            # we project back to the original dimension dim
            nn.Dropout(dropout)
            # we apply dropout
        )

    def forward(self, x):
        return self.net(x)
这里其实并不复杂,你只需要理解,FFN(前馈网络)是由两个多层感知机(MLP)串联而成的。
通常,第一个MLP将数据映射到更高维的空间,而第二个MLP则将其映射回输入数据的维度,这就是为什么我们有“维度(dim)”和“隐藏维度(hidden dim)”这两个概念。
关键点:
-
dim:输入令牌的维度。
-
hidden_dim:FFN的中间维度。
-
GELU:激活函数。尽管原始论文使用的是ReLU,但GELU因其更平滑的过渡而变得更加流行。
针对所有自学遇到困难的同学们,我帮大家系统梳理大模型学习脉络,将这份 LLM大模型资料 分享出来:包括LLM大模型书籍、640套大模型行业报告、LLM大模型学习视频、LLM大模型学习路线、开源大模型学习教程等, 😝有需要的小伙伴,可以 扫描下方二维码领取🆓↓↓↓
👉[CSDN大礼包🎁:全网最全《LLM大模型入门+进阶学习资源包》免费分享(安全链接,放心点击)]()👈

3. Transformer编码器:堆叠L个Transformer层
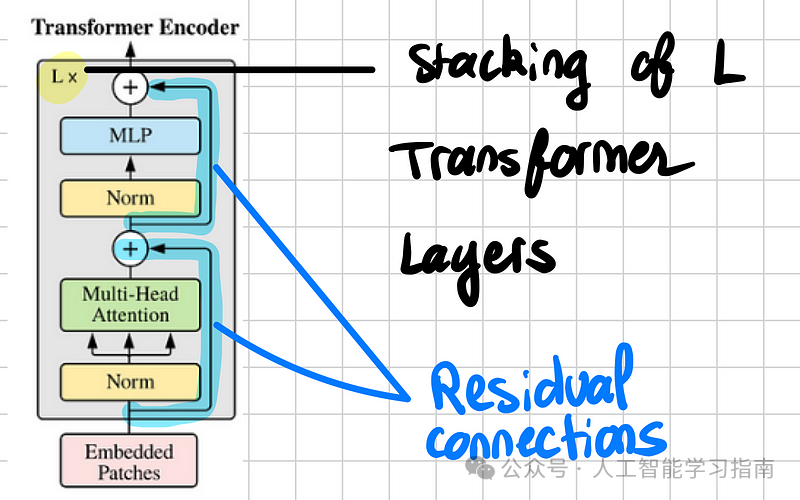
Transformer编码器
有了注意力层和前馈神经网络,我们就可以组装一个Transformer层了。
Transformer编码器本质上是L个Transformer层的堆叠。
记住,Transformer层就像乐高积木一样——输入维度与输出维度相同,因此我们可以根据需要堆叠任意数量(或内存允许的数量)。
别忘了残差连接对于保持梯度流动和使优化更顺畅至关重要。
class Transformer(nn.Module):
    def __init__(self, dim, depth, heads, dim_head, mlp_dim_ratio, dropout):
        super().__init__()
        self.norm = nn.LayerNorm(dim)
        self.layers = nn.ModuleList([])
        mlp_dim = mlp_dim_ratio * dim
        for _ in range(depth):
            self.layers.append(nn.ModuleList([
                Attention(dim=dim, heads=heads, dim_head=dim_head, dropout=dropout),
                FFN(dim=dim, hidden_dim=mlp_dim, dropout=dropout)
            ]))

    def forward(self, x):
        for attn, ffn in self.layers:
            x = attn(x) + x
            x = ffn(x) + x
        return self.norm(x)
组装最终的ViT
最艰难的部分已经完成,现在我们可以组装完整的视觉变换器了。
我们主要需要添加三个组件:
-
将图像转换为补丁,然后转换为向量。
-
添加位置嵌入。
-
添加CLS令牌。

图像分块处理过程
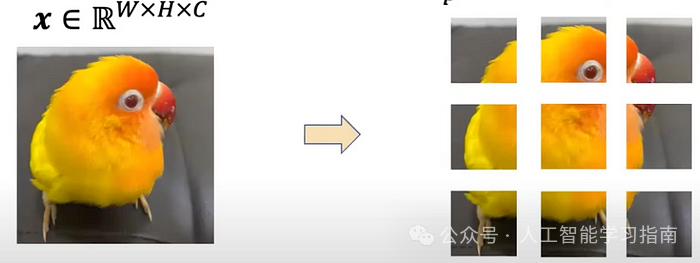
将图像转换为图像块的过程
首先,我们定义一个简单的工具函数,帮助我们将标量转换为元组。
def pair(t):
    """
    Converts a single value into a tuple of two values.
    If t is already a tuple, it is returned as is.

    Args:
        t: A single value or a tuple.

    Returns:
        A tuple where both elements are t if t is not a tuple.
    """
    return t if isinstance(t, tuple) else (t, t)
现在可以准备开始编写ViT的代码了
开始前的几个合理性检查:
我们需要检查是否正确地将图像分割成了整数个补丁。换句话说,我们需要确认图像的高度和宽度都能被补丁维度整除。
class ViT(nn.Module):
    def __init__(self, *, image_size, patch_size, num_classes, dim, depth, heads, mlp_dim_ratio, pool='cls', channels=3, dim_head=64, dropout=0.):
        """
        Initializes a Vision Transformer (ViT) model.

        Args:
            image_size (int or tuple): Size of the input image (height, width).
            patch_size (int or tuple): Size of each patch (height, width).
            num_classes (int): Number of output classes.
            dim (int): Dimension of the embedding space.
            depth (int): Number of transformer layers.
            heads (int): Number of attention heads.
            mlp_dim (int): Dimension of the feedforward network.
            pool (str): Pooling strategy ('cls' or 'mean').
            channels (int): Number of input channels (e.g., 3 for RGB images).
            dim_head (int): Dimension of each attention head.
            dropout (float): Dropout rate.
        """
        super().__init__()

        # Convert image size and patch size to tuples if they are single values
        image_height, image_width = pair(image_size)
        patch_height, patch_width = pair(patch_size)

        # Ensure that the image dimensions are divisible by the patch size
        assert image_height % patch_height == 0 and image_width % patch_width == 0, 'Image dimensions must be divisible by the patch size.'

        # Calculate the number of patches and the dimension of each patch
        num_patches = (image_height // patch_height) * (image_width // patch_width)
        patch_dim = channels * patch_height * patch_width
下一步是将补丁转换为嵌入。请记住,图像具有C=3的维度(红绿蓝三通道)。我们需要展开这个维度,并压缩每个补丁的维度(patch_size x patch_size x c)。
# Define the patch embedding layer
self.to_patch_embedding = nn.Sequential(
    # Rearrange the input tensor to (batch_size, num_patches, patch_dim)
    Rearrange('b c (h p1) (w p2) -> b (h w) (p1 p2 c)', p1=patch_height, p2=patch_width),
    nn.LayerNorm(patch_dim),  # Normalize each patch
    nn.Linear(patch_dim, dim),  # Project patches to embedding dimension
    nn.LayerNorm(dim)  # Normalize the embedding
)
然后,我们需要定义CLS令牌和位置嵌入。CLS令牌有助于将整个图像表示为单个向量,而位置嵌入则帮助模型了解令牌的空间位置。它们都是学习参数(随机初始化)。
# Ensure the pooling strategy is valid
assert pool in {'cls', 'mean'}, 'pool type must be either cls (cls token) or mean (mean pooling)'

# Define CLS token and positional embeddings
self.cls_token = nn.Parameter(torch.randn(1, 1, dim))  # Learnable class token
self.pos_embedding = nn.Parameter(torch.randn(1, num_patches + 1, dim))  # Positional embeddings for patches and class tok
最后,我们只需定义之前定义的Transformer层,并添加一个分类头即可。
# Define the transformer encoder
self.transformer = Transformer(dim, depth, heads, dim_head, mlp_dim_ratio, dropout)

# Pooling strategy ('cls' token or mean of patches)
self.pool = pool
# Identity layer (no change to the tensor)
self.to_latent = nn.Identity()

# Classification head
self.mlp_head = nn.Linear(dim, num_classes)
前向传播
我们已经初始化了ViT(Vision Transformer,视觉转换器)的所有组件,现在只需按照正确的顺序调用它们来执行前向传播。
首先,我们将输入图像分割成多个小块(patches),并将每个小块展开成一个向量。
接着,我们复制CLS标记(沿批次维度),并将其在第1维(即序列长度维)上进行拼接。
实际上,我们只为一个向量学习参数,但需要将其与每个图像拼接,这就是为什么我们要扩展一个维度的原因。
然后,我们为每个标记添加位置嵌入。
def forward(self, img):
    """
    Forward pass through the Vision Transformer model.

    Args:
        img (Tensor): Input image tensor of shape (batch_size, channels, height, width).

    Returns:
        dict: A dictionary containing the class token, feature map, and classification result.
    """
    # Convert image to patch embeddings
    x = self.to_patch_embedding(img) # Shape: (batch_size, num_patches, dim)
    b, n, _ = x.shape  # Get batch size, number of patches, and embedding dimension

    # Repeat class token for each image in the batch
    cls_tokens = repeat(self.cls_token, '1 1 d -> b 1 d', b=b)

    # Concatenate class token with patch embeddings
    x = torch.cat((cls_tokens, x), dim=1)

    # Add positional embeddings to the input
    x += self.pos_embedding[:, :(n + 1)]

    # Apply dropout for regularization
    x = self.dropout(x)
随后,我们应用Transformer编码器。其主要作用是构建一个包含三项内容的输出:
-
CLS标记(图像的单个向量表示)。
-
特征图(图像每个小块的向量化表示)。
-
分类头逻辑(可选):用于分类任务。请注意,Vision Transformer可以训练完成多种任务,但分类是最初被应用的任务。
# Pass through transformer encoder
x = self.transformer(x) # Shape: (batch_size, num_patches + 1, dim)

# Extract class token and feature map
cls_token = x[:, 0]  # Extract class token
feature_map = x[:, 1:]  # Remaining tokens are feature map

# Apply pooling operation: 'cls' token or mean of patches
pooled_output = cls_token if self.pool == 'cls' else feature_map.mean(dim=1)

# Apply the identity transformation (no change to the tensor)
pooled_output = self.to_latent(pooled_output)

# Apply the classification head to the pooled output
classification_result = self.mlp_head(pooled_output)

# Return a dictionary with the required components
return {
    'cls_token': cls_token,  # Class token
    'feature_map': feature_map,  # Feature map (patch embeddings)
    'classification_head_logits': classification_result  # Final classification result
综上所述,以下是ViT的最终代码
class ViT(nn.Module):
    def __init__(self, *, image_size, patch_size, num_classes, dim, depth, heads, mlp_dim_ratio, pool='cls', channels=3, dim_head=64, dropout=0.):
        """
        Initializes a Vision Transformer (ViT) model.

        Args:
            image_size (int or tuple): Size of the input image (height, width).
            patch_size (int or tuple): Size of each patch (height, width).
            num_classes (int): Number of output classes.
            dim (int): Dimension of the embedding space.
            depth (int): Number of transformer layers.
            heads (int): Number of attention heads.
            mlp_dim (int): Dimension of the feedforward network.
            pool (str): Pooling strategy ('cls' or 'mean').
            channels (int): Number of input channels (e.g., 3 for RGB images).
            dim_head (int): Dimension of each attention head.
            dropout (float): Dropout rate.
        """
        super().__init__()

        # Convert image size and patch size to tuples if they are single values
        image_height, image_width = pair(image_size)
        patch_height, patch_width = pair(patch_size)

        # Ensure that the image dimensions are divisible by the patch size
        assert image_height % patch_height == 0 and image_width % patch_width == 0, 'Image dimensions must be divisible by the patch size.'

        # Calculate the number of patches and the dimension of each patch
        num_patches = (image_height // patch_height) * (image_width // patch_width)
        patch_dim = channels * patch_height * patch_width


        # Define the patch embedding layer
        self.to_patch_embedding = nn.Sequential(
            # Rearrange the input tensor to (batch_size, num_patches, patch_dim)
            Rearrange('b c (h p1) (w p2) -> b (h w) (p1 p2 c)', p1=patch_height, p2=patch_width),
            nn.LayerNorm(patch_dim),  # Normalize each patch
            nn.Linear(patch_dim, dim),  # Project patches to embedding dimension
            nn.LayerNorm(dim)  # Normalize the embedding
        )

        # Ensure the pooling strategy is valid
        assert pool in {'cls', 'mean'}, 'pool type must be either cls (cls token) or mean (mean pooling)'

        # Define CLS token and positional embeddings
        self.cls_token = nn.Parameter(torch.randn(1, 1, dim))  # Learnable class token

        self.pos_embedding = nn.Parameter(torch.randn(1, num_patches + 1, dim))  # Positional embeddings for patches and class token

        self.dropout = nn.Dropout(dropout)  # Dropout for regularization

        # Define the transformer encoder
        self.transformer = Transformer(dim, depth, heads, dim_head, mlp_dim_ratio, dropout)

        # Pooling strategy ('cls' token or mean of patches)
        self.pool = pool
        # Identity layer (no change to the tensor)
        self.to_latent = nn.Identity()

        # Classification head
        self.mlp_head = nn.Linear(dim, num_classes)

    def forward(self, img):
        """
        Forward pass through the Vision Transformer model.

        Args:
            img (Tensor): Input image tensor of shape (batch_size, channels, height, width).

        Returns:
            dict: A dictionary containing the class token, feature map, and classification result.
        """
        # Convert image to patch embeddings
        x = self.to_patch_embedding(img) # Shape: (batch_size, num_patches, dim)
        b, n, _ = x.shape  # Get batch size, number of patches, and embedding dimension

        # Repeat class token for each image in the batch
        cls_tokens = repeat(self.cls_token, '1 1 d -> b 1 d', b=b)

        # Concatenate class token with patch embeddings
        x = torch.cat((cls_tokens, x), dim=1)

        # Add positional embeddings to the input
        x += self.pos_embedding[:, :(n + 1)]

        # Apply dropout for regularization
        x = self.dropout(x)

        # Pass through transformer encoder
        x = self.transformer(x) # Shape: (batch_size, num_patches + 1, dim)

        # Extract class token and feature map
        cls_token = x[:, 0]  # Extract class token
        feature_map = x[:, 1:]  # Remaining tokens are feature map

        # Apply pooling operation: 'cls' token or mean of patches
        pooled_output = cls_token if self.pool == 'cls' else feature_map.mean(dim=1)

        # Apply the identity transformation (no change to the tensor)
        pooled_output = self.to_latent(pooled_output)

        # Apply the classification head to the pooled output
        classification_result = self.mlp_head(pooled_output)

        # Return a dictionary with the required components
        return {
            'cls_token': cls_token,  # Class token
            'feature_map': feature_map,  # Feature map (patch embeddings)
            'classification_head_logits': classification_result  # Final classification result
        }
在大模型时代,我们如何有效的去学习大模型?
现如今大模型岗位需求越来越大,但是相关岗位人才难求,薪资持续走高,AI运营薪资平均值约18457元,AI工程师薪资平均值约37336元,大模型算法薪资平均值约39607元。

掌握大模型技术你还能拥有更多可能性:
• 成为一名全栈大模型工程师,包括Prompt,LangChain,LoRA等技术开发、运营、产品等方向全栈工程;
• 能够拥有模型二次训练和微调能力,带领大家完成智能对话、文生图等热门应用;
• 薪资上浮10%-20%,覆盖更多高薪岗位,这是一个高需求、高待遇的热门方向和领域;
• 更优质的项目可以为未来创新创业提供基石。
可能大家都想学习AI大模型技术,也_想通过这项技能真正达到升职加薪,就业或是副业的目的,但是不知道该如何开始学习,因为网上的资料太多太杂乱了,如果不能系统的学习就相当于是白学。为了让大家少走弯路,少碰壁,这里我直接把都打包整理好,希望能够真正帮助到大家_。
一、AGI大模型系统学习路线
很多人学习大模型的时候没有方向,东学一点西学一点,像只无头苍蝇乱撞,下面是我整理好的一套完整的学习路线,希望能够帮助到你们学习AI大模型。

第一阶段: 从大模型系统设计入手,讲解大模型的主要方法;
第二阶段: 在通过大模型提示词工程从Prompts角度入手更好发挥模型的作用;
第三阶段: 大模型平台应用开发借助阿里云PAI平台构建电商领域虚拟试衣系统;
第四阶段: 大模型知识库应用开发以LangChain框架为例,构建物流行业咨询智能问答系统;
第五阶段: 大模型微调开发借助以大健康、新零售、新媒体领域构建适合当前领域大模型;
第六阶段: 以SD多模态大模型为主,搭建了文生图小程序案例;
第七阶段: 以大模型平台应用与开发为主,通过星火大模型,文心大模型等成熟大模型构建大模型行业应用。
二、640套AI大模型报告合集
这套包含640份报告的合集,涵盖了AI大模型的理论研究、技术实现、行业应用等多个方面。无论您是科研人员、工程师,还是对AI大模型感兴趣的爱好者,这套报告合集都将为您提供宝贵的信息和启示。

三、AI大模型经典PDF书籍
随着人工智能技术的飞速发展,AI大模型已经成为了当今科技领域的一大热点。这些大型预训练模型,如GPT-3、BERT、XLNet等,以其强大的语言理解和生成能力,正在改变我们对人工智能的认识。 那以下这些PDF籍就是非常不错的学习资源。

四、AI大模型各大场景实战案例

结语
【一一AGI大模型学习 所有资源获取处(无偿领取)一一】
所有资料 ⚡️ ,朋友们如果有需要全套 《LLM大模型入门+进阶学习资源包》,扫码获取~
👉[CSDN大礼包🎁:全网最全《LLM大模型入门+进阶学习资源包》免费分享(安全链接,放心点击)]()👈


 1609
1609

 被折叠的 条评论
为什么被折叠?
被折叠的 条评论
为什么被折叠?
 到【灌水乐园】发言


