


Activity
1.Activity主要与界面显示相关,它像一个装载器,可以装载各种布局和控件
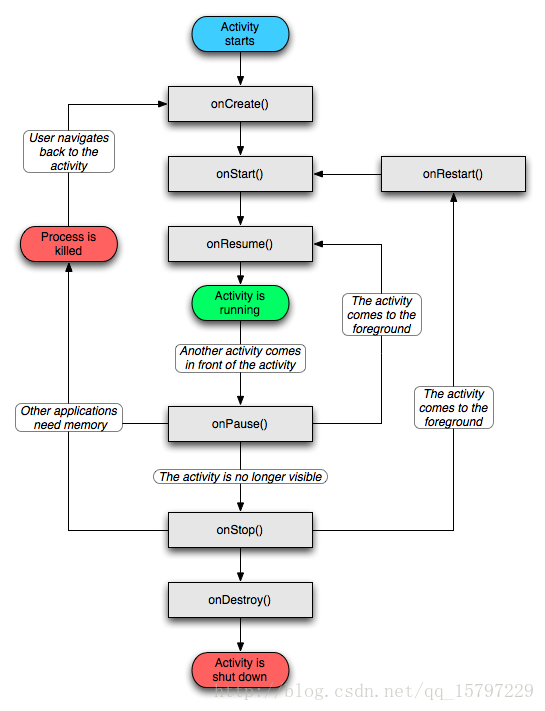
Activity的生命周期
1.Runtime负责管理Activity的生命周期
Activity堆栈
1.Activity启动后会被压入栈中,最上面的Activity都将是活跃状态,是当前正在与用户交互的Activity。当有新来的Activity时,被覆盖的Activity进入暂停状态,栈顶Activity被结束时,下面的Activity将会调用onResume函数恢复与用户的交互状态
2.在栈中,一个Activity从创建到销毁,可能会经历以下4种状态
- 激活(Active,栈顶,用户可见,有焦点,能交互)
- 暂停(Paused,无焦点,不可交互,可能可见)
- 停止(Stopped,完全不可见,依然在栈中,最可能回收)
- 非激活(Inactive,Activity被杀掉或重启以前,Activity已被Destroy,无资源,不在栈中)
3.以下方法通知Activity状态改变 - onCreate(Bundle savedInstanceState) 初始化UI资源
- onStart() 启动Activity
- onRestart() 重启Activity
- onResume() pause状态–>start状态,数据恢复
- onPause() 保存参数,等到onResume()时可以恢复
- onStop() Activity停止,退出工作
- onDestroy() Activity生命终结
4.Activity之间可以通过Bundle,文件,Preference,数据库或静态变量来传递数据
5.onRestoreInstanceState(Bundle savedInstanceState) 用来恢复之前的UI状态,在onCreate完成后调用
6.onSaveInstanceState(Bundle savedInstanceState) 在当前Activity即将被停止并且移除栈顶保留UI状态时调用
多个Activity之间的数据传递
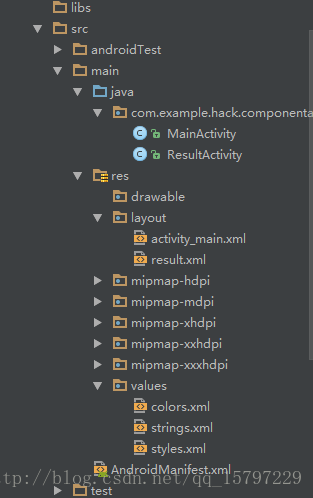
Activity项目截图
//activity_main.xml文件
<?xml version="1.0" encoding="utf-8"?>
<!--多个Activity之间的通信-->
<LinearLayout xmlns:android="http://schemas.android.com/apk/res/android"
    android:layout_width="match_parent"
    android:layout_height="match_parent"
    android:orientation="vertical">
    <EditText
        android:id="@+id/message"
        android:layout_width="fill_parent"
        android:layout_height="wrap_content" />
    <Button
        android:id="@+id/ok"
        android:layout_width="fill_parent"
        android:layout_height="wrap_content"
        android:text="@string/trans"/>
</LinearLayout>
//result.xml文件
<?xml version="1.0" encoding="utf-8"?>
<LinearLayout xmlns:android="http://schemas.android.com/apk/res/android"
android:layout_width="match_parent"
android:layout_height="match_parent"
android:orientation="vertical">
<TextView
android:id="@+id/getdata"
android:layout_width="fill_parent"
android:layout_height="wrap_content" />
</LinearLayout>//strings.xml文件
<resources>
<string name="app_name">ComponentApplication</string>
<string name="trans">确认传递数据</string>
<string name="hello">Hello,ServiceDemo!</string>
</resources>//MainActivity.java
package com.example.hack.componentapplication;
import android.content.Intent;
import android.app.Activity;
import android.os.Bundle;
import android.view.View;
import android.widget.Button;
import android.widget.EditText;
public class MainActivity extends Activity {
private EditText et;
@Override
protected void onCreate(Bundle savedInstanceState) {
super.onCreate(savedInstanceState);
setContentView(R.layout.activity_main);
Button transData = (Button) findViewById(R.id.ok);
et = (EditText) findViewById(R.id.message);
transData.setOnClickListener(new View.OnClickListener() {
@Override
public void onClick(View view) {
String transMessage = et.getText().toString();
System.out.print(transMessage);
//Bundle相当于一个容器
Bundle bundle = new Bundle();
bundle.putString("data", transMessage);
//Intent用于通信
Intent intent = new Intent();
intent.setClass(MainActivity.this, ResultActivity.class);
intent.putExtras(bundle);
startActivity(intent);
}
});
}
}//ResultActivity.java
package com.example.hack.componentapplication;
import android.content.Intent;
import android.app.Activity;
import android.os.Bundle;
import android.widget.TextView;
public class ResultActivity extends Activity {
@Override
protected void onCreate(Bundle savedInstanceState) {
super.onCreate(savedInstanceState);
setContentView(R.layout.result);
TextView tv = (TextView) findViewById(R.id.getdata);
Intent intent = getIntent();
Bundle b = intent.getExtras();
String getData = b.getString("data");
tv.setText(getData);
}
}Service
1.一般不能与用户交互,不能自己启动,由另一个动作触发,服务运行在后台,完成一些操作
2.退出应用程序时,并不能结束服务的运行,仍然运行在后台,执行一些动作
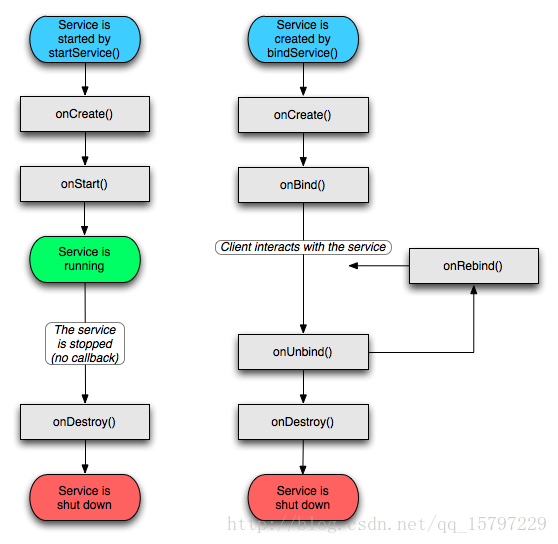
Service的生命周期
1.Service需要被动的结束,始于Context.startService(),停止于Context.stopService()或Service.stopSelfResult(),不管调多少次startService(),只需要调一次stopService()就可以停止Service
2.外部程序与Service建立连接始于Context.bindService(),结束于Context.unbindService(),多个客户端可以绑定到同一个Service,如果Service没有启动,bindService()可以选择启动它
3.Service生命周期的三个函数状态
- onCreate() 创建
- onStart(Intent intent) 开始
- onDestroy() 结束
4.如果一个Android Service生命周期可以从外部绑定,可触发以下方法:
- IBinder onBind(Intent intent)
- boolean onUnbind(Intent intent)
- void onRebind(Intent intent)
5.onCreate()和onDestroy()用于所有通过Context.startService() or Context.bindService()启动的Service;onStart()只用于通过startService()开始的Service
6.调用unbindService()方法会触发onUnbind()方法和onDestroy()方法
7.如果Service已经启动了,再次启动Service时,不会执行onCreate()方法,而直接执行onStart()方法
生命周期图:
Service与Activity通信
1.启动Service时,系统会开启新进程,这样,Service和自己的应用程序就分别在两个进程中
2.想获取启动的Service实例时,可用到bindService()方法和onBindService()方法,它们分别执行Service中的IBinder()和onUnbind()方法
通信:
- 通过Intent启动Service时,可以通过bundle传数据到Service中
- 使用BinderService时,可以通过parcel传数据
- 还可以通过传递Handler到Service中,Service就可以通过Handler来将消息不断地发送到前端
Service与Activity通信实例
<?xml version="1.0" encoding="utf-8"?>
<LinearLayout xmlns:android="http://schemas.android.com/apk/res/android"
    android:layout_width="fill_parent"
    android:layout_height="fill_parent"
    android:orientation="vertical">
    <TextView
        android:id="@+id/text"
        android:layout_width="fill_parent"
        android:layout_height="wrap_content"
        android:text="@string/hello" />
    <Button
        android:id="@+id/startservice"
        android:layout_width="fill_parent"
        android:layout_height="wrap_content"
        android:text="startService" />
    <Button
        android:id="@+id/stopservice"
        android:layout_width="fill_parent"
        android:layout_height="wrap_content"
        android:text="stopService" />
    <Button
        android:id="@+id/bindservice"
        android:layout_width="fill_parent"
        android:layout_height="wrap_content"
        android:text="bindService" />
    <Button
        android:id="@+id/unbindservice"
        android:layout_width="fill_parent"
        android:layout_height="wrap_content"
        android:text="unbindService" />
</LinearLayout>
//strings.xml文件
<resources>
<string name="app_name">MyService</string>
<string name="hello">Hello,ServiceDemo</string>
</resources>//AndroidManifest.xml文件
<?xml version="1.0" encoding="utf-8"?>
<manifest xmlns:android="http://schemas.android.com/apk/res/android"
package="com.example.hack.myservice">
<application
android:allowBackup="true"
android:icon="@mipmap/ic_launcher"
android:label="@string/app_name"
android:roundIcon="@mipmap/ic_launcher_round"
android:supportsRtl="true"
android:theme="@style/AppTheme">
<activity android:name=".ServiceDemo">
<intent-filter>
<action android:name="android.intent.action.MAIN" />
<category android:name="android.intent.category.LAUNCHER" />
</intent-filter>
</activity>
<service
android:name=".StartService"
android:enabled="true"
android:exported="true"></service>
</application>
</manifest>//ServiceDemo.java文件
package com.example.hack.myservice;
import android.app.Activity;
import android.content.ComponentName;
import android.content.Context;
import android.content.Intent;
import android.content.ServiceConnection;
import android.os.Bundle;
import android.os.IBinder;
import android.view.View;
import android.widget.Button;
import android.widget.TextView;
public class ServiceDemo extends Activity implements View.OnClickListener {
private StartService mstartService;
private TextView mTextView;
private Button startServiceButton;
private Button stopServiceButton;
private Button bindServiceButton;
private Button unbindServiceButton;
private Context mContext;
//这里需要用到ServiceConnection,其中Context.bindService和Context.unBindService()里面用到
private ServiceConnection mServiceConnection = new ServiceConnection() {
@Override
public void onServiceConnected(ComponentName componentName, IBinder iBinder) {
mstartService = ((StartService.MyBinder) iBinder).getService();
mTextView.setText("I am frome Service :" + mstartService.getSystemTime());
}
@Override
public void onServiceDisconnected(ComponentName componentName) {
}
};
@Override
public void onCreate(Bundle savedInstanceState) {
super.onCreate(savedInstanceState);
setContentView(R.layout.activity_service_demo);
setupViews();
}
//初始化布局中的各种控件
private void setupViews() {
mContext = ServiceDemo.this;
mTextView = findViewById(R.id.text);
startServiceButton = findViewById(R.id.startservice);
stopServiceButton = findViewById(R.id.stopservice);
bindServiceButton = findViewById(R.id.bindservice);
unbindServiceButton = findViewById(R.id.unbindservice);
startServiceButton.setOnClickListener(this);
stopServiceButton.setOnClickListener(this);
bindServiceButton.setOnClickListener(this);
unbindServiceButton.setOnClickListener(this);
}
@Override
public void onClick(View view) {
if(view == startServiceButton){
Intent i = new Intent();
i.setClass(ServiceDemo.this, StartService.class);
mContext.startService(i);
}else if(view == stopServiceButton){
Intent i = new Intent();
i.setClass(ServiceDemo.this, StartService.class);
mContext.stopService(i);
}else if(view == bindServiceButton){
Intent i = new Intent();
i.setClass(ServiceDemo.this, StartService.class);
mContext.bindService(i, mServiceConnection, BIND_AUTO_CREATE);
}else{
mContext.unbindService(mServiceConnection);
}
}
}
//StartService.java文件
package com.example.hack.myservice;

import android.app.Service;
import android.content.Intent;
import android.os.Binder;
import android.os.IBinder;
import android.text.format.Time;
import android.util.Log;

public class StartService extends Service {
    //定义一个Tag标签
    private static final String TAG = "StartService";
    //这里定义一个Binder类,用在onBind()方法里,这样Activity那边可以获取到
    private MyBinder mBinder = new MyBinder();
    public StartService() {
    }

    @Override
    public IBinder onBind(Intent intent) {
        Log.e(TAG, "start IBinder~~~");
        return mBinder;
    }

    @Override
    public void onCreate(){
        Log.e(TAG, "start onCreate~~~");
        super.onCreate();
    }

    @Override
    public void onStart(Intent intent, int startId) {
        Log.e(TAG, "start onStart~~~");
        super.onStart(intent, startId);
    }

    @Override
    public void onDestroy() {
        Log.e(TAG, "start onDestroy~~~");
        super.onDestroy();
    }

    @Override
    public boolean onUnbind(Intent intent) {
        Log.e(TAG, "start onUnbind~~~");
        return super.onUnbind(intent);
    }

    //这里是一个获取当前时间的函数
    public String getSystemTime(){
        Time now = new Time();
        now.setToNow();
        return now.toString();
    }

    public class MyBinder extends Binder{
        StartService getService(){
            return StartService.this;
        }
    }
}


 151
151

 被折叠的 条评论
为什么被折叠?
被折叠的 条评论
为什么被折叠?
 到【灌水乐园】发言


