


以下面转换图片尺寸的代码resize_images.py为例:
代码功能:原始图片放在img文件夹中,然后运行代码可以转换成指定分辨率,保存在同一目录下的新生成的文件夹中
import os
import sys
import cv2
from datetime import datetime
from tqdm import tqdm

def resize_image(image_path, target_size):
    """Resize the image to the target size."""
    image = cv2.imread(image_path)
    resized_image = cv2.resize(image, (target_size, target_size))
    return resized_image

def process_images_in_directory(directory, target_size):
    """Resize all images in the specified directory to the target size and save them in the output directory."""
    timestamp = datetime.now().strftime("%Y%m%d_%H%M%S")
    output_directory = os.path.join(os.getcwd(), f"resized_{target_size}x{target_size}_{timestamp}")
    if not os.path.exists(output_directory):
        os.makedirs(output_directory)

    image_files = [f for f in os.listdir(directory) if f.lower().endswith(('.png', '.jpg', '.jpeg', '.bmp', '.tiff'))]
    total_images = len(image_files)
    print(f"Processing images from directory: {directory}")
    print(f"Total images to process: {total_images}")

    for idx, filename in enumerate(tqdm(image_files, desc="Resizing images", unit="image")):
        image_path = os.path.join(directory, filename)
        resized_image = resize_image(image_path, target_size)

        # Save the resized image
        resized_image_path = os.path.join(output_directory, filename)
        cv2.imwrite(resized_image_path, resized_image)

    print(f"Resized images are saved in {output_directory}")

if __name__ == "__main__":
    if len(sys.argv) != 2:
        print("Usage: python resize_images.py <target_size>")
        sys.exit(1)

    try:
        target_size = int(sys.argv[1])
    except ValueError:
        print("Target size must be an integer.")
        sys.exit(1)

    # Get the directory of images, which is in the current directory under 'img'
    current_directory = os.getcwd()
    image_directory = os.path.join(current_directory, 'img')

    if not os.path.exists(image_directory):
        print(f"Image directory {image_directory} does not exist.")
        sys.exit(1)

    process_images_in_directory(image_directory, target_size)
要将你的Python项目打包,使其在其他计算机上运行而不需要用户手动配置环境,你可以使用几种方法。其中一种有效的方法是使用 PyInstaller 来创建一个可执行文件。PyInstaller 可以将Python程序及其所有依赖项打包到一个单独的可执行文件中,适用于Windows、Linux和MacOS。
一、安装PyInstaller
pip install pyinstaller
二、Pylnstaller介绍
PyInstaller 是一个强大的工具,它可以将 Python 程序打包成独立的可执行文件。它支持多种参数来控制打包过程。下面是一些常用的 PyInstaller 参数:
基本选项
--name=NAME:指定输出文件的名称。--onefile或-F:将所有文件打包成一个单独的可执行文件。--onedir或-D:将所有文件打包到一个目录(默认方式)。--windowed或-w:不显示控制台窗口(适用于 GUI 应用)。--console或-c:显示控制台窗口(默认方式,适用于命令行应用)。
路径和搜索相关
--paths=DIR:在分析时添加搜索路径,可以指定多个。--additional-hooks-dir=HOOKSPATH:添加外部的钩子(hooks)目录。--runtime-tmpdir=PATH:指定解压缩临时文件的目录。--specpath=DIR:放置生成的 spec 文件的目录。
数据和资源
--add-data=<SRC;DEST or SRC:DEST>:添加数据文件。--add-binary=<SRC;DEST or SRC:DEST>:添加二进制文件。--upx-dir=DIR:指定 UPX 压缩工具的路径,如果安装了 UPX。--upx-exclude=FILE:指定不用 UPX 压缩的文件。
钩子和导入
--hidden-import=MODULENAME:指定隐藏的导入,即代码中没有显式导入的模块。--exclude-module=MODULENAME:排除特定的模块。--collect-submodules=MODULENAME:收集指定模块的所有子模块。
输出和调试
--log-level=LEVEL:设置日志级别(例如 INFO, DEBUG, WARN)。--clean:清理 PyInstaller 缓存和临时文件,然后退出。--noconfirm:覆盖输出目录(如果存在)而不询问。--debug:生成用于调试的可执行文件。
配置和版本信息
--version-file=FILE:包含版本信息的文件,用于资源。--manifest=FILE:包含 Windows manifest 文件,可以控制某些权限和系统兼容性。
其他
--key=KEY:用于加密 Python 字节码的密钥。--icon=ICON_FILE:为可执行文件指定一个图标文件。
使用示例
例如,你可以通过以下命令创建一个没有控制台的窗口应用,包含外部数据和图标:
pyinstaller --onefile --windowed --icon=app.ico --add-data="datafile.txt;." your_script.py
这条命令将生成一个单文件的应用,不显示控制台窗口,包含一个图标和一个数据文件。
这些参数可以帮助你根据特定需求自定义 Python 应用的打包过程。更详细的参数说明可以通过命令 pyinstaller --help 查看或访问 PyInstaller 的官方文档。
三、使用 PyInstaller 打包你的脚本:
你可以运行以下命令来创建一个独立的可执行文件。这个命令将分析你的脚本,找出所有必要的库,并将它们打包。
pyinstaller --onefile resize_images.py
PyInstaller 将在 dist 文件夹中创建可执行文件。你可以在这个文件夹中找到名为 resize_images.exe 的文件。
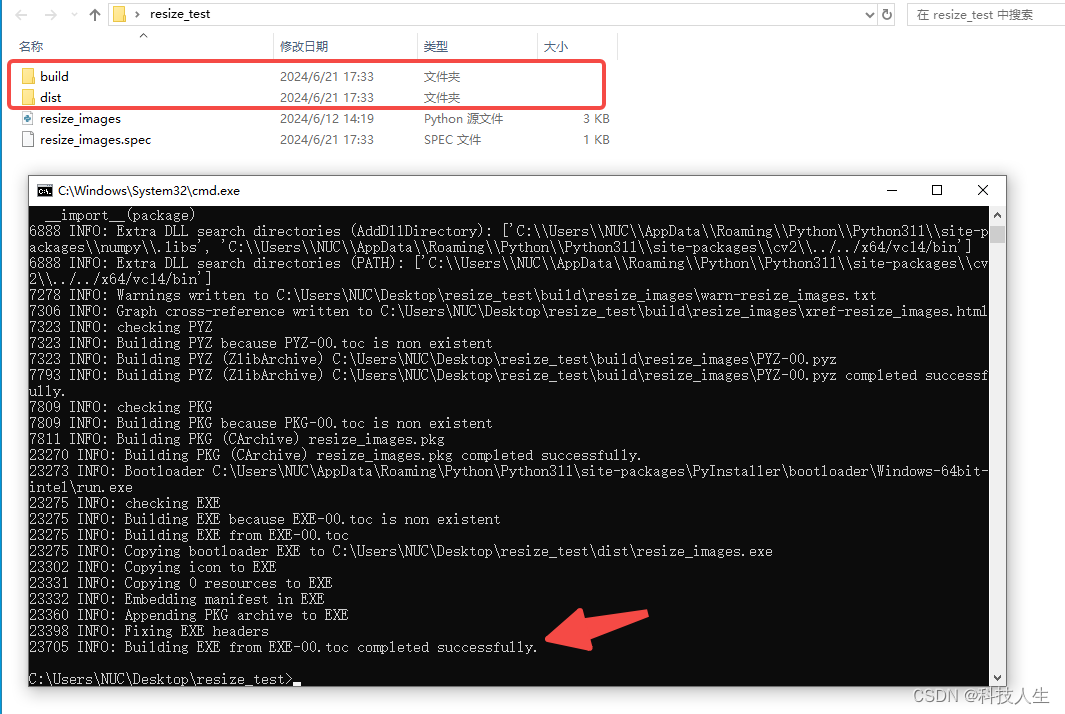
生成可执行文件后,可以放到任何地方运行,不需要额外的环境,上面的build文件夹也不需要
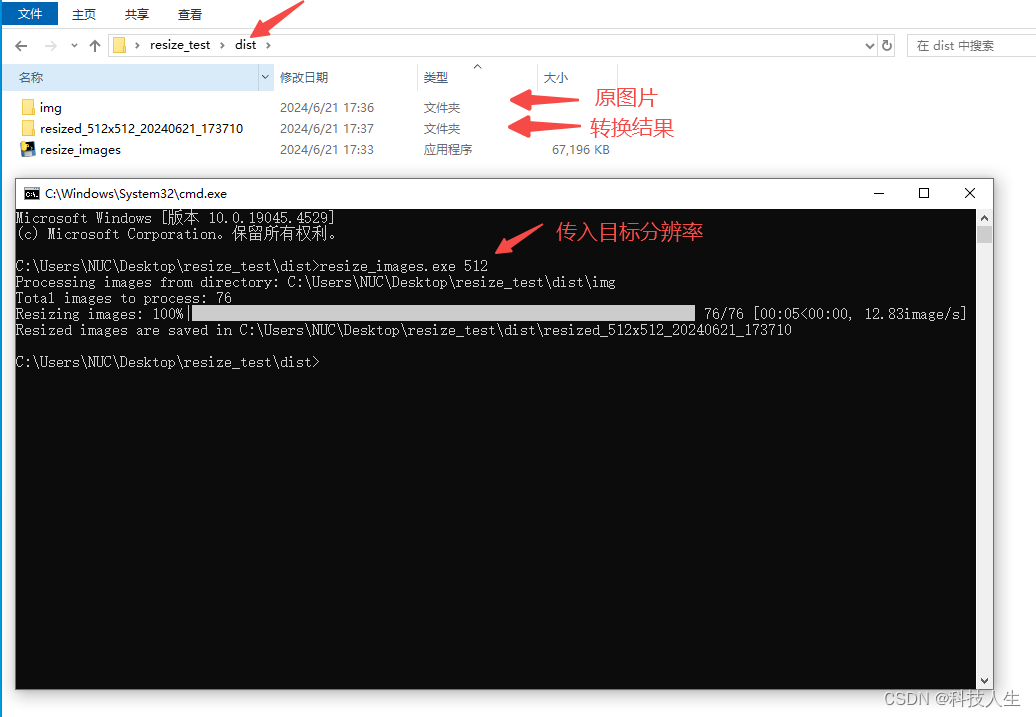
四、测试可执行文件
可执行文件双击就可以运行,不过要传入分辨率的值,所以不能直接双击运行,除非python代码里默认了目标分辨率,不用传入,那就可以直接双击运行。
下面是带参数运行的方式
1. 方式一:在cmd终端中运行
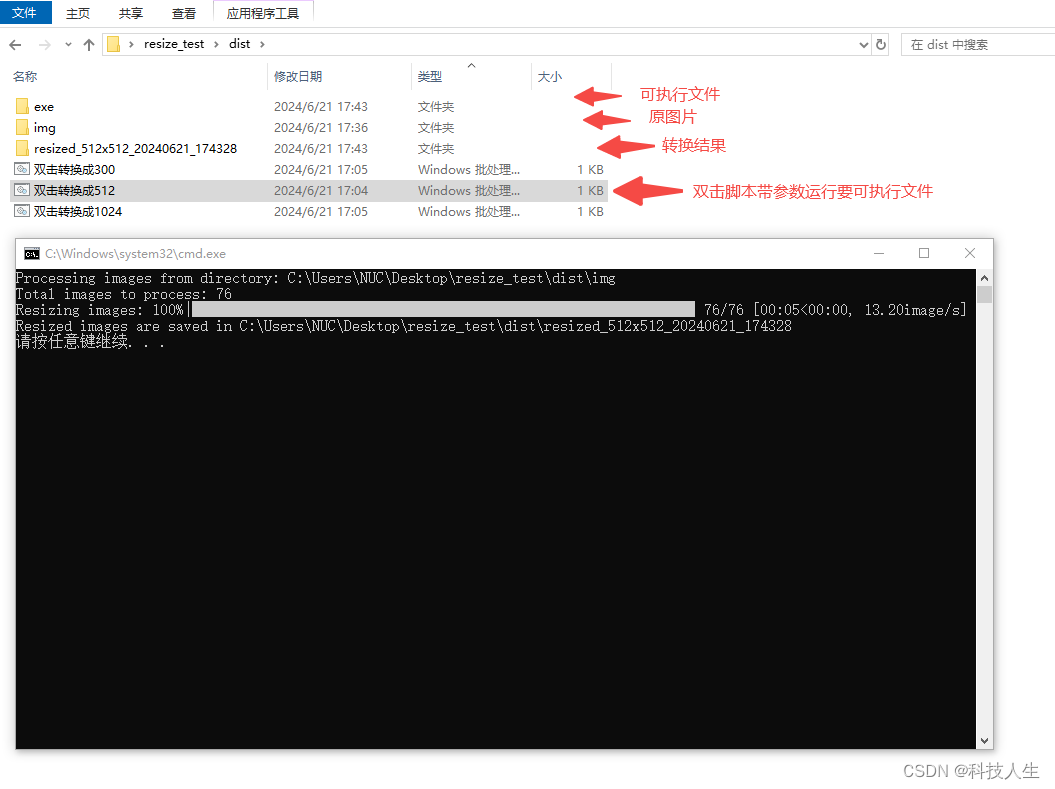
2. 编写脚本运行
为了简洁,新建一个exe文件夹放可执行文件
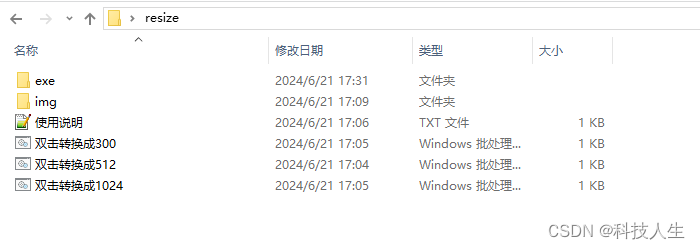
“双击转换成512”脚本内容,其它的同理可得
@echo off
.\exe\resize_images.exe 512
pause


 205
205

 被折叠的 条评论
为什么被折叠?
被折叠的 条评论
为什么被折叠?
 到【灌水乐园】发言


