


完整代码在 FchZero/Digita_Image_Processing_Experiment (github.com)
一、实验目的
1.掌握车牌阈值分割;
2.掌握基于形态学计算的图像分割;
3.掌握图像的二值化;
4.掌握基于像素投影的字符分割;
5.掌握字符识别原理。
二、实验原理
1.图像灰度化
灰度数字图像是每个像素只有一个采样颜色的图像。这类图像通常显示为从最暗黑色到最亮的白色的灰度,尽管理论上这个采样可以任何颜色的不同深浅,甚至可以是不同亮度上的不同颜色。灰度图像与黑白图像不同,在计算机图像领域中黑白图像只有黑白两种颜色,灰度图像在黑色与白色之间还有许多级的颜色深度。
2.图像二值化
图像二值化就是将图像上的像素点的灰度值设置为 0 或 255,也就是将整个图像呈现出明显的黑白效果。
3.图像形态学运算
见前述实验
4.阈值分割原理
阈值分割算法是图形分割中应用场景最多的算法之一。简单地说,对灰度图像进行阈值分割就是先确定一个处于图像灰度取值范围内的阈值,然后将图像中各个像素的灰度值与这个阈值比较,并根据比较的结果将对应的像素划分为两类:像素灰度大于阈值的一类和像素值小于阈值的另一类,灰度值等于阈值的像素可以归入这两类之一。分割后的两类像素一般分属图像的两个不同区域,所以对像素根据阈值分类达到了区域分割的目的。
5.字符分割原理
二值化后的图像,在没有字符的区域,y 方向上像素灰度和为 0,在有字符的区域为灰度和非0。
三、实验内容、核心算法/代码及结果
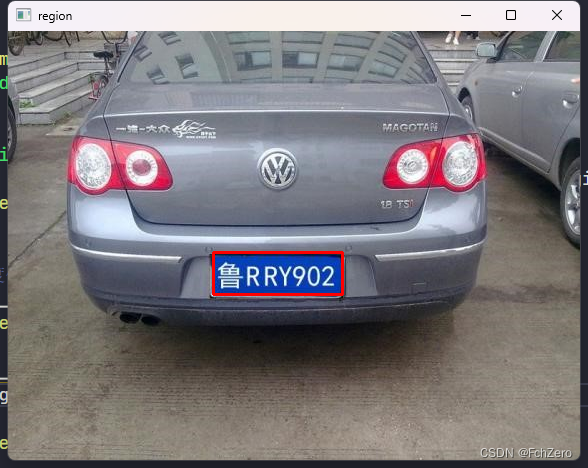
# 车牌定位函数
def location(image):
    R = image[:, :, 2]
    G = image[:, :, 1]
    B = image[:, :, 0]
    region = []
    for i in range(image.shape[0]):
        for j in range(image.shape[1]):
            if B[i, j] > 0:
                if (
                    (R[i, j] / B[i, j]) < 0.35
                    and (G[i, j] / B[i, j]) < 0.9
                    and B[i, j] > 90
                ) or (
                    (R[i, j] / B[i, j]) < 0.9
                    and (G[i, j] / B[i, j]) < 0.35
                    and B[i, j] < 90
                ):
                    region.append([i, j])
    region = np.array(region)
    # print(region)
    np.savetxt("region.txt", region, fmt="%d", delimiter=",")

    # 行索引去重
    row_index = np.unique(region[:, 0])
    # 行索引计数
    row_index_number = np.zeros(row_index.shape, dtype=np.uint8)
    for i in range(region.shape[0]):
        for j in range(row_index.shape[0]):
            if region[i, 0] == row_index[j]:
                row_index_number[j] = row_index_number[j] + 1
    row_index_number = row_index_number > 10  # 将误判的点去除
    row_index = row_index[row_index_number]
    # print(row_index)

    # 列索引去重
    col_index = np.unique(region[:, 1])
    # 列索引计数
    col_index_number = np.zeros(col_index.shape, dtype=np.uint8)
    for i in range(region.shape[0]):
        for j in range(col_index.shape[0]):
            if region[i, 1] == col_index[j]:
                col_index_number[j] = col_index_number[j] + 1
    col_index_number = col_index_number > 10  # 将误判的点去除
    col_index = col_index[col_index_number]
    # print(col_index)

    region = np.array(
        [[np.min(row_index), np.max(row_index)], [np.min(col_index), np.max(col_index)]]
    )
    # print(region)
    cv.rectangle(
        image,
        pt1=(region[1, 0], region[0, 0]),
        pt2=(region[1, 1], region[0, 1]),  # 坐标格式为(x, y),与数组索引相反
        color=(0, 0, 255),
        thickness=2,
    )
    cv.imshow("region", image)
    cv.waitKey(0)
    return region


# 车牌分割函数
def segmentation(image):
    temp_col_index = []  # 存储含有字符的列的索引
    for col in range(image.shape[1]):
        if np.sum(image[:, col]) >= 2 * 255:  # 存在大于等于2个255的列存在字符
            temp_col_index.append(col)
    temp_col_index = np.array(temp_col_index)
    np.savetxt("temp_col_index.txt", temp_col_index, fmt="%d", delimiter=",")

    flag = 0  # 每个字符的起始列
    flag_i = 0  # 第flag_i个字符
    # 二维数组,每行代表每个字符的列索引,每行的列数为30,不足30的补0
    char_region_col = np.uint8(np.zeros([7, 30]))
    for j in range(temp_col_index.shape[0] - 1):
        # 相邻两个列索引的差值大于等于2,说明这两个列索引之间没有字符
        if (
            temp_col_index[j + 1] - temp_col_index[j] >= 2
        ):  # 提取到的含有字符的列之间不是相邻的(可初步解决川的分割问题)
            temp = temp_col_index[flag : j + 1]
            temp = np.append(temp, np.zeros(30 - temp.shape[0]))  # 补成30维的向量
            temp = np.uint8(temp.reshape(1, 30))
            char_region_col[flag_i, :] = temp
            flag = j + 1
            flag_i = flag_i + 1
    temp = temp_col_index[flag:]
    temp = np.append(temp, np.zeros(30 - temp.shape[0]))  # 补成30维的向量
    temp = np.uint8(temp.reshape(1, 30))
    char_region_col[flag_i, :] = temp
    # np.savetxt("char_region_col.txt", char_region_col, fmt="%d", delimiter=",")
    return char_region_col


# 字符提取函数
# 针对单个字符,用于去除其周围的边缘,并resize为25*15的图片:height=25,width=15
def char_extraction(image):
    # 提取满足条件(有2个以上的255的单元格)的列索引
    col_index = []
    for col in range(image.shape[1]):
        if np.sum(image[:, col]) >= 2 * 255:
            col_index.append(col)
    col_index = np.array(col_index)
    # 提取满足条件(有2个以上的255的单元格)的行索引
    row_index = []
    for row in range(image.shape[0]):
        if np.sum(image[row, :]) >= 2 * 255:
            row_index.append(row)
    row_index = np.array(row_index)

    # 按索引提取字符(符合条件的行列中取min~max),并resize到25 * 15大小
    char_image = image[
        np.min(row_index) : np.max(row_index) + 1,
        np.min(col_index) : np.max(col_index) + 1,
    ]
    char_image = np.uint8(char_image)
    # 提取到的含有字符的列之间不是相邻的(可初步解决川的分割问题)
    if col_index.shape[0] <= 3 or row_index.shape[0] <= 3:
        char_image = image[
            np.min(row_index) : np.max(row_index) + 1,
            np.min(col_index) : np.max(col_index) + 1,
        ]
        pad_row1 = np.int8(np.floor((25 - char_image.shape[0]) / 2))
        pad_row2 = np.int8(np.ceil((25 - char_image.shape[0]) / 2))
        pad_col1 = np.int8(np.floor((15 - char_image.shape[1]) / 2))
        pad_col2 = np.int8(np.ceil((15 - char_image.shape[1]) / 2))
        # cv.pad()用于在图像周围添加边框,参数为(图像,((上,下),(左,右)),填充方式,填充值)
        char_image = np.pad(
            char_image,
            ((pad_row1, pad_row2), (pad_col1, pad_col2)),
            "constant",
            constant_values=(0, 0),
        )
        char_image = np.uint8(char_image)
    else:
        char_image = cv.resize(char_image, (15, 25), interpolation=0)
    return char_image


# 模板生成函数
def template_generation(template_path, template_size):
    template_image_out = np.zeros([template_size, 25, 15], dtype=np.uint8)
    index = 0
    files = os.listdir(template_path)
    for file in files:
        template_image = cv.imdecode(
            np.fromfile(template_path + "/" + file, dtype=np.uint8), -1
        )
        template_image_gray = cv.cvtColor(template_image, cv.COLOR_BGR2GRAY)
        template_image_binary = cv.threshold(
            template_image_gray, 0, 255, cv.THRESH_BINARY + cv.THRESH_OTSU
        )[1]
        template_image_binary = (
            255 - template_image_binary
        )  # 模板给出的与车牌上的是相反的,所有用255相减进行匹配
        template_image_out[index, :, :] = char_extraction(template_image_binary)
        index = index + 1
    return template_image_out


# 字符识别函数
def char_recognition():
    car_character = np.uint8(np.zeros([7, 25, 15]))
    car_character[0, :, :] = license_province1.copy()
    car_character[1, :, :] = license_province2.copy()
    car_character[2, :, :] = license_number1.copy()
    car_character[3, :, :] = license_number2.copy()
    car_character[4, :, :] = license_number3.copy()
    car_character[5, :, :] = license_number4.copy()
    car_character[6, :, :] = license_number5.copy()
    match_length = (
        Chinese_char_template.shape[0]
        + Alphabet_char_template.shape[0]
        + Number_char_template.shape[0]
    )
    match_mark = np.zeros([7, match_length])
    Chinese_char_start = 0
    Chinese_char_end = Chinese_char_template.shape[0]
    Alphabet_char_start = Chinese_char_template.shape[0]
    Alphabet_char_end = Chinese_char_template.shape[0] + Alphabet_char_template.shape[0]
    Number_char_start = Chinese_char_template.shape[0] + Alphabet_char_template.shape[0]
    Number_char_end = match_length
    for i in range(match_mark.shape[0]):  # 7个需识别的字符
        # 所有的汉字模板
        for j in range(Chinese_char_start, Chinese_char_end):
            match_mark[i, j] = cv.matchTemplate(
                car_character[i, :, :], Chinese_char_template[j, :, :], cv.TM_CCOEFF
            )
        # 所有的字母模板
        for j in range(Alphabet_char_start, Alphabet_char_end):
            match_mark[i, j] = cv.matchTemplate(
                car_character[i, :, :],
                Alphabet_char_template[j - Alphabet_char_start, :, :],
                cv.TM_CCOEFF,
            )
        # 所有的数字模板
        for j in range(Number_char_start, Number_char_end):
            match_mark[i, j] = cv.matchTemplate(
                car_character[i, :, :],
                Number_char_template[j - Number_char_start, :, :],
                cv.TM_CCOEFF,
            )
    license_index = np.argmax(match_mark, axis=1)
    license = []
    for i in range(license_index.shape[0]):
        if 0 <= license_index[i] <= 28:
            license.append(Chinese_character[license_index[i]])
        if 29 <= license_index[i] <= 54:
            license.append(Alphabet_character[license_index[i] - 29])
        if 55 <= license_index[i] <= 64:
            license.append(Number_character[license_index[i] - 55])
    # 打印识别结果
    # print(license)
    print("车牌号为:", end="")
    for i in range(len(license)):
        print(license[i], end="")


if __name__ == "__main__":
    img = cv.imread('Experiment_content\\Experiment5-6\\5.jpg')
    # 1、车牌定位
    region = location(img)
    license_region = img[region[0, 0] : region[0, 1], region[1, 0] : region[1, 1]]
    cv.imshow("license_region", license_region)
    cv.waitKey(0)

# 2、分割区域灰度化、二值化
license_region_gray = cv.cvtColor(license_region, cv.COLOR_BGR2GRAY)
# cv.imshow('license_region_gray', license_region_gray)
# cv.waitKey(0)
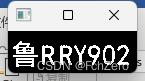
license_region_binary = cv.threshold(
license_region_gray, 0, 255, cv.THRESH_BINARY + cv.THRESH_OTSU
)[1]
cv.imshow("license_region_binary", license_region_binary)
cv.waitKey(0)
# np.savetxt("license_region_binary.txt", license_region_binary, fmt="%d", delimiter=",")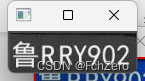
    # 3、车牌分割

    char_region_col = segmentation(license_region_binary)
    # 4、车牌识别

    # 4.1、字符提取

    char_region_row = np.uint8(np.zeros([7, 30]))

    for row in range(char_region_row.shape[0]):

        temp = char_region_col[row, :]

        index = 0

        for i in range(temp.shape[0]):  # 去除列索引中多余的0

            if temp[i] == 0:

                index = i

                break

        col_temp = temp[0:index]

        temp_img = license_region_binary[:, np.min(col_temp) : np.max(col_temp) + 1]

        t = np.nonzero(np.sum(temp_img, axis=1))

        if row == 0:

            license_province1 = temp_img[t, :]  # 汉字后续扩展成40*40

            license_province1 = license_province1[0, :, :]

            license_province1 = char_extraction(license_province1)

            license_province1 = np.uint8(license_province1)

        if row == 1:

            license_province2 = temp_img[t, :]  # 字母和数字后续扩展成40*40

            license_province2 = license_province2[0, :, :]

            license_province2 = char_extraction(license_province2)

            license_province2 = np.uint8(license_province2)

        if row == 2:

            license_number1 = temp_img[t, :]

            license_number1 = license_number1[0, :, :]

            license_number1 = char_extraction(license_number1)

            license_number1 = np.uint8(license_number1)

        if row == 3:

            license_number2 = temp_img[t, :]

            license_number2 = license_number2[0, :, :]

            license_number2 = char_extraction(license_number2)

            license_number2 = np.uint8(license_number2)

        if row == 4:

            license_number3 = temp_img[t, :]

            license_number3 = license_number3[0, :, :]

            license_number3 = char_extraction(license_number3)

            license_number3 = np.uint8(license_number3)

        if row == 5:

            license_number4 = temp_img[t, :]

            license_number4 = license_number4[0, :, :]

            license_number4 = char_extraction(license_number4)

            license_number4 = np.uint8(license_number4)

        if row == 6:

            license_number5 = temp_img[t, :]

            license_number5 = license_number5[0, :, :]

            license_number5 = char_extraction(license_number5)

            license_number5 = np.uint8(license_number5)


    cv.imshow("license_province1", license_province1)

    cv.imshow("license_province2", license_province2)

    cv.imshow("license_number1", license_number1)

    cv.imshow("license_number2", license_number2)

    cv.imshow("license_number3", license_number3)

    cv.imshow("license_number4", license_number4)

    cv.imshow("license_number5", license_number5)


    cv.waitKey(0)

    # cv.hconcat()

    cv.destroyAllWindows()


    # 4.2、生成模板

    # 读取所有的汉字并生成模板

    Chinese_character = open("Experiment_content\\Experiment5-6\\汉字.txt", encoding="gbk").read()

    Chinese_character = Chinese_character.split("\n")

    Chinese_char_template = template_generation(

        "Experiment_content\\Experiment5-6\\汉字", len(Chinese_character)

    )

    # 读取所有的数字并生成模板

    Number_character = open("Experiment_content\\Experiment5-6\\数字.txt", encoding="gbk").read()

    Number_character = Number_character.split("\n")

    Number_char_template = template_generation(

        "Experiment_content\\Experiment5-6\\数字", len(Number_character)

    )

    # 读取所有的字母并生成模板

    Alphabet_character = open("Experiment_content\\Experiment5-6\\英文.txt", encoding="gbk").read()

    Alphabet_character = Alphabet_character.split("\n")

    Alphabet_char_template = template_generation(

        "Experiment_content\\Experiment5-6\\英文", len(Alphabet_character)

    )


    # 4.3、字符识别

    char_recognition()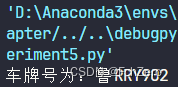
完整代码在 FchZero/Digita_Image_Processing_Experiment (github.com)


 494
494


 被折叠的 条评论
为什么被折叠?
被折叠的 条评论
为什么被折叠?
 到【灌水乐园】发言


