


GitHub链接:https://github.com/ultralytics/yolov3
训练单类链接:https://github.com/ultralytics/yolov3/wiki/Example:-Train-Single-Class
参考链接:https://blog.csdn.net/qq_44787464/article/details/99736670(其实参考这个就足够复现了)
我只是把这个过程中遇到的问题说一下,同时也按自己的方式记录一下,为以后使用的时候不到处搜做个准备。
我的环境是python3.6,CUDA10.0,torch1.2.0,torchvision0.4.0
torchvision0.4.0链接:https://pan.baidu.com/s/1sUi-dteb5Muo0pKQodFVmQ
提取码:l6vv
torch1.2.0链接:https://pan.baidu.com/s/1TIeM-iyijhX4rR-AqqXCsA
提取码:6b8c
如果你的trochvision版本不是0.4.0你有可能遇到以下错误
1.
Traceback (most recent call last):
  File ".\train.py", line 412, in <module>
    train()  # train normally
  File ".\train.py", line 317, in train
    dataloader=testloader)
  File "D:\wcs\yolov3-master\test.py", line 98, in test
    output = non_max_suppression(inf_out, conf_thres=conf_thres, iou_thres=iou_thres)  # nms
  File "D:\wcs\yolov3-master\utils\utils.py", line 560, in non_max_suppression
    i = torchvision.ops.boxes.nms(boxes, scores, iou_thres)
AttributeError: module 'torchvision' has no attribute 'ops'
Traceback (most recent call last):
  File ".\train.py", line 3, in <module>
    import torch.distributed as dist
  File "C:\ProgramData\Anaconda3\lib\site-packages\torch\__init__.py", line 81, in <module>
    from torch._C import *
ImportError: DLL load failed: 找不到指定的模块。
1.数据准备
数据结构就是标准的VOC数据结构
链接:https://pan.baidu.com/s/1cAuV3ASpwTNlWaglmEp-9w
提取码:w3kg

(1)生成train.txt,val.txt,test.txt等(不包含路径)即:

getText.py
import os
import random

trainval_percent = 0.1
train_percent = 0.9
xmlfilepath = './data/cell/Annotations'
txtsavepath = './data/cell/ImageSets'
total_xml = os.listdir(xmlfilepath)

num = len(total_xml)
lists = range(num)
tv = int(num * trainval_percent)
tr = int(tv * train_percent)
trainval = random.sample(lists, tv)
train = random.sample(trainval, tr)

ftrainval = open('./data/cell/ImageSets/trainval.txt', 'w')
ftest = open('./data/cell/ImageSets/test.txt', 'w')
ftrain = open('./data/cell/ImageSets/train.txt', 'w')
fval = open('./data/cell/ImageSets/val.txt', 'w')

for i in lists:
    name = total_xml[i][:-4] + '\n'
    if i in trainval:
        ftrainval.write(name)
        if i in train:
            ftest.write(name)
        else:
            fval.write(name)
    else:
        ftrain.write(name)

ftrainval.close()
ftrain.close()
fval.close()
ftest.close()
(2)生成标签信息以及带路径的train.txt,val.txt等文件
voc_label.py
import xml.etree.ElementTree as ET
import pickle
import os
from os import listdir, getcwd
from os.path import join

sets = ['train', 'test','val']

classes = ["RBC"]#there only one class


def convert(size, box):
    dw = 1. / size[0]
    dh = 1. / size[1]
    x = (box[0] + box[1]) / 2.0
    y = (box[2] + box[3]) / 2.0
    w = box[1] - box[0]
    h = box[3] - box[2]
    x = x * dw
    w = w * dw
    y = y * dh
    h = h * dh
    return (x, y, w, h)


def convert_annotation(image_id):
    in_file = open('./data/cell/Annotations/%s.xml' % (image_id))
    out_file = open('./data/cell/labels/%s.txt' % (image_id), 'w')
    tree = ET.parse(in_file)
    root = tree.getroot()
    size = root.find('size')
    w = int(size.find('width').text)
    h = int(size.find('height').text)

    for obj in root.iter('object'):
        difficult = obj.find('difficult').text
        cls = obj.find('name').text
        if cls not in classes or int(difficult) == 1:
            continue
        cls_id = classes.index(cls)
        xmlbox = obj.find('bndbox')
        b = (float(xmlbox.find('xmin').text), float(xmlbox.find('xmax').text), float(xmlbox.find('ymin').text),
             float(xmlbox.find('ymax').text))
        bb = convert((w, h), b)
        out_file.write(str(cls_id) + " " + " ".join([str(a) for a in bb]) + '\n')


wd = getcwd()
print(wd)
for image_set in sets:
    if not os.path.exists('./data/cell/labels/'):
        os.makedirs('./data/cell/labels/')
    image_ids = open('./data/cell/ImageSets/%s.txt' % (image_set)).read().strip().split()
    list_file = open('./data/cell/%s.txt' % (image_set), 'w')
    for image_id in image_ids:
        list_file.write('./data/cell/images/%s.jpg\n' % (image_id))
        convert_annotation(image_id)
    list_file.close()
产生下面的文件:

(3)配置文件

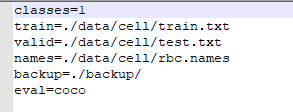
rbc.data(只有一个类别,eval参数那个不用管,我仔细看了源码,没有用到)
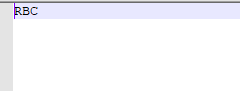
rbc.names(类别的名字)
2.训练
训练之前主要修改配置文件,电脑不行只能训练那个yolov3-tiny.cfg

修改的内容主要是类别相关的地方,一开始的链接里有了,我截下图,原始是80类,下面说了计算最后filters的方法,搜索找到filters=255的地方统一修改成18(一类的计算(4+1+1)*3=18),然后找到所有classes的地方改成1就行了

一个类别修改后的cfg文件
[net]
# Testing
batch=1
subdivisions=1
# Training
# batch=64
# subdivisions=2
width=640
height=480
channels=3
momentum=0.9
decay=0.0005
angle=0
saturation = 1.5
exposure = 1.5
hue=.1

learning_rate=0.001
burn_in=1000
max_batches = 100200
policy=steps
steps=50000,45000
scales=.1,.1

[convolutional]
batch_normalize=1
filters=16
size=3
stride=1
pad=1
activation=leaky

[maxpool]
size=2
stride=2

[convolutional]
batch_normalize=1
filters=32
size=3
stride=1
pad=1
activation=leaky

[maxpool]
size=2
stride=2

[convolutional]
batch_normalize=1
filters=64
size=3
stride=1
pad=1
activation=leaky

[maxpool]
size=2
stride=2

[convolutional]
batch_normalize=1
filters=128
size=3
stride=1
pad=1
activation=leaky

[maxpool]
size=2
stride=2

[convolutional]
batch_normalize=1
filters=256
size=3
stride=1
pad=1
activation=leaky

[maxpool]
size=2
stride=2

[convolutional]
batch_normalize=1
filters=512
size=3
stride=1
pad=1
activation=leaky

[maxpool]
size=2
stride=1

[convolutional]
batch_normalize=1
filters=1024
size=3
stride=1
pad=1
activation=leaky

###########

[convolutional]
batch_normalize=1
filters=256
size=1
stride=1
pad=1
activation=leaky

[convolutional]
batch_normalize=1
filters=512
size=3
stride=1
pad=1
activation=leaky

[convolutional]
size=1
stride=1
pad=1
filters=18
activation=linear


[yolo]
mask = 3,4,5
anchors = 10,14,  23,27,  37,58,  81,82,  135,169,  344,319
classes=1
num=6
jitter=.3
ignore_thresh = .7
truth_thresh = 1
random=1

[route]
layers = -4

[convolutional]
batch_normalize=1
filters=128
size=1
stride=1
pad=1
activation=leaky

[upsample]
stride=2

[route]
layers = -1, 8

[convolutional]
batch_normalize=1
filters=256
size=3
stride=1
pad=1
activation=leaky

[convolutional]
size=1
stride=1
pad=1
filters=18
activation=linear

[yolo]
mask = 1,2,3
anchors = 10,14,  23,27,  37,58,  81,82,  135,169,  344,319
classes=1
num=6
jitter=.3
ignore_thresh = .7
truth_thresh = 1
random=1
训练命令:
python3 .\train.py --data ./data/cell/rbc.data --cfg ./cfg/yolov3-tiny.cfg --weights ./weights/yolov3-tiny.pt --epochs 10
yolov3-tiny.pt文件需要翻墙下载,我把所有的都下了,这里给你们百度链接:https://pan.baidu.com/s/1XGH9OpY-DUKfBqptNyBWjA
提取码:r4jl
3.预测
把需要预测的图像复制到sample文件夹下

python3 .\detect.py --names ./data/cell/rbc.names --cfg ./cfg/yolov3-tiny.cfg --weights ./weights/best.pt
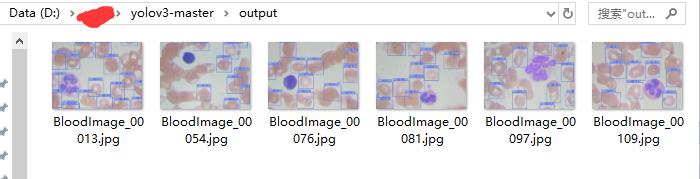
运行后自动产生output结果文件

完整
链接:https://pan.baidu.com/s/1pe79dyifq8f-BSu1DTCN0g
提取码:qhag


 1234
1234


 被折叠的 条评论
为什么被折叠?
被折叠的 条评论
为什么被折叠?
 到【灌水乐园】发言


