cesium 自定义顶点属性

在这里插入图片描述

// 创建平面
    const planeGeometry = new Cesium.PlaneGeometry({
      vertexFormat: Cesium.VertexFormat.POSITION_AND_ST, // 位置和UV
    });

    const geometry = Cesium.PlaneGeometry.createGeometry(planeGeometry);

    // [3]-----[2]
    //  |       |
    // [0]-----[1]
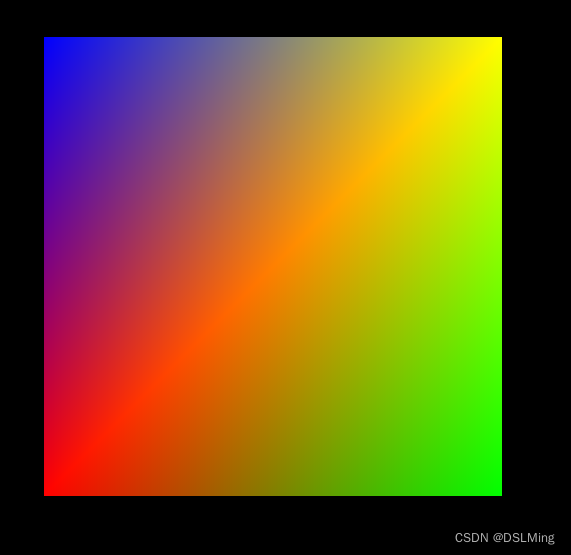
    geometry.attributes.colors = new Cesium.GeometryAttribute({
      componentDatatype: Cesium.ComponentDatatype.FLOAT,
      componentsPerAttribute: 3,
      values: [
        1,0,0,
        0,1,0,
        1,1,0,
        0,0,1,
      ],
    });

    // 创建材质
    const material = new Cesium.Material({
      fabric: {
        uniforms: {
          // color2: new Cesium.Color(.0, 1.0, 0.0, 1.0),
          // image: "../../public/images/marker.png"
        },
        source: `
        czm_material czm_getMaterial(czm_materialInput materialInput){
          czm_material material = czm_getDefaultMaterial(materialInput);

          // vec2 st = materialInput.st;
          // vec4 colorImage = texture(image, st);

          // material.alpha = colorImage.a;
          // material.diffuse = colorImage.rgb;
          return material;
        }`
      },

    });

    const center = Cesium.Cartesian3.fromDegrees(106, 26, 10)
    const translateMatrix = Cesium.Transforms.eastNorthUpToFixedFrame(center);

    const dimensions = new Cesium.Cartesian3(400.0, 400.0, 1.0);
    const scaleMatrix = Cesium.Matrix4.fromScale(dimensions);

    const modelMatrix = new Cesium.Matrix4();
    Cesium.Matrix4.multiply(translateMatrix, scaleMatrix, modelMatrix);

    const plane = new Cesium.Primitive({
      asynchronous: false,
      geometryInstances: new Cesium.GeometryInstance({
        geometry: geometry,
        attributes: {
          color: Cesium.ColorGeometryInstanceAttribute.fromColor(Cesium.Color.BLUE)
        },
        modelMatrix
      }),
      appearance: new Cesium.MaterialAppearance({
        material: material,
        vertexShaderSource: `
          in vec3 position3DHigh;
          in vec3 position3DLow;
          in vec3 normal;
          in vec2 st;
          in float batchId;

          // instance attribute
          in vec4 color;

          // geometry attribute
          in vec4 colors;

          out vec3 v_positionEC;
          out vec3 v_normalEC;
          out vec2 v_st;
          out vec4 v_color;

          void main() {
            vec4 p = czm_computePosition();

            v_positionEC = (czm_modelViewRelativeToEye * p).xyz;
            v_normalEC = czm_normal * normal;
            v_st = st;
            v_color = colors;
            gl_Position = czm_modelViewProjectionRelativeToEye * p;
          }
        `,
        fragmentShaderSource: `
          in vec2 v_st;
          in vec4 v_color;

          void main() {
            out_FragColor = vec4(v_color.rgb, 1.);
          }
        `
      }),
      show: true,
    })
    viewer.scene.primitives.add(plane);
  • 0
    点赞
  • 0
    收藏
    觉得还不错? 一键收藏
  • 0
    评论
Cesium中,可以通过自定义shader来创建自定义材质。具体步骤如下: 1. 创建一个新的着色器程序 首先,需要创建一个新的着色器程序,其中包含自定义顶点着色器和片元着色器。这可以通过Cesium的ShaderProgram类来实现,如下所示: var myShaderProgram = new Cesium.ShaderProgram({ vertexShaderSource: '...', // 自定义顶点着色器代码 fragmentShaderSource: '...' // 自定义的片元着色器代码 }); 2. 创建一个新的材质 接下来,需要使用刚刚创建的着色器程序来创建一个新的材质。这可以通过Cesium的Material类来实现,如下所示: var myMaterial = new Cesium.Material({ fabric: { type: 'Custom', uniforms: { // 自定义uniform变量 }, source: myShaderProgram } }); 在这个例子中,我们在材质的“fabric”属性中指定了自定义类型,并将着色器程序作为源代码传递。 3. 将新材质应用于对象 最后,可以将新材质应用于Cesium场景中的对象。这可以通过设置对象的“material”属性来实现,如下所示: myEntity.material = myMaterial; 在这个例子中,我们将自定义材质应用于名为“myEntity”的实体对象。 需要注意的是,在自定义材质时,需要自己编写完整的顶点和片元着色器代码,并定义所有必要的uniform变量。 Cesium提供了一些内置的uniform变量,如czm_modelViewProjection、czm_sunDirection等,可以在着色器代码中使用。

“相关推荐”对你有帮助么?

  • 非常没帮助
  • 没帮助
  • 一般
  • 有帮助
  • 非常有帮助
提交
评论
添加红包

请填写红包祝福语或标题

红包个数最小为10个

红包金额最低5元

当前余额3.43前往充值 >
需支付:10.00
成就一亿技术人!
领取后你会自动成为博主和红包主的粉丝 规则
hope_wisdom
发出的红包
实付
使用余额支付
点击重新获取
扫码支付
钱包余额 0

抵扣说明:

1.余额是钱包充值的虚拟货币,按照1:1的比例进行支付金额的抵扣。
2.余额无法直接购买下载,可以购买VIP、付费专栏及课程。

余额充值