


上一篇我们介绍到创建设备文件的方法,利用cat /proc/devices查看申请到的设备名,设备号。
第一种是使用mknod手工创建:mknod filename type major minor
第二种是自动创建设备节点:利用udev(mdev)来实现设备文件的自动创建,首先应保证支持udev(mdev),由busybox配置。
具体udev相关知识这里不详细阐述,可以移步Linux 文件系统与设备文件系统 —— udev 设备文件系统,这里主要讲使用方法。
在驱动用加入对udev 的支持主要做的就是:在驱动初始化的代码里调用class_create(...)为该设备创建一个class,再为每个设备调用device_create(...)创建对应的设备。
内核中定义的struct class结构体,顾名思义,一个struct class结构体类型变量对应一个类,内核同时提供了class_create(…)函数,可以用它来创建一个类,这个类存放于sysfs下面,一旦创建好了这个类,再调用 device_create(…)函数来在/dev目录下创建相应的设备节点。
这样,加载模块的时候,用户空间中的udev会自动响应 device_create()函数,去/sysfs下寻找对应的类从而创建设备节点。
下面是两个函数的解析:
1、class_create(...) 函数
功能:创建一个类;
下面是具体定义:
- #define class_create(owner, name) \
- ({ \
- static struct lock_class_key __key; \
- __class_create(owner, name, &__key); \
- })
owner:THIS_MODULE
name : 名字
- struct class *__class_create(struct module *owner, const char *name,
- struct lock_class_key *key)
- {
- struct class *cls;
- int retval;
- cls = kzalloc(sizeof(*cls), GFP_KERNEL);
- if (!cls) {
- retval = -ENOMEM;
- goto error;
- }
- cls->name = name;
- cls->owner = owner;
- cls->class_release = class_create_release;
- retval = __class_register(cls, key);
- if (retval)
- goto error;
- return cls;
- error:
- kfree(cls);
- return ERR_PTR(retval);
- }
- EXPORT_SYMBOL_GPL(__class_create);
销毁函数:void class_destroy(struct class *cls)
- void class_destroy(struct class *cls)
- {
- if ((cls == NULL) || (IS_ERR(cls)))
- return;
- class_unregister(cls);
- }
2、device_create(...) 函数
struct device *device_create(struct class *class, struct device *parent,
dev_t devt, void *drvdata, const char *fmt, ...)
功能:创建一个字符设备文件
参数:
struct class *class :类
struct device *parent:NULL
dev_t devt :设备号
void *drvdata :null、
const char *fmt :名字
返回:
struct device *
下面是源码解析:
- struct device *device_create(struct class *class, struct device *parent,
- dev_t devt, void *drvdata, const char *fmt, ...)
- {
- va_list vargs;
- struct device *dev;
- va_start(vargs, fmt);
- dev = device_create_vargs(class, parent, devt, drvdata, fmt, vargs);
- va_end(vargs);
- return dev;
- }
device_create_vargs(class, parent, devt, drvdata, fmt, vargs)解析如下:
- struct device *device_create_vargs(struct class *class, struct device *parent,
- dev_t devt, void *drvdata, const char *fmt,
- va_list args)
- {
- return device_create_groups_vargs(class, parent, devt, drvdata, NULL,
- fmt, args);
- }
下面是一个实例:
hello.c
- #include <linux/module.h>
- #include <linux/fs.h>
- #include <linux/cdev.h>
- #include <linux/device.h>
- static int major = 250;
- static int minor=0;
- static dev_t devno;
- static struct class *cls;
- static struct device *test_device;
- static int hello_open (struct inode *inode, struct file *filep)
- {
- printk("hello_open \n");
- return 0;
- }
- static struct file_operations hello_ops=
- {
- .open = hello_open,
- };
- static int hello_init(void)
- {
- int ret;
- printk("hello_init \n");
- devno = MKDEV(major,minor);
- ret = register_chrdev(major,"hello",&hello_ops);
- cls = class_create(THIS_MODULE, "myclass");
- if(IS_ERR(cls))
- {
- unregister_chrdev(major,"hello");
- return -EBUSY;
- }
- test_device = device_create(cls,NULL,devno,NULL,"hello");//mknod /dev/hello
- if(IS_ERR(test_device))
- {
- class_destroy(cls);
- unregister_chrdev(major,"hello");
- return -EBUSY;
- }
- return 0;
- }
- static void hello_exit(void)
- {
- device_destroy(cls,devno);
- class_destroy(cls);
- unregister_chrdev(major,"hello");
- printk("hello_exit \n");
- }
- MODULE_LICENSE("GPL");
- module_init(hello_init);
- module_exit(hello_exit);
test.c
- #include <sys/types.h>
- #include <sys/stat.h>
- #include <fcntl.h>
- #include <stdio.h>
- main()
- {
- int fd;
- fd = open("/dev/hello",O_RDWR);
- if(fd<0)
- {
- perror("open fail \n");
- return ;
- }
- close(fd);
- }
makefile
- ifneq ($(KERNELRELEASE),)
- obj-m:=hello.o
- $(info "2nd")
- else
- KDIR := /lib/modules/$(shell uname -r)/build
- PWD:=$(shell pwd)
- all:
- $(info "1st")
- make -C $(KDIR) M=$(PWD) modules
- clean:
- rm -f *.ko *.o *.symvers *.mod.c *.mod.o *.order
- endif
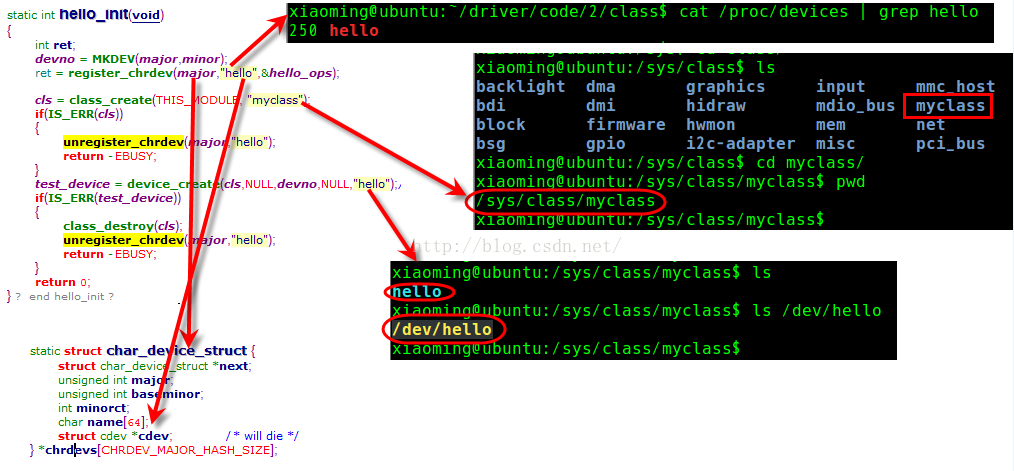
下面可以看几个class几个名字的对应关系:
上一篇我们介绍到创建设备文件的方法,利用cat /proc/devices查看申请到的设备名,设备号。
第一种是使用mknod手工创建:mknod filename type major minor
第二种是自动创建设备节点:利用udev(mdev)来实现设备文件的自动创建,首先应保证支持udev(mdev),由busybox配置。
具体udev相关知识这里不详细阐述,可以移步Linux 文件系统与设备文件系统 —— udev 设备文件系统,这里主要讲使用方法。
在驱动用加入对udev 的支持主要做的就是:在驱动初始化的代码里调用class_create(...)为该设备创建一个class,再为每个设备调用device_create(...)创建对应的设备。
内核中定义的struct class结构体,顾名思义,一个struct class结构体类型变量对应一个类,内核同时提供了class_create(…)函数,可以用它来创建一个类,这个类存放于sysfs下面,一旦创建好了这个类,再调用 device_create(…)函数来在/dev目录下创建相应的设备节点。
这样,加载模块的时候,用户空间中的udev会自动响应 device_create()函数,去/sysfs下寻找对应的类从而创建设备节点。
下面是两个函数的解析:
1、class_create(...) 函数
功能:创建一个类;
下面是具体定义:
- #define class_create(owner, name) \
- ({ \
- static struct lock_class_key __key; \
- __class_create(owner, name, &__key); \
- })
owner:THIS_MODULE
name : 名字
- struct class *__class_create(struct module *owner, const char *name,
- struct lock_class_key *key)
- {
- struct class *cls;
- int retval;
- cls = kzalloc(sizeof(*cls), GFP_KERNEL);
- if (!cls) {
- retval = -ENOMEM;
- goto error;
- }
- cls->name = name;
- cls->owner = owner;
- cls->class_release = class_create_release;
- retval = __class_register(cls, key);
- if (retval)
- goto error;
- return cls;
- error:
- kfree(cls);
- return ERR_PTR(retval);
- }
- EXPORT_SYMBOL_GPL(__class_create);
销毁函数:void class_destroy(struct class *cls)
- void class_destroy(struct class *cls)
- {
- if ((cls == NULL) || (IS_ERR(cls)))
- return;
- class_unregister(cls);
- }
2、device_create(...) 函数
struct device *device_create(struct class *class, struct device *parent,
dev_t devt, void *drvdata, const char *fmt, ...)
功能:创建一个字符设备文件
参数:
struct class *class :类
struct device *parent:NULL
dev_t devt :设备号
void *drvdata :null、
const char *fmt :名字
返回:
struct device *
下面是源码解析:
- struct device *device_create(struct class *class, struct device *parent,
- dev_t devt, void *drvdata, const char *fmt, ...)
- {
- va_list vargs;
- struct device *dev;
- va_start(vargs, fmt);
- dev = device_create_vargs(class, parent, devt, drvdata, fmt, vargs);
- va_end(vargs);
- return dev;
- }
device_create_vargs(class, parent, devt, drvdata, fmt, vargs)解析如下:
- struct device *device_create_vargs(struct class *class, struct device *parent,
- dev_t devt, void *drvdata, const char *fmt,
- va_list args)
- {
- return device_create_groups_vargs(class, parent, devt, drvdata, NULL,
- fmt, args);
- }
下面是一个实例:
hello.c
- #include <linux/module.h>
- #include <linux/fs.h>
- #include <linux/cdev.h>
- #include <linux/device.h>
- static int major = 250;
- static int minor=0;
- static dev_t devno;
- static struct class *cls;
- static struct device *test_device;
- static int hello_open (struct inode *inode, struct file *filep)
- {
- printk("hello_open \n");
- return 0;
- }
- static struct file_operations hello_ops=
- {
- .open = hello_open,
- };
- static int hello_init(void)
- {
- int ret;
- printk("hello_init \n");
- devno = MKDEV(major,minor);
- ret = register_chrdev(major,"hello",&hello_ops);
- cls = class_create(THIS_MODULE, "myclass");
- if(IS_ERR(cls))
- {
- unregister_chrdev(major,"hello");
- return -EBUSY;
- }
- test_device = device_create(cls,NULL,devno,NULL,"hello");//mknod /dev/hello
- if(IS_ERR(test_device))
- {
- class_destroy(cls);
- unregister_chrdev(major,"hello");
- return -EBUSY;
- }
- return 0;
- }
- static void hello_exit(void)
- {
- device_destroy(cls,devno);
- class_destroy(cls);
- unregister_chrdev(major,"hello");
- printk("hello_exit \n");
- }
- MODULE_LICENSE("GPL");
- module_init(hello_init);
- module_exit(hello_exit);
test.c
- #include <sys/types.h>
- #include <sys/stat.h>
- #include <fcntl.h>
- #include <stdio.h>
- main()
- {
- int fd;
- fd = open("/dev/hello",O_RDWR);
- if(fd<0)
- {
- perror("open fail \n");
- return ;
- }
- close(fd);
- }
makefile
- ifneq ($(KERNELRELEASE),)
- obj-m:=hello.o
- $(info "2nd")
- else
- KDIR := /lib/modules/$(shell uname -r)/build
- PWD:=$(shell pwd)
- all:
- $(info "1st")
- make -C $(KDIR) M=$(PWD) modules
- clean:
- rm -f *.ko *.o *.symvers *.mod.c *.mod.o *.order
- endif
下面可以看几个class几个名字的对应关系:


 511
511

 被折叠的 条评论
为什么被折叠?
被折叠的 条评论
为什么被折叠?
 到【灌水乐园】发言


