


一、算法简介
1.1 什么是Grounding DINO?
Grounding DINO 是一种结合文本和图像的多模态目标检测模型,能够直接根据自然语言描述。它基于 Transformer 架构,将文本语义与视觉特征深度融合,实现开放词汇(Open-Vocabulary)的物体检测。
- 核心功能:文字驱动的目标检测器,通过文字描述定位图像中的物体
- 技术亮点:无需预训练类别标签,支持开放式描述
- 举例:输入:"穿红衣服的人";输出:人物在图像中的坐标框
1.2 什么是SAM?
SAM(Segment Anything Model) 是 Meta 提出的通用图像分割模型,能够对图像中的任意物体生成像素级分割掩码。它的核心目标是实现“零样本分割”,即无需特定数据训练即可分割新物体。
- 高效分割:基于 ViT(Vision Transformer)架构,可快速生成高质量掩码。
- 零样本泛化:无需微调即可分割训练数据中未出现过的物体。
- 输入:坐标框
- 输出:物体的像素级掩码
1.3 Grounding DINO+SAM能做什么
输入一张图片,不仅能框出物体位置,还能生成像素级掩码。例如:
- 自动驾驶中精准识别行人、车辆
- 工业质检定位产品缺陷区域
- 摄影后期抠图替换背景
1.4 工作流程
文字描述 → DINO定位目标 → SAM精细分割 → 可视化结果二、环境准备
2.1 环境配置
在终端执行以下命令
# 基础依赖
pip install torch torchvision opencv-python

# 算法库
pip install git+https://github.com/IDEA-Research/GroundingDINO.git
pip install git+https://github.com/facebookresearch/segment-anything.git
如果算法库安装失败可以手动下载安装。
2.2 文件下载
2.2.1 权重文件下载
# DINO模型权重文件地址
https://huggingface.co/ShilongLiu/GroundingDINO/resolve/main/groundingdino_swint_ogc.pth

# SAM模型权重文件地址
https://dl.fbaipublicfiles.com/segment_anything/sam_vit_b_01ec64.pth如果下载不下来可以去文章结尾获取
2.2.2 配置文件
groundingdino_swint_ogc.py无法下载,直接添加
batch_size = 1
modelname = "groundingdino"
backbone = "swin_T_224_1k"
position_embedding = "sine"
pe_temperatureH = 20
pe_temperatureW = 20
return_interm_indices = [1, 2, 3]
backbone_freeze_keywords = None
enc_layers = 6
dec_layers = 6
pre_norm = False
dim_feedforward = 2048
hidden_dim = 256
dropout = 0.0
nheads = 8
num_queries = 900
query_dim = 4
num_patterns = 0
num_feature_levels = 4
enc_n_points = 4
dec_n_points = 4
two_stage_type = "standard"
two_stage_bbox_embed_share = False
two_stage_class_embed_share = False
transformer_activation = "relu"
dec_pred_bbox_embed_share = True
dn_box_noise_scale = 1.0
dn_label_noise_ratio = 0.5
dn_label_coef = 1.0
dn_bbox_coef = 1.0
embed_init_tgt = True
dn_labelbook_size = 2000
max_text_len = 256
text_encoder_type = "bert-base-uncased"
use_text_enhancer = True
use_fusion_layer = True
use_checkpoint = True
use_transformer_ckpt = True
use_text_cross_attention = True
text_dropout = 0.0
fusion_dropout = 0.0
fusion_droppath = 0.1
sub_sentence_present = True
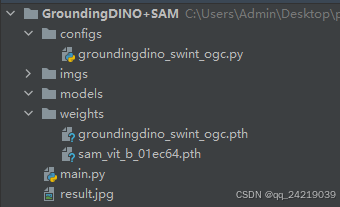
2.3 项目结构检查
三、完整代码示例
main.py
# -*- coding: utf-8 -*-
import time
import cv2
import numpy as np
import torch
from groundingdino.util.inference import Model
from segment_anything import sam_model_registry, SamPredictor

# -------------------- 参数设置 --------------------
CONFIG_PATH = "configs/groundingdino_swint_ogc.py"  # 配置文件路径
DINO_CHECKPOINT = "weights/groundingdino_swint_ogc.pth"  # DINO权重文件
SAM_CHECKPOINT = "weights/sam_vit_b_01ec64.pth"  # SAM权重文件
SAM_MODEL_TYPE = "vit_b"  # 可选: "vit_b"(最快)/ "vit_l" / "vit_h"(最准但最慢)

DEVICE = "cuda" if torch.cuda.is_available() else "cpu"
TORCH_DTYPE = torch.float16 if DEVICE == "cuda" else torch.float32

# -------------------- 模型加载 --------------------
# 初始化Grounding DINO
grounding_dino_model = Model(
    model_config_path=CONFIG_PATH,
    model_checkpoint_path=DINO_CHECKPOINT,
    device=DEVICE
)

# 初始化SAM
sam = sam_model_registry[SAM_MODEL_TYPE](checkpoint=SAM_CHECKPOINT)
sam_predictor = SamPredictor(sam.to(DEVICE))


# -------------------- 核心处理函数 --------------------
def instance_segmentation(image_path, text_prompt):
    # 读取图像
    image = cv2.cvtColor(cv2.imread(image_path), cv2.COLOR_BGR2RGB)

    # Grounding DINO检测
    detections = grounding_dino_model.predict_with_caption(
        image=image,
        caption=text_prompt,
        box_threshold=0.35,
        text_threshold=0.25
    )

    # 提取检测结果
    detection_result = detections[0]

    # 转换检测框格式 (确保使用PyTorch张量)
    boxes = torch.as_tensor(
        detection_result.xyxy,
        dtype=torch.float32,  # 必须指定浮点类型
        device=DEVICE  # 与SAM模型相同的设备
    )

    # SAM生成掩码
    sam_predictor.set_image(image)
    transformed_boxes = sam_predictor.transform.apply_boxes_torch(
        boxes=boxes,
        original_size=image.shape[:2]  # 输入图像原始尺寸 (H, W)
    )

    # 预测掩码 (确保输入张量在正确设备)
    masks, _, _ = sam_predictor.predict_torch(
        point_coords=None,
        point_labels=None,
        boxes=transformed_boxes,
        multimask_output=False
    )

    return masks, boxes


# -------------------- 可视化与保存 --------------------
def visualize_and_save(image_path, masks, boxes, output_path="output.png"):
    image = cv2.cvtColor(cv2.imread(image_path), cv2.COLOR_BGR2RGB)

    # 绘制检测框
    for box in boxes:
        x1, y1, x2, y2 = map(int, box)
        cv2.rectangle(image, (x1, y1), (x2, y2), (0, 255, 0), 2)

    # 叠加分割掩码
    for mask in masks:
        mask = mask.cpu().numpy().squeeze()
        color_mask = np.random.randint(0, 256, (3,))
        image[mask > 0] = image[mask > 0] * 0.5 + color_mask * 0.5

    cv2.imwrite(output_path, cv2.cvtColor(image, cv2.COLOR_RGB2BGR))


# -------------------- 使用示例 --------------------
if __name__ == "__main__":
    # 示例输入
    while 1:
        img_path = "./imgs/%s.jpg" % input("请输入图号:")
        time1 = time.time()
        text_prompt = "car. wheel"  # 支持多个目标用英文句号分隔

        # 执行实例分割
        masks, boxes = instance_segmentation(img_path, text_prompt)
        print(time.time() - time1)
        # 可视化保存结果
        visualize_and_save(img_path, masks, boxes, "result.jpg")
        print("分割结果已保存至 result.jpg")
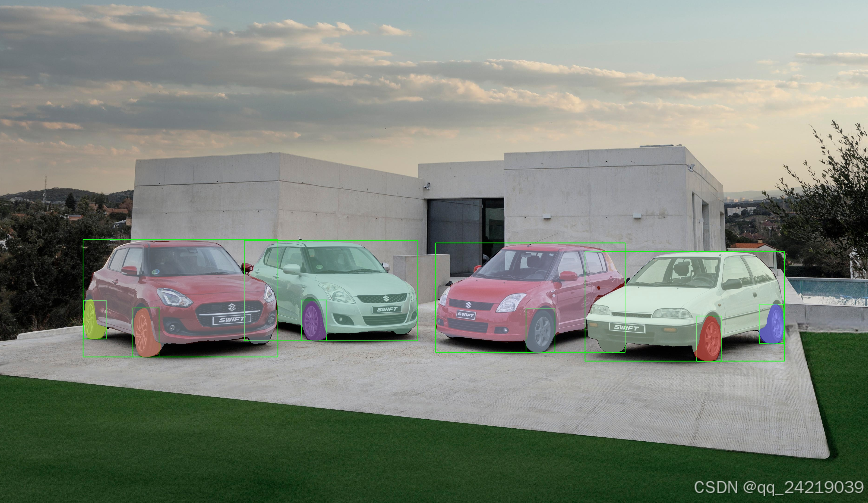
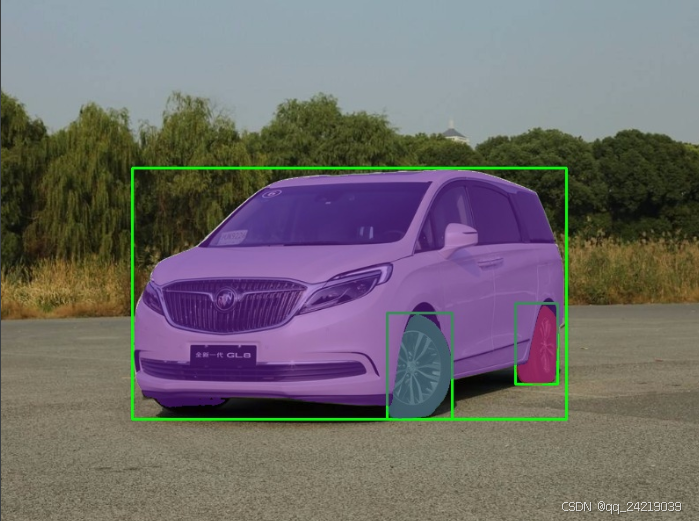
四、运行示例
将".jpg"格式的图片准备好放入imgs文件夹中,运行后终端提示“请输入图号:”,此时输入文件名按下回车,每次循环运行完可查看result.jpg文件。
可修改text_prompt参数来实现识别自己想要的内容。此处识别car和wheel。
以上代码仅为示例参考,可自行优化、增加功能。
五、直接拿代码及相关文件
包含代码、示例图片、权重文件
链接:https://pan.baidu.com/s/1TdxSzr4HuB2AFPIaHqFU5g?pwd=6s9e
提取码:6s9e


 2850
2850

 被折叠的 条评论
为什么被折叠?
被折叠的 条评论
为什么被折叠?
 到【灌水乐园】发言


