


1.问题描述
网络以各种可能格式(例如“1958年8月29日”,“03/30/1968”,“1987年6月24日”)写成的日期作为输入,并将它们转换成标准化的机器可读的日期(例如“1958 -08-29“,”1968-03-30“,”1987-06-24“),让网络学习以通用机器可读格式YYYY-MM-DD输出日期
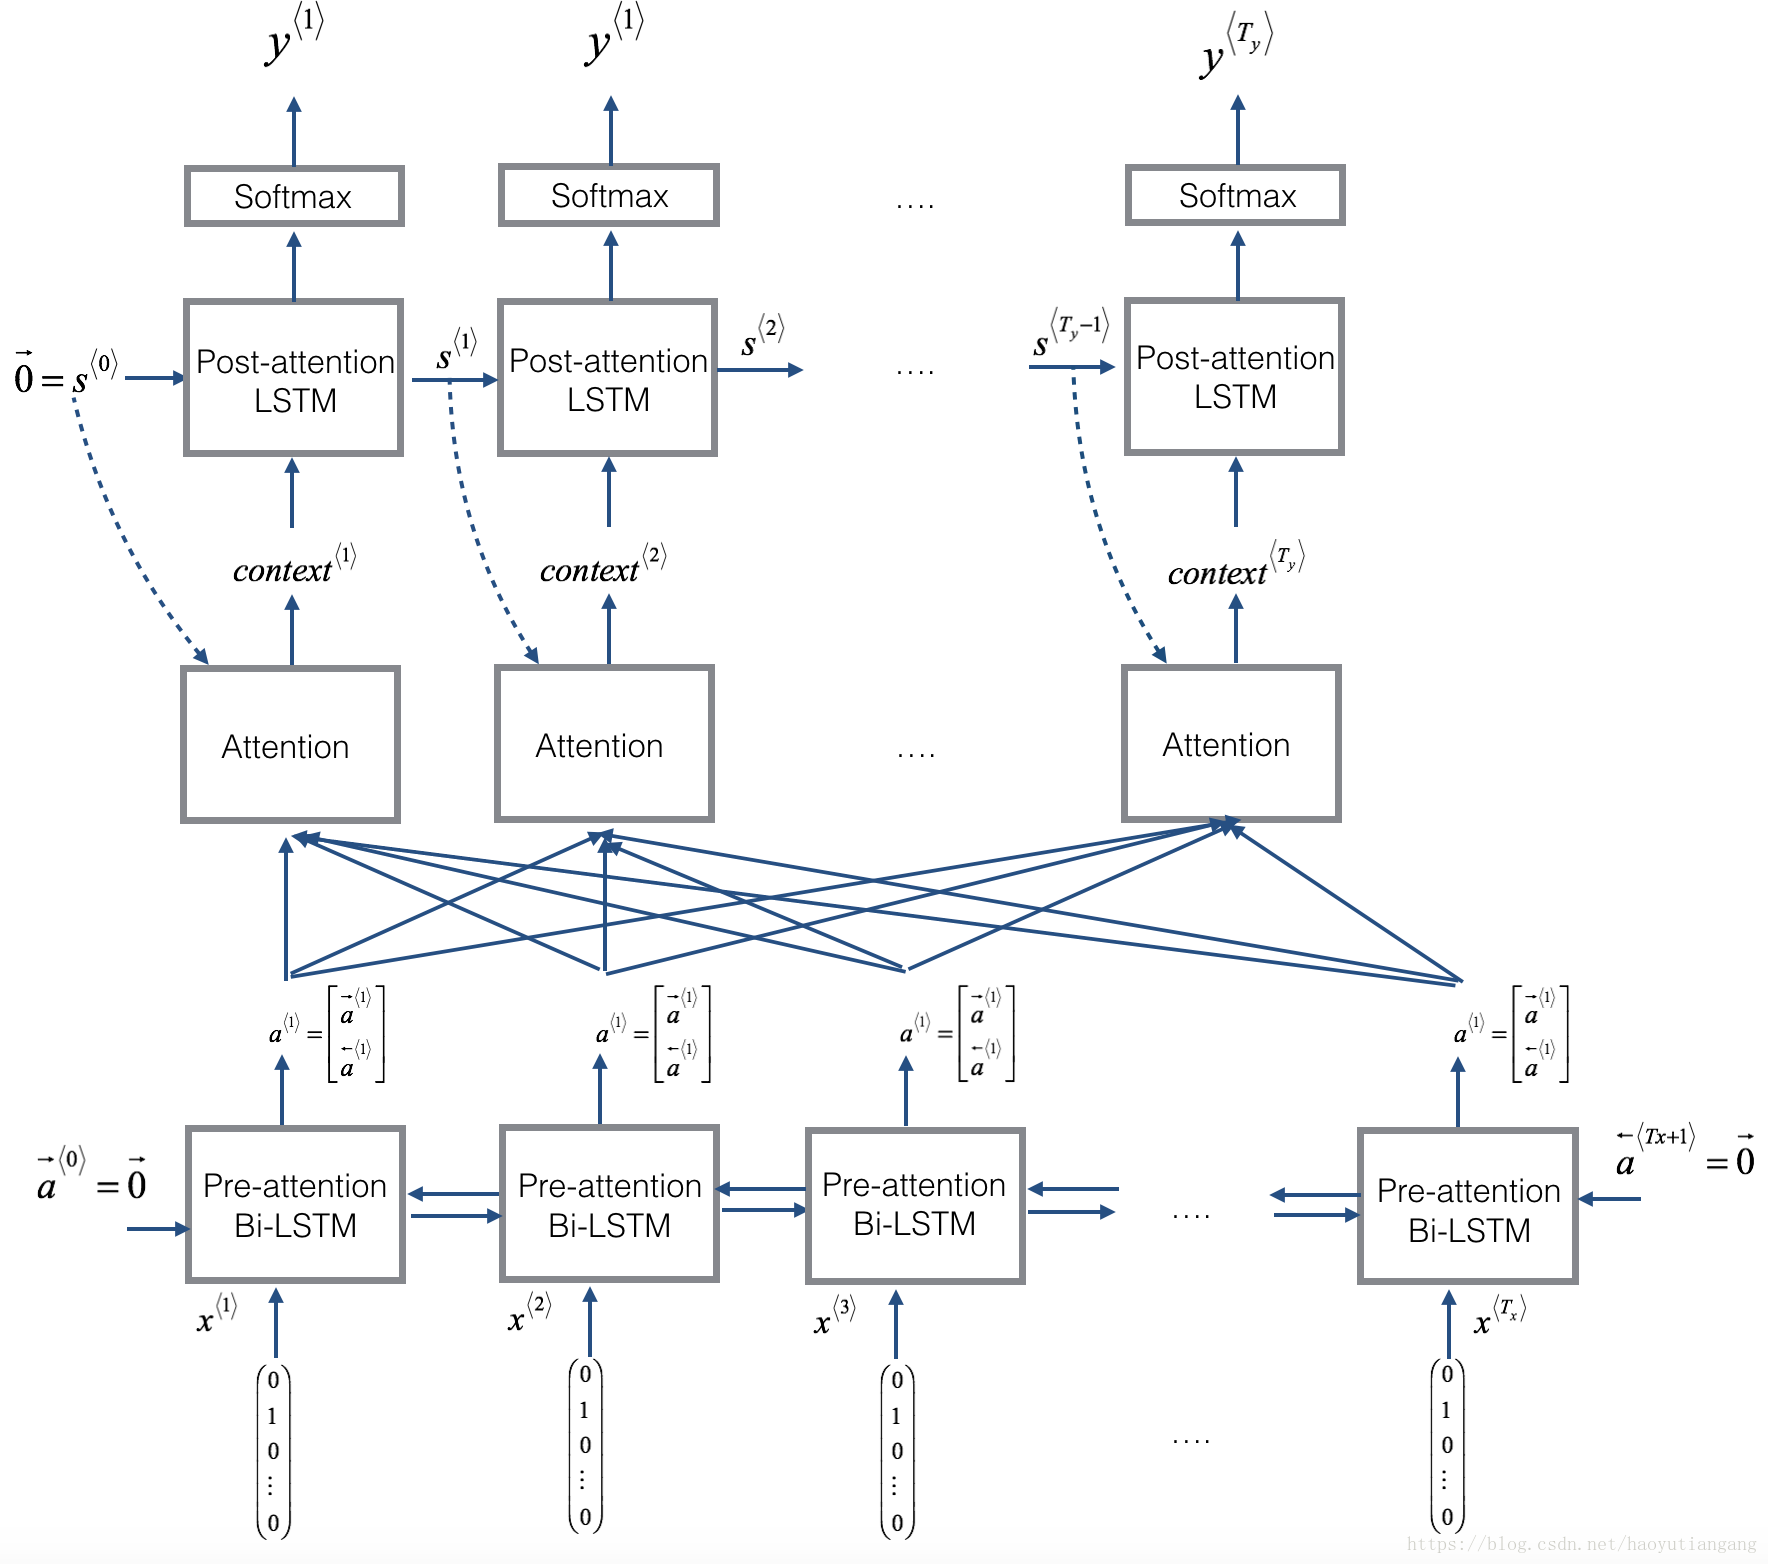
2.模型介绍
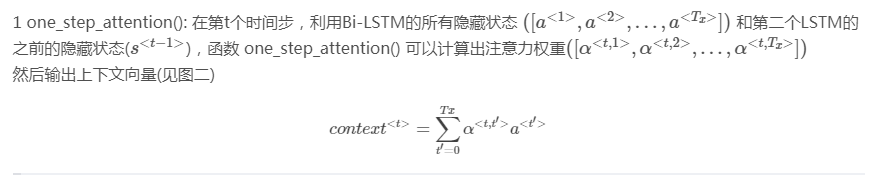
上图是注意力机制的模型,下图是每步注意力变量α<t,t′>的计算,该变量将用于计算每步输出的context<t>, 其中 (t = 1, … , Ty)
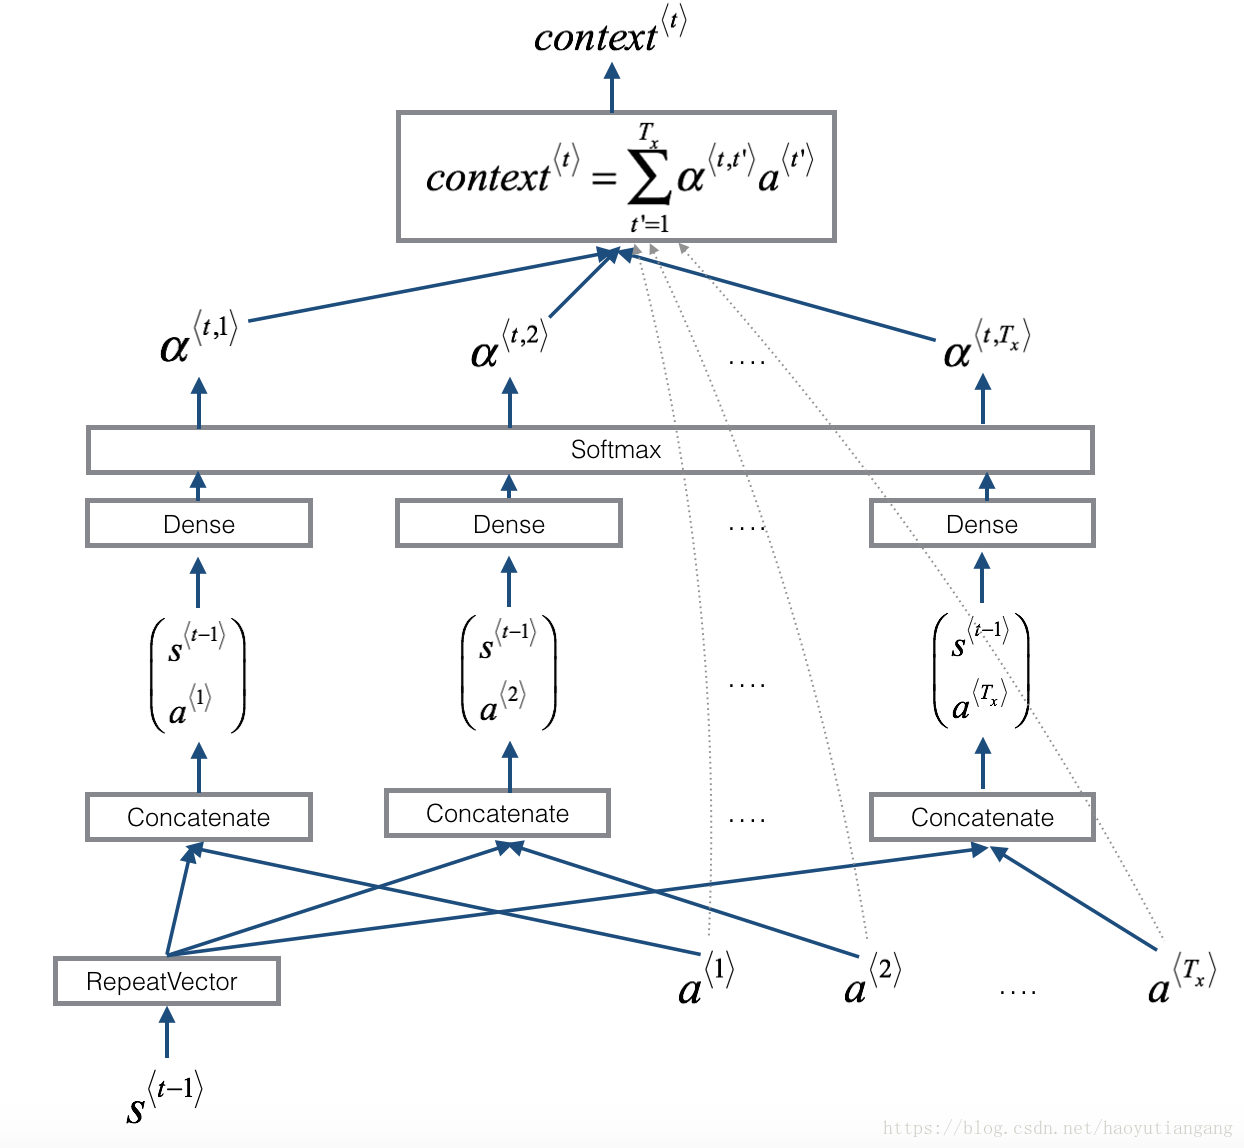

1.实现求解context
2.实现model,迭代Ty次ont_step_attention(),在每次迭代中根据计算出来的c,计算下一个LSTM,和预测值y

3.代码实现
#!/usr/bin/env python
# _*_ coding:utf-8 _*_
from keras.layers import Bidirectional, Concatenate, Permute, Dot, Input, LSTM, Multiply
from keras.layers import RepeatVector, Dense, Activation, Lambda
from keras.optimizers import Adam
from keras.utils import to_categorical
from keras.models import load_model, Model
import keras.backend as K
import numpy as np

from faker import Faker
import random
from tqdm import tqdm
from babel.dates import format_date
from nmt_utils import *
import matplotlib.pyplot as plt

# 1. 加载查看数据集
m=10000
'''
dataset:一个二元组列表(人类可读日期,机器可读日期)
human_vocab: 人类可读日期中使用到的所有字符到字典索引值的映射
machine_vocab: 机器可读日期中使用到的所有字符到字典索引值的映射(与human_vocab的索引没必要完全一致)
inv_machine_vocab: machine_vocab 的翻转映射,从索引映射到字符
'''
dataset,human_vocab,machine_vocab,inv_machine_vocab=load_dataset(m)
# 查看数据集--dataset:一个二元组列表(人类可读日期,机器可读日期)
# print(dataset[:10])

# 2.预处理数据---将原始文本数据映射到索引
Tx=30
# 因为“YYYY-MM-DD”是10个字符
Ty=10
X,Y,Xoh,Yoh=preprocess_data(dataset,human_vocab,machine_vocab,Tx,Ty)

# 查看数据维度
# print("X.shape:", X.shape) (10000, 30)
# print("Y.shape:", Y.shape)(10000, 10)
# print("Xoh.shape:", Xoh.shape) (10000, 30, 37)
# print("Yoh.shape:", Yoh.shape)(10000, 10, 11)
# 查看预处理之后的数据--将字母数字转为索引
# index = 0
# print("Source date:", dataset[index][0])
# print("Target date:", dataset[index][1])
# print()
# print("Source after preprocessing (indices):", X[index])
# print("Target after preprocessing (indices):", Y[index])
# print()
# print("Source after preprocessing (one-hot):", Xoh[index])
# print("Target after preprocessing (one-hot):", Yoh[index])

# 3.实现one_step_attention计算α
# 3.1model() 将会在for循环中执行Ty次one_step_attention(),
# 重要的是Ty的每个副本都具有相同的权重,
# 换言之,Ty的所有时间步共享权重。、

# 3.1利用共享权重实现层
# 3.1.1定义层对象(全局变量)
repeator=RepeatVector(Tx)
concatenator=Concatenate(axis=-1)
densor1=Dense(10,activation='tanh')
densor2=Dense(1,activation='relu')
activator=Activation(softmax,name="attention_weights")
dotor=Dot(axes=1)
# 3.1.2前向传播调用这个对象
# 用这些层实现 one_step_attention()
def one_step_attention(a,s_prev):
    '''
    执行一次注意力
    :param a:hidden state output of the Bi-LSTM, numpy-array of shape (m, Tx, 2*n_a)
    :param s_prev:previous hidden state of the (post-attention) LSTM, numpy-array of shape
    :return:context -- context vector, input of the next (post-attetion) LSTM cell
    '''
    # 使用repeator层重复s_prev变成维度为(m, Tx, n_s),方便和a的结合
    s_prev=repeator(s_prev)
    # 使用concatenator连接s_prev和a,on the last axis
    concat=concatenator([a,s_prev])
    # 使用densor1全连接网络前向计算,计算出e<t,t'>
    e=densor1(concat)
    # 使用densor2全连接网络前向传播,计算energies
    energies=densor2(e)
    # 使用softmax层计算α
    alphas=activator(energies)
    # 将alphas和a点乘,计算c
    context=dotor([alphas,a])

    return context


# 4.实现model--实现完整的模型,首先执行双向LSTM得到a
# 然后执行Ty次one_step_attention计算c,
# 在每次迭代中根据计算出来的c,计算下一个LSTM,和预测值y
n_a=32
n_s=64

post_actication_LSTM_cell=LSTM(n_s,return_state=True)
output_layer=Dense(len(machine_vocab),activation=softmax)

# 根据上一个LSTM单元的s<t-1>,c<t-1>,以及在one_step_attention计算的c<t>,
# 计算下一个LSTM单元的s<t>,c<t>,并且根据s<t>将其传入softmax,得到预测值y
def model(Tx,Ty,n_a,n_s,human_vocab_size,machine_vocab_size):
    '''

    :param Tx: 输入序列长度
    :param Ty: 输出序列长度
    :param n_a: hidden state size of the Bi-LSTM
    :param n_s: hidden state size of the post-attention LSTM
    :param human_vocab_size:human_vocab大小为37
    :param machine_vocab_size:machine_vocab为11(-,0-9)
    :return: model -- Keras model instance
    '''
    # 定义模型的输入shape(Tx,)
    # 定义s0,c0initial hidden state for the decoder LSTM of shape (n_s,)
    X=Input(shape=(Tx,human_vocab_size))
    s0=Input(shape=(n_s,),name='s0')
    c0=Input(shape=(n_s,),name='c0')
    s=s0
    c=c0

    # 初始化输出列表
    outputs=[]

    # 第一步:定义双向LSTM,Remember to use return_sequences=True.
    a=Bidirectional(LSTM(n_a,return_sequences=True))(X)

    # 第二步:迭代Ty步
    for t in range(Ty):
        # 2.1根据a和s计算c
        context=one_step_attention(a,s)

        # 2.2根据上一个LSTM单元的s<t-1>,c<t-1>,以及在one_step_attention计算的c<t>,
        # 计算下一个LSTM单元的s<t>,c<t>,
        s,_,c=post_actication_LSTM_cell(context,initial_state=[s,c])

        # 2.3将s输入softmax,预测
        out=output_layer(s)

        # 2.4将output保存到列表
        outputs.append(out)

    # 第三步:创建一个模型实例,有3个输入,返回输出列表
    model=Model(inputs=[X,s0,c0],outputs=outputs)

    return model

# 5.创建模型
model=model(Tx,Ty,n_a,n_s,len(human_vocab),len(machine_vocab))
# 查看总结概况是否与期待输出一致
# model.summary()
# 6.编译模型
opt=Adam(lr=0.0005,beta_1=0.9,beta_2=0.999,decay=0.01)
model.compile(loss='categorical_crossentropy',optimizer=opt,metrics=['accuracy'])

# 6.定义模型的输入与输出
# 输入:包含所有训练样本的(m=10000,Tx=30)的X、s0,c0
# 输出:为11个(m, Ty)元素的列表。所以:outputs[i][0], …, outputs[i][Ty] 表示第i的样本(X[i])的标签字符
s0=np.zeros((m,n_s))
c0=np.zeros((m,n_s))
outputs=list(Yoh.swapaxes(0,1))

# 7.训练模型
model.fit([Xoh,s0,c0],outputs,epochs=1,batch_size=100)

# 8.导入已经训练好的模型
# model.load_weights('models/model.h5')

# 9.测试--因为使用自己训练的模型,效果不好
# EXAMPLES=['3 May 1979', '5 April 09', '21th of August 2016', 'Tue 10 Jul 2007', 'Saturday May 9 2018', 'March 3 2001', 'March 3rd 2001', '1 March 2001']
# for example in EXAMPLES:
#     source=string_to_int(example,Tx,human_vocab)
#     source=np.array(list(map(lambda x:to_categorical(x,num_classes=len(human_vocab)),source))).swapaxes(0,1)
#     source=source.reshape((1,source.shape[1],source.shape[0]))  # (1,30,37)
#     prediction=np.squeeze(np.array(model.predict([source,s0,c0])))
#     prediction=np.squeeze(np.argmax(prediction,axis=1))
#     output=[inv_machine_vocab[int(i)] for i in prediction]
#
#     print("source:",example)
#     print("output:",''.join(output))

# 10.注意力可视化
attention_map = plot_attention_map(model, human_vocab, inv_machine_vocab, "Tuesday 09 Oct 1993", num = 7, n_s = 64)
参考文献:https://blog.csdn.net/haoyutiangang/article/details/81231629


 682
682


 被折叠的 条评论
为什么被折叠?
被折叠的 条评论
为什么被折叠?
 到【灌水乐园】发言


