


之前给笔记本电脑配置windows+ubuntu双系统感觉很简单,这次给新换的暗影精灵10 slim14配环境遇到了很多坑,特此记录一下。
1.Ubuntu安装
1.1 安装过程
安装过程可以参考我之前的文章。
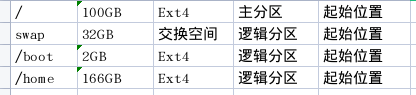
这款笔记本的硬盘是1TB,我给ubuntu20.04留了300GB,我的分区方案如下:
1.2 安装好之后没有启动项
之前也遇到过启动项的问题,使用boot-repair或者在bios上修改启动顺序两种方法基本能修好,这次完全不管用,最终采用如下方法最终成功:
step1: 在 Windows 搜索栏输入 cmd,右键选择「以管理员身份运行」。
step 2: 执行命令 bcdedit /set {bootmgr} path \EFI\ubuntu\grubx64.efi,若无效,尝试替换为shimx64.efi(支持Secure Boot),重启即可。
2.安装英伟达显卡驱动
step 1: 首先将系统自带的gdm3变为兼容性更好的lightdm
#更新软件源列表
sudo apt-get update

#更新软件包
sudo apt-get upgrade

#安装lightdm
sudo apt install lightdm

#设为默认管理器,选择lightdm后回车
sudo dpkg-reconfigure lightdm

#重启生效
sudo reboot
step 2:禁用系统自带的nouveau驱动
a.查看系统是否启用了nouveau显卡驱动
运行如下指令:
lsmod | grep nouveau
如果有内容输出,则说明nouveau已被启用,需要执行后续从b.开始的步骤以将nouveau禁用;
如果没有内容输出,则可以直接安装nvidia驱动。
b.修改blacklist.conf配置
cd ../../etc/modprobe.d

sudo gedit blacklist.conf
在文件最后插入以下两行内容:
blacklist nouveau
options nouveau modeset=0
保存并关闭该文件
通过以下命令更新系统,并使刚刚修改的文件生效:
sudo update-initramfs -u
重启系统
reboot
c.再次验证nouveau是否已经禁用
再次输入如下命令,如果没有输出,则证明nouveau显卡驱动已经被禁用,此时可以安装nvidia显卡驱动。
lsmod | grep nouveau
step 3:下载Nvidia驱动并安装
很多教程推荐用sudo ubuntu-drivers autoinstall或者sudo apt install nvidia-driver-470,但是我用这些方法安装完之后屏幕会卡死,重启后直接黑屏并且无法进入tty界面,因此我选择用.run文件进行安装。
暗影精灵10 slim14 我购买的版本是GeForce RTX 4060 Laptop显卡,下载好的驱动名字为NVIDIA-Linux-x86_64-570.144.run
接下来通过如下命令获取该.run文件的执行权限:
chmod +x NVIDIA-Linux-x86_64-570.144.run
显卡驱动的编译需要c++环境,安装一下GCC和CMAKE:
sudo apt-get update

sudo apt-get install gcc

sudo apt install cmake
关闭图形界面sudo systemctl stop lightdm, 然后按 Ctrl+Alt+F2 切换到 TTY 终端(如 F2-F6)
输入用户名和密码后,找到自己下载的.run文件的位置,输入如下指令安装:
sudo ./NVIDIA-Linux-x86_64-570.144.run -no-x-check -no-nouveau-check -no-opengl-files
安装过程中的一些选项:
1)Would you like to register the kernel module souces with DKMS? This will allow DKMS to automatically build a new module, if you install a different kernel later? 选择 No 继续。
2)问题没记住,选项是:install without signing 问题大概是:Nvidia’s 32-bit compatibility libraries? 选择 No 继续。
3)Would you like to run the nvidia-xconfigutility to automatically update your x configuration so that the NVIDIA x driver will be used when you restart x? Any pre-existing x confile will be backed up. 选择Yes 继续
安装完成后先输入nvidia-smi测试驱动是否安装好,并且恢复图形界面显示sudo systemctl start lightdm,然后重启sudo reboot
step 4(重点):
重启电脑后有很大概率黑屏,我试了很多方法,最终参考这篇文章成功解决。
1)强制关机重启电脑后进入恢复模式或者按住 Ctrl + Alt + F2 进入控制台(tty)
2)查看电脑所有的显卡,检查一下是否带有 intel 核显lspci | grep VGA
00:02.0 VGA compatible controller: Intel Corporation UHD Graphics 630 (Mobile)
01:00.0 VGA compatible controller: NVIDIA Corporation TU117M [GeForce GTX 1650 Mobile / Max-Q] (rev a1)
其中每行输出内容的开始是一串编号,这是这个设备的 BusID,需要记住,后面会用到。再次nvidia-smi检查一下 NVIDIA 显卡驱动是否安装成功,本篇教程只针对 NVIDIA 驱动安装成功但无法用于图形化界面显示的情况。
3)修改桌面系统 Xserver的配置文件 /etc/X11/xorg.conf
sudo nano /etc/X11/xorg.conf
在文本末尾添加 intel 核显驱动的配置信息
Section "Device"
    Identifier     "Device0"
    Driver         "intel"
    VendorName     "Intel Corporation"
    BusID          "PCI:0:2:0"
EndSection
其中,Section 用于指定一个设备配置段的开始,字段名为 Device 代表一个图形设备。
Identifier 为设备的标识符,可以任意取,别和已有的重名就行。
Driver 用于告诉 Xserver 从哪里加载设备的驱动程序,VendorName 指示设备的制造厂商。
BusID 指示设备的BusID,由前文所述的 lspci 命令获取。
接着在屏幕配置段中修改图形设备为 intel 核显,将其中的 Device 属性的值设置为 intel 核显的设备的标识符。
Section "Screen"
    Identifier     "Screen0"
    Device         "Device0"
    Monitor        "Monitor0"
    DefaultDepth    24
    SubSection     "Display"
        Depth       24
    EndSubSection
EndSection
按下ctrl + x保存并退出,按y确认,然后重启电脑sudo reboot。
采用上述方法后再次启动时,图形界面可能出现还是比较慢,稍微等一下即可。
附完整版的xorg.conf文件:
# nvidia-xconfig: X configuration file generated by nvidia-xconfig
# nvidia-xconfig:  version 570.144


Section "ServerLayout"
    Identifier     "Default Layout"
    Screen         "Default Screen" 0 0
    InputDevice    "Keyboard0" "CoreKeyboard"
    InputDevice    "Mouse0" "CorePointer"
EndSection

Section "Module"
    Load           "modesetting"
    Load           "glx"
EndSection

Section "InputDevice"

    # generated from default
    Identifier     "Keyboard0"
    Driver         "kbd"
EndSection

Section "InputDevice"

    # generated from default
    Identifier     "Mouse0"
    Driver         "mouse"
    Option         "Protocol" "auto"
    Option         "Device" "/dev/psaux"
    Option         "Emulate3Buttons" "no"
    Option         "ZAxisMapping" "4 5"
EndSection

Section "Monitor"
    Identifier     "Monitor0"
    VendorName     "Unknown"
    ModelName      "Unknown"
    Option         "DPMS"
EndSection

Section "Device"
    Identifier     "Device1"
    Driver         "nvidia"
    VendorName     "Intel Corporation"
    BusID          "PCI:1:0:0"
EndSection

Section "Device"
    Identifier     "Device0"
    Driver         "intel"
    VendorName     "Intel Corporation"
    Option         "TripleBuffer" "true"
    Option         "TearFree"     "true"
    Option         "DRI"          "false"
    BusID          "PCI:0:2:0"
EndSection

Section "Screen"
    Identifier     "Default Screen"
    Device         "Device0"
    Monitor        "Monitor0"
    DefaultDepth    24
    SubSection     "Display"
        Depth       24
    EndSubSection
EndSection


 3439
3439

 被折叠的 条评论
为什么被折叠?
被折叠的 条评论
为什么被折叠?
 到【灌水乐园】发言


