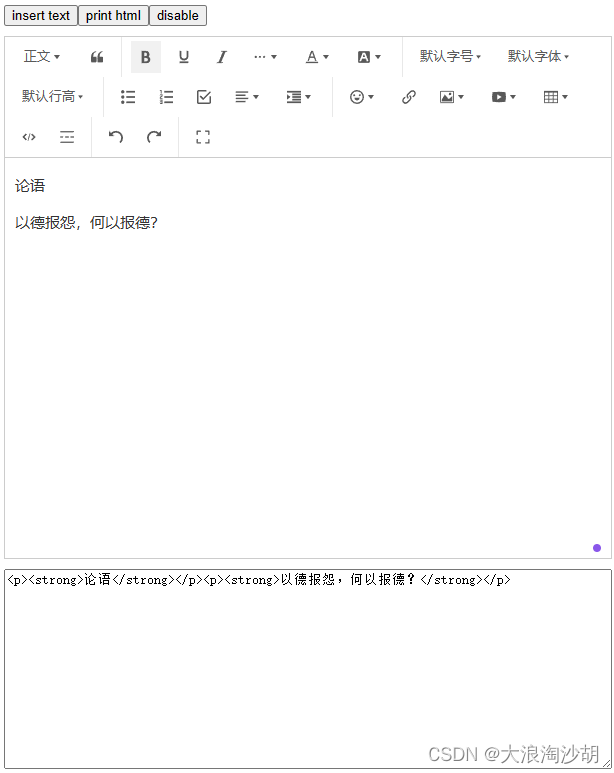
1、在Vue项目中安装WangEditor
对于Vue2:
npm install @wangeditor/editor-for-vue --save
或者 yarn add @wangeditor/editor-for-vue
对于Vue3:
npm install @wangeditor/editor-for-vue@next --save
或者 yarn add @wangeditor/editor-for-vue@next
2、将WangEditor封装成组件WangEditor.vue
<template>
    <div>
      <div>
        <button @click="insertText">insert text</button>
        <button @click="printHtml">print html</button>
        <button @click="disable">disable</button>
      </div>
      <div style="border: 1px solid #ccc; margin-top: 10px">
        <Toolbar
          :editor="editorRef"
          :defaultConfig="toolbarConfig"
          :mode="mode"
          style="border-bottom: 1px solid #ccc"
        />
        <Editor
          :defaultConfig="editorConfig"
          :mode="mode"
          v-model="valueHtml"
          style="height: 400px; overflow-y: hidden"
          @onCreated="handleCreated"
          @onChange="handleChange" @onDestroyed="handleDestroyed" @onFocus="handleFocus" @onBlur="handleBlur" @customAlert="customAlert" @customPaste="customPaste" /> </div> <div style="margin-top: 10px"> <textarea v-model="valueHtml" readonly style="width: 100%; height: 200px; outline: none" ></textarea> </div> </div> </template> <script> import '@wangeditor/editor/dist/css/style.css';
  import { onBeforeUnmount, ref, shallowRef, onMounted } from 'vue';
  import { Editor, Toolbar } from '@wangeditor/editor-for-vue';

  export default {
    components: { Editor, Toolbar },
    setup() {
      // 编辑器实例,必须用 shallowRef,重要!
      const editorRef = shallowRef();

      // 内容 HTML
      const valueHtml = ref('<p>hello</p>');

      // 模拟 ajax 异步获取内容
      onMounted(() => {
        setTimeout(() => {
          valueHtml.value = '<p>模拟 Ajax 异步设置内容</p>';
        }, 1500);
      });

      const toolbarConfig = {};
      const editorConfig = { placeholder: '请输入内容...' };

      // 组件销毁时,也及时销毁编辑器,重要!
      onBeforeUnmount(() => {
        const editor = editorRef.value;
        if (editor == null) return;

        editor.destroy();
      });

      // 编辑器回调函数
      const handleCreated = (editor) => {
        console.log('created', editor);
        editorRef.value = editor; // 记录 editor 实例,重要!
      };
      const handleChange = (editor) => {
        console.log('change:', editor.getHtml());
      };
      const handleDestroyed = (editor) => {
        console.log('destroyed', editor);
      };
      const handleFocus = (editor) => {
        console.log('focus', editor);
      };
      const handleBlur = (editor) => {
        console.log('blur', editor);
      };
      const customAlert = (info, type) => {
        alert(`【自定义提示】${type} - ${info}`);
      };
      const customPaste = (editor, event, callback) => {
        console.log('ClipboardEvent 粘贴事件对象', event);

        // 自定义插入内容
        editor.insertText('xxx');

        // 返回值(注意,vue 事件的返回值,不能用 return)
        callback(false); // 返回 false ,阻止默认粘贴行为
        // callback(true) // 返回 true ,继续默认的粘贴行为
      };

      const insertText = () => {
        const editor = editorRef.value;
        if (editor == null) return;

        editor.insertText('hello world');
      };

      const printHtml = () => {
        const editor = editorRef.value;
        if (editor == null) return;
        console.log(editor.getHtml());
      };

      const disable = () => {
        const editor = editorRef.value;
        if (editor == null) return;
        editor.disable()
      };

      return {
        editorRef,
        mode: 'default',
        valueHtml,
        toolbarConfig,
        editorConfig,
        handleCreated,
        handleChange,
        handleDestroyed,
        handleFocus,
        handleBlur,
        customAlert,
        customPaste,
        insertText,
        printHtml,
        disable
      };
    },
  };
  </script>
3、调用组件
<template>
  <div>
    <WangEditor></WangEditor>
  </div>
</template>

<script setup>
import WangEditor from './WangEditor.vue'
</script>
4、运行效果


 6102
6102

 被折叠的 条评论
为什么被折叠?


