


回顾
1.shader基本使用
1.shader粒子
粒子
粒子效果是什么? 顾名思义就是由N个粒子组成。在three.js中往attribute中传递一个坐标点就是一个粒子,传递多个就能组成粒子效果。
例子
例子一
创建一个大小永远为20像素大小的黄色例子
const positions = [{
    x: 0,
    y: 0,
    z: 0
}];

const attrPositions = [];

positions.forEach((p) => {
    attrPositions.push(p.x, p.y, p.z);
})

const geometry = new THREE.BufferGeometry();

geometry.setAttribute('position', new THREE.Float32BufferAttribute(attrPositions, 3));


const shader = new THREE.ShaderMaterial({
    uniforms: {
        uColor: {
            value: new THREE.Color('#FFFF00')
        },
        uSzie: {
            value: 20
        }
    },
    vertexShader: `
        uniform float uSzie;
        void main() {
            // 顶点着色器计算后的Position
            gl_Position = projectionMatrix * modelViewMatrix * vec4(position, 1.0);
            // 永远为10像素大小
            gl_PointSize = uSzie;
        }`,
    fragmentShader: `
        uniform vec3 uColor;
        void main() {
            gl_FragColor = vec4(uColor, 1.0);
        }`
});

const point = new THREE.Points(geometry, shader);

scene.add(point);
更改vertexShader, gl_PointSize给改为与模型矩阵相乘。可以随着空间的远近而变化
vertexShader: `
uniform float uSzie;
void main() {
    // 顶点着色器计算后的Position
    vec4 mvPosition = modelViewMatrix * vec4(position, 1.0);
    gl_Position = projectionMatrix * mvPosition;
    // 大小
    gl_PointSize = 10.0 * 300.0 / (-mvPosition.z);
}`

例子二
在position增加一排粒子,增加一排x = -500 到 x = 500的100个粒子;
粒子的数量以及位置是根据attribute中的数据量决定的。
// 更改position数据
const positions = [];
const attrCindex = [];
const source = -500;
const target = 500;
const number = 100;
const total = target - source;

for (let i = 0; i < number; i++) {
    const index = i / (number - 1);
    const x = total * index - total / 2;
	attrCindex.push(index);
    positions.push({
        x: x,
        y: 0,
        z: 0
    });
}
// 传递当前所在位置
geometry.setAttribute('cindex', new THREE.Float32BufferAttribute(attrCindex, 1));

const shader = new THREE.ShaderMaterial({
    uniforms: {
        uColor: {
            value: new THREE.Color('#FF0000')
        },
        uColor1: {
            value: new THREE.Color('#FFFFFF')
        },
        uSzie: {
            value: 20
        }
    },
    vertexShader: `
        attribute float cindex;
        uniform float uSize;
        uniform vec3 uColor;
        uniform vec3 uColor1;
        varying vec3 vColor;
        void main() {
            // 顶点着色器计算后的Position
            // mix 混淆颜色
            vColor = mix(uColor, uColor1, cindex);
            vec4 mvPosition = modelViewMatrix * vec4(position, 1.0);
            gl_Position = projectionMatrix * mvPosition;
            // 大小
            gl_PointSize = uSize* 300.0 / (-mvPosition.z);
        }`,
    fragmentShader: `
        varying vec3 vColor;
        void main() {
            gl_FragColor = vec4(vColor, 1.0);
        }`
});

例子三
粒子飞线效果,是由多个粒子组成一条线,同shader去控制点位的展示, 去形成一条飞线,把节点数据变为1000个,设置一个高度变化
节点数据也可以使用以下节点来生成数据
CatmullRomCurve3
CubicBezierCurve3
QuadraticBezierCurve3

通过传递所有点的位置索引,来设置粒子点位区间的显示,例如
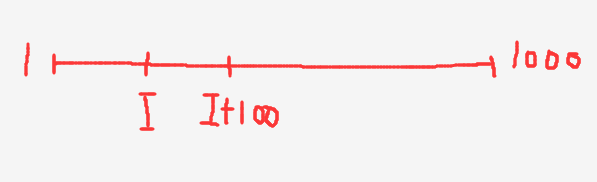
我们找到节点I的位置,然后往后算100个粒子节点,其余的隐藏掉,我门就得到了飞线

const positions = [];
const attrPositions = [];
const attrCindex = [];
const attrCnumber = [];

// 粒子位置计算
const source = -500;
const target = 500;
const number = 1000;
const height = 300;
const total = target - source;

for (let i = 0; i < number; i++) {
    const index = i / (number - 1);
    const x = total * index - total / 2;
    const y = Math.sin(index * Math.PI) * height;
    positions.push({
        x: x,
        y: y,
        z: 0
    });
    attrCindex.push(index);
    attrCnumber.push(i);
}

positions.forEach((p) => {
    attrPositions.push(p.x, p.y, p.z);
})

const geometry = new THREE.BufferGeometry();

geometry.setAttribute('position', new THREE.Float32BufferAttribute(attrPositions, 3));
// 传递当前所在位置
geometry.setAttribute('index', new THREE.Float32BufferAttribute(attrCindex, 1));
geometry.setAttribute('current', new THREE.Float32BufferAttribute(attrCnumber, 1));

const shader = new THREE.ShaderMaterial({
    transparent: true,
    uniforms: {
        uColor: {
            value: new THREE.Color('#FF0000') // 颜色
        },
        uColor1: {
            value: new THREE.Color('#FFFFFF')
        },
        uRange: {
            value: 100 // 显示当前范围的个数
        },
        uSize: {
            value: 20 // 粒子大小
        },
        uTotal: {
            value: number // 当前粒子的所有的总数
        },
        time: {
            value: 0 //
        }
    },
    vertexShader: `
        attribute float index;
        attribute float current;
        uniform float time;
        uniform float uSize;
        uniform float uRange; // 展示区间
        uniform float uTotal; // 粒子总数
        uniform vec3 uColor;
        uniform vec3 uColor1;
        varying vec3 vColor;
        varying float vOpacity;
        void main() {
            // 需要当前显示的索引
            float showNumber = uTotal * mod(time, 1.0);
            if (showNumber > current && showNumber < current + uRange) {
                vOpacity = 1.0;
            } else {
                vOpacity = 0.0;
            }

            // 顶点着色器计算后的Position
            vColor = mix(uColor, uColor1, index);
            vec4 mvPosition = modelViewMatrix * vec4(position, 1.0);
            gl_Position = projectionMatrix * mvPosition;
            // 大小
            gl_PointSize = uSize* 300.0 / (-mvPosition.z);
        }`,
    fragmentShader: `
        varying vec3 vColor;
        varying float vOpacity;
        void main() {
            gl_FragColor = vec4(vColor, vOpacity);
        }`
});

const point = new THREE.Points(geometry, shader);

scene.add(point);

setInterval(() => {
    shader.uniforms.time.value += 0.001;
})
然后在控制区间内粒子大小,在范围内前面大后面小,
`
 float size = uSize;
 float showNumber = uTotal * mod(time, 1.0);
 if (showNumber > current && showNumber < current + uRange) {
    float uIndex = ((current + uRange) - showNumber) / uRange;
    size *= uIndex;
    vOpacity = 1.0;
} else {
	vOpacity = 0.0;
}
`

DEMO地址
觉得可以的话请给一个小星星或者一个赞
QQ群:1082834010


 3257
3257


 被折叠的 条评论
为什么被折叠?
被折叠的 条评论
为什么被折叠?
 到【灌水乐园】发言


