


1.运行paddle中,ernie的序列标注命令时候报错
ImportError: libcudart.so.10.2: cannot open shared object file: No such file or directory
解决:
1.查看代码环境对应版本,
Tesla V100上nvidia驱动、cuda版本、cudnn版本、nccl版本、python版本以及PaddlePaddle版本
NVIDIA Driver Version: 418.67
CUDA Version: 10.1
所以先conda中安装对应cuda版本
conda install cudatoolkit=10.1
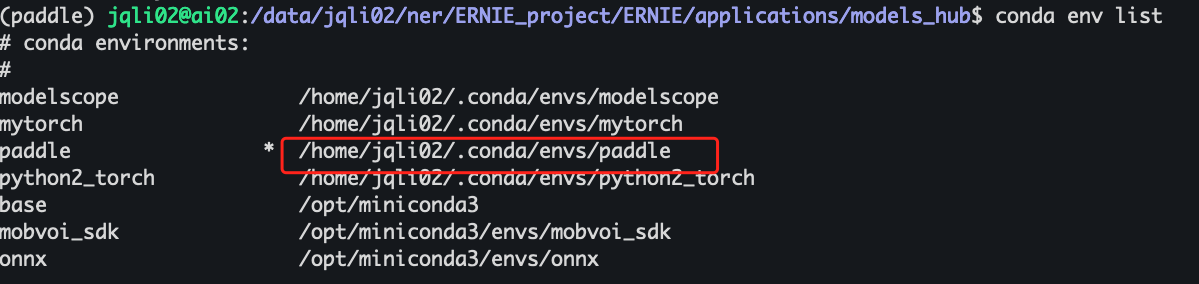
安装后的lib环境在 /home/jqli02/.conda/envs/paddle
在此目录下查看,没有libcudart.so.10.2,
- 百度搜索,下载 libcudart.so.10.2,并传到该目录下。
下载目录 https://pan.baidu.com/s/1JctSCWNLkuO44LkmH3hqeA?pwd=cbh8&_at_=1686215339331
3.将环境设置指到该目录
export LD_LIBRARY_PATH=$LD_LIBRARY_PATH:/home/jqli02/.conda/envs/paddle/lib/ 一次性的
vim /home/jqli02/.bashrc

把这一句添加到一行中

export LD_LIBRARY_PATH=$LD_LIBRARY_PATH:/home/jqli02/.conda/envs/paddle/lib/

然后 source /home/jqli02/.bashrc  永久生效
2.chatglm跑不通
别人能跑的chatglm-Turning,我的环境中跑不通
地址:
ChatGLM-Tuning
命令:
sh train.sh
 其中train.sh的内容为
 python3 finetune.py  --dataset_path data/alpaca  --lora_rank 8  --per_device_train_batch_size 8   --gradient_accumulation_steps 1  --max_steps 52000   --save_steps 1000  --save_total_limit 2 --learning_rate 1e-4 --fp16    --remove_unused_columns false --logging_steps 50  --output_dir ./output
其中训练代码中,对于device的设定为
#finetune.py代码中,定义如下:
# init model
    device = torch.device("cuda:0" if torch.cuda.is_available() else "cpu")
    model = AutoModel.from_pretrained(
        "/data2/jqli02/chatglm/model/chatglm-6b", load_in_8bit=True, trust_remote_code=True, device_map={'': device})

    print ("device:",device)
结果:
错误状况1:
前提:cuda:0 第一次能跑入训练。 control+z切断后,又重启跑,
结果:报错如下
OutOfMemoryError: CUDA out of memory. Tried to allocate 7.18 GiB (GPU 0; 23.69 GiB total capacity; 15.93 GiB already allocated; 4.93 GiB free;
17.76 GiB reserved in total by PyTorch) If reserved memory is >> allocated memory try setting max_split_size_mb to avoid fragmentation.  See
documentation for Memory Management and PYTORCH_CUDA_ALLOC_CONF
然而用top和nvidia-smi看后台,没有任何进程
错误状况2:
finetune.py中,改成cuda:1
启动训练
打印device信息
device: cuda:1
报错如下:
ValueError: You can't train a model that has been loaded in 8-bit
precision on a different device than the one you're training on. Make
sure you loaded the model on the correct device using for example
`device_map={'':torch.cuda.current_device()}you're training on. Make sure
you loaded the model on the correct device using for example
`device_map={'':torch.cuda.current_device() or
device_map={'':torch.xpu.current_device()}
错误状况3:
直接外部指定cuda,在启动
CUDA_VISIBLE_DEVICES=1 ./train.sh
报错:
RuntimeError: CUDA error: invalid device ordinal
Compile with `TORCH_USE_CUDA_DSA` to enable device-side assertions.
改成指定0,依然不行
CUDA_VISIBLE_DEVICES=0 ./train.sh

--------
RuntimeError: CUDA error: invalid device ordinal
Compile with `TORCH_USE_CUDA_DSA` to enable device-side assertions.
但是在别的代码中这样指定可以执行
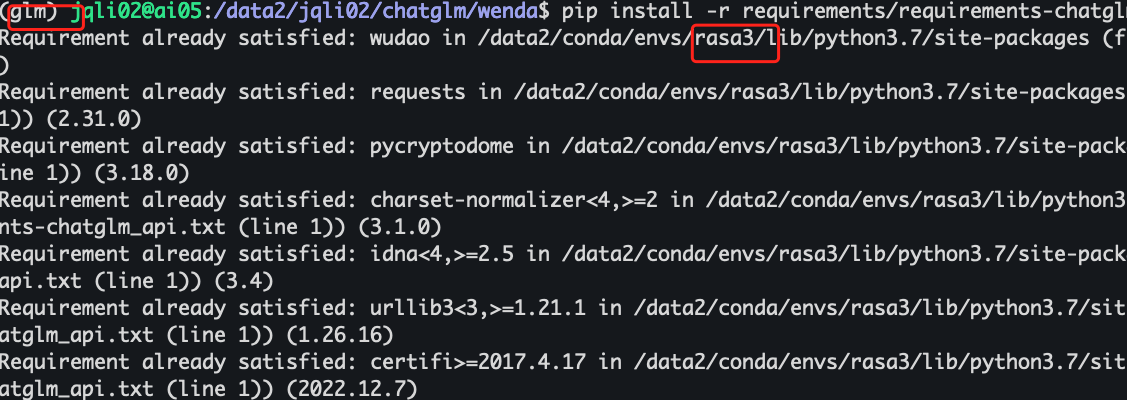
3.pip如何指定安装环境来安装
Pip install -r requirements.txt 的时候,总会匹配到别的conda环境中,然后显示已经满足,不需要安装,但实际本conda环境中本没有该工具
如下图,我在glm环境中安装,匹配说rasa3环境中已经存在因为拒绝安装
解决:
1.找到本环境对应的python执行文件的路径
2.指定本环境的python 所带的pip安装命令

   /data2/conda/envs/glm/bin/python3.8 -m pip install -r requirements.txt
4. 解决python起的url服务,显示端口被占用的问题
解决:
1.查端口号服务的pid是那个
linux下,如下查
netstat -apn | grep 4002
或者
lsof -i:88889

mac下,如下查
lsof -i tcp:5005
2.杀掉该进程
   kill -9 386578
再执行该脚本,发现可以了。
5.rasa interactive中遇到的错误
ERROR    asyncio  - Future exception was never retrieved
future: <Future finished exception=BlockingIOError(35, 'write could not complete without blocking', 0)>
Traceback (most recent call last):
  File "/Users/USERNAME/.pyenv/versions/3.9.11/lib/python3.9/concurrent/futures/thread.py", line 58, in run
    result = self.fn(*self.args, **self.kwargs)
BlockingIOError: [Errno 35] write could not complete without blocking
解决:
pip uninstall uvloop
6.huggface下载模型报错
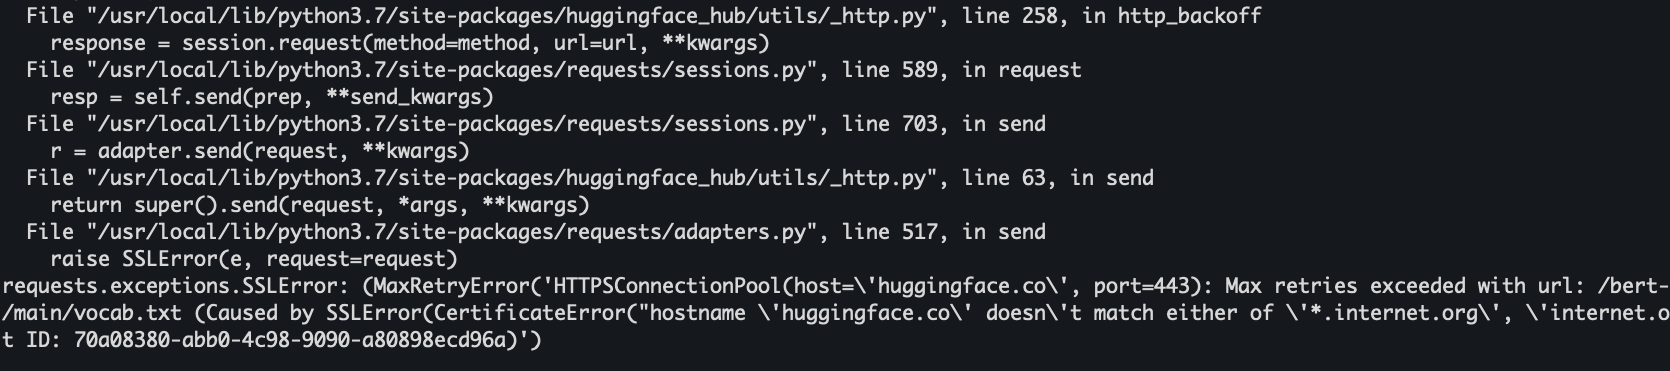
解决方法
https://blog.csdn.net/duoyasong5907/article/details/130813500
1.把requests降下来, pip install requests==2.27.1
2.有request函数的那个代码文件里,加以下两句
   import os
  os.environ['CURL_CA_BUNDLE'] = ''
7.llama模型部署报错
报错解决
1、报错:
.conda/envs/gf_python38/lib/python3.8/site-packages/bitsandbytes/libbitsandbytes_cpu.so: undefined symbol: cquantize_blockwise_fp16_nf4
出现问题原因:
libbitsandbytes_cpu 版本不对导致的
解决:
在目录.conda/envs/gf_python38/lib/python3.8/site-packages/bitsandbytes,用自己的cuda版本.so 覆盖libbitsandbytes_cpu.so
即:cp libbitsandbytes_cuda117.so libbitsandbytes_cpu.so
8.报错说version `GLIBCXX_3.4.29’ not found
报错如下
import pandas._libs.window.aggregations as window_aggregations
ImportError: /lib/x86_64-linux-gnu/libstdc++.so.6: version `GLIBCXX_3.4.29' not found (required by /data2/conda/envs/glm/lib/python3.8/site-packages/pandas/_libs/window/aggregations.cpython-38-x86_64-linux-gnu.so)
解决办法参考
https://blog.csdn.net/kikiLQQ/article/details/129238099?spm=1001.2101.3001.6650.5&utm_medium=distribute.pc_relevant.none-task-blog-2%7Edefault%7ECTRLIST%7ERate-5-129238099-blog-129021887.235%5Ev38%5Epc_relevant_anti_vip_base&depth_1-utm_source=distribute.pc_relevant.none-task-blog-2%7Edefault%7ECTRLIST%7ERate-5-129238099-blog-129021887.235%5Ev38%5Epc_relevant_anti_vip_base&utm_relevant_index=6
步骤:
1.cd /data2/conda  进入虚拟环境路径
2.find ./ -name libstdc++.so.6* 找这个
3.strings ./envs/glm/lib/libstdc++.so.6  | grep GLIBCXX 列出这个,发现有 GLIBCXX_3.4.29
4.设置路径 i
好了,重新运行刚才脚本试试
9.rasa放着好久不用,启动后报错
报错如下
from packaging.version import LegacyVersion

ImportError: cannot import name 'LegacyVersion' from 'packaging.version' (/data2/conda/envs/rasa3/lib/python3.7/site-packages/packaging/version.py)
之前能跑的数据也报错这个。之前能用的环境,rasa3中,报错如此
期间做了什么改变了环境?
解决
查到如下这个
https://rasa-open-source.atlassian.net/browse/OSS-704
说 packaging只适合 pinned to ">=20.0,<21.0" 这个区间,为什么conda中会被改动,很奇怪
抱着试试的态度
安装一个低版本 packaing

pip install packaging==20.0
成功了!跑起来了。
10.chatglm3 ptuning,nohup后台训练时候,总是中途报错
总设定最多1000个step,再经过400个step后会报错,报错如下:
raise SignalException(f"Process {os.getpid()} got signal: {sigval}", sigval=sigval)
torch.distributed.elastic.multiprocessing.api.SignalException: Process 4156314 got signal: 1
百度发现说是nohup导致的错误,改成tmux,如下是方法
首先安装 tmux  conda install -c conda-forge tmux
[terminal]: tmux new -s train_model       # 创建一个会话,并设置绘画名:train_model
[tmux]: conda activate env_name           # 在tmux会话中,我们激活我们要使用的conda环境
[tmux]: python train.py                   # 在tmux会话中,开始训练我们的模型
[tmux]: [ Ctrl+b ] [ d ]                  # 将会话与窗口分离
[terminal]: tmux ls                       # 查看我们刚刚创建的会话
查看目前存在的窗口
tmux ls
5: 1 windows (created Thu Dec 14 19:07:08 2023)
6: 1 windows (created Fri Dec 15 11:53:54 2023)

关闭不需要的窗口
tmux kill-window -t 5
tmux kill-window -t 6
11.训练或者部署的时候报错:cuda:out of memory.
报错如下类似:OutOfMemoryError: CUDA out of memory. Tried to allocate 78.00 MiB (GPU 0; 23.00 GiB total capacity; 17 GiB already allocated; 0 bytes free; 17 GiB reserved in total by PyTorch) If reserved memory is >> allocated memory try setting max_split_size_mb to avoid fragmentation. See documentation for Memory Management and PYTORCH_CUDA_ALLOC_CONF
就会奇怪很大量的显存被reserved了。最终连78M的容量都余不出来,想着会不会不是内存的问题,看看能不能释放出来保留的一部分内容,就可以跑程序了。遂网上查一堆。
参考一些解决方法:能做的尝试主要如下几种:
1.减少batchsize,我已经减少到1了。
2.代码中加这几句:
   import gc
   gc.collect()
   torch.cuda.empty_cache()
   不知道有用没,我反正加了
3. 修改max_split_size_mb 参考这篇 https://blog.csdn.net/MirageTanker/article/details/127998036
   具体理解没懂,只是按照它的方法尝试了多次
   代码中如此改:import os
   os.environ['PYTORCH_CUDA_ALLOC_CONF'] = 'max_split_size_mb:32'
  或者运行终端中单次生效 export PYTORCH_CUDA_ALLOC_CONF=max_split_size_mb:32  此处32只是一个尝试值。最终能跑起来的就是32.不知道换别的行不行
4.以上还不行,代码中把模型加载改成如下
   model = AutoModel.from_pretrained(model_args.model_name_or_path, config=config, trust_remote_code=True).quantize(4).cuda()  量化4bit的加载,并转到cuda   (感觉主要是这条起了作用)
5.然后又会报如下错误
  https://blog.csdn.net/imwaters/article/details/124385799
  一通操作,先卸载了某个nccl又安装了,把nvidia-nccl-cu11 版本从2.12.1 升级成了2.19.3

  conda list | grep nccl
nvidia-nccl-cu11          2.19.3                   pypi_0    pypi
nvidia-nccl-cu12          2.18.1                   pypi_0    pypi
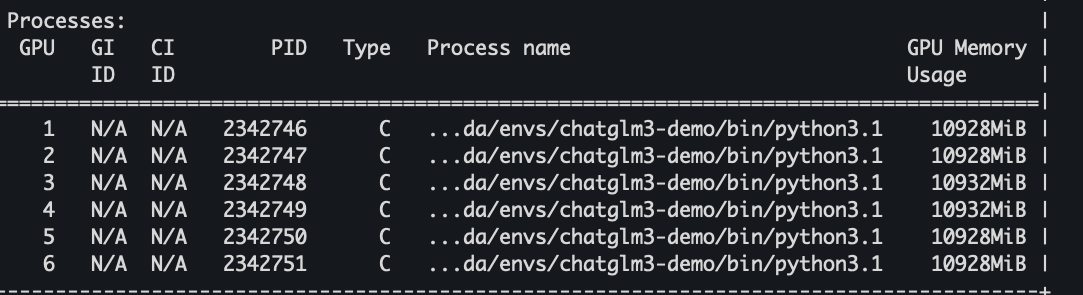
6./data2/jqli02/LLM/chatglm3/ChatGLM3/finetune_chatmodel_demo
sh scripts/finetune_ds.sh 发现能跑了。
用了6个gpu,6个都占的满满的。速度很快,半小时内完成全量微调。
12.安装vllm时候报错:cuda和pytorch不匹配
安装vllm
conda activate chatglm3-demo
cd vllm
pip install -e .
报错
 The detected CUDA version (12.1) mismatches the version that was used to compile
      PyTorch (11.7). Please make sure to use the same CUDA version
报错原因:cuda和pytorch不匹配
检查环境中cuda的版本:
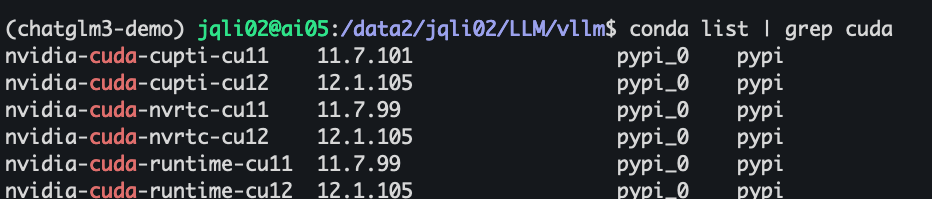
发现每个都有两个版本,把12.1相关的都挨个删除了。继续安装 pip install -e . 还是不行。报同样的错误。


 100
100

 被折叠的 条评论
为什么被折叠?
被折叠的 条评论
为什么被折叠?
 到【灌水乐园】发言


