test
// The contents of this file are in the public domain. See LICENSE_FOR_EXAMPLE_PROGRAMS.txt
/*
This is an example illustrating the use of the perspective_window tool
in the dlib C++ Library. It is a simple tool for displaying 3D point
clouds on the screen.
*/
#include <dlib/gui_widgets.h>
#include <dlib/image_transforms.h>
#include <cmath>
using namespace dlib;
using namespace std;
// ----------------------------------------------------------------------------------------
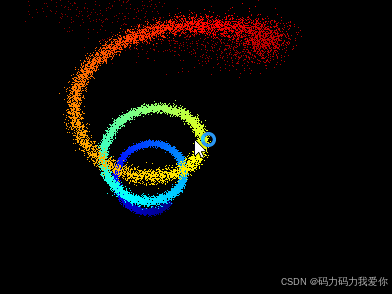
int test3DPointCloudPreview()
{
// Let's make a point cloud that looks like a 3D spiral.
std::vector<perspective_window::overlay_dot> points;
dlib::rand rnd;
for (double i = 0; i < 20; i += 0.001)
{
// Get a point on a spiral
dlib::vector<double> val(sin(i), cos(i), i / 4);
// Now add some random noise to it
dlib::vector<double> temp(rnd.get_random_gaussian(),
rnd.get_random_gaussian(),
rnd.get_random_gaussian());
val += temp / 20;
// Pick a color based on how far we are along the spiral
rgb_pixel color = colormap_jet(i, 0, 20);
// And add the point to the list of points we will display
points.push_back(perspective_window::overlay_dot(val, color));
}
// Now finally display the point cloud.
perspective_window win;
win.set_title("perspective_window 3D point cloud");
win.add_overlay(points);
win.wait_until_closed();
return 0;
}
// ----------------------------------------------------------------------------
// K分类算法
#include <dlib/dnn.h>
int testDNNMetricLearning() try
{
using namespace std;
using namespace dlib;
// The API for doing metric learning is very similar to the API for
// multi-class classification. In fact, the inputs are the same, a bunch of
// labeled objects. So here we create our dataset. We make up some simple
// vectors and label them with the integers 1,2,3,4. The specific values of
// the integer labels don't matter.
std::vector<matrix<double, 0, 1>> samples;
std::vector<unsigned long> labels;
// class 1 training vectors
samples.push_back({ 1,0,0,0,0,0,0,0 }); labels.push_back(1);
samples.push_back({ 0,1,0,0,0,0,0,0 }); labels.push_back(1);
// class 2 training vectors
samples.push_back({ 0,0,1,0,0,0,0,0 }); labels.push_back(2);
samples.push_back({ 0,0,0,1,0,0,0,0 }); labels.push_back(2);
// class 3 training vectors
samples.push_back({ 0,0,0,0,1,0,0,0 }); labels.push_back(3);
samples.push_back({ 0,0,0,0,0,1,0,0 }); labels.push_back(3);
// class 4 training vectors
samples.push_back({ 0,0,0,0,0,0,1,0 }); labels.push_back(4);
samples.push_back({ 0,0,0,0,0,0,0,1 }); labels.push_back(4);
// Make a network that simply learns a linear mapping from 8D vectors to 2D
// vectors.
using net_type = loss_metric<fc<2, input<matrix<double, 0, 1>>>>;
net_type net;
dnn_trainer<net_type> trainer(net);
trainer.set_learning_rate(0.1);
// It should be emphasized out that it's really important that each mini-batch contain
// multiple instances of each class of object. This is because the metric learning
// algorithm needs to consider pairs of objects that should be close as well as pairs
// of objects that should be far apart during each training step. Here we just keep
// training on the same small batch so this constraint is trivially satisfied.
while (trainer.get_learning_rate() >= 1e-4)
trainer.train_one_step(samples, labels);
// Wait for training threads to stop
trainer.get_net();
cout << "done training" << endl;
// Run all the samples through the network to get their 2D vector embeddings.
std::vector<matrix<float, 0, 1>> embedded = net(samples);
// Print the embedding for each sample to the screen. If you look at the
// outputs carefully you should notice that they are grouped together in 2D
// space according to their label.
for (size_t i = 0; i < embedded.size(); ++i)
cout << "label: " << labels[i] << "\t" << trans(embedded[i]);
// Now, check if the embedding puts things with the same labels near each other and
// things with different labels far apart.
int num_right = 0;
int num_wrong = 0;
for (size_t i = 0; i < embedded.size(); ++i)
{
for (size_t j = i + 1; j < embedded.size(); ++j)
{
if (labels[i] == labels[j])
{
// The loss_metric layer will cause things with the same label to be less
// than net.loss_details().get_distance_threshold() distance from each
// other. So we can use that distance value as our testing threshold for
// "being near to each other".
if (length(embedded[i] - embedded[j]) < net.loss_details().get_distance_threshold())
++num_right;
else
++num_wrong;
}
else
{
if (length(embedded[i] - embedded[j]) >= net.loss_details().get_distance_threshold())
++num_right;
else
++num_wrong;
}
}
}
cout << "num_right: " << num_right << endl;
cout << "num_wrong: " << num_wrong << endl;
return 0;
}
catch (std::exception& e)
{
cout << e.what() << endl;
}
#include <dlib/image_processing/frontal_face_detector.h>
#include <dlib/gui_widgets.h>
#include <dlib/image_io.h>
#include <filesystem>
// ----------------------------------------------------------------------------------------
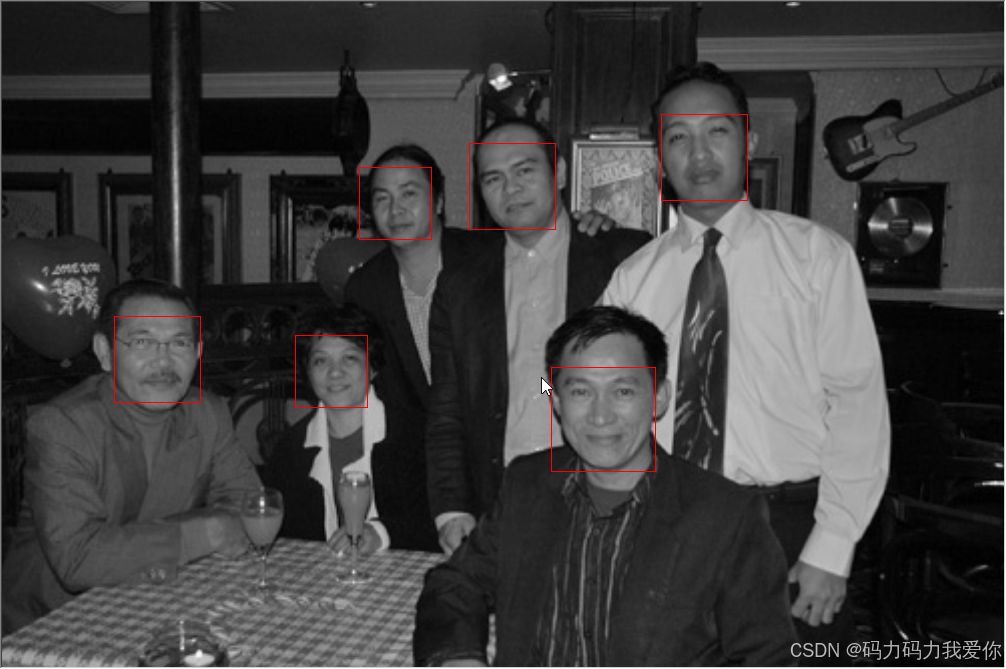
int testRecognizeFace(const char* filePath)
{
using namespace dlib;
using namespace std;
try
{
frontal_face_detector detector = get_frontal_face_detector();
image_window win;
if (!std::filesystem::is_directory(filePath))
return 1;
for (const auto& entry : std::filesystem::directory_iterator(filePath)) {
if (entry.is_regular_file()) {
std::cout << "processing image File: " << entry.path().filename() << std::endl;
array2d<unsigned char> img;
load_image(img, entry.path().string());
// Make the image bigger by a factor of two. This is useful since
// the face detector looks for faces that are about 80 by 80 pixels
// or larger. Therefore, if you want to find faces that are smaller
// than that then you need to upsample the image as we do here by
// calling pyramid_up(). So this will allow it to detect faces that
// are at least 40 by 40 pixels in size. We could call pyramid_up()
// again to find even smaller faces, but note that every time we
// upsample the image we make the detector run slower since it must
// process a larger image.
pyramid_up(img);
// Now tell the face detector to give us a list of bounding boxes
// around all the faces it can find in the image.
std::vector<rectangle> dets = detector(img);
cout << "Number of faces detected: " << dets.size() << endl;
// Now we show the image on the screen and the face detections as
// red overlay boxes.
win.clear_overlay();
win.set_image(img);
win.add_overlay(dets, rgb_pixel(255, 0, 0));
cout << "Hit enter to process the next image..." << endl;
cin.get();
}
}
}
catch (exception& e)
{
cout << "\nexception thrown!" << endl;
cout << e.what() << endl;
}
}
// ----------------------------------------------------------------------------------------
void test() {
//test3DPointCloudPreview(); // pcl 3D点云展示
testDNNMetricLearning(); // k分类算法
/*
done training
label: 1 -0.151457 -0.076636
label: 1 -0.147003 -0.0889589
label: 2 0.0614508 0.529338
label: 2 0.136569 0.497333
label: 3 0.561938 0.00232342
label: 3 0.624519 -0.0519932
label: 4 -0.538596 -0.606784
label: 4 -0.429636 -0.711575
num_right: 28
num_wrong: 0
*/
testRecognizeFace("D:/dlib/examples/faces"); // 人脸识别
/*
processing image File: "2007_007763.jpg"
Number of faces detected: 7
Hit enter to process the next image...
processing image File: "2008_001009.jpg"
Number of faces detected: 2
Hit enter to process the next image...
processing image File: "2008_001322.jpg"
Number of faces detected: 3
Hit enter to process the next image...
*/
}
效果
参考
GitHub - davisking/dlib: A toolkit for making real world machine learning and data analysis applications in C++
创作不易,小小的支持一下吧!


 1098
1098

 被折叠的 条评论
为什么被折叠?
被折叠的 条评论
为什么被折叠?
 到【灌水乐园】发言


