


文章目录
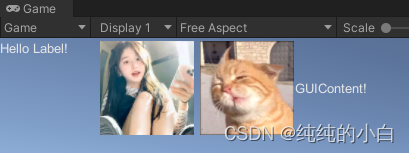
1、Label
1.1、CODE
using UnityEngine;

public class OnGui_Label : MonoBehaviour
{
    Rect textRect = new Rect(0, 0, 100, 100);
    Rect picRect = new Rect(100, 0, 100, 100);
    Rect guiContentRect = new Rect(200, 0, 200, 100);

    public Texture texture;
    public GUIStyle guiStyle;
    public GUIContent guiContent;

    // GUI.Label 共有6个重载(带 GUIStyle 的可以配置样式)
    private void OnGUI() // GUI回调
    {
        // 显示字符串
        GUI.Label(textRect, "Hello Label!");
        //GUI.Label(textRect, "Hello Label!", guiStyle);

        // 显示图片
        GUI.Label(picRect, texture);
        //GUI.Label(picRect, texture, guiStyle);

        // 显示文本或纹理标签
        GUI.Label(guiContentRect, guiContent);
        //GUI.Label(guiContentRect, guiContent, guiStyle);
    }
}
1.2、Result
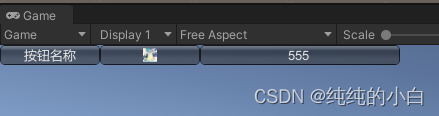
2、Button
2.1、CODE
using UnityEngine;

public class OnGui_Button : MonoBehaviour
{
    Rect textRect = new Rect(0, 0, 100, 20);
    Rect picRect = new Rect(100, 0, 100, 20);
    Rect guiContentRect = new Rect(200, 0, 200, 20);

    public Texture texture;
    public GUIStyle guiStyle;
    public GUIContent guiContent;

    /**
     * GUI.Button 共有6个重载(带 GUIStyle 的可以配置样式)
     * 返回值是bool:true被点击
     *
     */
    private void OnGUI()
    {
        // 显示文字
        bool textBtnClick = GUI.Button(textRect, "按钮名称");
        //GUI.Button(textRect, "按钮名称", guiStyle);

        // 显示图片
        bool picBtnClick = GUI.Button(picRect, texture);
        //GUI.Button(picRect, texture, guiStyle);

        // 显示文本或纹理标签
        bool contentBtnClick = GUI.Button(guiContentRect, guiContent);
        //GUI.Button(guiContentRect, guiContent, guiStyle);

        if (textBtnClick)
        {
            Debug.Log("文字按钮被点击");
        }
        if (picBtnClick)
        {
            Debug.Log("图片按钮被点击");
        }
        if (contentBtnClick)
        {
            Debug.Log("显示文本或纹理标签按钮被点击");
        }
    }
}
2.2、Result
3、TextField
3.1、CODE
using UnityEngine;

public class OnGui_TextField : MonoBehaviour
{
    Rect textOverRect = new Rect(0, 0, 100, 20);
    Rect textMaxRect = new Rect(100, 0, 100, 20);

    public GUIStyle guiStyle;

    public string contentOver;
    public string contentMax;

    // GUI.TextField 共有4个重载(带 GUIStyle 的可以配置样式)
    private void OnGUI()
    {
        // 会返回输入的内容
        contentOver = GUI.TextField(textOverRect, contentOver);
        //GUI.TextField(textRect, content, guiStyle);

        // 限制最大输入长度
        contentMax = GUI.TextField(textMaxRect, contentMax, 4);
        //GUI.TextField(textRect, contentMax, 4, guiStyle);
    }
}
3.2、Result

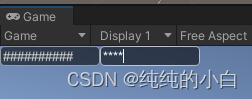
4、PasswordField
4.1、CODE
using UnityEngine;

public class OnGui_PasswordField : MonoBehaviour
{
    Rect passwordOverRect = new Rect(0, 0, 100, 20);
    Rect passwordMaxRect = new Rect(100, 0, 100, 20);

    public GUIStyle guiStyle;

    public string passwordOver;
    public string passwordMax;

    // GUI.PasswordField 共有4个重载(带 GUIStyle 的可以配置样式)
    private void OnGUI()
    {
        // 会返回输入的内容
        passwordOver = GUI.PasswordField(passwordOverRect, passwordOver, '#');
        //GUI.PasswordField(passwordOverRect, passwordOver, '', guiStyle);

        // 限制最大输入长度
        passwordMax = GUI.PasswordField(passwordMaxRect, passwordMax, '*', 4);
        //GUI.PasswordField(passwordOverRect, passwordOver, '', 4, guiStyle);
    }
}
4.2、Result
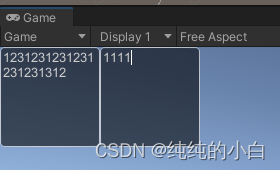
5、TextArea
用法完全跟 TextField 一样
5.1、CODE
using UnityEngine;

public class OnGui_TextArea : MonoBehaviour
{
    Rect textOverRect = new Rect(0, 0, 100, 100);
    Rect textMaxRect = new Rect(100, 0, 100, 100);

    public GUIStyle guiStyle;
    public GUIContent guiContent;

    public string contentOver;
    public string contentMax;

    // GUI.TextArea 共有4个重载(带 GUIStyle 的可以配置样式)
    private void OnGUI()
    {
        contentOver = GUI.TextArea(textOverRect, contentOver); // 会返回输入的内容
        //GUI.TextArea(textRect, content, guiStyle);

        contentMax = GUI.TextArea(textMaxRect, contentMax, 4); // 限制最大输入长度
        //GUI.TextArea(textRect, contentMax, 4, guiStyle);
    }
}
5.2、Result
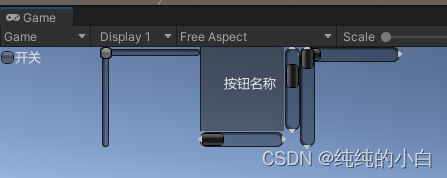
6、其他
6.1、CODE
using UnityEngine;

public class OnGui_Other : MonoBehaviour
{
    Rect toggleRect = new Rect(0, 0, 100, 100);
    Rect sliderRect = new Rect(100, 0, 100, 100);
    Rect beginScrollViewRect = new Rect(200, 0, 100, 100);
    Rect scrollbarRect = new Rect(300, 0, 100, 100);

    public bool toggle;
    public float horizontalSlider;
    public float verticalSlider;
    public Vector2 scrollView;
    public float scrollbar;

    private void OnGUI()
    {
        // 开关:共7个重载
        toggle = GUI.Toggle(toggleRect, toggle, "开关");

        // 滑动条:横竖各3个重载
        horizontalSlider = GUI.HorizontalSlider(sliderRect, horizontalSlider, 0, 10);
        verticalSlider = GUI.VerticalSlider(sliderRect, verticalSlider, 0, 10);

        // 滚动条:横竖各2个重载
        scrollbar = GUI.HorizontalScrollbar(scrollbarRect, scrollbar, 10, 0, 100);
        scrollbar = GUI.VerticalScrollbar(scrollbarRect, scrollbar, 10, 0, 100);

        // 滚动视图 :开始和结束之间是内容
        {
            // 开启:共4个重载
            scrollView = GUI.BeginScrollView(beginScrollViewRect, scrollView, new Rect(0, 0, 500, 500));

            GUI.Button(new Rect(0, 0, 100, 300), "按钮名称");
            // ...

            // 结束
            GUI.EndScrollView();
        }
    }
}
6.2、Result


 3107
3107


 被折叠的 条评论
为什么被折叠?
被折叠的 条评论
为什么被折叠?
 到【灌水乐园】发言


