


点击这里可以查看我所有关于图形图像处理的文章
简单图片包括Bitmap和BitmapFactory两类。
Bitmap用于显示一张位图,BitmapFactory用于封装一个Bitmap对象。
如果想将Bitmap封装成一个BitmapFactory对象,可以调用BitmapDrawable的构造方法。
Bitmap bitmap = BitmapFactory.decodeFile("draw1.jpg");
BitmapDrawable bd = new BitmapDrawable(bitmap);
如果需要获取BitmapDrawable包装的 Bitmap对象,可以调用 BitmapDrawable的getBitmap()方法。
Bitmap bitmap = bd.getBitmap()Bitmap类常用函数
| 编号 | 方 法 | 描 述 |
|---|---|---|
| 1 | createBitmap(Bitmap source,int x,int y,int width,int height) | 从原位图source的指定坐标点(x,y)开始,截取宽为width,长为height的部分,创建一个新的Bitm对象 |
| 2 | createBitmap(int width,int height,Bitmap.Config cpnfig) | 创建一个宽度为width,长为height的新位图 |
| 3 | getHeight() | 获取位图的高度 |
| 4 | getWidth() | 获取位图的宽度 |
| 5 | isRecycle() | 返回该Bitmap对象是否已被收回 |
| 6 | recycle() | 强制一个Bitmap对象立刻收回自己 |
简单图片实例—图片放大器
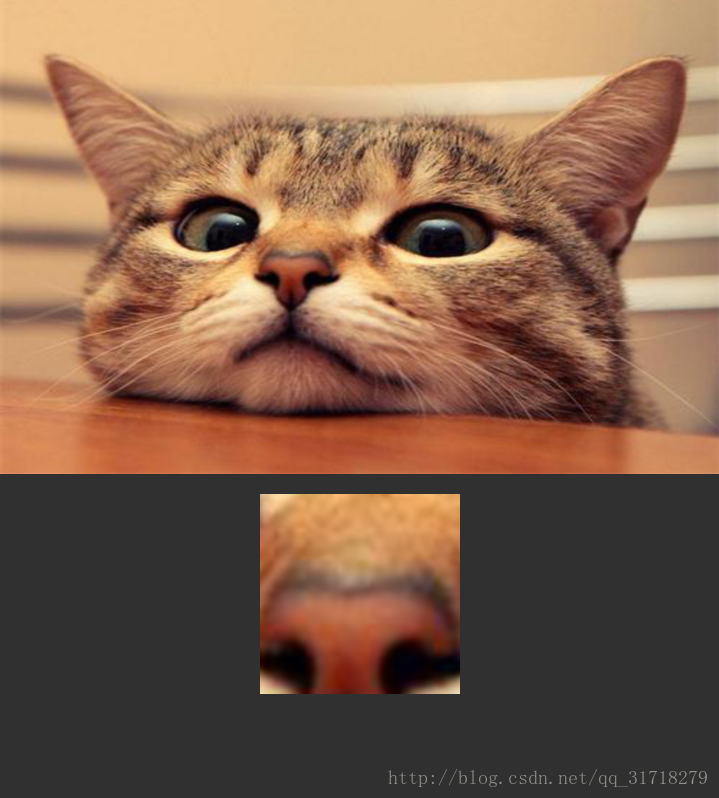
说明:这个图片放大器要实现的功能就:是在一张图片上我们点击哪个区域,会对该处的细节进行放大处理。
activity_main.xml
<?xml version="1.0" encoding="utf-8"?>
<LinearLayout xmlns:android="http://schemas.android.com/apk/res/android"
    android:layout_width="match_parent"
    android:layout_height="match_parent"
    android:orientation="vertical">
    <ImageView
        android:id="@+id/bitmap1"
        android:layout_width="match_parent"
        android:layout_height="240dp"
        android:scaleType="fitXY"/>
    <ImageView
        android:id="@+id/bitmap2"
        android:layout_width="100dp"
        android:layout_height="100dp"
        android:layout_gravity="center_horizontal"
        android:layout_marginTop="10dp"/>
</LinearLayout>
MainActivity.java
package com.file.file;

import android.app.Activity;
import android.graphics.Bitmap;
import android.graphics.BitmapFactory;
import android.graphics.drawable.BitmapDrawable;
import android.os.Bundle;
import android.view.MotionEvent;
import android.view.View;
import android.widget.ImageView;

public class MainActivity extends Activity {

    @Override
    protected void onCreate(Bundle savedInstanceState) {
        super.onCreate(savedInstanceState);
        setContentView(R.layout.activity_main);
        final ImageView bitmap1 = (ImageView)findViewById(R.id.bitmap1);
        final ImageView bitmap2 = (ImageView)findViewById(R.id.bitmap2);
//        获取图片
        bitmap1.setImageBitmap(BitmapFactory.decodeResource(getResources(),R.drawable.cat));
        bitmap1.setOnTouchListener(new View.OnTouchListener() {
            @Override
//            设置触摸监听器
            public boolean onTouch(View view, MotionEvent motionEvent) {
                BitmapDrawable bitmapDrawable = (BitmapDrawable)bitmap1.getDrawable();
                Bitmap bitmap = bitmapDrawable.getBitmap();
                float xchange = bitmap.getWidth()/(float)bitmap1.getWidth();
                float ychange = bitmap.getHeight()/(float)bitmap1.getHeight();

                int x = (int)(motionEvent.getX() * xchange);
                int y = (int)(motionEvent.getY() * ychange);
//          获取原图和手机上照片显示的比例(一般手机会对图片按比例缩小)


//                我在下面设置的是以(x,y)为中心,长宽各为100的正方形
//                如果X/Y +50 > 图片的长度/宽度,就表名这已经到达边缘
//                那么就将中心设置在距离边缘50位置,以下雷同
                if (x+50>bitmap.getWidth()){
                    x = bitmap.getWidth()-50;
                }
                if (x-50<0){
                    x=50;
                }
                if (y+50>bitmap.getHeight()){
                    y = bitmap.getHeight()-50;
                }
                if (y-50<0){
                    y=50;
                }


                bitmap2.setImageBitmap(Bitmap.createBitmap(bitmap,x-50,y-50,100,100));
                bitmap2.setVisibility(View.VISIBLE);

                return false;
            }
        });
    }

}
实现效果截图


 480
480


 被折叠的 条评论
为什么被折叠?
被折叠的 条评论
为什么被折叠?
 到【灌水乐园】发言


