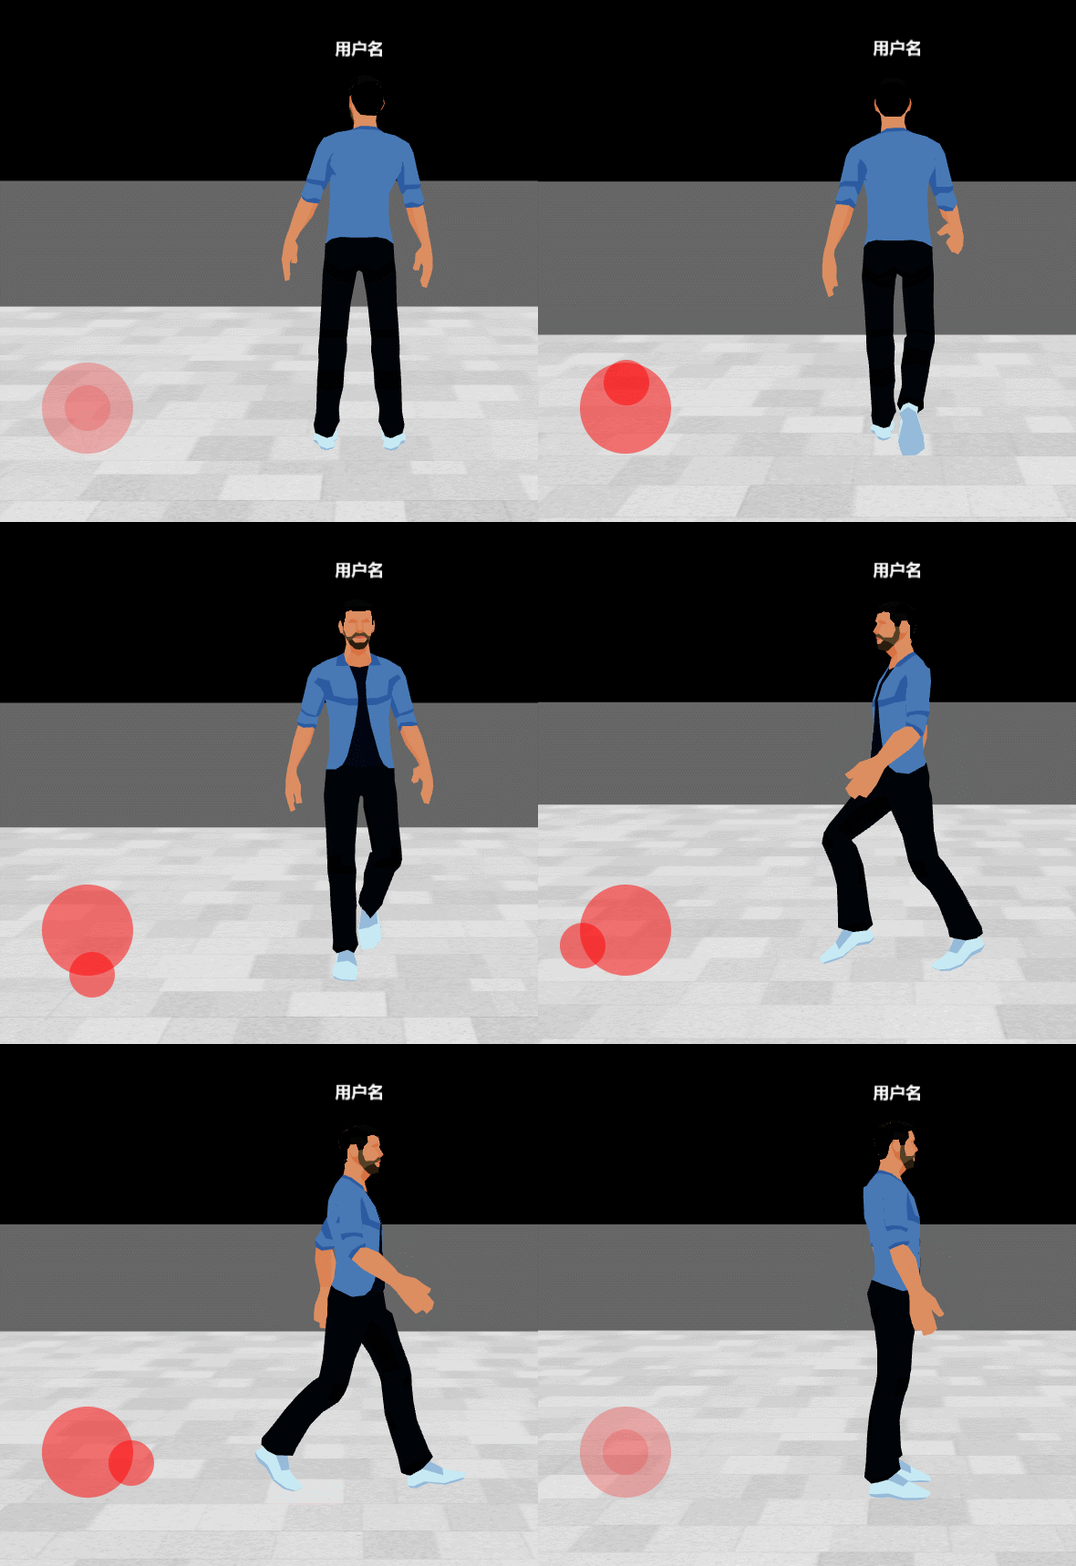
nippleJs是一个虚拟摇杆的js库,专为可触摸的设备提供接口,常被用于游戏和可操作硬件设备的app或网页中
在使用Threejs搭建的3D场景中使用nippleJs控制人物行走及镜头跟随的功能,效果如图:
1、下载nippleJs:Nipplejs by yoannmoinet
或npm安装:
npm install nipplejs --save2、创建摇杆:
const joystickContainer = document.getElementById("joystick-container");
const option = {
    zone: joystickContainer,
    mode: "static", // 静态模式,摇杆固定在屏幕上
    position: { top: "70%", left: "20%" }, // 摇杆的初始位置
    color: "red", // 摇杆的颜色
}
// 初始化虚拟摇杆
const joystick = nipplejs.create(option);
其中option其他配置参数如下:
//options 参数说明
var options = {
    zone: Element,                  // active zone
    color: String,
    size: Integer,
    threshold: Float,               // before triggering a directional event
    fadeTime: Integer,              // transition time
    multitouch: Boolean,
    maxNumberOfNipples: Number,     // when multitouch, what is too many?
    dataOnly: Boolean,              // no dom element whatsoever
    position: Object,               // preset position for 'static' mode
    mode: String,                   // 'dynamic', 'static' or 'semi'
    restJoystick: Boolean|Object,   // Re-center joystick on rest state
    restOpacity: Number,            // opacity when not 'dynamic' and rested
    lockX: Boolean,                 // only move on the X axis
    lockY: Boolean,                 // only move on the Y axis
    catchDistance: Number,          // distance to recycle previous joystick in
                                    // 'semi' mode
    shape: String,                  // 'circle' or 'square'
    dynamicPage: Boolean,           // Enable if the page has dynamically visible elements
    follow: Boolean,                // Makes the joystick follow the thumbstick
};
3、添加人物绑定
// 主人物
function host() {
    let gloader = new THREE.GLTFLoader();
    const dracoLoader = new THREE.DRACOLoader();
    dracoLoader.setDecoderPath("./plugins/Three/libs/draco/"); // 设置public下的解码路径,注意最后面的/
    gloader.setDRACOLoader(dracoLoader);
        gloader.load("./models/man.glb", (result) => {
        peopleObj = result.scene;
        peopleObj.position.set(0, 0, 1);
        peopleAnimations = result.animations;

        // 组合对象添加到场景中
        scene.add(peopleObj);

        calcplayerdir(); // 计算角度

        mixer = new THREE.AnimationMixer(peopleObj);
        mixerArr.push(mixer);
        activeAction = mixer.clipAction(peopleAnimations[1]);
        activeAction.play();
    });
}
4、给摇杆添加事件
joystick
  .on("start", function (evt, data) {
    canmove = true;
    hostWalk();   //人物行走动画
    controls.enabled = false;
    lastpx = data.position.x;
    lastpy = data.position.y;
  })
  .on("move", function (evt, data) {
    // direction有不存在的情况
    // console.log(data.direction);
    if (data.direction) {
      canmove = true;
      peopleObj.movedistance = data.distance;
      if (data.direction) {
        playerforward.set(
          lastpx - data.position.x,
          0,
          lastpy - data.position.y
        );
      }
    }
  })
  .on("end", function (evt, data) {
    canmove = false;
    hostStop();    //人物行走动画停止
    if (!peopleObj) return;
    controls.target.copy(peopleObj.position).add(new THREE.Vector3(0, 1, 0));
    controls.enabled = true;
  });
5、相机镜头和人物跟随
//相机跟随
function cameraFollow() {
  if (!peopleObj || controls.enabled) return;

  const d = new THREE.Vector3();
  d.copy(dir);
  d.multiplyScalar(1);
  d.negate();

  const playerpos = new THREE.Vector3();
  playerpos.copy(peopleObj.position);
  playerpos.add(d);
  camera.position.copy(playerpos).add(new THREE.Vector3(0, 1, 0));
  camera.lookAt(new THREE.Vector3(peopleObj.position.x, peopleObj.position.y + 1, peopleObj.position.z));
}
//人物行走
function run(delta) {
    if (qqq) {
        const forward = new THREE.Vector3(0, 0, 0);
        forward.copy(playerforward);
        forward.applyQuaternion(qqq);
        forward.normalize();
        forward.multiplyScalar(movedistance * 0.01 * delta);
        const p = new THREE.Vector3().copy(peopleObj.position);
        p.add(forward);
        peopleObj.lookAt(p);
        peopleObj.position.copy(p);
    }
}
6、计算角度
// 触摸或鼠标抬起后,重新计算角度
renderer.domElement.addEventListener("touchend", () => {
  calcplayerdir();
});
renderer.domElement.addEventListener("mouseup", () => {
  calcplayerdir();
});

/* 计算角度*/
function calcplayerdir() {
  const campos = new THREE.Vector3();
  campos.copy(camera.position);
  const playerpos = new THREE.Vector3();
  playerpos.copy(peopleObj.position);
  campos.y = playerpos.y;
  dir = playerpos.sub(campos);
  console.log("ddd: ", dir);

  const d = new THREE.Vector3();
  d.copy(dir);
  d.multiplyScalar(2);
  const p = new THREE.Vector3().copy(peopleObj.position);
  p.add(d);
  const player1 = peopleObj.clone();
  player1.lookAt(p);
  player1.updateMatrixWorld();
  player1.visible = false;
  qqq = new THREE.Quaternion();
  qqq.copy(player1.quaternion);
}
7、放到render里面渲染
controls.update(dt);
if (peopleObj) {
        if (canmove) {
        run(dt);
        }
        cameraFollow();
  }
更改摇杆样式,只更改颜色可通过option的参数实现,先让圆盘变得好像自己设计的图,更改样式即可,主要要加!important来强制约束
.back{
    background: url(images/back_bg.png) no-repeat center !important;
    background-size: 100% !important;
}
.front{
    background: url(images/front_bg.png) no-repeat center !important;
    background-size: 100% !important;
}
到这里使用nippleJs创建摇杆控制人物及镜头的案例就做完了~
 你的鼓励将是我创作的最大动力~


 1499
1499

 被折叠的 条评论
为什么被折叠?


