


 本文详细指导如何在Android设备上使用OpenCV深度学习模块运行MobileNet模型,包括设置环境、创建项目、配置依赖和实际操作,让你了解从头到尾的实践过程。
OpenCV: How to run deep networks on Android device
Prev Tutorial: How to schedule your network for Halide backend
Next Tutorial: YOLO DNNs
| Original author | Dmitry Kurtaev |
| Compatibility | OpenCV >= 3.3 |
Introduction
In this tutorial you'll know how to run deep learning networks on Android device using OpenCV deep learning module.
Tutorial was written for the following versions of corresponding software:
- Android Studio 2.3.3
- OpenCV 3.3.0+
Requirements
- Download and install Android Studio from https://developer.android.com/studio.
- Get the latest pre-built OpenCV for Android release from Releases · opencv/opencv · GitHub and unpack it (for example,
opencv-4.X.Y-android-sdk.zip). - Download MobileNet object detection model from GitHub - chuanqi305/MobileNet-SSD: Caffe implementation of Google MobileNet SSD detection network, with pretrained weights on VOC0712 and mAP=0.727.. We need a configuration file
MobileNetSSD_deploy.prototxtand weightsMobileNetSSD_deploy.caffemodel.
Create an empty Android Studio project
- Open Android Studio. Start a new project. Let's call it
opencv_mobilenet.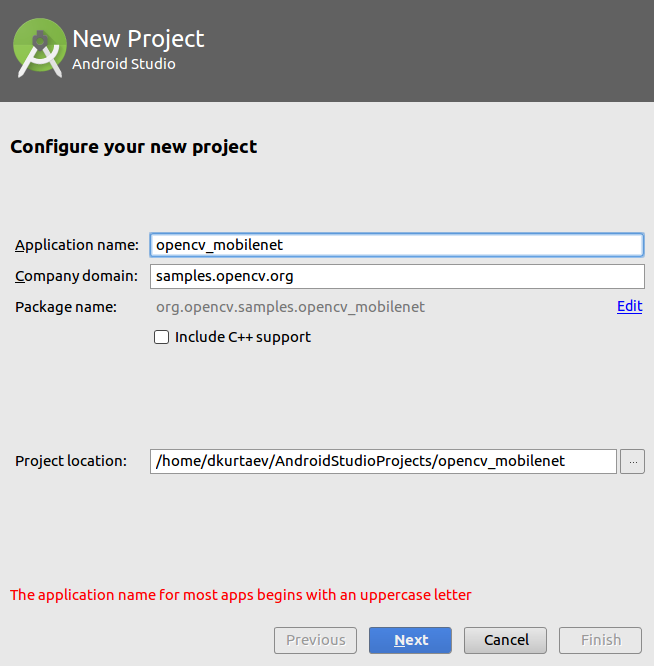
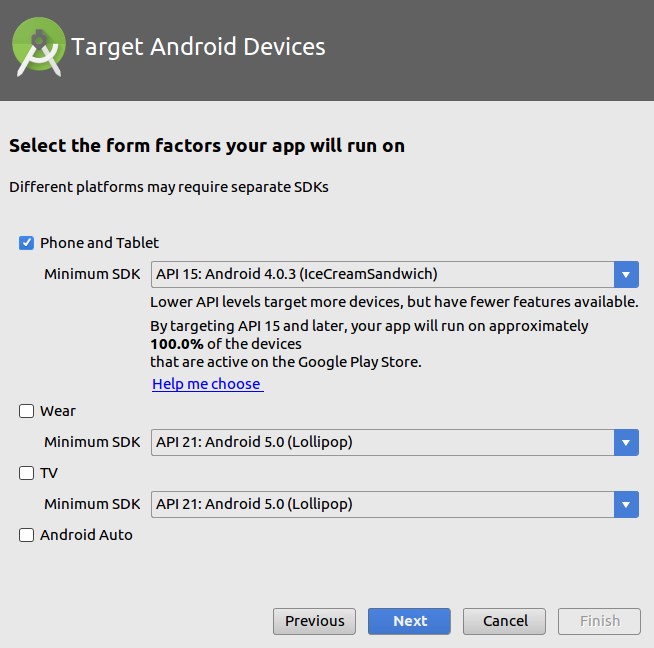
- Keep default target settings.
-
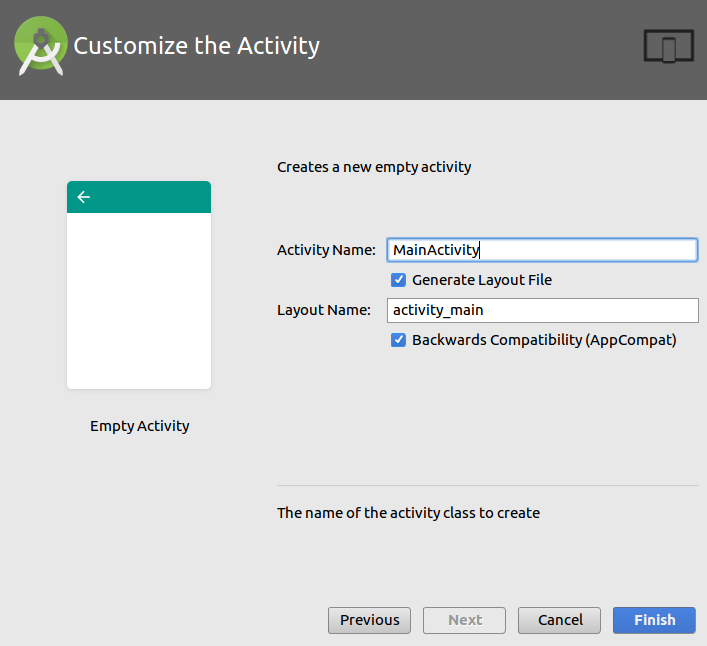
Use "Empty Activity" template. Name activity as
MainActivitywith a corresponding layoutactivity_main.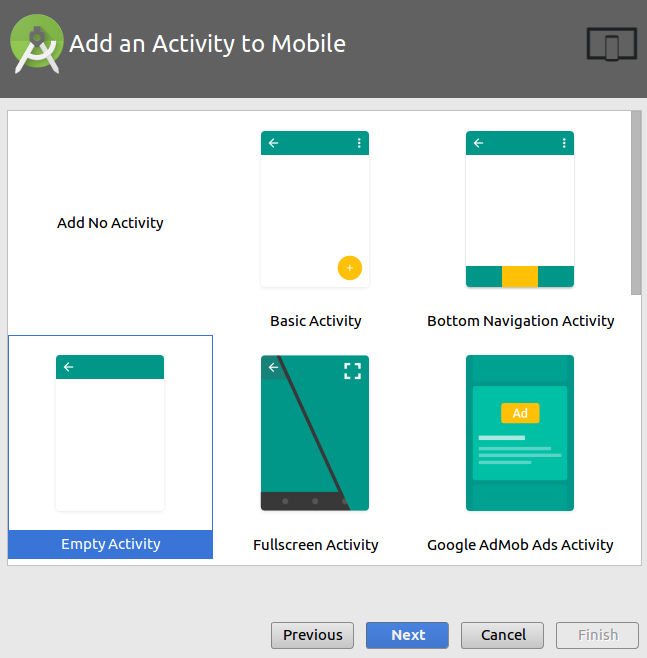
- Wait until a project was created. Go to
Run->Edit Configurations. ChooseUSB Deviceas target device for runs.
Plug in your device and run the project. It should be installed and launched successfully before we'll go next.
Note
Read Introduction into Android Development in case of problems.
Add OpenCV dependency
-
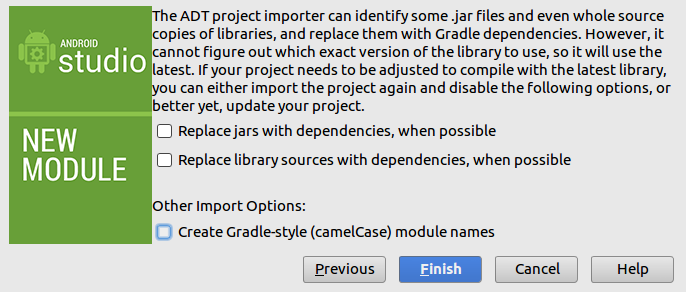
Go to
File->New->Import moduleand provide a path tounpacked_OpenCV_package/sdk/java. The name of module detects automatically. Disable all features that Android Studio will suggest you on the next window.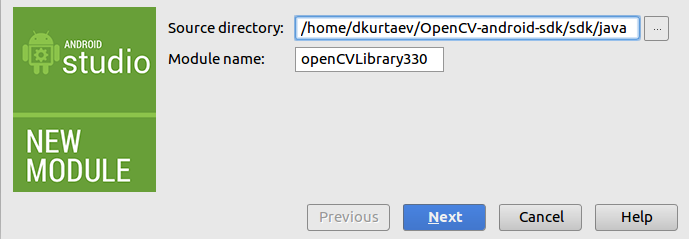
-
Open two files:
AndroidStudioProjects/opencv_mobilenet/app/build.gradleAndroidStudioProjects/opencv_mobilenet/openCVLibrary330/build.gradle
Copy both
compileSdkVersionandbuildToolsVersionfrom the first file to the second one.compileSdkVersion 14->compileSdkVersion 26buildToolsVersion "25.0.0"->buildToolsVersion "26.0.1" - Make the project. There is no errors should be at this point.
-
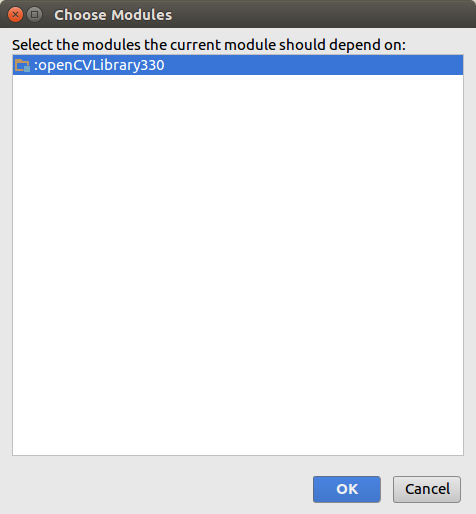
Go to
File->Project Structure. Add OpenCV module dependency.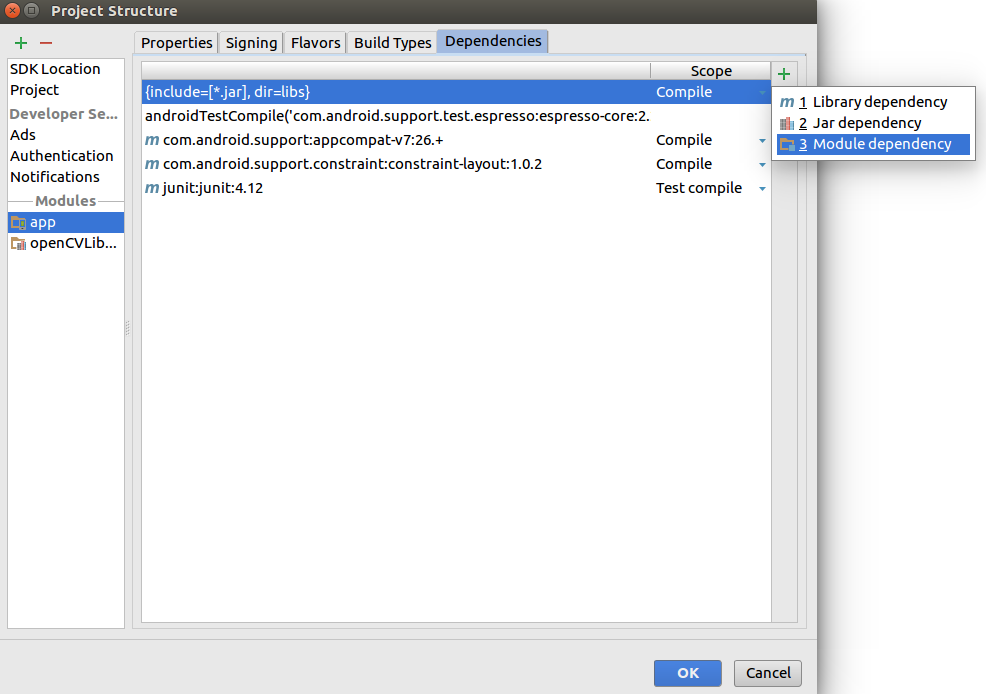
- Install once an appropriate OpenCV manager from
unpacked_OpenCV_package/apkto target device.adb install OpenCV_3.3.0_Manager_3.30_armeabi-v7a.apk
- Congratulations! We're ready now to make a sample using OpenCV.
Make a sample
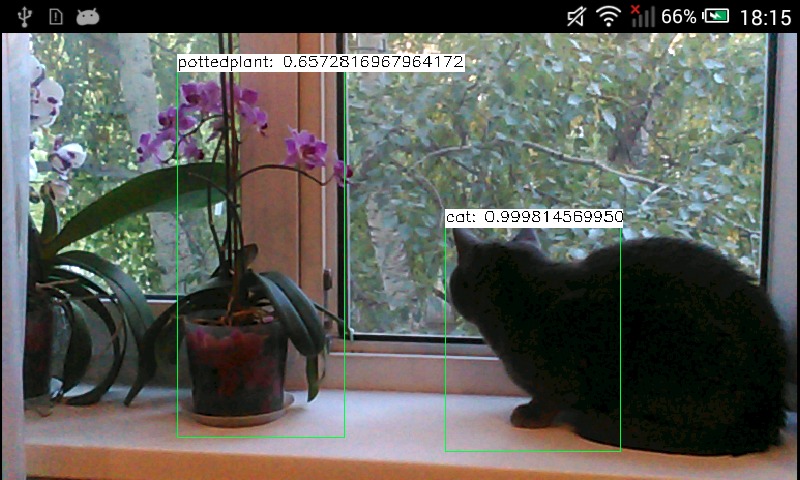
Our sample will takes pictures from a camera, forwards it into a deep network and receives a set of rectangles, class identifiers and confidence values in [0, 1] range.
- First of all, we need to add a necessary widget which displays processed frames. Modify
app/src/main/res/layout/activity_main.xml:<?xml version="1.0" encoding="utf-8"?>
<FrameLayout xmlns:android="http://schemas.android.com/apk/res/android"
xmlns:app="http://schemas.android.com/apk/res-auto"
xmlns:tools="http://schemas.android.com/tools"
android:layout_width="match_parent"
android:layout_height="match_parent"
tools:context="org.opencv.samples.opencv_mobilenet.MainActivity">
<org.opencv.android.JavaCameraView
android:id="@+id/CameraView"
android:layout_width="match_parent"
android:layout_height="match_parent"
android:visibility="visible" />
</FrameLayout>
- Put downloaded
MobileNetSSD_deploy.prototxtandMobileNetSSD_deploy.caffemodelintoapp/build/intermediates/assets/debugfolder. - Modify
/app/src/main/AndroidManifest.xmlto enable full-screen mode, set up a correct screen orientation and allow to use a camera.<?xml version="1.0" encoding="utf-8"?>
<manifest xmlns:android="http://schemas.android.com/apk/res/android"
package="org.opencv.samples.opencv_mobilenet"
>
<application
android:allowBackup="true"
android:icon="@mipmap/ic_launcher"
android:label="@string/app_name"
android:roundIcon="@mipmap/ic_launcher_round"
android:supportsRtl="true"
android:theme="@style/Theme.AppCompat.NoActionBar"> <!--Full screen mode-->
<activity android:name=".MainActivity"
android:screenOrientation="landscape"> <!--Screen orientation-->
<intent-filter>
<action android:name="android.intent.action.MAIN" />
<category android:name="android.intent.category.LAUNCHER" />
</intent-filter>
</activity>
</application>
<!--Allow to use a camera-->
<uses-permission android:name="android.permission.CAMERA"/>
<uses-feature android:name="android.hardware.camera" android:required="false"/>
<uses-feature android:name="android.hardware.camera.autofocus" android:required="false"/>
<uses-feature android:name="android.hardware.camera.front" android:required="false"/>
<uses-feature android:name="android.hardware.camera.front.autofocus" android:required="false"/>
</manifest>
- Replace content of
app/src/main/java/org/opencv/samples/opencv_mobilenet/MainActivity.java:package org.opencv.samples.opencv_mobilenet;
import android.content.Context;
import android.content.res.AssetManager;
import android.os.Bundle;
import android.support.v7.app.AppCompatActivity;
import android.util.Log;
import org.opencv.android.BaseLoaderCallback;
import org.opencv.android.CameraBridgeViewBase;
import org.opencv.android.CameraBridgeViewBase.CvCameraViewFrame;
import org.opencv.android.CameraBridgeViewBase.CvCameraViewListener2;
import org.opencv.android.LoaderCallbackInterface;
import org.opencv.android.OpenCVLoader;
import org.opencv.core.Core;
import org.opencv.core.Mat;
import org.opencv.core.Point;
import org.opencv.core.Scalar;
import org.opencv.core.Size;
import org.opencv.dnn.Net;
import org.opencv.dnn.Dnn;
import org.opencv.imgproc.Imgproc;
import java.io.BufferedInputStream;
import java.io.File;
import java.io.FileOutputStream;
import java.io.IOException;
public class MainActivity extends AppCompatActivity implements CvCameraViewListener2 {
// Initialize OpenCV manager.
private BaseLoaderCallback mLoaderCallback = new BaseLoaderCallback(this) {
@Override
public void onManagerConnected(int status) {
switch (status) {
case LoaderCallbackInterface.SUCCESS: {
Log.i(TAG, "OpenCV loaded successfully");
mOpenCvCameraView.enableView();
break;
}
default: {
super.onManagerConnected(status);
break;
}
}
}
};
@Override
public void onResume() {
super.onResume();
OpenCVLoader.initAsync(OpenCVLoader.OPENCV_VERSION, this, mLoaderCallback);
}
@Override
protected void onCreate(Bundle savedInstanceState) {
super.onCreate(savedInstanceState);
setContentView(R.layout.activity_main);
// Set up camera listener.
mOpenCvCameraView = (CameraBridgeViewBase)findViewById(R.id.CameraView);
mOpenCvCameraView.setVisibility(CameraBridgeViewBase.VISIBLE);
mOpenCvCameraView.setCvCameraViewListener(this);
}
// Load a network.
public void onCameraViewStarted(int width, int height) {
String proto = getPath("MobileNetSSD_deploy.prototxt", this);
String weights = getPath("MobileNetSSD_deploy.caffemodel", this);
net = Dnn.readNetFromCaffe(proto, weights);
Log.i(TAG, "Network loaded successfully");
}
public Mat onCameraFrame(CvCameraViewFrame inputFrame) {
final int IN_WIDTH = 300;
final int IN_HEIGHT = 300;
final float WH_RATIO = (float)IN_WIDTH / IN_HEIGHT;
final double IN_SCALE_FACTOR = 0.007843;
final double MEAN_VAL = 127.5;
final double THRESHOLD = 0.2;
// Get a new frame
Mat frame = inputFrame.rgba();
Imgproc.cvtColor(frame, frame, Imgproc.COLOR_RGBA2RGB);
// Forward image through network.
Mat blob = Dnn.blobFromImage(frame, IN_SCALE_FACTOR,
new Size(IN_WIDTH, IN_HEIGHT),
new Scalar(MEAN_VAL, MEAN_VAL, MEAN_VAL), /*swapRB*/false, /*crop*/false);
net.setInput(blob);
Mat detections = net.forward();
int cols = frame.cols();
int rows = frame.rows();
detections = detections.reshape(1, (int)detections.total() / 7);
for (int i = 0; i < detections.rows(); ++i) {
double confidence = detections.get(i, 2)[0];
if (confidence > THRESHOLD) {
int classId = (int)detections.get(i, 1)[0];
int left = (int)(detections.get(i, 3)[0] * cols);
int top = (int)(detections.get(i, 4)[0] * rows);
int right = (int)(detections.get(i, 5)[0] * cols);
int bottom = (int)(detections.get(i, 6)[0] * rows);
// Draw rectangle around detected object.
Imgproc.rectangle(frame, new Point(left, top), new Point(right, bottom),
new Scalar(0, 255, 0));
String label = classNames[classId] + ": " + confidence;
int[] baseLine = new int[1];
Size labelSize = Imgproc.getTextSize(label, Imgproc.FONT_HERSHEY_SIMPLEX, 0.5, 1, baseLine);
// Draw background for label.
Imgproc.rectangle(frame, new Point(left, top - labelSize.height),
new Point(left + labelSize.width, top + baseLine[0]),
new Scalar(255, 255, 255), Imgproc.FILLED);
// Write class name and confidence.
Imgproc.putText(frame, label, new Point(left, top),
Imgproc.FONT_HERSHEY_SIMPLEX, 0.5, new Scalar(0, 0, 0));
}
}
return frame;
}
public void onCameraViewStopped() {}
// Upload file to storage and return a path.
private static String getPath(String file, Context context) {
AssetManager assetManager = context.getAssets();
BufferedInputStream inputStream = null;
try {
// Read data from assets.
inputStream = new BufferedInputStream(assetManager.open(file));
byte[] data = new byte[inputStream.available()];
inputStream.read(data);
inputStream.close();
// Create copy file in storage.
File outFile = new File(context.getFilesDir(), file);
FileOutputStream os = new FileOutputStream(outFile);
os.write(data);
os.close();
// Return a path to file which may be read in common way.
return outFile.getAbsolutePath();
} catch (IOException ex) {
Log.i(TAG, "Failed to upload a file");
}
return "";
}
private static final String TAG = "OpenCV/Sample/MobileNet";
private static final String[] classNames = {"background",
"aeroplane", "bicycle", "bird", "boat",
"bottle", "bus", "car", "cat", "chair",
"cow", "diningtable", "dog", "horse",
"motorbike", "person", "pottedplant",
"sheep", "sofa", "train", "tvmonitor"};
private Net net;
private CameraBridgeViewBase mOpenCvCameraView;
}
- Launch an application and make a fun!


 623
623

 被折叠的 条评论
为什么被折叠?
被折叠的 条评论
为什么被折叠?
 到【灌水乐园】发言


