


工厂模式
工厂模式是创建型设计模式,它提供了一种创建对象的方式。
工厂模式用于创建对象而无需指定其具体类。
样例:首先,定义一个形状的抽象基类:
#include <iostream>
#include <memory>

// 抽象产品:形状
class Shape {
public:
    virtual ~Shape() {}
    virtual void draw() const = 0;
};

// 具体产品:圆形
class Circle : public Shape {
public:
    void draw() const override {
        std::cout << "Drawing Circle" << std::endl;
    }
};

// 具体产品:矩形
class Rectangle : public Shape {
public:
    void draw() const override {
        std::cout << "Drawing Rectangle" << std::endl;
    }
};
接下来,定义工厂类来生成形状对象:
// 工厂类:形状工厂
class ShapeFactory {
public:
    static std::unique_ptr<Shape> createShape(const std::string& shapeType) {
        if (shapeType == "CIRCLE") {
            return std::make_unique<Circle>();
        } else if (shapeType == "RECTANGLE") {
            return std::make_unique<Rectangle>();
        } else {
            throw std::runtime_error("Invalid shape type");
        }
    }
};
最后,使用工厂来创建不同的形状对象:
int main() {
    try {
        auto circle = ShapeFactory::createShape("CIRCLE");
        circle->draw();

        auto rectangle = ShapeFactory::createShape("RECTANGLE");
        rectangle->draw();

        // 尝试创建一个不支持的形状,将抛出异常
        // auto unknownShape = ShapeFactory::createShape("UNKNOWN");
    } catch (const std::exception& e) {
        std::cerr << e.what() << std::endl;
    }

    return 0;
}
单例模式(懒汉式、饿汉式)
观察者模式
观察者模式(Observer Pattern)是一种行为设计模式,它定义了一种一对多的依赖关系,让多个观察者对象可以同时监听某一个主题对象,当主题对象状态发生变化时,它的所有观察者都会得到通知并自动更新。
#include <iostream>
#include <vector>
#include <functional>

// 主题类
class Subject {
public:
    void addObserver(const std::function<void()>& observer) {
        observers.push_back(observer);
    }

    void notifyObservers() {
        for (const auto& observer : observers) {
            observer();
        }
    }

private:
    std::vector<std::function<void()>> observers;
};

// 具体观察者类
class ConcreteObserver {
public:
    ConcreteObserver(const std::string& name) : name(name) {}

    void update() {
        std::cout << "Observer " << name << " has been notified!" << std::endl;
    }

private:
    std::string name;
};

int main() {
    // 创建主题对象
    Subject subject;

    // 创建具体观察者对象
    ConcreteObserver observer1("Observer 1");
    ConcreteObserver observer2("Observer 2");

    // 注册观察者到主题对象中
    subject.addObserver(std::bind(&ConcreteObserver::update, &observer1));
    subject.addObserver(std::bind(&ConcreteObserver::update, &observer2));

    // 主题对象状态发生变化,通知观察者
    subject.notifyObservers();

    return 0;
}
在这个示例中,Subject 类表示主题对象,它维护了一个观察者列表 observers,可以动态添加观察者。addObserver 函数用于向Subject对象注册观察者,接受一个函数对象作为参数。notifyObservers 函数用于通知所有注册的观察者,通过调用观察者的函数对象来实现通知。
ConcreteObserver 类的 update 函数,在接收到通知时会执行该函数以进行更新操作。
适配器模式
适配器模式用于将一个类的接口转换成所期望的另一个接口。
这允许原本接口不兼容的类可以一起工作。
#include <iostream>
#include <string>

// 目标接口(Target Interface),客户端所期待的接口
class Target {
public:
    virtual ~Target() {}
    virtual void request() const = 0;
};

// 需要被适配的类(Adaptee),其接口不符合客户端的需求
class Adaptee {
public:
    void specificRequest() const {
        std::cout << "Adaptee's specific request" << std::endl;
    }
};

// 对象适配器,通过组合方式实现适配器
class Adapter : public Target {
private:
    Adaptee *adaptee; // 对需要适配的类的引用
public:
    Adapter(Adaptee *adaptee) : adaptee(adaptee) {}

    void request() const override {
        // 调用Adaptee的方法来实现Target接口的方法
        adaptee->specificRequest();
    }
};

int main() {
    Adaptee adaptee;
    Target *adapter = new Adapter(&adaptee);

    // 客户端通过Target接口调用request方法
    adapter->request();

    delete adapter;
    return 0;
}
在这个例子中,Adaptee 类有一个不符合 Target 接口的 specificRequest() 方法。
然后,我们创建了 Adapter 类,它实现了 Target 接口,并通过组合方式引入了 Adaptee 类的对象。
使用 Adapter 类调用 Adaptee 类的 specificRequest() 方法,达到了适配器模式的效果。
外观模式
外观模式(Facade Pattern)旨在为复杂系统提供一个简化的接口,使得客户端可以更容易地使用系统。
在这个模式中,外观类提供了一个高层次的接口,隐藏了系统的复杂性,使得只需要与外观类交互,而不需要直接与系统的各个子系统交互。
#include <iostream>
#include <string>

// 子系统A
class SubsystemA {
public:
    void operationA() {
        std::cout << "SubsystemA: Performing operation A\n";
    }
};

// 子系统B
class SubsystemB {
public:
    void operationB() {
        std::cout << "SubsystemB: Performing operation B\n";
    }
};

// 子系统C
class SubsystemC {
public:
    void operationC() {
        std::cout << "SubsystemC: Performing operation C\n";
    }
};

// 外观类
class Facade {
private:
    SubsystemA subsystemA;
    SubsystemB subsystemB;
    SubsystemC subsystemC;

public:
    // 提供一个简化的接口,封装了对子系统的操作
    void operation() {
        std::cout << "Facade: Initiate complex operation...\n";
        subsystemA.operationA();
        subsystemB.operationB();
        subsystemC.operationC();
        std::cout << "Facade: Complex operation completed\n";
    }
};

int main() {
    // 客户端只需要与外观类交互,而不需要了解内部子系统的复杂性
    Facade facade;
    facade.operation();

    return 0;
}
代理模式
代理模式是一种结构型设计模式,它允许你提供一个替代品,以控制对其他对象的访问。
下面是一个简单示例,我们以图书馆中书籍的借阅为例。
#include <iostream>
#include <string>

// 抽象主题(Subject)接口
class Book {
public:
    virtual void display() const = 0;
    virtual ~Book() {}
};

// 具体主题(Concrete Subject)
class RealBook : public Book {
    std::string title;
public:
    RealBook(const std::string& _title) : title(_title) {}

    void display() const override {
        std::cout << "Displaying book: " << title << std::endl;
    }
};

// 代理(Proxy)类
class BookProxy : public Book {
    std::string title;
    RealBook* realBook; // 代理内部保持了一个真实主题的引用
public:
    BookProxy(const std::string& _title) : title(_title), realBook(nullptr) {}

    ~BookProxy() {
        if (realBook)
            delete realBook;
    }

    // 惰性加载真实主题
    void display() const override {
        if (!realBook)
            realBook = new RealBook(title);
        realBook->display();
    }
};

int main() {
    // 使用代理
    BookProxy proxy("Design Patterns");
    proxy.display();

    return 0;
}
在这个例子中,Book 是抽象基类,定义了书籍的接口。
RealBook 是具体的书籍类,实现了这个接口。
而 BookProxy 是代理类,它保存了一个RealBook 对象的指针,并在需要时创建和使用这个真实对象。代理类在实际调用时,可以控制对真实对象的访问,比如实现惰性加载、访问控制等。
这个例子中,当我们调用代理对象的 display() 方法时,代理类会首先检查是否已经有了真实书籍对象的实例,如果没有则创建并显示真实对象,否则直接显示已有的真实对象。
装饰器模式(包装模式)
装饰器模式(Wrapper Pattern)是一种结构型设计模式,允许你通过将对象放入包含行为的特殊包装器类中来为对象添加新的行为。
下面是一个用Modern C++实现的装饰器模式的样例:
#include <iostream>
#include <memory>
// Component Interface
class Beverage {
public:
virtual std::string getDescription() const = 0;
virtual double cost() const = 0;
virtual ~Beverage() = default;
};
// Concrete Component
class Espresso : public Beverage {
public:
std::string getDescription() const override {
return "Espresso";
}
double cost() const override {
return 1.99;
}
};
// Decorator Base Class
class CondimentDecorator : public Beverage {
protected:
std::shared_ptr<Beverage> beverage;
public:
explicit CondimentDecorator(std::shared_ptr<Beverage> beverage) : beverage(std::move(beverage)) {}
};
// Concrete Decorator
class Milk : public CondimentDecorator {
public:
explicit Milk(std::shared_ptr<Beverage> beverage) : CondimentDecorator(std::move(beverage)) {}
std::string getDescription() const override {
return beverage->getDescription() + ", Milk";
}
double cost() const override {
return beverage->cost() + 0.5;
}
};
// Concrete Decorator
class Mocha : public CondimentDecorator {
public:
explicit Mocha(std::shared_ptr<Beverage> beverage) : CondimentDecorator(std::move(beverage)) {}
std::string getDescription() const override {
return beverage->getDescription() + ", Mocha";
}
double cost() const override {
return beverage->cost() + 0.7;
}
};
int main() {
// Order an Espresso
std::shared_ptr<Beverage> beverage = std::make_shared<Espresso>();
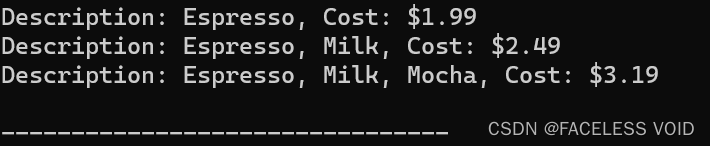
std::cout << "Description: " << beverage->getDescription() << ", Cost: $" << beverage->cost() << std::endl;
// Add Milk to the Espresso
beverage = std::make_shared<Milk>(beverage);
std::cout << "Description: " << beverage->getDescription() << ", Cost: $" << beverage->cost() << std::endl;
// Add Mocha to the Espresso with Milk
beverage = std::make_shared<Mocha>(beverage);
std::cout << "Description: " << beverage->getDescription() << ", Cost: $" << beverage->cost() << std::endl;
return 0;
}
在这个示例中,Beverage 是接口,Espresso 是具体组件,
CondimentDecorator 是装饰器的基类,而 Milk 和 Mocha 是具体装饰器。这个示例模拟了在咖啡上添加牛奶和摩卡的情况,每个装饰器都会修改原始咖啡的描述和价格。
桥接模式
它通过将抽象部分与实现分离,使它们可以独立变化。
#include <iostream>
#include <memory>

// 实现部分接口
class Implementor {
public:
    virtual ~Implementor() = default;
    virtual void OperationImpl() const = 0;
};
// 具体实现A
class ConcreteImplementorA : public Implementor {
public:
    void OperationImpl() const override {
        std::cout << "ConcreteImplementorA Operation Implementation\n";
    }
};
// 具体实现B
class ConcreteImplementorB : public Implementor {
public:
    void OperationImpl() const override {
        std::cout << "ConcreteImplementorB Operation Implementation\n";
    }
};

// 抽象部分接口
class Abstraction {
protected:
    std::shared_ptr<Implementor> implementor;
public:
    Abstraction(std::shared_ptr<Implementor> impl) : implementor(impl) {}
    virtual ~Abstraction() = default;
    virtual void Operation() const {
        implementor->OperationImpl();
    }
};
// 扩展抽象部分
class RefinedAbstraction : public Abstraction {
public:
    RefinedAbstraction(std::shared_ptr<Implementor> impl) : Abstraction(impl) {}
    void Operation() const override {
        std::cout << "RefinedAbstraction Operation\n";
        implementor->OperationImpl();
    }
};

int main() {
    std::shared_ptr<Implementor> implementorA = std::make_shared<ConcreteImplementorA>();
    std::shared_ptr<Implementor> implementorB = std::make_shared<ConcreteImplementorB>();

    std::unique_ptr<Abstraction> abstractionA = std::make_unique<RefinedAbstraction>(implementorA);
    abstractionA->Operation();

    std::unique_ptr<Abstraction> abstractionB = std::make_unique<RefinedAbstraction>(implementorB);
    abstractionB->Operation();

    return 0;
}
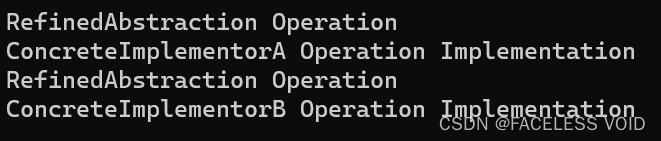
在这个示例中,桥接模式通过将抽象部分(Abstraction)与实现部分(Implementor)分离,使它们可以独立变化。
可以很容易地添加新的实现部分或新的抽象部分,而不会影响现有的代码。
模板方法模式
模板方法模式定义了一个算法的框架,但将一些步骤的实现留给子类。
这允许子类在不改变算法结构的情况下重新定义算法的特定步骤。
#include <iostream>
#include <string>

// Abstract class defining the template method
class AbstractClass {
public:
    void templateMethod() {
        primitiveOperation1();
        primitiveOperation2();
        // Optionally, additional hooks could be placed here
    }
    virtual ~AbstractClass() = default;
protected:
    // Primitive operations, to be implemented by subclasses
    virtual void primitiveOperation1() = 0;
    virtual void primitiveOperation2() = 0;
};


// Concrete class implementing AbstractClass
class ConcreteClass : public AbstractClass {
protected:
    void primitiveOperation1() override {
        std::cout << "ConcreteClass: Primitive Operation 1\n";
    }

    void primitiveOperation2() override {
        std::cout << "ConcreteClass: Primitive Operation 2\n";
    }
};


// Another Concrete class implementing AbstractClass
class AnotherConcreteClass : public AbstractClass {
protected:
    void primitiveOperation1() override {
        std::cout << "AnotherConcreteClass: Primitive Operation 1\n";
    }

    void primitiveOperation2() override {
        std::cout << "AnotherConcreteClass: Primitive Operation 2\n";
    }
};


int main() {
    AbstractClass* object1 = new ConcreteClass();
    AbstractClass* object2 = new AnotherConcreteClass();

    std::cout << "Client calls template method on ConcreteClass object:\n";
    object1->templateMethod();

    std::cout << "\nClient calls template method on AnotherConcreteClass object:\n";
    object2->templateMethod();

    delete object1;
    delete object2;

    return 0;
}
在这个示例中,AbstractClass是抽象类,其中定义了一个模板方法templateMethod(),该方法包含了算法的框架。
在main()函数中,我们创建了两个具体子类的对象,并调用了它们的templateMethod()方法,这样就可以看到模板方法模式的运行效果。
策略模式
这个简单
策略模式允许在运行时选择算法的行为。
#include <iostream>
#include <functional>

// 定义策略接口
using Strategy = std::function<void()>;

// 定义上下文类
class Context {
public:
    // 设置策略
    void setStrategy(Strategy strategy) {
        m_strategy = std::move(strategy);
    }

    // 执行策略
    void executeStrategy() {
        if (m_strategy) {
            m_strategy();
        } else {
            std::cout << "No strategy set\n";
        }
    }

private:
    Strategy m_strategy;
};

int main() {
    // 创建上下文对象
    Context context;

    // 定义并设置策略1
    Strategy strategy1 = []() {
        std::cout << "Executing strategy 1\n";
    };
    context.setStrategy(strategy1);

    // 执行策略1
    context.executeStrategy();

    // 定义并设置策略2
    Strategy strategy2 = []() {
        std::cout << "Executing strategy 2\n";
    };
    context.setStrategy(strategy2);

    // 执行策略2
    context.executeStrategy();

    return 0;
}
责任链模式
责任链模式是一种行为设计模式,
它允许多个对象处理请求,而无需显式指定处理请求的对象。请求沿着链传递,直到有一个对象处理它为止。
#include <iostream>
#include <memory>
#include <string>

// 请求类
class Request {
public:
    Request(std::string content) : content_(content) {}
    std::string getContent() const { return content_; }

private:
    std::string content_;
};

// 处理器接口
class Handler {
public:
    virtual ~Handler() = default;
    virtual void handleRequest(const Request& request) = 0;
    virtual void setNext(std::shared_ptr<Handler> next) = 0;
};

// 具体处理器A
class ConcreteHandlerA : public Handler {
public:
    void handleRequest(const Request& request) override {
        if (request.getContent() == "A") {
            std::cout << "ConcreteHandlerA handles the request: " << request.getContent() << std::endl;
        } else if (next_) {
            next_->handleRequest(request);
        } else {
            std::cout << "No handler can deal with the request: " << request.getContent() << std::endl;
        }
    }

    void setNext(std::shared_ptr<Handler> next) override {
        next_ = next;
    }

private:
    std::shared_ptr<Handler> next_;
};

// 具体处理器B
class ConcreteHandlerB : public Handler {
public:
    void handleRequest(const Request& request) override {
        if (request.getContent() == "B") {
            std::cout << "ConcreteHandlerB handles the request: " << request.getContent() << std::endl;
        } else if (next_) {
            next_->handleRequest(request);
        } else {
            std::cout << "No handler can deal with the request: " << request.getContent() << std::endl;
        }
    }

    void setNext(std::shared_ptr<Handler> next) override {
        next_ = next;
    }

private:
    std::shared_ptr<Handler> next_;
};

int main() {
    // 创建具体处理器A、B
    auto handlerA = std::make_shared<ConcreteHandlerA>();
    auto handlerB = std::make_shared<ConcreteHandlerB>();

    // 设置责任链
    handlerA->setNext(handlerB);

    // 创建请求
    Request requestA("A");
    Request requestB("B");
    Request requestC("C");

    // 处理请求
    handlerA->handleRequest(requestA);
    handlerA->handleRequest(requestB);
    handlerA->handleRequest(requestC);

    return 0;
}
在这个示例中,我们创建了两个具体处理器 ConcreteHandlerA 和 ConcreteHandlerB,它们分别能处理请求 “A” 和 “B”。
如果某个处理器不能处理请求,它会将请求传递给责任链中的下一个处理器。在 main() 函数中,我们创建了一个责任链,并使用请求依次测试了处理器的处理能力。


 673
673


 被折叠的 条评论
为什么被折叠?
被折叠的 条评论
为什么被折叠?
 到【灌水乐园】发言


