基于python-opencv的一种先二值化再进行霍夫圆识别的方法

        之前在准备中国机器人大赛的微型无人机赛道时,要求识别以下标靶中正中央的内容。

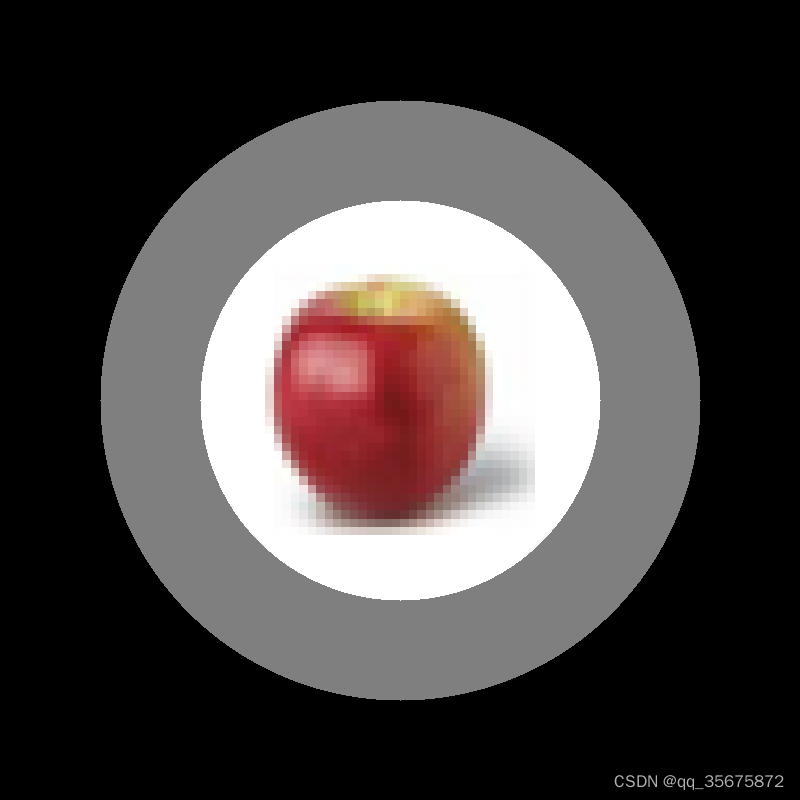
        由于带着外圆可能会产生误识别导致识别错误,于是想要使用霍夫圆检测的方法定位图像中间位置,并对图像进行裁剪输出合适的ROI区域。

        理论上来说霍夫圆检测算法能识别出图中的两个圆,只需要使用其中一个圆的半径大小进行图像的裁剪即可。但是在实际操作过程中可能有时只会识别出其中一个圆,这样就会导致实际切割出的ROI区域不符合所需要求。

        针对以上问题,解决方案是先将图片进行二值化,去除其中的一个圆,接下来再对二值化后的图像进行霍夫圆检测,这样就不会因为检测出的圆的半径不时跳动而造成识别上的困难。

        以下分别是原始输入图像、二值化后图像、Canny算子图像以及最终裁剪图像。

       可以看出,通过这种二值化后进行检测方式裁剪出来的图像准确性比直接使用霍夫圆检测算法具有更高的稳定性以及准确性。

        以下是二值化之后再进行霍夫圆检测的代码。代码先将原始图像转化为灰度图,再进行二值化处理,经过一次高斯滤波后使用Canny算子寻找圆轮廓,接着再进行一次高斯滤波,接下来进行霍夫圆检测即可。

R_Parameter = 0.45
 
def circlecut(frame):
    if(frame is not None): 
        gray = cv2.cvtColor(frame, cv2.COLOR_BGR2GRAY)   # 转换为灰色通道
        r = 0
        #  消除噪声
        thresh, binary = cv2.threshold(gray, 127, 255, cv2.THRESH_BINARY)   #全局二值化
        Gauss1 = cv2.GaussianBlur(binary, (5, 5), 2, 1)
        edges = cv2.Canny(Gauss1, 50, 100)  # 边缘识别
        Gauss2 = cv2.GaussianBlur(edges, (5, 5), 2, 1)
        cv2.imshow('Gauss2', Gauss2)
        # 识别圆形
        circles = cv2.HoughCircles(Gauss2, cv2.HOUGH_GRADIENT, 1, 10, param1=1, param2=80, minRadius=20, maxRadius=200)
        if circles is not None:  # 如果识别出圆
            for circle in circles[0]:
                #  获取圆的坐标与半径
                if(int(circle[2]) > r):
                    x = int(circle[0])
                    y = int(circle[1])
                    r = int(circle[2])
            if((y-r*R_Parameter) > 0 and (y+r*R_Parameter) > 0 and (x-r*R_Parameter) < 480 and (x+r*R_Parameter) < 640):   #防止ROI区域大于屏幕区域
                frame = frame[int(y-r*R_Parameter):int(y+r*R_Parameter), int(x-r*R_Parameter):int(x+r*R_Parameter)]
                frame = cv2.resize(frame, (128, 128), interpolation = cv2.INTER_AREA)   #改变图片长宽
        return frame
    else:
        return None

        其中需要注意的点是,不知为何,使用其它的滤波算法或者不进行滤波会导致霍夫圆检测失败,测试时只有高斯滤波之后才能使用。

  • 1
    点赞
  • 4
    收藏
    觉得还不错? 一键收藏
  • 0
    评论
以下是一些用Python-OpenCV编写的机械零件尺寸测量的代码示例: 1. 通过轮廓检测测量物体的尺寸 ```python import cv2 # 读取像 img = cv2.imread('part.jpg') # 转换为灰度像 gray = cv2.cvtColor(img, cv2.COLOR_BGR2GRAY) # 二值化像 ret, thresh = cv2.threshold(gray, 127, 255, cv2.THRESH_BINARY) # 查找轮廓 contours, hierarchy = cv2.findContours(thresh, cv2.RETR_TREE, cv2.CHAIN_APPROX_SIMPLE) # 绘制轮廓 cv2.drawContours(img, contours, -1, (0, 255, 0), 2) # 计算物体的尺寸 cnt = contours[0] x, y, w, h = cv2.boundingRect(cnt) print('Width:', w) print('Height:', h) # 显示像 cv2.imshow('image', img) cv2.waitKey(0) cv2.destroyAllWindows() ``` 2. 使用霍夫变换检测直线并测量长度 ```python import cv2 import numpy as np # 读取像 img = cv2.imread('part.jpg') # 转换为灰度像 gray = cv2.cvtColor(img, cv2.COLOR_BGR2GRAY) # 边缘检测 edges = cv2.Canny(gray, 50, 150, apertureSize=3) # 进行霍夫变换检测直线 lines = cv2.HoughLines(edges, 1, np.pi/180, 200) # 绘制直线 for line in lines: rho, theta = line[0] a = np.cos(theta) b = np.sin(theta) x0 = a*rho y0 = b*rho x1 = int(x0 + 1000*(-b)) y1 = int(y0 + 1000*(a)) x2 = int(x0 - 1000*(-b)) y2 = int(y0 - 1000*(a)) cv2.line(img, (x1, y1), (x2, y2), (0, 0, 255), 2) # 计算直线长度 length = np.sqrt((x2-x1)**2 + (y2-y1)**2) print('Length:', length) # 显示像 cv2.imshow('image', img) cv2.waitKey(0) cv2.destroyAllWindows() ``` 3. 使用模板匹配测量物体的尺寸 ```python import cv2 import numpy as np # 读取像和模板 img = cv2.imread('part.jpg') template = cv2.imread('template.jpg') # 转换为灰度像 img_gray = cv2.cvtColor(img, cv2.COLOR_BGR2GRAY) template_gray = cv2.cvtColor(template, cv2.COLOR_BGR2GRAY) # 获取模板的尺寸 w, h = template_gray.shape[::-1] # 进行模板匹配 res = cv2.matchTemplate(img_gray, template_gray, cv2.TM_CCOEFF_NORMED) # 获取匹配结果的坐标 min_val, max_val, min_loc, max_loc = cv2.minMaxLoc(res) # 绘制匹配结果的矩形框 top_left = max_loc bottom_right = (top_left[0] + w, top_left[1] + h) cv2.rectangle(img, top_left, bottom_right, (0, 0, 255), 2) # 计算物体的尺寸 width = w height = h print('Width:', width) print('Height:', height) # 显示像 cv2.imshow('image', img) cv2.waitKey(0) cv2.destroyAllWindows() ```

“相关推荐”对你有帮助么?

  • 非常没帮助
  • 没帮助
  • 一般
  • 有帮助
  • 非常有帮助
提交
评论
添加红包

请填写红包祝福语或标题

红包个数最小为10个

红包金额最低5元

当前余额3.43前往充值 >
需支付:10.00
成就一亿技术人!
领取后你会自动成为博主和红包主的粉丝 规则
hope_wisdom
发出的红包
实付
使用余额支付
点击重新获取
扫码支付
钱包余额 0

抵扣说明:

1.余额是钱包充值的虚拟货币,按照1:1的比例进行支付金额的抵扣。
2.余额无法直接购买下载,可以购买VIP、付费专栏及课程。

余额充值