


本文亮点:
- 详解FFDNet源码,数据处理、模型训练和验证、推理测试全流程讲解,无论是科研还是应用,新手小白都能看懂,学习阅读毫无压力,去噪入门必看;
- 理论和源码结合,进一步加深理解算法原理、明确训练和测试流程;
- 更换路径和相关参数即可训练自己的图像数据集,无论是灰度图还是RGB图均可;
- 复现过程中的报错和踩坑全复盘,保证源码无任何运行问题;
- 去噪前后图像对比,噪声对比。
文章目录
前言
论文题目:FFDNet: Toward a Fast and Flexible Solution for CNN based Image Denoising —— FFDNet:迈向基于 CNN 的图像去噪的快速灵活解决方案
论文地址:FFDNet: Toward a Fast and Flexible Solution for CNN based Image Denoising
论文源码:https://github.com/cszn/FFDNet
对应的论文精读:【图像去噪】论文精读:FFDNet: Toward a Fast and Flexible Solution for CNN based Image Denoising
请先看DnCNN的论文精读和复现!FFDNet实现的相关参数和细节请看上面的论文精读,本文主要是讲解代码!
此外,有一篇FFDNet专门的分析报告:An Analysis and Implementation of the FFDNet Image Denoising Method。
本文参考代码:
由于论文源码Pytorch版本中的main_train_ffdnet.py已失效,只有main_test_ffdnet.py以及网络结构,以防我自己实现的训练过程不够严谨,所以我们使用上面分析报告中的源码以及相关修改的代码来进行复现和解析。请下载参考代码1中的代码,已包含训练好的gray和rgb模型。
准备工作:Waterloo Exploration Database(4744张彩色图像)和BSD400(400张灰度图像)数据集作为训练集,BSD68和Set12作为灰度图测试、CBSD68和Kodak24用于彩色图测试、以及其他测试集。请读者下载好数据集,尽量在数据集所在论文提供的官方途径下载,以免图像质量不同造成评价指标误差。
Waterloo Exploration Database下载地址:https://kedema.org/project/exploration/index.html
其他数据集下载地址:
项目文件说明
- datasets:数据集所在文件夹
- logs:训练过程中的模型和日志存放位置
- models:源码提供的两个训练好的模型
- dataset.py:封装数据集
- functions.py:上下采样的相关操作
- models:FFDNet网络实现
- prepare_patches.py:制作h5训练集和验证集
- test_ffdnet_ipol.py:测试FFDNet模型
- train.py:训练FFDNet
- utils.py:工具类
FFDNet网络结构
本节对应functions.py和models.py。
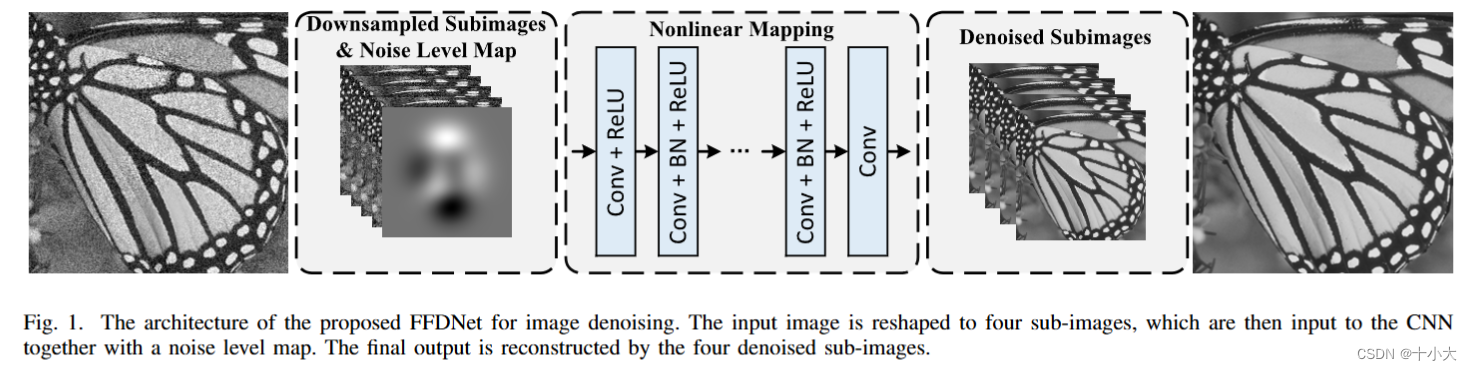
上下采样以及Noise Level Map的实现(FFDNet的核心)
与DnCNN相比,FFDNet在输入和网络中间添加下采样和noise level map步骤,在网络和输出中间添加上采样步骤。
具体地,假设输入图像的维度为C×H×W,C为通道数,H和W分别为图像的高和宽。则
- 下采样是将输入图像的每四个像素分成一组,作为一个新的通道。这样,图像就由C×H×W变成了4×C×H/2×W/2,即一分四。
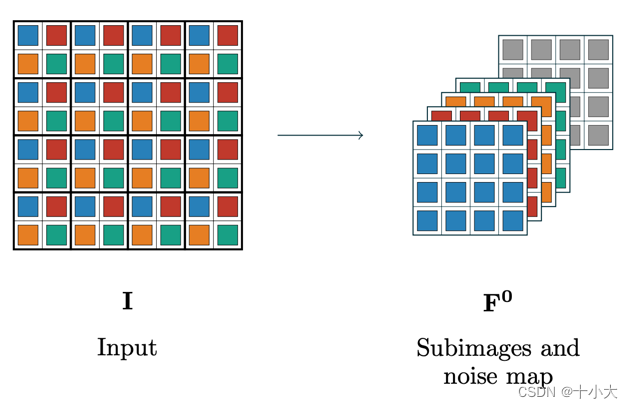
- noise level map是与下采样的图像相同大小的噪声映射。输入和网络中间步骤就是将四个下采样后的子图和noise level map堆叠作为网络的输入。
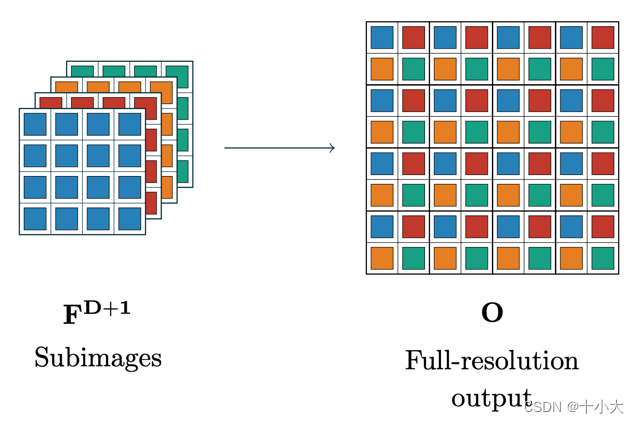
- 上采样是下采样的逆过程。
我们通过代码来进一步理解上述过程的实现,对应functions.py:
"""
Functions implementing custom NN layers

Copyright (C) 2018, Matias Tassano <matias.tassano@parisdescartes.fr>

This program is free software: you can use, modify and/or
redistribute it under the terms of the GNU General Public
License as published by the Free Software Foundation, either
version 3 of the License, or (at your option) any later
version. You should have received a copy of this license along
this program. If not, see <http://www.gnu.org/licenses/>.
"""
import torch
from torch.autograd import Function, Variable

# 上下采样原理:https://7568.github.io/2021/11/07/FFDNet.html

# 下采样,将噪声子图和noise level map堆叠在一起作为网络输入
def concatenate_input_noise_map(input, noise_sigma):
	r"""Implements the first layer of FFDNet. This function returns a
	torch.autograd.Variable composed of the concatenation of the downsampled
	input image and the noise map. Each image of the batch of size CxHxW gets
	converted to an array of size 4*CxH/2xW/2. Each of the pixels of the
	non-overlapped 2x2 patches of the input image are placed in the new array
	along the first dimension.

	Args:
		input: batch containing CxHxW images —— (n,c,h,w)的张量
		noise_sigma: the value of the pixels of the CxH/2xW/2 noise map —— noise level map
	"""
	# 目标: C×H×W ——> 4×C×H/2×W/2
	# noise_sigma is a list of length batch_size
	N, C, H, W = input.size()
	dtype = input.type()
	sca = 2
	sca2 = sca*sca
	Cout = sca2*C  # 4 × C
	Hout = H//sca
	Wout = W//sca
	idxL = [[0, 0], [0, 1], [1, 0], [1, 1]]

	# Fill the downsampled image with zeros
	# 定义与输出张量大小相同的全零张量
	if 'cuda' in dtype:
		downsampledfeatures = torch.cuda.FloatTensor(N, Cout, Hout, Wout).fill_(0)
	else:
		downsampledfeatures = torch.FloatTensor(N, Cout, Hout, Wout).fill_(0)

	# Build the CxH/2xW/2 noise map
	# (N,C,H,W)
	noise_map = noise_sigma.view(N, 1, 1, 1).repeat(1, C, Hout, Wout)

	# Populate output
	for idx in range(sca2):
		downsampledfeatures[:, idx:Cout:sca2, :, :] = \
			input[:, :, idxL[idx][0]::sca, idxL[idx][1]::sca]

	# concatenate de-interleaved mosaic with noise map
	return torch.cat((noise_map, downsampledfeatures), 1)

# FFDNet最后上采样过程,将网络输出的子图堆叠在一起重建成最终输出
class UpSampleFeaturesFunction(Function):
	r"""Extends PyTorch's modules by implementing a torch.autograd.Function.
	This class implements the forward and backward methods of the last layer
	of FFDNet. It basically performs the inverse of
	concatenate_input_noise_map(): it converts each of the images of a
	batch of size CxH/2xW/2 to images of size C/4xHxW
	"""

	# 上采样
	@staticmethod
	def forward(ctx, input):
		N, Cin, Hin, Win = input.size() # (b,c,h,w)
		dtype = input.type() # 类型
		sca = 2
		sca2 = sca*sca
		Cout = Cin//sca2 # C/4
		Hout = Hin*sca # H × 2
		Wout = Win*sca # W × 2
		idxL = [[0, 0], [0, 1], [1, 0], [1, 1]] # 相邻四个像素索引

		# 检查输入通道数是否能被4整除
		assert (Cin%sca2 == 0), \
			'Invalid input dimensions: number of channels should be divisible by 4'

		# 定义个输出格式的tensor
		result = torch.zeros((N, Cout, Hout, Wout)).type(dtype)
		for idx in range(sca2):
			result[:, :, idxL[idx][0]::sca, idxL[idx][1]::sca] = \
				input[:, idx:Cin:sca2, :, :]  # 将输入切片填充到result中,实现上采样

		return result

	# 下采样
	@staticmethod
	def backward(ctx, grad_output):
		N, Cg_out, Hg_out, Wg_out = grad_output.size()
		dtype = grad_output.data.type()
		sca = 2
		sca2 = sca*sca
		Cg_in = sca2*Cg_out
		Hg_in = Hg_out//sca
		Wg_in = Wg_out//sca
		idxL = [[0, 0], [0, 1], [1, 0], [1, 1]]

		# Build output
		grad_input = torch.zeros((N, Cg_in, Hg_in, Wg_in)).type(dtype)
		# Populate output
		for idx in range(sca2):
			# 按idxL的位置,相邻四个像素为一组,取每一组对应位置的值,赋给grad_input的每个通道,那么grad_input的每个通道就是新的一组,也就是下采样过程。
			# 上采样同理,逆过程
			grad_input[:, idx:Cg_in:sca2, :, :] = \
				grad_output.data[:, :, idxL[idx][0]::sca, idxL[idx][1]::sca]

		return Variable(grad_input)

# Alias functions
upsamplefeatures = UpSampleFeaturesFunction.apply
各种图像均是以张量的形式处理,并时刻注意图像的大小变化。通过代码可知,下采样是通过处理后切片赋值实现的,上采样同理,noise level map定义为相同大小的噪声张量。相关思路请看代码中注释。
注:图像一分四的时候,图像大小必须能被四整除,否则无法处理。比如,BSD68中的图像大小为321×481或481×321。如果不预先处理直接下采样,则会报错。
FFDNet整个网络结构实现
FFDnet整个网络结构流程为输入——下采样和噪声水平图堆叠——中间网络结构(同DnCNN)——上采样——输出。
models.py实现如下:
"""
Definition of the FFDNet model and its custom layers

Copyright (C) 2018, Matias Tassano <matias.tassano@parisdescartes.fr>

This program is free software: you can use, modify and/or
redistribute it under the terms of the GNU General Public
License as published by the Free Software Foundation, either
version 3 of the License, or (at your option) any later
version. You should have received a copy of this license along
this program. If not, see <http://www.gnu.org/licenses/>.
"""
import torch.nn as nn
from torch.autograd import Variable
import functions

# 上采样
class UpSampleFeatures(nn.Module):
	r"""Implements the last layer of FFDNet
	"""
	def __init__(self):
		super(UpSampleFeatures, self).__init__()
	def forward(self, x):
		return functions.upsamplefeatures(x)

# FFDNet的中间网络结构,与DnCNN相同
class IntermediateDnCNN(nn.Module):
	r"""Implements the middel part of the FFDNet architecture, which
	is basically a DnCNN net
	"""
	def __init__(self, input_features, middle_features, num_conv_layers):
		super(IntermediateDnCNN, self).__init__()
		self.kernel_size = 3
		self.padding = 1
		self.input_features = input_features
		self.num_conv_layers = num_conv_layers
		self.middle_features = middle_features
		if self.input_features == 5: # 灰度图本身通道是1,那么4c就是4,再加上noise map就是5,输出还是4
			self.output_features = 4 #Grayscale image
		elif self.input_features == 15: # 彩色图通道是3,4C就是12,每个通道有个noise map,所以输入是15,输出是12
			self.output_features = 12 #RGB image
		else:
			raise Exception('Invalid number of input features')

		layers = []
		layers.append(nn.Conv2d(in_channels=self.input_features,\
								out_channels=self.middle_features,\
								kernel_size=self.kernel_size,\
								padding=self.padding,\
								bias=False))
		layers.append(nn.ReLU(inplace=True))
		for _ in range(self.num_conv_layers-2):
			layers.append(nn.Conv2d(in_channels=self.middle_features,\
									out_channels=self.middle_features,\
									kernel_size=self.kernel_size,\
									padding=self.padding,\
									bias=False))
			layers.append(nn.BatchNorm2d(self.middle_features))
			layers.append(nn.ReLU(inplace=True))
		layers.append(nn.Conv2d(in_channels=self.middle_features,\
								out_channels=self.output_features,\
								kernel_size=self.kernel_size,\
								padding=self.padding,\
								bias=False))
		self.itermediate_dncnn = nn.Sequential(*layers)
	def forward(self, x):
		out = self.itermediate_dncnn(x)
		return out

# FFDNet整个网络框架
class FFDNet(nn.Module):
	r"""Implements the FFDNet architecture
	"""
	def __init__(self, num_input_channels):
		super(FFDNet, self).__init__()
		self.num_input_channels = num_input_channels
		# 网络结构参数
		if self.num_input_channels == 1:
			# Grayscale image
			self.num_feature_maps = 64
			self.num_conv_layers = 15
			self.downsampled_channels = 5
			self.output_features = 4
		elif self.num_input_channels == 3:
			# RGB image
			self.num_feature_maps = 96
			self.num_conv_layers = 12
			self.downsampled_channels = 15
			self.output_features = 12
		else:
			raise Exception('Invalid number of input features')

		self.intermediate_dncnn = IntermediateDnCNN(\
				input_features=self.downsampled_channels,\
				middle_features=self.num_feature_maps,\
				num_conv_layers=self.num_conv_layers)
		self.upsamplefeatures = UpSampleFeatures()

	def forward(self, x, noise_sigma):
		# 下采样,堆叠sub-images和noise level map
		concat_noise_x = functions.concatenate_input_noise_map(\
				x.data, noise_sigma.data)
		concat_noise_x = Variable(concat_noise_x)
		h_dncnn = self.intermediate_dncnn(concat_noise_x)
		pred_noise = self.upsamplefeatures(h_dncnn)
		return pred_noise
数据预处理
本节对应dataset.py和prepare_patches.py。其中,prepare_patches.py是制作数据集的入口,包含相关参数和读取等,设置好参数执行即可获得数据集;dataset.py中是制作训练集和验证集的相关操作和封装成Tensor。
主要读懂dataset.py中的核心代码。
制作图像块并封装成h5格式
制作训练集所需的图像块,主要涉及dataset.py中img_to_patches函数和prepare_data函数。前者是训练集所需的切块操作,后者是将训练集和验证集制作成h5文件。
代码如下:
# 切块操作
def img_to_patches(img, win, stride=1):
	r"""Converts an image to an array of patches.

	Args:
		img: a numpy array containing a CxHxW RGB (C=3) or grayscale (C=1) image
		     img为chw,RGB为3hw,gray为1hw;维度事先处理好
		win: size of the output patches
		stride: int. stride
	"""
	k = 0 # 块索引
	endc = img.shape[0]
	endw = img.shape[1]
	endh = img.shape[2]
	patch = img[:, 0:endw-win+0+1:stride, 0:endh-win+0+1:stride] # Numpy:(c,num_patch_w,num_patch_h)
	total_pat_num = patch.shape[1] * patch.shape[2] # 裁剪总块数
	res = np.zeros([endc, win*win, total_pat_num], np.float32) # 存储提取的块
	for i in range(win):
		for j in range(win):
			patch = img[:, i:endw-win+i+1:stride, j:endh-win+j+1:stride] # 按步长裁剪
			res[:, k, :] = np.array(patch[:]).reshape(endc, total_pat_num) # 填充
			k = k + 1
	return res.reshape([endc, win, win, total_pat_num]) # 返回指定格式(c,h,w,n)

# 制作h5训练集和验证集
def prepare_data(data_path, \
				 val_data_path, \
				 patch_size, \
				 stride, \
				 max_num_patches=None, \
				 aug_times=1, \
				 gray_mode=False):
	r"""Builds the training and validations datasets by scanning the
	corresponding directories for images and extracting	patches from them.

	Args:
		data_path: path containing the training image dataset,训练集路径
		val_data_path: path containing the validation image dataset,验证集路径
		patch_size: size of the patches to extract from the images,图像块大小
		stride: size of stride to extract patches,步长
		max_num_patches: maximum number of patches to extract,提取的图像块最大数量
		aug_times: number of times to augment the available data minus one,数据增强次数
		gray_mode: build the databases composed of grayscale patches,是否是灰度图
	"""
	# training database
	print('> Training database')
	scales = [1, 0.9, 0.8, 0.7]	  # 数据增强缩放倍数
	types = ('*.bmp', '*.png')	# 图像类型
	files = []	# 数据列表
	for tp in types:
		files.extend(glob.glob(os.path.join(data_path, tp)))
	files.sort()  # 将图像放到files列表中并排序

	# 数据集命名
	if gray_mode:
		traindbf = 'train_gray.h5'
		valdbf = 'val_gray.h5'
	else:
		traindbf = 'train_rgb.h5'
		valdbf = 'val_rgb.h5'

	# 最大图像块数量设置,并输出显示
	if max_num_patches is None:
		max_num_patches = 5000000
		print("\tMaximum number of patches not set")
	else:
		print("\tMaximum number of patches set to {}".format(max_num_patches))

	# **********
	# 制作h5训练集
	# **********
	train_num = 0
	i = 0
	with h5py.File(traindbf, 'w') as h5f: # 写入名为traindbf的h5文件
		while i < len(files) and train_num < max_num_patches: # 循环处理
			imgor = cv2.imread(files[i])	# 读取图像
			# h, w, c = img.shape
			for sca in scales:
				img = cv2.resize(imgor, (0, 0), fx=sca, fy=sca, \
								interpolation=cv2.INTER_CUBIC) # 根据缩放因子缩放
				if not gray_mode:
					# CxHxW RGB image
					img = (cv2.cvtColor(img, cv2.COLOR_BGR2RGB)).transpose(2, 0, 1) # RGB图转成hwc ——> chw
				else:
					# CxHxW grayscale image (C=1)
					img = cv2.cvtColor(img, cv2.COLOR_BGR2GRAY) # 灰度图只有hw两个维度
					img = np.expand_dims(img, 0)	# 在最前面添加一个为1的维度,即1hw
				img = normalize(img) # 归一化
				patches = img_to_patches(img, win=patch_size, stride=stride) # 得到单张图像裁剪后的图像块集合 (c,h,w,n)
				print("\tfile: %s scale %.1f # samples: %d" % \
					  (files[i], sca, patches.shape[3]*aug_times)) # 输出信息,最后是单张图像裁剪出的块数
				for nx in range(patches.shape[3]): # 对于每个块,应用随机数据增强,然后存到h5中
					data = data_augmentation(patches[:, :, :, nx].copy(), \
							  np.random.randint(0, 7))
					h5f.create_dataset(str(train_num), data=data)
					train_num += 1
					for mx in range(aug_times-1): # 增强次数大于1,则多用一次1-4中的一个随机增强方法
						data_aug = data_augmentation(data, np.random.randint(1, 4))
						h5f.create_dataset(str(train_num)+"_aug_%d" % (mx+1), data=data_aug)
						train_num += 1
			i += 1

	# **********
	# 制作h5验证集
	# **********

	# validation database
	# 验证集没有切块,直接转成对应格式即可
	print('\n> Validation database')
	files = []
	for tp in types:
		files.extend(glob.glob(os.path.join(val_data_path, tp)))
	files.sort()
	h5f = h5py.File(valdbf, 'w')
	val_num = 0
	for i, item in enumerate(files):
		print("\tfile: %s" % item)
		img = cv2.imread(item)
		if not gray_mode:
			# C. H. W, RGB image
			img = (cv2.cvtColor(img, cv2.COLOR_BGR2RGB)).transpose(2, 0, 1)
		else:
			# C, H, W grayscale image (C=1)
			img = cv2.cvtColor(img, cv2.COLOR_BGR2GRAY)
			img = np.expand_dims(img, 0)
		img = normalize(img)
		h5f.create_dataset(str(val_num), data=img)
		val_num += 1
	h5f.close()

	print('\n> Total')
	print('\ttraining set, # samples %d' % train_num)
	print('\tvalidation set, # samples %d\n' % val_num)
将图像块转成DataLoader所需的Tensor格式
使用Dataset类,将前一步制作好的h5数据集转成Tensor
# 将h5验证集和训练集转成DataLoader所需的Tensor格式
class Dataset(udata.Dataset):
	r"""Implements torch.utils.data.Dataset
	"""
	def __init__(self, train=True, gray_mode=False, shuffle=False):
		super(Dataset, self).__init__()
		self.train = train
		self.gray_mode = gray_mode
		if not self.gray_mode:
			self.traindbf = 'train_rgb.h5'
			self.valdbf = 'val_rgb.h5'
		else:
			self.traindbf = 'train_gray.h5'
			self.valdbf = 'val_gray.h5'

		if self.train:
			h5f = h5py.File(self.traindbf, 'r')
		else:
			h5f = h5py.File(self.valdbf, 'r')
		self.keys = list(h5f.keys())

		# 打乱顺序,增加鲁棒性
		if shuffle:
			random.shuffle(self.keys)
		h5f.close()

	def __len__(self):
		# 128 * 8000
	    return 128 * 8000
		# return len(self.keys)

	def __getitem__(self, index):
		if self.train:
			h5f = h5py.File(self.traindbf, 'r')
		else:
			h5f = h5py.File(self.valdbf, 'r')
		key = self.keys[index]
		data = np.array(h5f[key])
		h5f.close()
		return torch.Tensor(data)
注:对于BSD400数据集来说,代码中的切块方式使得训练集数量大于128 × 8, 000,所以数据集长度我们返回128 × 8, 000,而不是实际的切块数量。
prepare_patches.py
设置好参数后执行如下代码,主目录下会生成两个h5文件,一个是训练集一个是验证集,具体参数说明请见注释:
"""
Construction of the training and validation databases

Copyright (C) 2018, Matias Tassano <matias.tassano@parisdescartes.fr>

This program is free software: you can use, modify and/or
redistribute it under the terms of the GNU General Public
License as published by the Free Software Foundation, either
version 3 of the License, or (at your option) any later
version. You should have received a copy of this license along
this program. If not, see <http://www.gnu.org/licenses/>.
"""
import argparse
from dataset import prepare_data

if __name__ == "__main__":
	parser = argparse.ArgumentParser(description=\
								  "Building the training patch database")
	# True or False, 选择灰度图制作还是RGB图
	parser.add_argument("--gray", default=True, action='store_true',\
						help='prepare grayscale database instead of RGB')
	# Preprocessing parameters
	# Gray:70×70;RGB:50×50
	parser.add_argument("--patch_size", "--p", type=int, default=70, \
					 help="Patch size")
	# stride:合理即可,大于128×8000,然后从所有块中选128×8000个
	# BSD400,70×70,stride=3为patch个数为大于128×8000的最小整数
	# WED,50×50,stride=
	parser.add_argument("--stride", "--s", type=int, default=3, \
					 help="Size of stride")
	# 设置块数上限
	parser.add_argument("--max_number_patches", "--m", type=int, default=None, \
						help="Maximum number of patches")
	# 每个块数据增强次数,一般是1次随机增强(同DnCNN源码)
	parser.add_argument("--aug_times", "--a", type=int, default=1, \
						help="How many times to perform data augmentation")
	# 训练集和验证集路径
	parser.add_argument("--trainset_dir", type=str, default='datasets/BSD400', \
					 help='path of trainset')
	parser.add_argument("--valset_dir", type=str, default='datasets/Set12', \
						 help='path of validation set')
	args = parser.parse_args()

	# 默认参数,我们使用BSD68验证
	if args.gray:
		if args.trainset_dir is None:
			args.trainset_dir = 'datasets/BSD400'
		if args.valset_dir is None:
			args.valset_dir = 'datasets/Set12'
	else:
		if args.trainset_dir is None:
			args.trainset_dir = 'datasets/Waterloo_Exploration_Database'
		if args.valset_dir is None:
			args.valset_dir = 'datasets/CBSD68'

	print("\n### Building databases ###")
	print("> Parameters:")
	for p, v in zip(args.__dict__.keys(), args.__dict__.values()):
		print('\t{}: {}'.format(p, v))
	print('\n')

	prepare_data(args.trainset_dir,\
					args.valset_dir,\
					args.patch_size,\
					args.stride,\
					args.max_number_patches,\
					aug_times=args.aug_times,\
					gray_mode=args.gray)
注:对于灰度图来说,如果验证集使用BSD68,则在【训练时】会报错(制作数据集的时候不会报错):RuntimeError: The expanded size of the tensor (160) must match the existing size (161) at non-singleton dimension 3. Target sizes: [1, 1, 240, 160]. Tensor sizes: [241, 161]。原因为图像大小不整除4的问题,而我们模型的下采样不具备处理多余像素的能力,所以如果你想使用BSD68验证,请先将图像裁剪为宽高可以被4整除。为什么放到数据预处理章节说明该报错呢?因为,如果直接用Set12验证,256×256大小的图像没有任何问题;用BSD68就会报错,那回过头来还是得重新制作数据集,即该报错不是训练阶段的问题,而是数据预处理阶段的问题,虽然它是在训练时产生的。
训练FFDNet
本节对应train.py。
任何使用Pytorch框架训练深度学习模型的训练代码大同小异,主要包含DataLoader读取数据;定义模型、损失函数、优化器;接续训练;学习率调整等,而去噪的训练是在训练过程中给图像加噪声作为输入,通过模型输出,输出结果与原图之间评估,计算PSNR,通过验证的结果显示模型的性能趋势,最后保存性能最优的模型。
FFDNet训练代码如下,细节说明请看注释:
"""
Trains a FFDNet model

By default, the training starts with a learning rate equal to 1e-3 (--lr).
After the number of epochs surpasses the first milestone (--milestone), the
lr gets divided by 100. Up until this point, the orthogonalization technique
described in the FFDNet paper is performed (--no_orthog to set it off).

Copyright (C) 2018, Matias Tassano <matias.tassano@parisdescartes.fr>

This program is free software: you can use, modify and/or
redistribute it under the terms of the GNU General Public
License as published by the Free Software Foundation, either
version 3 of the License, or (at your option) any later
version. You should have received a copy of this license along
this program. If not, see <http://www.gnu.org/licenses/>.
"""
import os
import argparse
import numpy as np
import torch
import torch.nn as nn
import torch.optim as optim
from torch.autograd import Variable
from torch.utils.data import DataLoader
import torchvision.utils as utils
from tensorboardX import SummaryWriter
from models import FFDNet
from dataset import Dataset
from utils import weights_init_kaiming, batch_psnr, init_logger, \
			svd_orthogonalization

os.environ["CUDA_DEVICE_ORDER"] = "PCI_BUS_ID"
os.environ["CUDA_VISIBLE_DEVICES"] = "0"

def main(args):
	r"""Performs the main training loop
	"""
	# Load dataset
	print('> Loading dataset ...')
	dataset_train = Dataset(train=True, gray_mode=args.gray, shuffle=True)
	dataset_val = Dataset(train=False, gray_mode=args.gray, shuffle=False)
	loader_train = DataLoader(dataset=dataset_train, num_workers=6, \
							   batch_size=args.batch_size, shuffle=True)
	print("\t# of training samples: %d\n" % int(len(dataset_train)))

	# Init loggers
	if not os.path.exists(args.log_dir):
		os.makedirs(args.log_dir)
	writer = SummaryWriter(args.log_dir)
	logger = init_logger(args)

	# Create model
	if not args.gray:
		in_ch = 3
	else:
		in_ch = 1
	net = FFDNet(num_input_channels=in_ch)
	# Initialize model with He init
	net.apply(weights_init_kaiming)
	# Define loss
	criterion = nn.MSELoss(size_average=False)

	# Move to GPU
	device_ids = [0] # 添加id可以多卡运行
	model = nn.DataParallel(net, device_ids=device_ids).cuda()
	criterion.cuda()

	# Optimizer
	optimizer = optim.Adam(model.parameters(), lr=args.lr)

	# Resume training or start a new
	if args.resume_training:
		resumef = os.path.join(args.log_dir, 'ckpt.pth')
		if os.path.isfile(resumef):
			checkpoint = torch.load(resumef)
			print("> Resuming previous training")
			model.load_state_dict(checkpoint['state_dict'])
			optimizer.load_state_dict(checkpoint['optimizer'])
			new_epoch = args.epochs
			new_milestone = args.milestone
			current_lr = args.lr
			args = checkpoint['args']
			training_params = checkpoint['training_params']
			start_epoch = training_params['start_epoch']
			args.epochs = new_epoch
			args.milestone = new_milestone
			args.lr = current_lr
			print("=> loaded checkpoint '{}' (epoch {})"\
				  .format(resumef, start_epoch))
			print("=> loaded parameters :")
			print("==> checkpoint['optimizer']['param_groups']")
			print("\t{}".format(checkpoint['optimizer']['param_groups']))
			print("==> checkpoint['training_params']")
			for k in checkpoint['training_params']:
				print("\t{}, {}".format(k, checkpoint['training_params'][k]))
			argpri = vars(checkpoint['args'])
			print("==> checkpoint['args']")
			for k in argpri:
				print("\t{}, {}".format(k, argpri[k]))

			args.resume_training = False
		else:
			raise Exception("Couldn't resume training with checkpoint {}".\
				   format(resumef))
	else:
		start_epoch = 0
		training_params = {}
		training_params['step'] = 0
		training_params['current_lr'] = 0
		training_params['no_orthog'] = args.no_orthog

	# Training
	for epoch in range(start_epoch, args.epochs):

		# 调整学习率
		# Learning rate value scheduling according to args.milestone
		if epoch > args.milestone[1]: # epoch>60,学习率1e-3 --> 1e-6, 后面的epoch是微调模型
			current_lr = args.lr / 1000.
			training_params['no_orthog'] = True # 微调模型不使用正交
		elif epoch > args.milestone[0]:
			current_lr = args.lr / 10. # epoch>50,学习率1e-3 --> 1e-4
		else:
			current_lr = args.lr

		# set learning rate in optimizer
		for param_group in optimizer.param_groups:
			param_group["lr"] = current_lr
		print('learning rate %f' % current_lr)

		# train
		for i, data in enumerate(loader_train, 0):
			# Pre-training step
			model.train()
			model.zero_grad()
			optimizer.zero_grad()

			# inputs: noise and noisy image
			img_train = data
			noise = torch.zeros(img_train.size())
			stdn = np.random.uniform(args.noiseIntL[0], args.noiseIntL[1], \
							size=noise.size()[0])
			for nx in range(noise.size()[0]):
				sizen = noise[0, :, :, :].size()
				noise[nx, :, :, :] = torch.FloatTensor(sizen).\
									normal_(mean=0, std=stdn[nx])
			imgn_train = img_train + noise
			# Create input Variables
			img_train = Variable(img_train.cuda())
			imgn_train = Variable(imgn_train.cuda())
			noise = Variable(noise.cuda())
			stdn_var = Variable(torch.cuda.FloatTensor(stdn))

			# Evaluate model and optimize it
			out_train = model(imgn_train, stdn_var)
			# 噪声与模型输出之间的损失,是预测噪声,应该是DnCNN中的损失定义,因为用了残差学习,对应论文公式(1)
			# 也就是criterion(out_train, (imgn_train - img_train))
			loss = criterion(out_train, noise) / (imgn_train.size()[0]*2)
			# 输入与模型输出之间的损失,是预测去噪后的图像,对应FFDNet中定义的损失,没用残差学习,对应论文公式(5)
			# 如果按上面损失训练出来的模型,推理时输入噪声图像,输出会是噪声,而不是去噪后的图像,需要用带噪图像减去噪声
			# TODO 论文中在III-F节特意说明不预测噪声的原因,也是不适用残差学习的原因,即从简。但报告中指出使用残差学习会好一点点
			# TODO 都差不多,如果预测噪声,那就在models中改成残差学习。
			# loss = criterion(out_train, img_train) / (imgn_train.size()[0] * 2)
			loss.backward()
			optimizer.step()

			# Results
			model.eval()
			out_train = torch.clamp(imgn_train-model(imgn_train, stdn_var), 0., 1.)
			psnr_train = batch_psnr(out_train, img_train, 1.)
			# PyTorch v0.4.0: loss.data[0] --> loss.item()

			if training_params['step'] % args.save_every == 0:
				# Apply regularization by orthogonalizing filters
				if not training_params['no_orthog']:
					model.apply(svd_orthogonalization)

				# Log the scalar values
				# writer.add_scalar('loss', loss.data[0], training_params['step'])

				writer.add_scalar('loss', loss.item(), training_params['step'])

				writer.add_scalar('PSNR on training data', psnr_train, \
					  training_params['step'])
				print("[epoch %d][%d/%d] loss: %.4f PSNR_train: %.4f" %\
					# (epoch+1, i+1, len(loader_train), loss.data[0], psnr_train))
					  (epoch + 1, i + 1, len(loader_train), loss.item(), psnr_train))
			training_params['step'] += 1
		# The end of each epoch
		model.eval()

		# Validation
		psnr_val = 0
		for valimg in dataset_val:
			img_val = torch.unsqueeze(valimg, 0)
			noise = torch.FloatTensor(img_val.size()).\
					normal_(mean=0, std=args.val_noiseL)
			imgn_val = img_val + noise
			img_val, imgn_val = Variable(img_val.cuda()), Variable(imgn_val.cuda())
			sigma_noise = Variable(torch.cuda.FloatTensor([args.val_noiseL]))
			out_val = torch.clamp(imgn_val-model(imgn_val, sigma_noise), 0., 1.)
			psnr_val += batch_psnr(out_val, img_val, 1.)
		psnr_val /= len(dataset_val)
		print("\n[epoch %d] PSNR_val: %.4f" % (epoch+1, psnr_val))
		writer.add_scalar('PSNR on validation data', psnr_val, epoch)
		writer.add_scalar('Learning rate', current_lr, epoch)

		# Log val images
		try:
			if epoch == 0:
				# Log graph of the model
				writer.add_graph(model, (imgn_val, sigma_noise), )
				# Log validation images
				for idx in range(2):
					imclean = utils.make_grid(img_val.data[idx].clamp(0., 1.), \
											nrow=2, normalize=False, scale_each=False)
					imnsy = utils.make_grid(imgn_val.data[idx].clamp(0., 1.), \
											nrow=2, normalize=False, scale_each=False)
					writer.add_image('Clean validation image {}'.format(idx), imclean, epoch)
					writer.add_image('Noisy validation image {}'.format(idx), imnsy, epoch)
			for idx in range(2):
				imrecons = utils.make_grid(out_val.data[idx].clamp(0., 1.), \
										nrow=2, normalize=False, scale_each=False)
				writer.add_image('Reconstructed validation image {}'.format(idx), \
								imrecons, epoch)
			# Log training images
			imclean = utils.make_grid(img_train.data, nrow=8, normalize=True, \
						 scale_each=True)
			writer.add_image('Training patches', imclean, epoch)

		except Exception as e:
			logger.error("Couldn't log results: {}".format(e))

		# save model and checkpoint
		training_params['start_epoch'] = epoch + 1
		torch.save(model.state_dict(), os.path.join(args.log_dir, 'net.pth'))
		save_dict = { \
			'state_dict': model.state_dict(), \
			'optimizer' : optimizer.state_dict(), \
			'training_params': training_params, \
			'args': args\
			}
		torch.save(save_dict, os.path.join(args.log_dir, 'ckpt.pth'))
		if epoch % args.save_every_epochs == 0:
			torch.save(save_dict, os.path.join(args.log_dir, \
									  'ckpt_e{}.pth'.format(epoch+1)))
		del save_dict

if __name__ == "__main__":

	parser = argparse.ArgumentParser(description="FFDNet")
	# 灰度图为True,RGB图为False
	parser.add_argument("--gray", default=True, action='store_true',\
						help='train grayscale image denoising instead of RGB')

	# 日志文件路径
	parser.add_argument("--log_dir", type=str, default="logs", \
					 help='path of log files')

	#Training parameters
	parser.add_argument("--batch_size", type=int, default=128, 	\
					 help="Training batch size")
	parser.add_argument("--epochs", "--e", type=int, default=80, \
					 help="Number of total training epochs")
	parser.add_argument("--resume_training", "--r", action='store_true', default='logs/ckpt_e41.pth', \
						help="resume training from a previous checkpoint")
	parser.add_argument("--milestone", nargs=2, type=int, default=[50, 60], \
						help="When to decay learning rate; should be lower than 'epochs'")
	parser.add_argument("--lr", type=float, default=1e-3, \
					 help="Initial learning rate")
	# True则为不执行正交化
	parser.add_argument("--no_orthog", action='store_true',\
						help="Don't perform orthogonalization as regularization")
	# 每多少个epoch保存日志
	parser.add_argument("--save_every", type=int, default=10,\
						help="Number of training steps to log psnr and perform \
						orthogonalization")
	# 每多少个epoch保存模型
	parser.add_argument("--save_every_epochs", type=int, default=5,\
						help="Number of training epochs to save state")
	parser.add_argument("--noiseIntL", nargs=2, type=int, default=[0, 75], \
					 help="Noise training interval")
	parser.add_argument("--val_noiseL", type=float, default=25, \
						help='noise level used on validation set')
	argspar = parser.parse_args()

	# Normalize noise between [0, 1]
	argspar.val_noiseL /= 255.
	argspar.noiseIntL[0] /= 255.
	argspar.noiseIntL[1] /= 255.

	print("\n### Training FFDNet model ###")
	print("> Parameters:")
	for p, v in zip(argspar.__dict__.keys(), argspar.__dict__.values()):
		print('\t{}: {}'.format(p, v))
	print('\n')

	main(argspar)
先对报错进行说明,如果不做任何改变,源代码在loss.data[0]处会有报错。解决办法为loss.data[0] --> loss.item(),因为高版本的Pytorch改变了loss取值的用法。其次,代码中的loss定义为loss = criterion(out_train, noise) / (imgn_train.size()[0]*2),即模型预测的是噪声,而不是去噪后的图像。这与论文所述相悖,预测噪声是DnCNN,而FFDNet特意在论文Ⅲ-F节中阐述了预测去噪后的图像而不预测噪声的原因。所以,我认为此处应改为loss = criterion(out_train, imgn_train),即损失为去噪前后图像之间的像素loss。修改前,控制台输出的psnr都是0.00几,越小越好,因为是噪声与输出之间的loss,那肯定是越不像越好;而修改后psnr的输出正常,越大越好。
经实测,无论是哪种损失定义,结果差不多。带噪声图像减噪声和直接预测去噪后的图像,在视觉效果上几乎无差。于是,本文不做修改,完全按照源码原汁原味讲解。读者也不必过多纠结,以学习知识,看懂代码为主。
测试FFDNet
本节对应test_ffdnet_ipol.py。输入一张测试图像,在根目录下会得到四个输出,分别为噪声本身图像、带噪声的输入图像、ffdnet去噪后的图像、ffdnet预测的噪声图像。噪声之间对比,去噪后和加噪前对比。
代码如下:
"""
Denoise an image with the FFDNet denoising method
Copyright (C) 2018, Matias Tassano <matias.tassano@parisdescartes.fr>
This program is free software: you can use, modify and/or
redistribute it under the terms of the GNU General Public
License as published by the Free Software Foundation, either
version 3 of the License, or (at your option) any later
version. You should have received a copy of this license along
this program. If not, see <http://www.gnu.org/licenses/>.
"""
import os
import argparse
import time
import numpy as np
import cv2
import torch
import torch.nn as nn
from torch.autograd import Variable
from models import FFDNet
from utils import batch_psnr, normalize, init_logger_ipol, \
variable_to_cv2_image, remove_dataparallel_wrapper, is_rgb
import matplotlib.pyplot as plt
os.environ["CUDA_DEVICE_ORDER"] = "PCI_BUS_ID"
os.environ["CUDA_VISIBLE_DEVICES"] = "0"
def test_ffdnet(**args):
r"""Denoises an input image with FFDNet
"""
# Init logger
logger = init_logger_ipol()
# Check if input exists and if it is RGB
try:
rgb_den = is_rgb(args['input'])
except:
raise Exception('Could not open the input image')
# Open image as a CxHxW torch.Tensor
if rgb_den:
in_ch = 3
model_fn = 'models/net_rgb.pth'
imorig = cv2.imread(args['input'])
gt = imorig
# from HxWxC to CxHxW, RGB image
imorig = (cv2.cvtColor(imorig, cv2.COLOR_BGR2RGB)).transpose(2, 0, 1)
else:
# from HxWxC to CxHxW grayscale image (C=1)
in_ch = 1
model_fn = 'models/net_gray.pth'
imorig = cv2.imread(args['input'], cv2.IMREAD_GRAYSCALE)
gt = imorig
imorig = np.expand_dims(imorig, 0)
imorig = np.expand_dims(imorig, 0)
# 无论是灰度图还是RGB图,都处理成(b,c,h,w),b=1
# Handle odd sizes
expanded_h = False
expanded_w = False
sh_im = imorig.shape
if sh_im[2]%2 == 1:
expanded_h = True
imorig = np.concatenate((imorig, \
imorig[:, :, -1, :][:, :, np.newaxis, :]), axis=2)
if sh_im[3]%2 == 1:
expanded_w = True
imorig = np.concatenate((imorig, \
imorig[:, :, :, -1][:, :, :, np.newaxis]), axis=3)
imorig = normalize(imorig)
imorig = torch.Tensor(imorig)
# Absolute path to model file
model_fn = os.path.join(os.path.abspath(os.path.dirname(__file__)), \
model_fn)
# Create model
print('Loading model ...\n')
net = FFDNet(num_input_channels=in_ch)
# Load saved weights
if args['cuda']:
state_dict = torch.load(model_fn)
device_ids = [0]
model = nn.DataParallel(net, device_ids=device_ids).cuda()
else:
state_dict = torch.load(model_fn, map_location='cpu')
# CPU mode: remove the DataParallel wrapper
state_dict = remove_dataparallel_wrapper(state_dict)
model = net
model.load_state_dict(state_dict)
# Sets the model in evaluation mode (e.g. it removes BN)
model.eval()
# Sets data type according to CPU or GPU modes
if args['cuda']:
dtype = torch.cuda.FloatTensor
else:
dtype = torch.FloatTensor
# Add noise
if args['add_noise']:
noise = torch.FloatTensor(imorig.size()).\
normal_(mean=0, std=args['noise_sigma'])
imnoisy = imorig + noise
else:
imnoisy = imorig.clone()
# Test mode
with torch.no_grad(): # PyTorch v0.4.0
imorig, imnoisy = Variable(imorig.type(dtype)), \
Variable(imnoisy.type(dtype))
nsigma = Variable(
torch.FloatTensor([args['noise_sigma']]).type(dtype))
# Measure runtime
start_t = time.time()
# Estimate noise and subtract it to the input image
im_noise_estim = model(imnoisy, nsigma) # 预测的噪声
outim = torch.clamp(imnoisy-im_noise_estim, 0., 1.) # 去噪后的图像
stop_t = time.time()
if expanded_h:
imorig = imorig[:, :, :-1, :]
outim = outim[:, :, :-1, :]
imnoisy = imnoisy[:, :, :-1, :]
if expanded_w:
imorig = imorig[:, :, :, :-1]
outim = outim[:, :, :, :-1]
imnoisy = imnoisy[:, :, :, :-1]
# Compute PSNR and log it
if rgb_den:
logger.info("### RGB denoising ###")
else:
logger.info("### Grayscale denoising ###")
if args['add_noise']:
psnr = batch_psnr(outim, imorig, 1.)
psnr_noisy = batch_psnr(imnoisy, imorig, 1.)
logger.info("\tPSNR noisy {0:0.2f}dB".format(psnr_noisy))
logger.info("\tPSNR denoised {0:0.2f}dB".format(psnr))
else:
logger.info("\tNo noise was added, cannot compute PSNR")
logger.info("\tRuntime {0:0.4f}s".format(stop_t-start_t))
# Compute difference
diffout = 2*(outim - imorig) + .5
diffnoise = 2*(imnoisy-imorig) + .5
# Save images
if not args['dont_save_results']:
noisyimg = variable_to_cv2_image(imnoisy)
outimg = variable_to_cv2_image(outim)
cv2.imwrite("noisy.png", noisyimg)
cv2.imwrite("ffdnet.png", outimg)
if args['add_noise']:
cv2.imwrite("noisy_diff.png", variable_to_cv2_image(diffnoise))
cv2.imwrite("ffdnet_diff.png", variable_to_cv2_image(diffout))
# 对比图
fig, axes = plt.subplots(1, 5)
# 关闭坐标轴
for ax in axes:
ax.axis('off')
# 在每个子图中显示对应的图像
axes[0].imshow(gt)
axes[0].set_title('OrignalImage')
axes[1].imshow(noisyimg)
axes[1].set_title('Noisy')
axes[2].imshow(variable_to_cv2_image(diffnoise))
axes[2].set_title('NoisyImage')
axes[3].imshow(outimg)
axes[3].set_title('Denoisy')
axes[4].imshow(variable_to_cv2_image(diffout))
axes[4].set_title('FFDNetNoisy')
# 保存图像
plt.savefig('{}_plt_25.png'.format(args['input']), bbox_inches='tight', dpi=600)
if __name__ == "__main__":
# Parse arguments
parser = argparse.ArgumentParser(description="FFDNet_Test")
parser.add_argument('--add_noise', type=str, default="True")
parser.add_argument("--input", type=str, default="101085.png", \
help='path to input image')
parser.add_argument("--suffix", type=str, default="", \
help='suffix to add to output name')
parser.add_argument("--noise_sigma", type=float, default=25, \
help='noise level used on test set')
parser.add_argument("--dont_save_results", action='store_true', \
help="don't save output images")
parser.add_argument("--no_gpu", action='store_true', \
help="run model on CPU")
argspar = parser.parse_args()
# Normalize noises ot [0, 1]
argspar.noise_sigma /= 255.
# String to bool
argspar.add_noise = (argspar.add_noise.lower() == 'true')
# use CUDA?
argspar.cuda = not argspar.no_gpu and torch.cuda.is_available()
print("\n### Testing FFDNet model ###")
print("> Parameters:")
for p, v in zip(argspar.__dict__.keys(), argspar.__dict__.values()):
print('\t{}: {}'.format(p, v))
print('\n')
test_ffdnet(**vars(argspar))
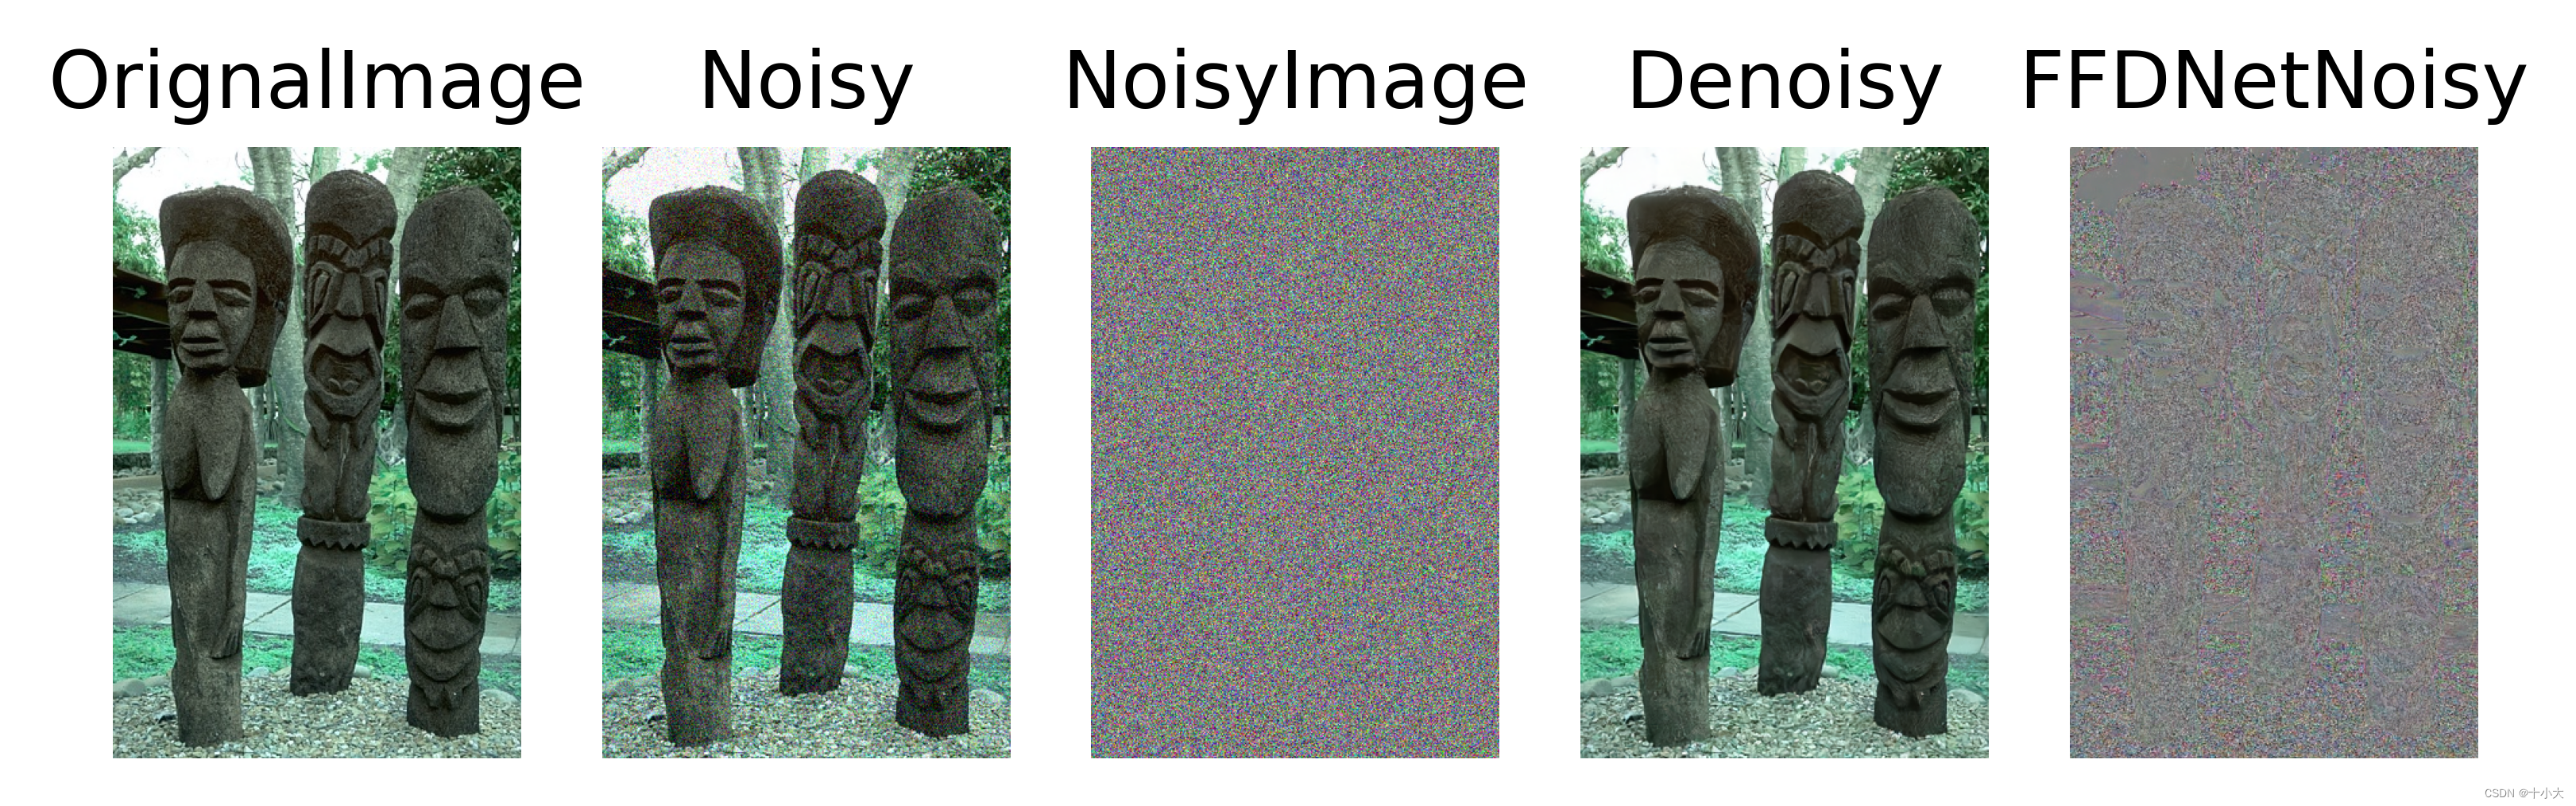
主要是图像的相关处理操作,我在源代码的基础上添加了plt的相关处理,将结果都放在一个图里展示,从左至右为输入图像,带噪声输入图像,噪声图像,去噪后图像,预测的噪声图像。:
RGB:
Gray:
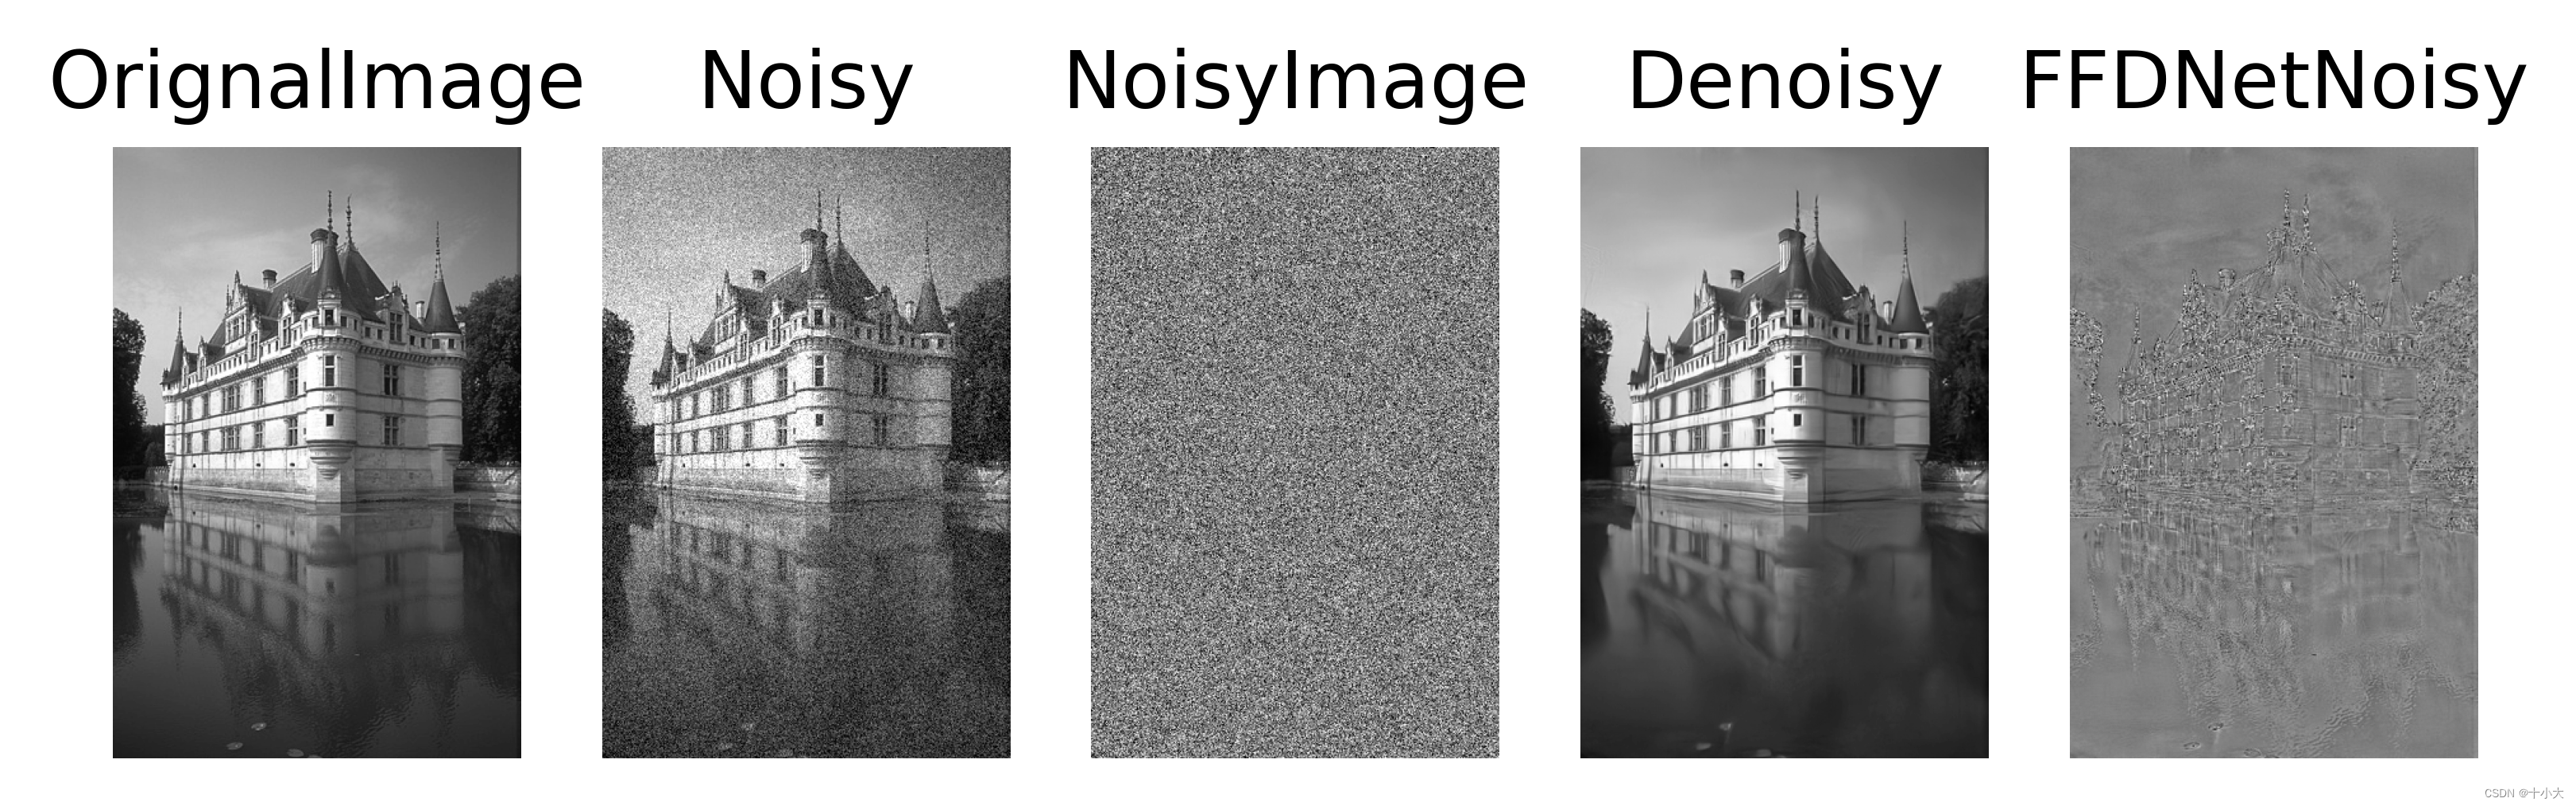
灰度图请将代码中的imshow的cmap属性设置为灰度,否则会有色差。例:axes[0].imshow(gt, cmap='gray')
至此本文结束。
如果本文对你有所帮助,请点赞收藏,创作不易,感谢您的支持!


 4418
4418

 被折叠的 条评论
为什么被折叠?
被折叠的 条评论
为什么被折叠?
 到【灌水乐园】发言


