


网上好多教程都是MPU6050的,看到有些网友说其实两款传感器读写都差不多,但是对于我这种小小白,只想先用例程上手,读出数据,其他的再慢慢来。
这里提供了一种简单上手的方法:
【MPU6500文档】:
链接:https://pan.baidu.com/s/1-fA5Kqf1M4Ami8VPBi0KAw?pwd=MPU6
提取码:MPU6

MPU-6500模块(三轴陀螺仪 + 三轴加速度)
模块型号 GY-6500 使用芯片 MPU-6500 供电电源 3-5v(内部低压差稳压) 通信方式 标准IIC/SPI通信协议 芯片内置16bit AD转换器,16位数据输出 陀螺仪范围 ±250 500 1000 2000 °/s 加速度范围 ±2±4±8±16g 采用沉金PCB,机器焊接工艺保证质量 引脚间距 2.54mm
【步骤】
0、接线(IIC)
其中SDA和SLK引脚可以指定为ESP的其他GPIO脚,使用Wire.begin(SDA_PIN,SLK_PIN)来指定相应的IO口为IIC引脚。见后述代码
| 合宙ESP32C3 | MPU6500 |
| VCC(3.3V) | VCC |
| GND | GND |
| SDA(GPIO4) | SDA |
| SLK(GPIO5) | SLK |
文件:
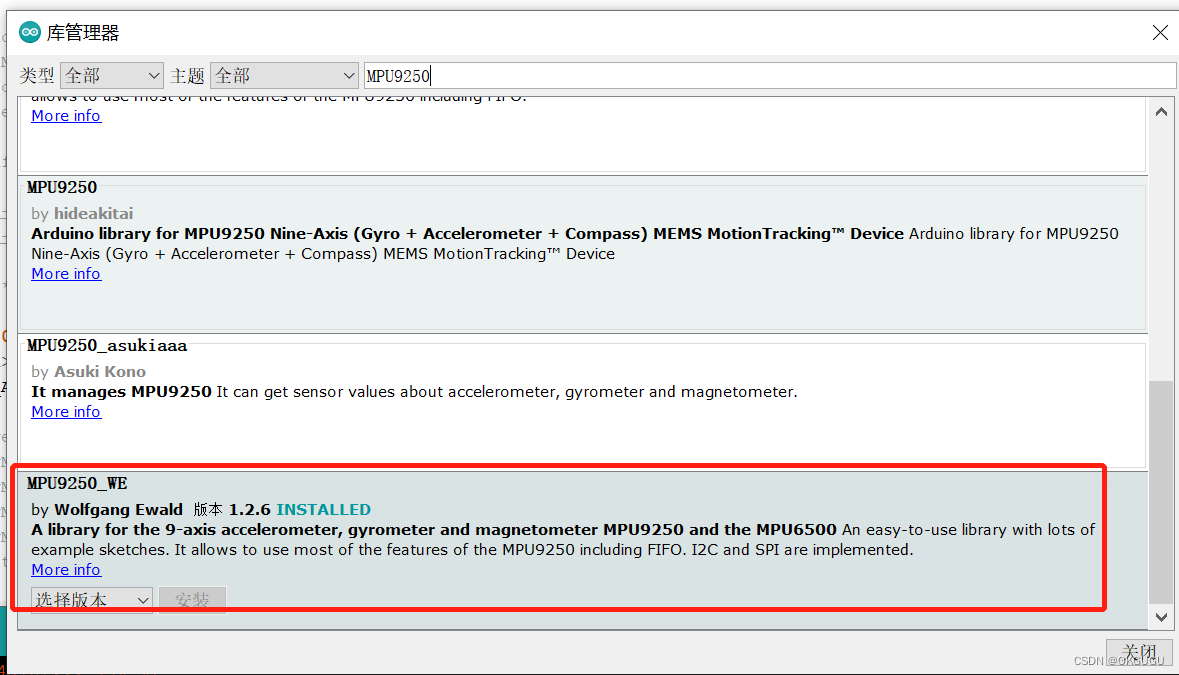
1、添加库
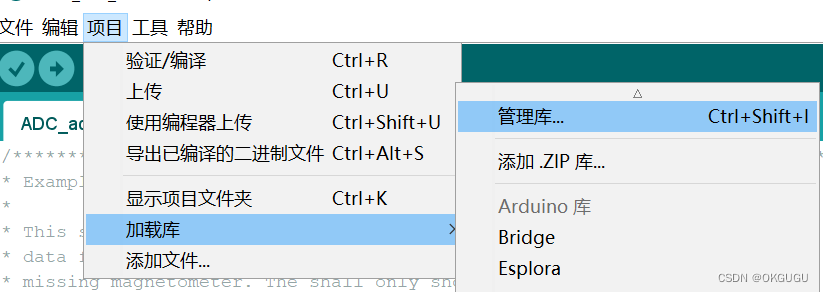
搜索MPU9250,找到“MPU9250_WE”并安装
2、打开示例代码
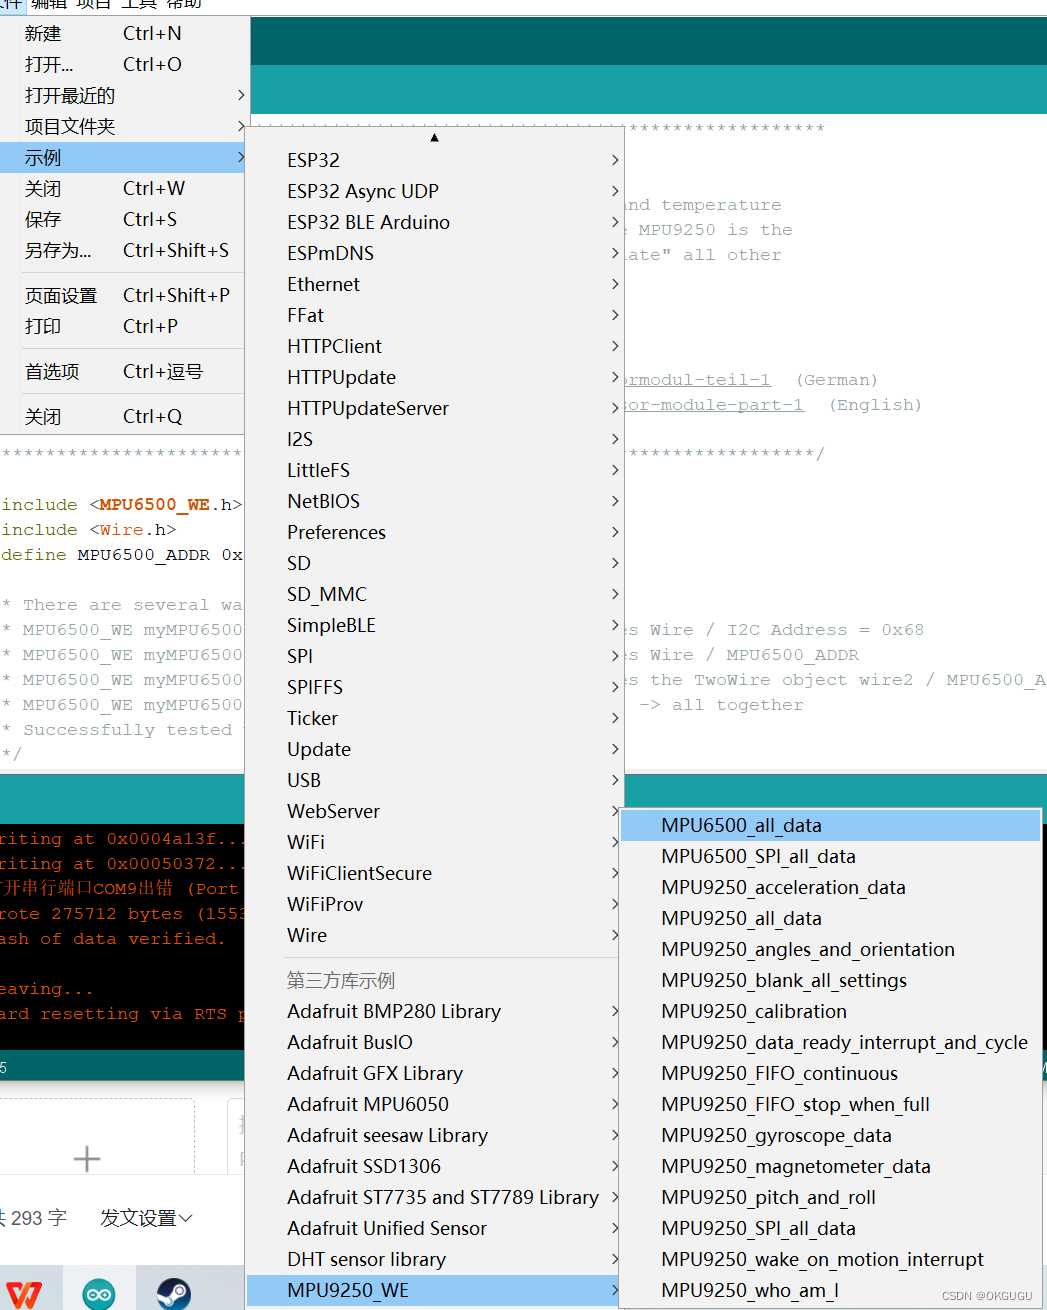
3、在setup()函数中添加
Wire.begin(4,5); //将GPIO4作为SDA,将GPIO5作为SLK完整示例代码如下:(注意MPU6500_ADDR地址为0x68)
/***************************************************************************
* Example sketch for the MPU6500_WE library
*
* This sketch shows how to get acceleration, gyroscocope and temperature
* data from the MPU6500. In essence, the difference to the MPU9250 is the
* missing magnetometer. The shall only show how to "translate" all other
* MPU9250 example sketches for use of the MPU6500
*
* For further information visit my blog:
*
* https://wolles-elektronikkiste.de/mpu9250-9-achsen-sensormodul-teil-1  (German)
* https://wolles-elektronikkiste.de/en/mpu9250-9-axis-sensor-module-part-1  (English)
*
***************************************************************************/

#include <MPU6500_WE.h>
#include <Wire.h>
#define MPU6500_ADDR 0x68

/* There are several ways to create your MPU6500 object:
 * MPU6500_WE myMPU6500 = MPU6500_WE()              -> uses Wire / I2C Address = 0x68
 * MPU6500_WE myMPU6500 = MPU6500_WE(MPU6500_ADDR)  -> uses Wire / MPU6500_ADDR
 * MPU6500_WE myMPU6500 = MPU6500_WE(&wire2)        -> uses the TwoWire object wire2 / MPU6500_ADDR
 * MPU6500_WE myMPU6500 = MPU6500_WE(&wire2, MPU6500_ADDR) -> all together
 * Successfully tested with two I2C busses on an ESP32
 */
MPU6500_WE myMPU6500 = MPU6500_WE(MPU6500_ADDR);

void setup() {
  Serial.begin(115200);
  Wire.begin(4,5);
  if(!myMPU6500.init()){
    Serial.println("MPU6500 does not respond");
  }
  else{
    Serial.println("MPU6500 is connected");
  }

  /* The slope of the curve of acceleration vs measured values fits quite well to the theoretical
   * values, e.g. 16384 units/g in the +/- 2g range. But the starting point, if you position the
   * MPU6500 flat, is not necessarily 0g/0g/1g for x/y/z. The autoOffset function measures offset
   * values. It assumes your MPU6500 is positioned flat with its x,y-plane. The more you deviate
   * from this, the less accurate will be your results.
   * The function also measures the offset of the gyroscope data. The gyroscope offset does not
   * depend on the positioning.
   * This function needs to be called at the beginning since it can overwrite your settings!
   */
  Serial.println("Position you MPU6500 flat and don't move it - calibrating...");
  delay(1000);
  myMPU6500.autoOffsets();
  Serial.println("Done!");

  /*  This is a more accurate method for calibration. You have to determine the minimum and maximum
   *  raw acceleration values of the axes determined in the range +/- 2 g.
   *  You call the function as follows: setAccOffsets(xMin,xMax,yMin,yMax,zMin,zMax);
   *  Use either autoOffset or setAccOffsets, not both.
   */
  //myMPU6500.setAccOffsets(-14240.0, 18220.0, -17280.0, 15590.0, -20930.0, 12080.0);

  /*  The gyroscope data is not zero, even if you don't move the MPU6500.
   *  To start at zero, you can apply offset values. These are the gyroscope raw values you obtain
   *  using the +/- 250 degrees/s range.
   *  Use either autoOffset or setGyrOffsets, not both.
   */
  //myMPU6500.setGyrOffsets(45.0, 145.0, -105.0);

  /*  You can enable or disable the digital low pass filter (DLPF). If you disable the DLPF, you
   *  need to select the bandwdith, which can be either 8800 or 3600 Hz. 8800 Hz has a shorter delay,
   *  but higher noise level. If DLPF is disabled, the output rate is 32 kHz.
   *  MPU6500_BW_WO_DLPF_3600
   *  MPU6500_BW_WO_DLPF_8800
   */
  myMPU6500.enableGyrDLPF();
  //myMPU6500.disableGyrDLPF(MPU6500_BW_WO_DLPF_8800); // bandwdith without DLPF

  /*  Digital Low Pass Filter for the gyroscope must be enabled to choose the level.
   *  MPU6500_DPLF_0, MPU6500_DPLF_2, ...... MPU6500_DPLF_7
   *
   *  DLPF    Bandwidth [Hz]   Delay [ms]   Output Rate [kHz]
   *    0         250            0.97             8
   *    1         184            2.9              1
   *    2          92            3.9              1
   *    3          41            5.9              1
   *    4          20            9.9              1
   *    5          10           17.85             1
   *    6           5           33.48             1
   *    7        3600            0.17             8
   *
   *    You achieve lowest noise using level 6
   */
  myMPU6500.setGyrDLPF(MPU6500_DLPF_6);

  /*  Sample rate divider divides the output rate of the gyroscope and accelerometer.
   *  Sample rate = Internal sample rate / (1 + divider)
   *  It can only be applied if the corresponding DLPF is enabled and 0<DLPF<7!
   *  Divider is a number 0...255
   */
  myMPU6500.setSampleRateDivider(5);

  /*  MPU6500_GYRO_RANGE_250       250 degrees per second (default)
   *  MPU6500_GYRO_RANGE_500       500 degrees per second
   *  MPU6500_GYRO_RANGE_1000     1000 degrees per second
   *  MPU6500_GYRO_RANGE_2000     2000 degrees per second
   */
  myMPU6500.setGyrRange(MPU6500_GYRO_RANGE_250);

  /*  MPU6500_ACC_RANGE_2G      2 g   (default)
   *  MPU6500_ACC_RANGE_4G      4 g
   *  MPU6500_ACC_RANGE_8G      8 g
   *  MPU6500_ACC_RANGE_16G    16 g
   */
  myMPU6500.setAccRange(MPU6500_ACC_RANGE_2G);

  /*  Enable/disable the digital low pass filter for the accelerometer
   *  If disabled the bandwidth is 1.13 kHz, delay is 0.75 ms, output rate is 4 kHz
   */
  myMPU6500.enableAccDLPF(true);

  /*  Digital low pass filter (DLPF) for the accelerometer, if enabled
   *  MPU6500_DPLF_0, MPU6500_DPLF_2, ...... MPU6500_DPLF_7
   *   DLPF     Bandwidth [Hz]      Delay [ms]    Output rate [kHz]
   *     0           460               1.94           1
   *     1           184               5.80           1
   *     2            92               7.80           1
   *     3            41              11.80           1
   *     4            20              19.80           1
   *     5            10              35.70           1
   *     6             5              66.96           1
   *     7           460               1.94           1
   */
  myMPU6500.setAccDLPF(MPU6500_DLPF_6);

  /* You can enable or disable the axes for gyroscope and/or accelerometer measurements.
   * By default all axes are enabled. Parameters are:
   * MPU6500_ENABLE_XYZ  //all axes are enabled (default)
   * MPU6500_ENABLE_XY0  // X, Y enabled, Z disabled
   * MPU6500_ENABLE_X0Z
   * MPU6500_ENABLE_X00
   * MPU6500_ENABLE_0YZ
   * MPU6500_ENABLE_0Y0
   * MPU6500_ENABLE_00Z
   * MPU6500_ENABLE_000  // all axes disabled
   */
  //myMPU6500.enableAccAxes(MPU6500_ENABLE_XYZ);
  //myMPU6500.enableGyrAxes(MPU6500_ENABLE_XYZ);
  delay(200);
}

void loop() {
  xyzFloat gValue = myMPU6500.getGValues();
  xyzFloat gyr = myMPU6500.getGyrValues();
  float temp = myMPU6500.getTemperature();
  float resultantG = myMPU6500.getResultantG(gValue);

  Serial.print("Acceleration in g (x,y,z):");
  Serial.print(gValue.x);
  Serial.print("   ");
  Serial.print(gValue.y);
  Serial.print("   ");
  Serial.print(gValue.z);
  Serial.print("Resultant g: ");
  Serial.println(resultantG);

  Serial.print("Gyroscope data in degrees/s: ");
  Serial.print(gyr.x);
  Serial.print("   ");
  Serial.print(gyr.y);
  Serial.print("   ");
  Serial.println(gyr.z);

  Serial.print("Temperature in °C: ");
  Serial.println(temp);

  Serial.println("********************************************");

  delay(1000);
}
4、编译下载后,串口显示如下:
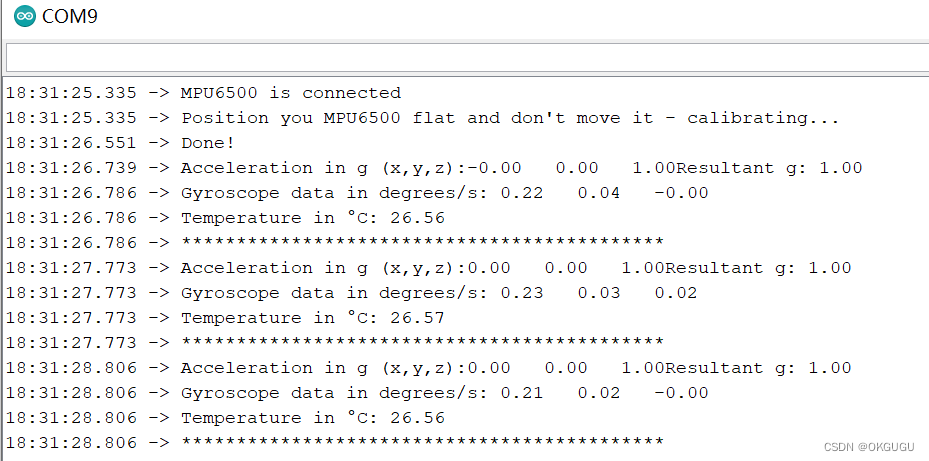
所有数据都能正常读取了,调用相关函数开发小功能还是可以的。有了数据显示,才有更大的动力探究更深的知识不是么,一开头就从寄存器来,怕是要劝退不少人,/苦笑


 1万+
1万+

 被折叠的 条评论
为什么被折叠?
被折叠的 条评论
为什么被折叠?
 到【灌水乐园】发言


