


前言
我们知道在工作中多线程可以帮助我们提升程序的效率,提高cpu多核的利用率,这里我们简单的记录以下C/C++多线程编程的知识
C语言用的是pthread,在gcc编译的时候需要加上-pthread选项
C++用的是std,虽然说C++可以用pthread但是std更加跨平台,pthread只能在类unix系统下用
我们这里讲一下内核线程(后面会提到,建议看完第二章再回过头看这里)
首先一个进程只有一个线程,其组织方式如下
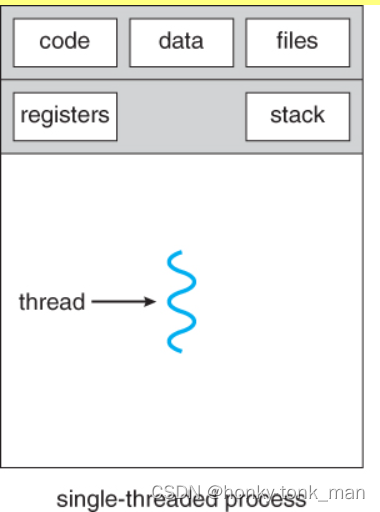
我们可以看到一个进程默认只有一个线程,且此线程拥有stack和registers,你可能会问stack存于内存中这个register和cpu的register有啥区别?其实这里面涉及到一个映射,线程(单进程单线程)最终要映射到cpu的core上,所以当映射到core后,core中的物理register映射到这个数据结构中,这个core(由这个线程运行)所创建的数据都存于stack中(因为寄存器非常小,所以需要从stack也就是内存中拿数据到寄存器中,最后交给core运行),当我们一个进程有多个线程结构如下

我们可以看到单个进程多线程,那么多线程只共享这个进程的数据区域和code,还有打开的fd,每个线程都有自己的stack和register,多个register还好说,当线程调度到core上就将其中一个线程的register映射到对应core的register上,那么如何将一个虚拟内存(因为在一个进程中)的占空间分成多个stack呢(多个stack给多个线程用),因为我们可以设置线程栈内存的大小,假如我们设置线程栈大小为X当我们只有一个线程,其只会用虚拟内存空间的栈空间的后Xbit,当我们同时开启n个线程的时候就会分配n*X个大小的栈空间分别给n个线程使用,他们互不干扰
为什么线程的上下文切换比进程上下文切换要快?首先明确一点一个进程只能在同一时间在一个cpu上运行,所以上下文切换的时候我们除了保存栈帧,PC等等信息,还要TLB flush,因为每个进程都独享一个完整的虚拟内存空间…那么我们线程切换的时候不用进行TLB flush,只用保存栈帧,PC等信息即可,因为多个线程共享一个虚拟的内存空间
如何查看默认的栈空间大小?
ulimit -s如何更改?
ulimit -s 100000
线程
线程是什么?
我们通常意义上讲的线程多为用户线程,比如说我们pthread创建的线程,比如我们std创建的线程,这些线程都是用户线程,他们有一个共同点都是用户创建的,其实还有一个线程叫做硬件线程,这个线程就是我们cpu每个核心上的线程,每个核心都是通过每个核心上的硬件线程去执行任务,而用户线程在cpu和操作系统上是不可见的
这里我们还要提到一种线程叫做内核线程,毫无疑问内核线程是由内核实现,他是硬件线程的映射,比如我们cpu有4个核心,每个核心一个硬件线程,那么我们的操作系统会根据硬件线程创建对应的内核线程,一个内核线程被block住,其他的内核线程还是可以使用(因为有多个硬件线程)
内核线程更具操作系统的调度算法将内核线程映射到相应的硬件线程上
内核线程上下文切换消耗会非常的大,因为我们的内核线程最终是映射在cpu的核心上或者说硬件线程上,也许我们有4个core每个core4个硬件线程,但是我们的操作系统有8个内核线程,此时我们可能会进行内核线程的上下文切换,当上下文切换,我们需要保存cpu寄存器中的值,所以内核线程上下文切换开销还是有点大
用户线程和内核线程的映射是M:1或者M:N的关系,而内核线程和硬件线程也存在映射关系,且内核或者说操作系统并不知道用户线程的存在,操作系统只知道内核线程的存在,关于用户线程向内核线程的调度是通过线程库去实现的,内核线程向硬件线程的调度是通过操作系统实现的,因为不管是用户线程映射到内核线程还是内核线程映射到硬件线程都不是1:1的关系,所以会存在 用户线程的上下文切换和内核线程的上下文切换,切换的对比上面已经说了
这里讲述一下硬件线程,我们看到市面上的CPU可能会写6核12线程等等,这个线程就是我们所说的硬件线程是真正core执行的东西,真正实现并行计算的东西,但是一般来说一个核也就是core一般只有1个线程,为什么会出现6核12线程这样一个core对应2个硬件线程呢?因为他是用到了超线程技术,我们知道CPU执行执行分为五个步骤,分别是
取值阶段
译码阶段
执行阶段
访问阶段
写回阶段
当我们一个指令执行到第二第三个阶段后不能说之前的阶段都空着啊,可以直接执行另一个程序,换句话说我们CPU有多个运算单元,我们执行一个指令可能只会让其中一个运算单元繁忙,但是其他的运算器都是空的,此时我们可以在执行一个指令的同时,执行另一个指令(选择的指令不会与另一个指令使用到的运算器相同),让我们的CPU大部分ALU繁忙起来,这样实现我们的超线程,也就是让我们一个core同时执行2个线程,假设我们在执行一个指令的时候所用到的运算器,是其他指令一开始也会用到的,那么就会阻塞住,再怎么超线程也不管用,1core2thread还是只能在这个时候当1core1thread用
所以我们可以说12core12thread要比6core12thread好,因为我们操作系统如果把多个内核线程调度到一个core上极有可能发生冲突,导致我们一个core只能当1个thread用,再怎么超线程也不管用,假如我们的操作系统将多个内核线程调度到不同的core上就会避免这个冲突问题,做到真正的并行计算
C/C++线程使用
并行化
在将线程之前,我们要明确一点,线程是我们并行化的一个方法,并行化就是充分利用我们的core,让所有的core都一起跑我们的应用,当然并行化也分种类,比如指令层级并行化(ILP)和数据层级并行化(DLP)
ILP可以看成MIMD,或者MISD,意思就是将指令流中的指令在不存在依赖的情况下放到不同的core上运行
DLP可以看成SIMD,或者SISD,也就是将所有的core都跑一个指令,但是将数据流中的不同数据放置到不同的core上跑,实现数据并行,有点像GPU的工作方式
创建线程
首先我们肯定是要创建线程的
C语言创建线程要这样int pthread_create(pthread_t *thread, const pthread_attr_t *attr,void *(*start_routine) (void *), void *arg);第一个参数是线程id的指针这个必须要写,第二个参数是设定线程的属性(假如不对线程做属性规定可写成NULL),第三个是线程执行函数的指针,第四个是传入待执行函数的arg也可为NULL
#include <pthread>
pthread_t tid
pthread_create(&tid,NULL,FUNCTION_NAME,NULL);
这样我们就创建了一个线程
在C++中使用std就简单的多了
#include<thread>
//using namespace std;
std::thread t1; //创建了一个线程t1
std::thread t2(T2_FUNCTION_WITHOUTARG);//创建了一个线程t2并且指定其运行的函数
std::thread t3(T3_FUNCTION,T3_ARG); //创建了一个线程t3并且执行其运行的函数并且指定其参数
这样一看C++的std比pthread要简单很多
注意我们如果指定指针执行某个class内部的成员函数,需要传递这个class对象的指针进去,比如
设置线程属性
我们可以设置线程属性,线程有非常多的属性我们可以设置,比如
设置线程的分离状态
分离线程(detached)意思是这个线程不能被其他的线程所杀死,当他执行完后他所用的资源由系统回收
非分离线程(joinable)意思是线程可以被其他线程杀死,或者回收,在被回收前(join)他的资源是不被释放的
我们还可以设置线程的调度策略等等
我们来设置线程不可分离,且用住线程来等待子线程执行完毕用 pthread_join() 来回收线程
#include <pthread.h>
#include <stdio.h>
#include <stdlib.h>
#include <unistd.h>

int count = 0;

void thread_add_count(void){
        sleep(5); //sleep 5 second
        count++;
}

int main(int argc, char * argv[]){
        pthread_t tid; //thread id
        pthread_attr_t thattr;  //thread attr
        int therr; // pthread_create return value

        pthread_attr_init(&thattr);  //init thread attr
        pthread_attr_setdetachstate(&thattr,PTHREAD_CREATE_JOINABLE);  //set thread joinable
        if( (therr = pthread_create(&tid,&thattr,&thread_add_count,NULL)) != 0 ){
                printf("create thread error\n");
                exit(EXIT_FAILURE);
        }

        //pthread_attr_destory(&thattr);   //destory thread

		/*block main thread wait for thread tid end,before end we release thread tid resource
		WARNING pass a thread to this function rather than thread id POINTER!!!*/
        pthread_join(tid,NULL);

        printf("count is %d\n", count);

        return 0;
}
而c++用std设置线程分离和join就简单的多
#include <thread>

std::thread t1(T1_FUNCTION);
t1.detach();//创建分离线程,意思是告诉os这个线程t1就算被摧毁,其执行的任务也要继续下去,一旦call这个函数后线程t1和其具体执行的任务就分离了,我们就不能够通过call t1.join()去阻塞等待t1执行完成

std::thread t2(T2_FUNCTION);
t2.join(); //t2为非分离线程,且主线程等待t2线程执行完毕
例子如下
#include <iostream>
#include <thread>

void
thread_call_from(int tid){
        std::cout << "launched by thread " << tid << std::endl;
}


int
main(){
        //create 10 thread obj
        std::thread t[10];

        //launched 10 thread with init function
        for(int i = 0; i < 10; i++){
                t[i] = std::thread(thread_call_from, i); // second para is tid
        }

        std::cout << "launched by main thread" << std::endl;

        //wait all thread ends
        for(int i = 0; i < 10; i++){
                t[i].join();
        }
}
上述的代码输出可能是这样的
launched by thread 1
launched by thread 4
launched by thread launched by main thread
3
launched by thread 2
launched by thread 7
launched by thread 6
launched by thread 9
launched by thread launched by thread 0
8
launched by thread 5
因为我们没有做synchronization,所以线程的输出是不固定的,也是线程不安全的
当我们的线程call的函数位于class内部,那么我们需要传入class obj即可,如下
#include <iostream>
#include <thread>


//using namespace std;

class A{
public:
    A(int num)
    :i(num){
        std::cout << "init class obj" <<'\n';
    }
    void print_i()  { std::cout <<  i << '\n'; }
    //std::thread t1 = std::thread(&A::print_i, this);

private:
    int i;
    //std::thread t1 = std::thread(&A::print_i, this);

};

int main(){
    A* a = new A(2);
    std::thread t1(&A::print_i, a); //假如函数位于class内部,就需要我们传入obj对象,这个对象就是a
    //std::cout << t1.join() << '\n';
    t1.join();

}
锁(线程synchronization)
互斥锁(mutex)
普通的mutex
我们可以用互斥锁,表示在某一个时刻,只有一个线程可以执行cout指令如下
#include <iostream>
#include <thread>
#include <mutex>

std::mutex mtx; //global mutex obj

void
thread_call_from(int tid){
        mtx.lock(); //lock
        std::cout << "launched by thread " << tid << std::endl;
        mtx.unlock(); //unlock
}


int
main(){
        //create 10 thread obj
        std::thread t[10];

        //launched 10 thread with init function
        for(int i = 0; i < 10; i++){
                t[i] = std::thread(thread_call_from, i); // second para is tid or para of function thread_call_from
        }

		mtx.lock();
        std::cout << "launched by main thread" << std::endl;
		mtx.unlock();;

        //wait all thread ends
        for(int i = 0; i < 10; i++){
                t[i].join();
        }
最后输出如下
launched by thread 0
launched by thread 2
launched by thread 3
launched by thread 4
launched by thread 6
launched by thread 5
launched by thread 8
launched by thread 7
launched by thread 1
launched by main thread
launched by thread 9
std::lock_guard
也是一种互斥锁,但是其随着std::lock_guard的销毁(调用对象的析构函数)而解锁,所以当超出范围后std::lock_guard对象自动销毁(解锁)
#include <iostream>
#include <mutex>
#include <thread>

int sum = 0;
std::mutex mu;

void job1(void){
    std::lock_guard<decltype(mu)> lock(mu);//创建lock_guard对象的时候已经上锁
    sum++;
}

int main(){
    std::thread t1(job1);
    t1.join();
}
std::unique_lock
std::lock_guard的缺陷也非常明显就是颗粒度大,此时我们可以用std::unique_lock,std::unique_lock和std::lock_guard大致上一样,区别就是std::unique_lock可以灵活的unlock如下
#include <iostream>
#include <mutex>
#include <thread>

int sum = 0;
std::mutex mu;

void job1(void){
    std::unique_lock<decltype(mu)> lock(mu);
    sum++;
    //...
    //...
    //...
    lock.unlock();//手动解锁而不是等到job1函数范围范围结束后自动调用析构函数(解锁)
    //...
}

int main(){
    //int tid = 3;
    std::thread t1(job1);
    //std::lock_guard<decltype(mu)> lock(mu);
    t1.join();
}


 752
752


 被折叠的 条评论
为什么被折叠?
被折叠的 条评论
为什么被折叠?
 到【灌水乐园】发言


